The unusual bootstrap drivers inside the 8086 microprocessor chip

The 8086 microprocessor is one of the most important chips ever created; it started the x86 architecture that still dominates desktop and server computing today. I've been reverse-engineering its circuitry by studying its silicon die. One of the most unusual circuits I found is a "bootstrap driver", a way to boost internal signals to improve performance.1

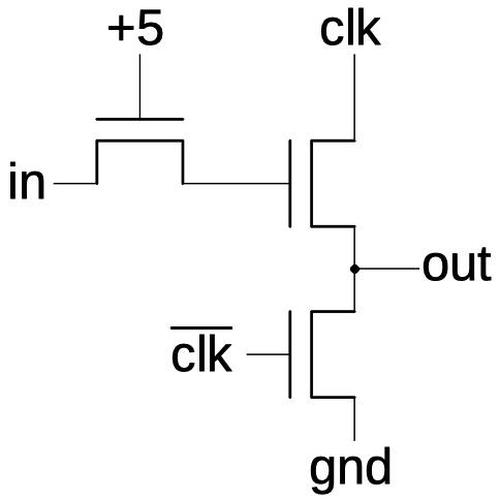
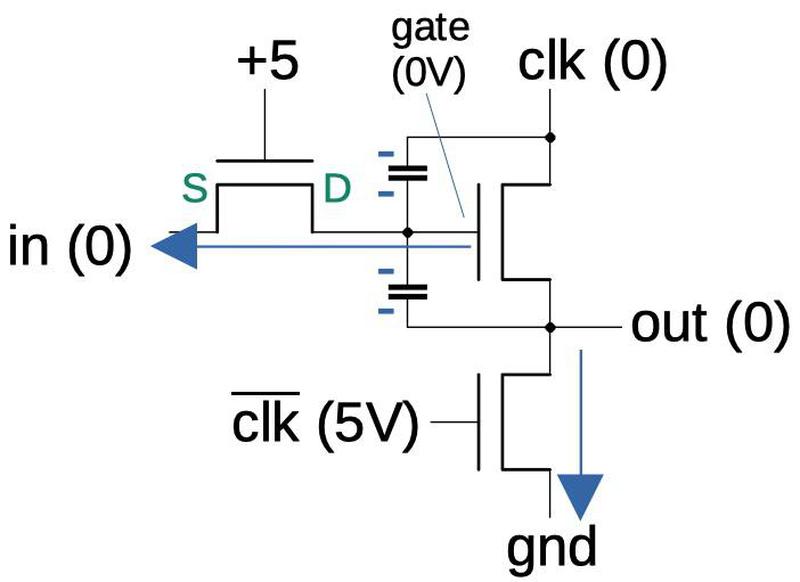
The bootstrap driver circuit from the 8086 processor.

The bootstrap driver circuit from the 8086 processor.

This circuit consists of just three NMOS transistors, amplifying an input signal to produce an output signal, but it doesn't resemble typical NMOS logic circuits and puzzled me for a long time. Eventually, I stumbled across an explanation:2 the "bootstrap driver" uses the transistor's capacitance to boost its voltage. It produces control pulses with higher current and higher voltage than otherwise possible, increasing performance. In this blog post, I'll attempt to explain how the tricky bootstrap driver circuit works.

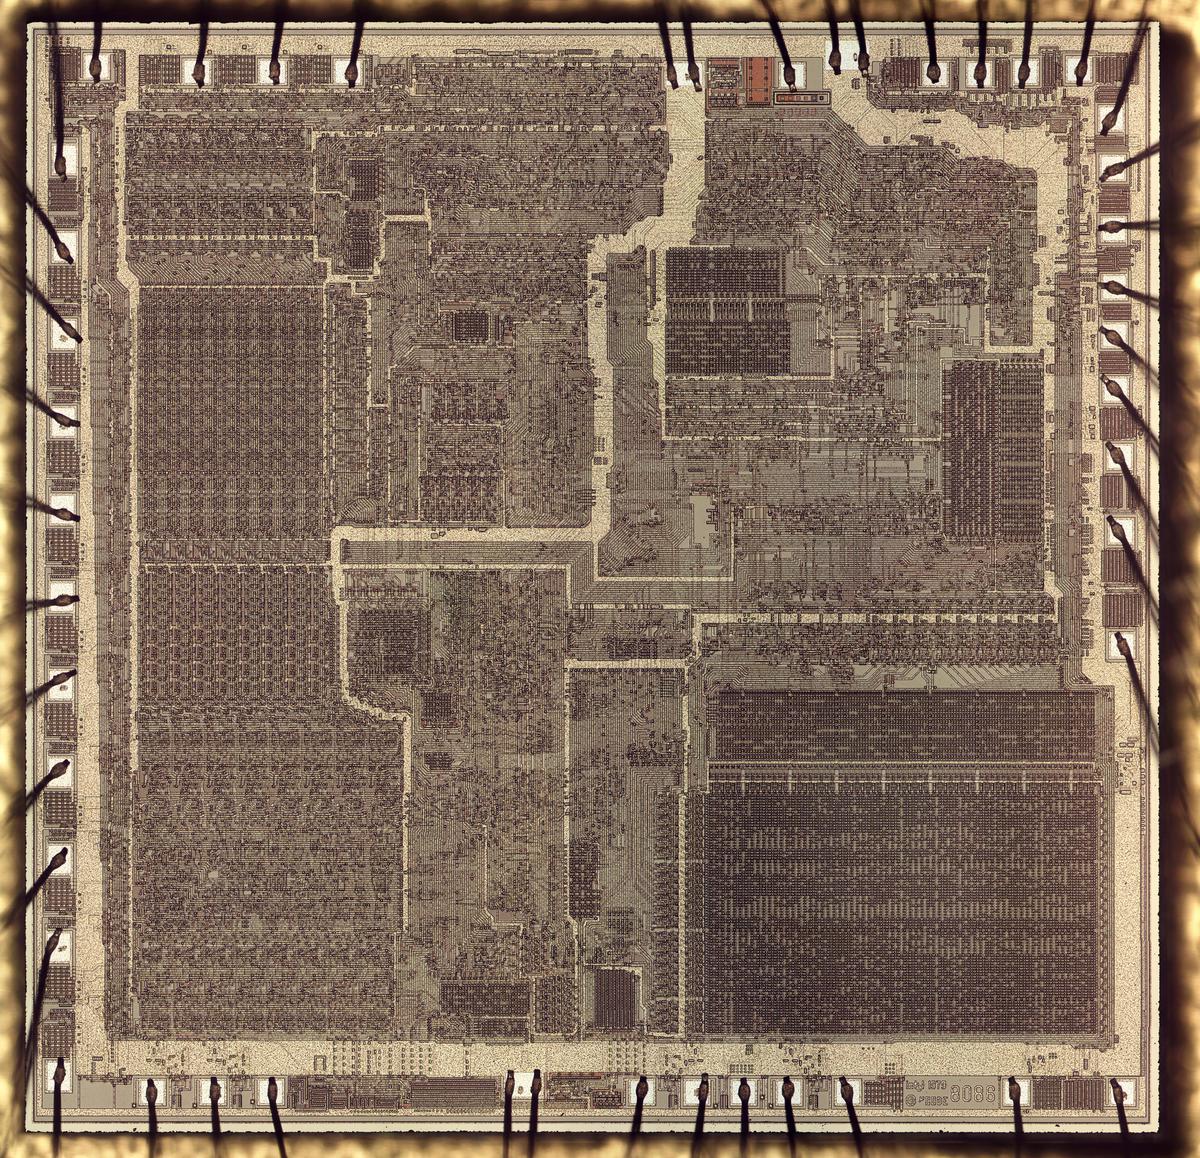
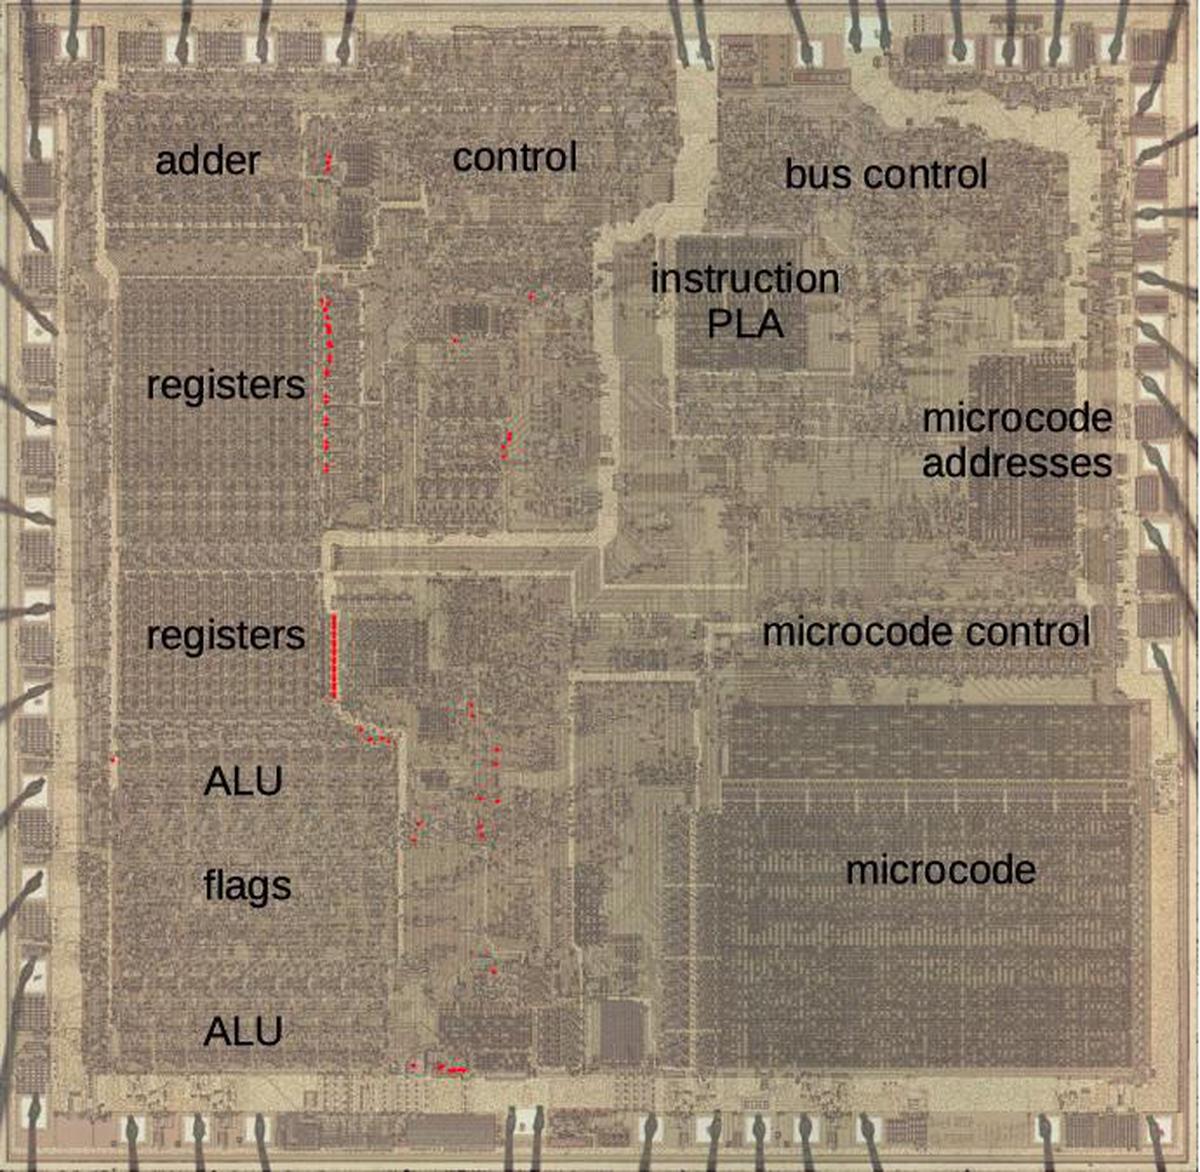
A die photo of the 8086 processor. The metal layer on top of the silicon is visible. Around the edge of the chip, bond wires provide connections to the chip's external pins. Click this image (or any other) for a larger version.

A die photo of the 8086 processor. The metal layer on top of the silicon is visible. Around the edge of the chip, bond wires provide connections to the chip's external pins. Click this image (or any other) for a larger version.

NMOS transistors

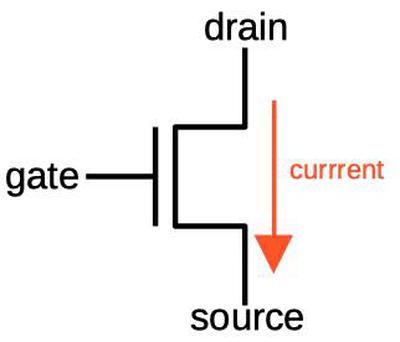
The 8086 is built from MOS transistors (MOSFETs), specifically NMOS transistors. Understanding the bootstrap driver requires some understanding of these transistors. If you're familiar with MOSFETs as components, they have source and drain pins and current flows from the drain to the source, controlled by the gate pin. Most of the time I treat an NMOS transistor as a digital switch between the drain and the source: a 1 input turns the transistor on, closing the switch, while a 0 turns the transistor off. However, for the bootstrap driver, we must consider the MOSFET in a bit more detail.

A MOSFET switches current from the drain to the source, under control of the gate.

A MOSFET switches current from the drain to the source, under control of the gate.

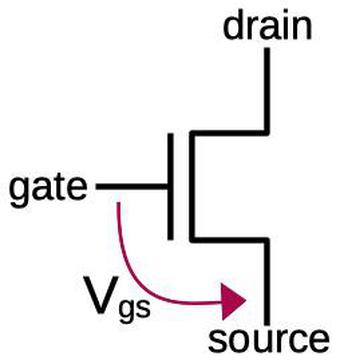
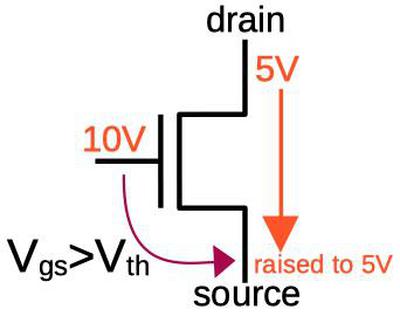
The important aspect of the gate is the difference between the gate voltage and the (typically lower) source voltage; this is denoted as Vgs. Without going into semiconductor physics, a slightly more accurate model is that the transistor turns on when the voltage between the gate and the source exceeds the fixed threshold voltage, Vth. This creates a conducting channel between the transistor's source and drain. Thus, if Vgs > Vth, the transistor turns on and current flows. Otherwise, the transistor turns off and no current flows.

The voltage between the gate and the source (Vgs) controls the transistor.

The voltage between the gate and the source (Vgs) controls the transistor.

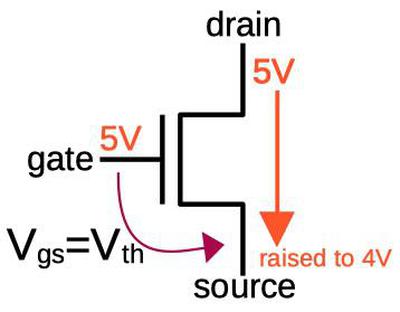
The threshold voltage has an important consequence for a chip such as the 8086. The 8086, like most chips of that era, used a 5-volt power supply. The threshold voltage depends on manufacturing characteristics, but I'll use 1 volt as a typical value.3 The result is that if you put 5 volts on the drain and on the gate, the transistor can pull the source up to about 4 volts, but then Vgs falls to the threshold voltage and the transistor stops conducting. Thus, the transistor can't pull the source all the way up to the 5-volt supply, but falls short by a volt on the output. In some circumstances this is a problem, and this is the problem that the bootstrap driver fixes.

Due to the threshold voltage, the transistor doesn't pull the source all the way to the drain's voltage, but "loses" a volt.

Due to the threshold voltage, the transistor doesn't pull the source all the way to the drain's voltage, but "loses" a volt.

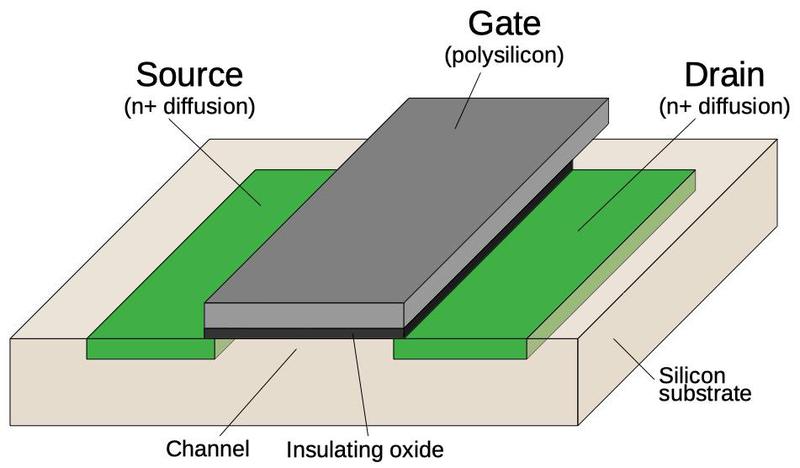
If you get a transistor as a physical component, the source and drain are not interchangeable. However, in an integrated circuit, there is no difference between the source and the drain, and this will be important.4 The diagram below shows how a MOSFET is constructed on the silicon die. The source and drain consist of regions of silicon doped with impurities to change their property. Between them is a channel of undoped silicon, which normally does not conduct. Above the channel is the gate, made of a special type of silicon called polysilicon. The voltage on the gate controls the conductivity of the channel. A very thin insulating layer separates the gate from the channel. As a side effect, the insulating layer creates some capacitance between the gate and the underlying silicon.

Diagram of an NMOS transistor in an integrated circuit.

Diagram of an NMOS transistor in an integrated circuit.

Basic NMOS circuits

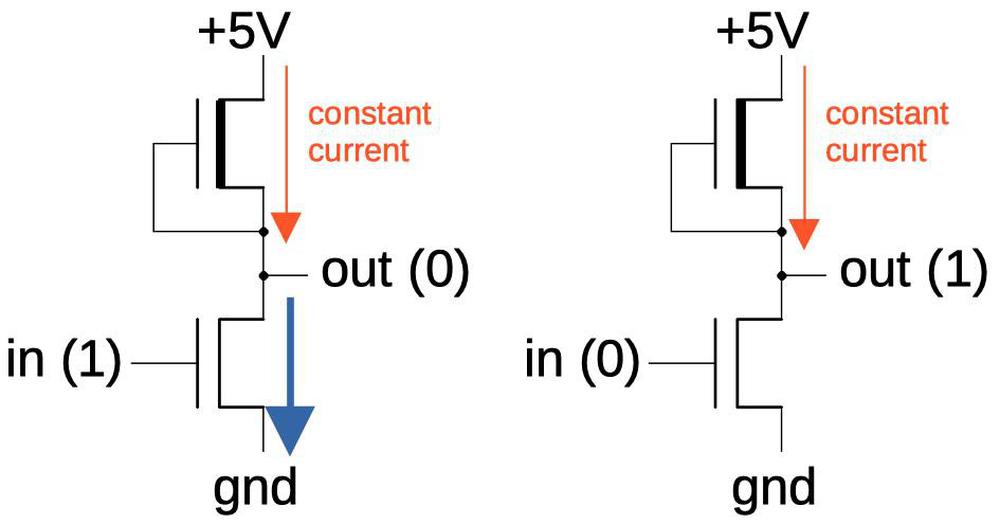
Before getting to the bootstrap driver, I'll explain how a basic inverter is implemented in an NMOS chip like the 8086. The inverter is built from two transistors: a normal transistor on the bottom, and a special load transistor on top that acts like a pull-up resistor, providing a small constant current.5 With a 1 input, the lower transistor turns on, pulling the output to ground to produce a 0 output. With a 0 input, the lower transistor turns off and the current from the upper transistor drives the output high to produce a 1 output. Thus, the circuit implements an inverter: producing a 1 when the input is 0 and vice versa.

A standard NMOS inverter is built from two transistors. The upper transistor is a "depletion load" transistor.

A standard NMOS inverter is built from two transistors. The upper transistor is a "depletion load" transistor.

The disadvantage of this inverter circuit is that when it produces a 0 output, current continuously flows through the load transistor and the lower transistor to ground. This wastes power, leading to high power consumption for NMOS circuitry. (To solve this, CMOS circuitry took over in the 1980s and is used in modern microprocessors.) This also limits the current that the inverter can provide.

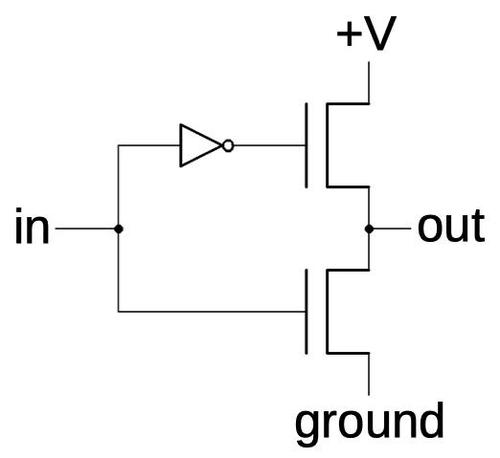
If a gate needs to provide a relatively large current, for instance to drive a long bus inside the chip, a more complex circuit is used, the "superbuffer". The superbuffer uses one transistor to pull the output high and a second transistor to pull the output low.6 Because only one transistor is on at a time, a high-current output can be produced without wasting power. There are two disadvantages of the superbuffer, though. First, the superbuffer requires an inverter to control the high-side transistor, so it uses considerably more space on the die. Second, the superbuffer can't pull the high output all the way up; it loses a volt due to the threshold voltage as described earlier.

Combining two output transistors with an inverter produces a higher-current output, known as a superbuffer.

Combining two output transistors with an inverter produces a higher-current output, known as a superbuffer.

The bootstrap driver

In some circumstances, you want both a high-current output, and the full output voltage. One example is connecting a register to an internal bus. Since the 8086 is a 16-bit chip, it uses 16 transistors for the bus connection. Driving 16 transistors in parallel requires a fairly high current. But the bus transistors are "pass" transistors, which lose a volt due to the threshold voltage, so you want to start with the full voltage, not already down one volt. To provide both high current and the full voltage, bootstrap drivers are used to control the buses, as well as similar tasks such as ALU control.

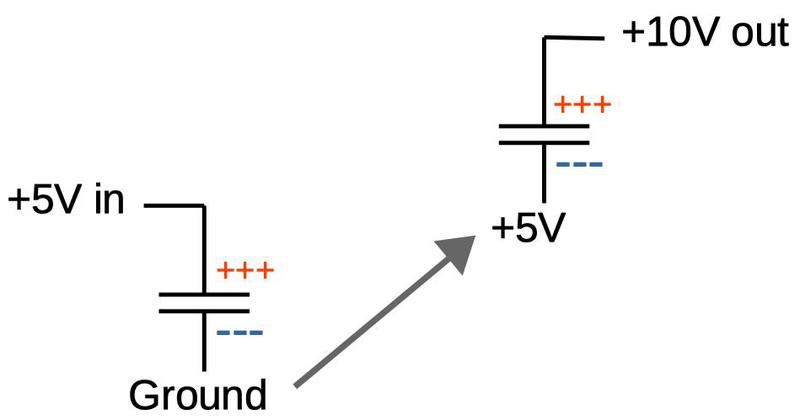
The concept behind the bootstrap driver is to drive the gate voltage significantly higher than 5 volts, so even after losing the threshold voltage, the transistor can produce the full 5-volt output.7 The higher voltage is generated by a charge pump, as illustrated below. Suppose you charge a capacitor with 5 volts. Now, disconnect the bottom of the capacitor from ground, and connect it to +5 volts. The capacitor is still charged with 5 volts, so now the high side is at +10 volts with respect to ground. Thus, a capacitor can be used to create a higher voltage by "pumping" the charge to a higher level.

On the left, the "flying capacitor' is charged to 5 volts. By switching the lower terminal to +5 volts, the capacitor now outputs +10 volts

On the left, the "flying capacitor' is charged to 5 volts. By switching the lower terminal to +5 volts, the capacitor now outputs +10 volts

The idea of the bootstrap driver is to attach a capacitor to the gate and charge it to 5 volts. Then, the low side of the capacitor is raised to 5 volts, boosting the gate side of the capacitor to 10 volts. With this high voltage on the gate, the threshold voltage is easily exceeded and the transistor can pass the full 5 volts from the drain to the source, producing a 5-volt output.

With a large voltage on the gate, the threshold voltage is exceeded and the transistor remains on until the source reaches 5 volts.

With a large voltage on the gate, the threshold voltage is exceeded and the transistor remains on until the source reaches 5 volts.

In the 8086 bootstrap driver,8 an explicit capacitor is not used.9 Instead, the transistor's inherent capacitance is sufficient. Due to the thin insulating oxide layer between the gate and the underlying silicon, the gate acts as the plate of a capacitor relative to the source and drain. This "parasitic" capacitance is usually a bad thing, but the bootstrap driver takes advantage of it.

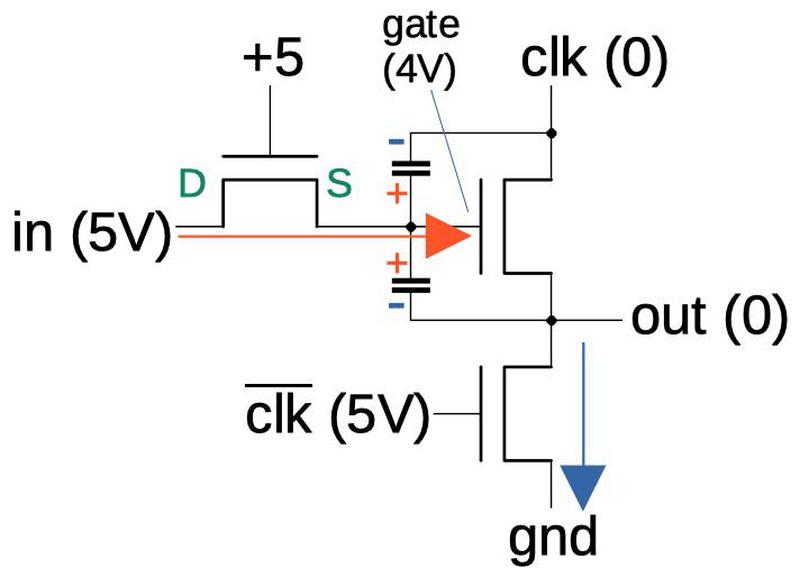
The diagrams below show how the bootstrap driver works. Unlike an inverter, the bootstrap driver is controlled by the chip's clock, generating an output only when the clock is high. In the first diagram, we assume that the input is a 1 and the clock is low (0). Two things happen. First, the inverted clock turns on the bottom transistor, pulling the output to ground. Second, the 5V input passes through the first transistor; the left side of the transistor acts as the drain and the right side as the source. Due to the threshold voltage, a volt is "lost" so about 4 volts reaches the gate of the second transistor. Since the source and drain of the second transistor are at 0 volts, the gate capacitors are charged with 4 volts. (Recall that these are not explicit capacitors, but are parasitic capacitors.)

The first step in the operation of the bootstrap driver. The gate capacitance is charged by the input.

The first step in the operation of the bootstrap driver. The gate capacitance is charged by the input.

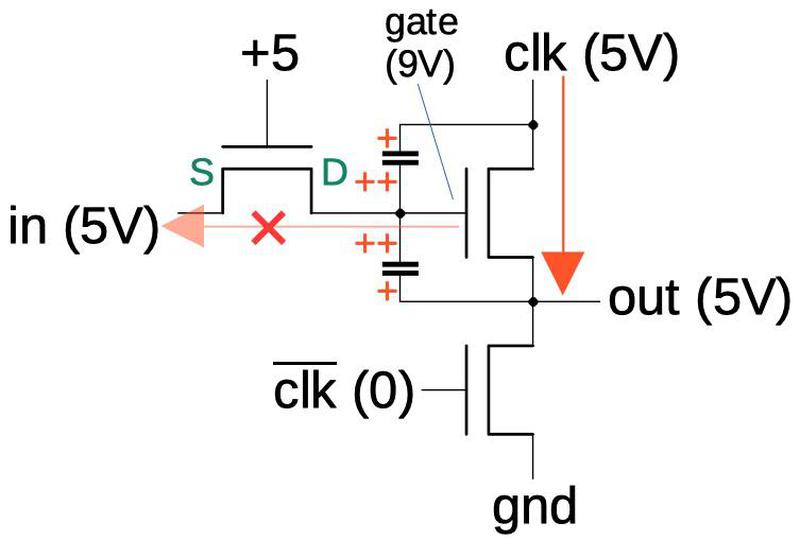
In the next step, the clock switches state and things become more interesting. The second transistor is on due to the voltage on the gate, so current flows from the clock to the output. In a "normal" circuit, the output would rise to 4 volts, losing a volt due to the threshold voltage of the second transistor. However, as the output voltage rises, it boosts the voltage on the gate capacitors and thus raises the gate voltage. The increased gate voltage allows the output voltage to rise above 4 volts, pushing the gate voltage even higher, until the output reaches 5 volts.10 Thus, the bootstrap driver produces a high-current output with the full 5 volts.

The second step in the operation of the bootstrap driver. As the output rises, it boosts the gate voltage even higher.

The second step in the operation of the bootstrap driver. As the output rises, it boosts the gate voltage even higher.

An important factor is that the first transistor now has a higher voltage on the right than on the left, so the source and drain switch roles. Since the transistor has 5 volts on the gate and on the (now) source, Vgs is 0 and current can't flow. Thus the first transistor blocks current flow from the gate, keeping the gate at its higher voltage. This is the critical role of the first transistor in the bootstrap driver, acting as a diode to block current flow out of the gate.

The diagram below shows what happens when the clock switches state again, assuming a low input. Now the first transistor's source voltage drops, making Vgs large and turning the transistor on. This allows the second transistor's gate voltage to flow out. Note that the first transistor is no longer acting as a diode, since current can flow in the "reverse" direction. The other important action in this clock phase is that the bottom transistor turns on, pulling the output low. These actions discharge the gate capacitance, preparing it for the next bootstrap cycle.

When the clock switches off, the driver is discharged, preparing it for the next cycle.

When the clock switches off, the driver is discharged, preparing it for the next cycle.

The 8086 die

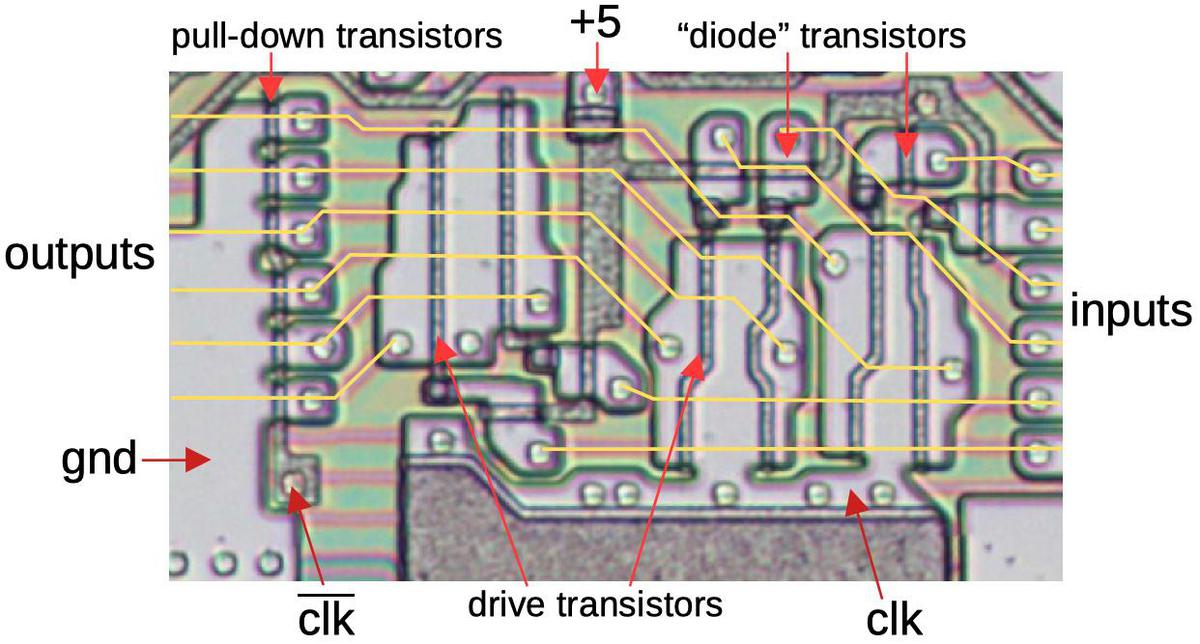
Now that I've explained the theory, how do bootstrap drivers appear on the silicon die of the 8086? The diagram below shows six drivers that control the ALU operation.11 There's a lot happening in this diagram, but I'll try to explain what's going on. For this photo, I removed the metal layer with acid to reveal the silicon underneath; the yellow lines show where the metal wiring was. The large pinkish regions are doped silicon, while the gray speckled lines are polysilicon on top. The greenish and reddish regions are undoped silicon, which doesn't conduct and can be ignored. A transistor is formed where a polysilicon line crosses silicon, with the source and drain on opposite sides. Note that some transistors share the source or drain region with a neighboring transistor, saving space. The circles are vias, connections between the metal and a lower layer.

Six bootstrap drivers as they appear on the chip.

Six bootstrap drivers as they appear on the chip.

The drivers start with six inputs at the right. Each input goes through a "diode" transistor with the gate tied to +5V. I've labeled two of these transistors and the other four are scattered around the image. Next, each signal goes to the gate of one of the drive transistors. These six large transistors pass the clock to the output when turned on. Note that the clock signal flows through large silicon regions, rather than "wires". Finally, each output has a pull-down transistor on the left, connecting it to ground (another large silicon region) under control of the inverted clock. The drive transistors are much larger than the other transistors, so they can provide much more current. Their size also provides the gate capacitance necessary for the operation of the bootstrap driver.

Although the six drivers in this diagram are electrically identical, each one has a different layout instead of repeating the same layout six times. This demonstrates how the layout has been optimized, moving transistors around to use space most efficiently.

In total, the 8086 has 81 bootstrap drivers, mostly controlling the register file and the ALU (arithmetic-logic unit). The die photo below shows the location of the drivers, indicated with red dots. Most of them are in the center-left of the chip, between the registers and ALU on the left and the control circuitry in the center.

The 8086 die with main functional blocks labeled. The bootstrap drivers are indicated with red dots.

The 8086 die with main functional blocks labeled. The bootstrap drivers are indicated with red dots.

Conclusions

For the most part, the 8086 uses standard NMOS logic circuits. However, a few of its circuits are unusual, and the bootstrap driver is one of them. This driver is a tricky circuit, depending on some subtle characteristics of MOS transistors, so I hope my explanation made sense. This driver illustrates how Intel used complex, special-case circuitry when necessary to get as much performance from the chip as possible.

If you're interested in the 8086, I wrote about the 8086 die, its die shrink process and the 8086 registers earlier. I plan to write more about the 8086 so follow me on Twitter @kenshirriff or RSS for updates.

Notes and references

  1. Intel used a "bootstrap load" circuit in the 4004 and 8008 processors. The bootstrap load has many similarities to the bootstrap driver, using capacitance to boost the output voltage. But it is a different circuit, used in a different role. The bootstrap load was designed for PMOS circuits to boost the voltage from a pull-up transistor, using explicit capacitors, built with a process invented by Federico Faggin. I wrote about the bootstrap load here

  2. The only explanation of a bootstrap driver that I could find is in section 2.3.1 of DRAM Circuit Design: A Tutorial. The 8086 transistors with the gate wired to +5V puzzled me for the longest time. It seemed to me that this transistor would always be on, and thus had no function. However, the high voltage of the bootstrap driver gives it a function. I was randomly reading the DRAM book and suddenly recognized that one of the circuits in that book was similar to the mysterious 8086 circuit. 

  3. The threshold voltage was considerably higher for older PMOS transistors. To get around this, old chips used considerably higher supply voltages, so "losing" the threshold voltage wasn't as much of a problem. For instance, the Intel 4004 used a 15-volt supply. 

  4. The reason that MOSFETs are symmetrical in an integrated circuit and asymmetrical as physical components is that MOSFETs really have four terminals: source, gate, drain, and the substrate (the underlying silicon on which the transistor is constructed). In component MOSFETs, the substrate is internally connected to the source, so the transistor has three pins. However, the source-substrate connection creates a diode, making the component MOSFET asymmetrical. Four-terminal MOSFETs such as the 3N155 exist but are rare. The MOnSter 6502 made use of 4-terminal MOSFET modules to implement the 6502's pass transistors. 

  5. The load transistor is a special type of transistor, a depletion transistor that is doped differently. The doping produces a negative threshold voltage, so the transistor remains on and provides a relatively constant current. See Wikipedia for more on depletion loads. 

  6. The superbuffer has some similarity with a CMOS gate. Both use separate transistors to pull the signal high or low, with only one transistor on at a time. The difference is that CMOS uses a complementary transistor, i.e. PMOS, to pull the signal high. PMOS performs better in this role than NMOS. Moreover, a PMOS transistor is turned on by a 0 on the gate. This behavior eliminates the need for the inverter in a superbuffer. 

  7. The 8086 processor also uses completely different charge pumps to create a negative voltage for a substrate bias. I discuss that use of charge pumps here

  8. Why is it called a bootstrap driver? The term originates with footwear: boots often had boot straps on the top, physical straps to help pull the boots on. In the 1800s, the saying "No man can lift himself by his own boot straps" was used as a metaphor for the impossibility of improvement solely through one's own effort. (Pulling on the straps on your boots superficially seems like it should lift you off the ground, but is of course physically impossible.) By the mid-1940s, "bootstrap" was used in electronics to describe a circuit that started itself up through positive feedback, metaphorically pulling itself up by its bootstraps. The bootstrap driver continues this tradition, pulling itself up to a higher voltage. 

  9. Some circuits in the 8086 use physical capacitors on the die, constructed from a metal layer over silicon. The substrate bias generators use relatively large capacitors. There are also some small capacitors that appear to be used for timing reasons. 

  10. The exact voltage on the gate will depend on the relative capacitances of different parts of the circuit, but I'm ignoring these factors. The voltages that I show in the diagram are illustrations of the principle, not accurate values. 

  11. Some of the 8086's bootstrap drivers pre-discharge when the clock is low and produce an output when the clock is high, while other drivers operate on the opposite clock phases. The ALU drivers in the die photo operate on the opposite phases, but I've labeled the diagram to match the previous discussion. 

Reverse-engineering a 1960s cordwood flip flop module with X-ray CT scans

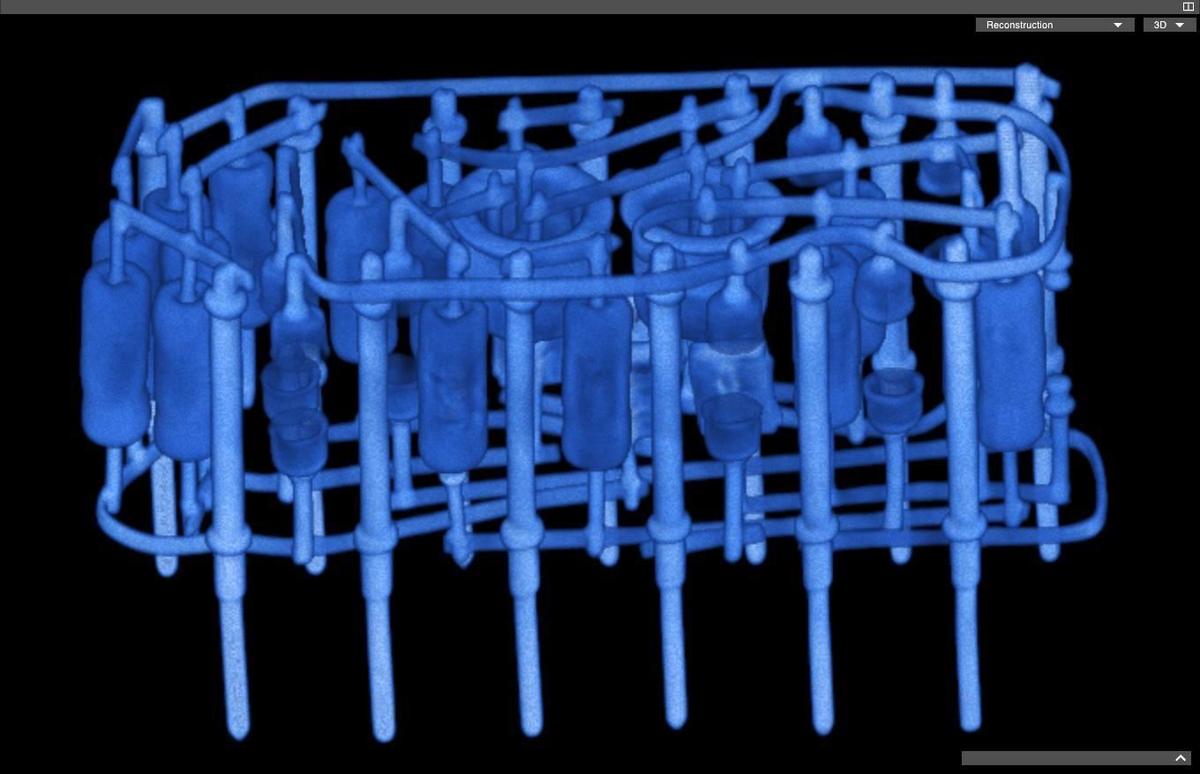
How can you find out what's inside a sealed electronics module from the 1960s? In this blog post, I reverse-engineer an encapsulated flip flop module that was used for ground-testing of equipment from the Apollo space program. These modules are undocumented1, so their internal circuitry is a mystery. Thanks to Lumafield, I obtained a three-dimensional CT scan of the module that clearly shows the wiring and components: transistors, diodes, resistors, and capacitors. From these images, I could determine the circuitry of this flip flop module.

A 3-D scan of the module showing the circuitry inside the compact package. This image uses the blue color map. Click this image (or any other) for a larger version.

A 3-D scan of the module showing the circuitry inside the compact package. This image uses the blue color map. Click this image (or any other) for a larger version.

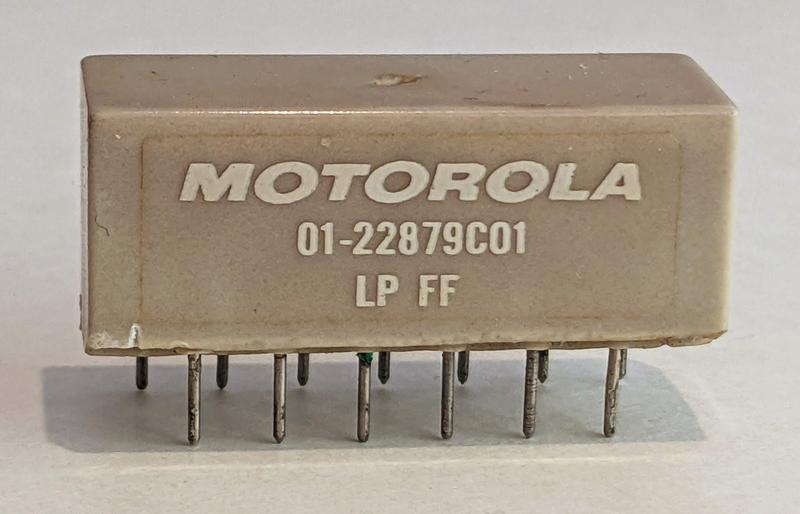
The photo below shows the module, a block of plastic 1.5 inches long with 13 pins. I could determine most of its functionality by probing it on a breadboard—conveniently, the pin spacing is compatible with standard solderless breadboards. The module is a flip flop (as the FF label suggests) but some questions remained. Last month, I reverse-engineered a simpler Motorola module (post) using 2-D X-rays. However, this flip flop module was much more complex and I couldn't reverse-engineer it from standard X-rays.

The Motorola LP FF module. It is a 13-pin block.

The Motorola LP FF module. It is a 13-pin block.

Fortunately, a company called Lumafield offered to take 3-D X-rays with their Neptune CT scanner. This 6-foot wide unit has a turntable and an X-Y-Z positioning mechanism inside. You put an item on the turntable and the unit automatically takes X-rays from hundreds of different angles. Cloud software then generates a 3-D representation from the X-rays. This industrial system is aimed at product development, product analysis, quality checking, and so forth. It handles metal components, soft goods such as shoes, plastic items, and complex assemblies. I think this is the first time it's been used for 1960s electronics, though.

The Lumafield CT X-ray machine. Photo courtesy of Lumafield.

The Lumafield CT X-ray machine. Photo courtesy of Lumafield.

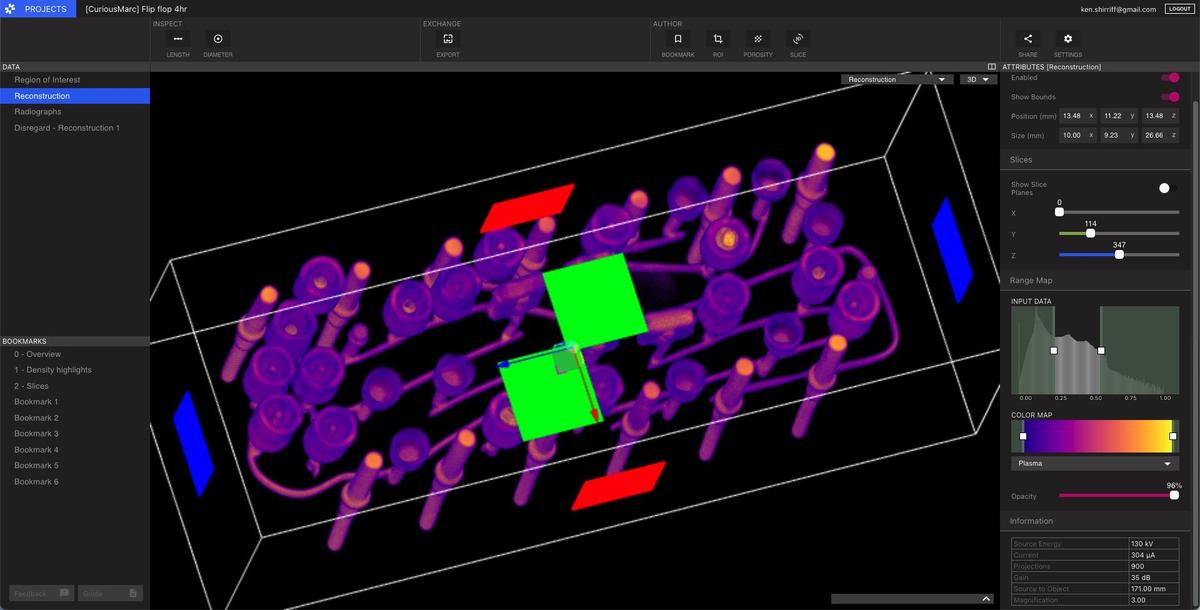
A simple web-based interface (below) lets you manipulate the representation by rotating and slicing it with your touchpad or mouse. In this screenshot, I'm adjusting the clipping box by sliding the red, green, and blue squares. This yields a cross-section of the module (purple). You can look at the flip flop module yourself at this link; give it a minute to load.

Screenshot of the Lumafield web interface.

Screenshot of the Lumafield web interface.

Background on the module

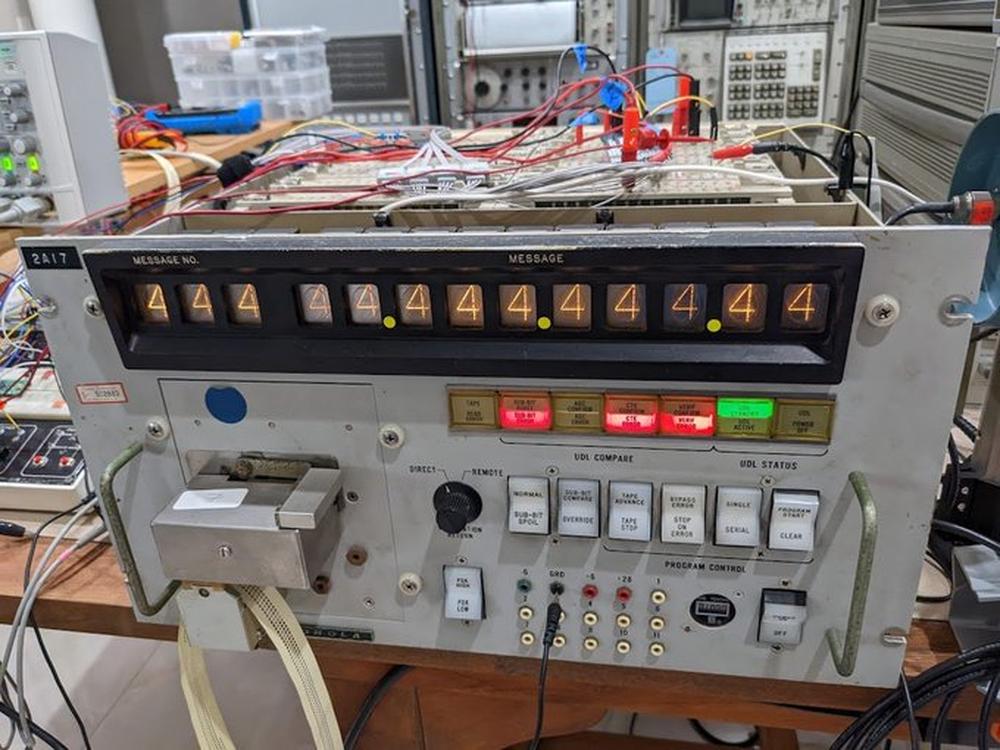
To ensure a successful Moon mission, all the systems of Apollo were thoroughly tested on the ground before flight. These Motorola modules were used in test equipment for One box onboard the spacecraft was the Up-Data Link,2 tested by the "Up-Data Link Confidence Test Set" shown below. Unfortunately the test box had no documentation, so I had to reverse-engineer its functionality.

The up-data test box is a heavy rack-mounted box full of circuitry. The wiring on top is for our reverse-engineering, plugged into the box's numerous test points.

The up-data test box is a heavy rack-mounted box full of circuitry. The wiring on top is for our reverse-engineering, plugged into the box's numerous test points.

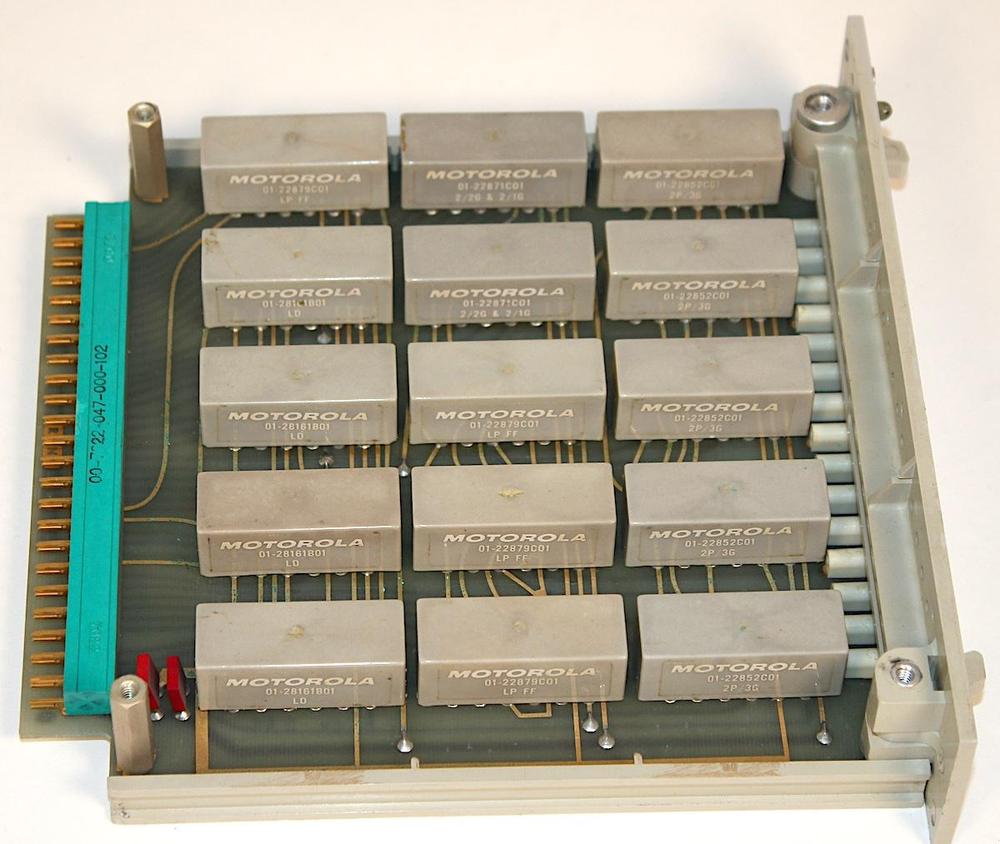
The test box was constructed from 25 printed-circuit boards, with the boards connected by a tangled backplane of point-to-point wiring. Each board held up to 15 tan Motorola modules, blocks that look a bit like relays but contain electronic circuitry. The photo below shows one of the boards.

One circuit board from the test box. It has 15 modules including four LP FF modules.

One circuit board from the test box. It has 15 modules including four LP FF modules.

You might wonder why complex electronics would be built from modules instead of integrated circuits. The invention of the integrated circuit in 1958 led to an electronic revolution, but in the mid-1960s integrated circuits were still expensive and rare. An alternative was small hybrid modules that functioned as building blocks: logic gates, flip flops, op-amps, and other circuits. Instead of a silicon chip, these hybrid modules contained discrete transistors, resistors, capacitors, and other components.

The components inside the module

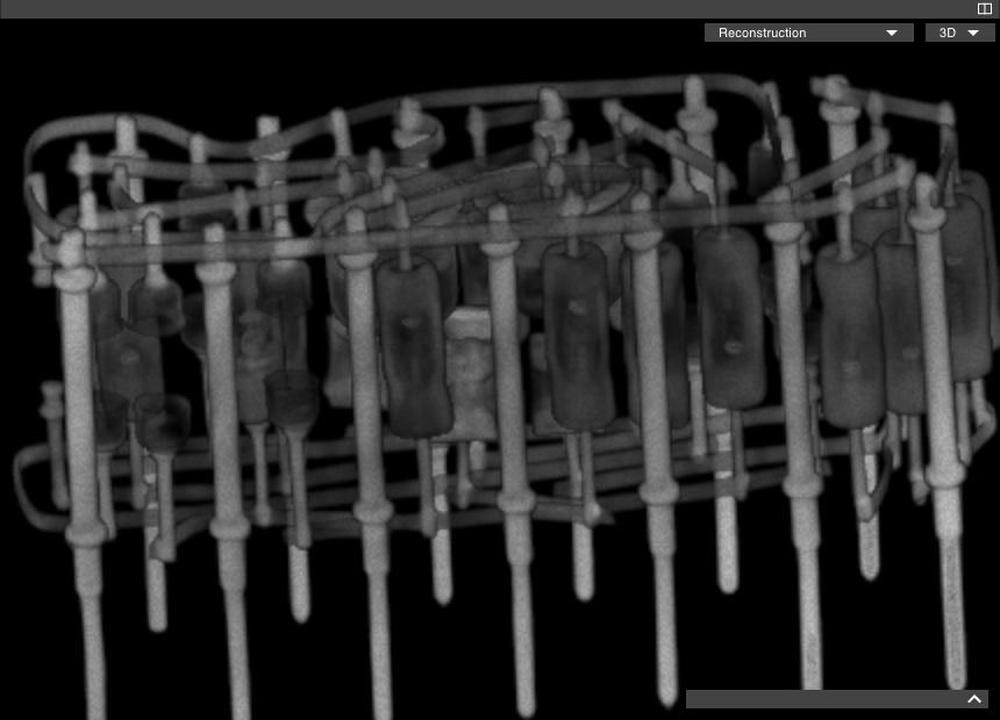
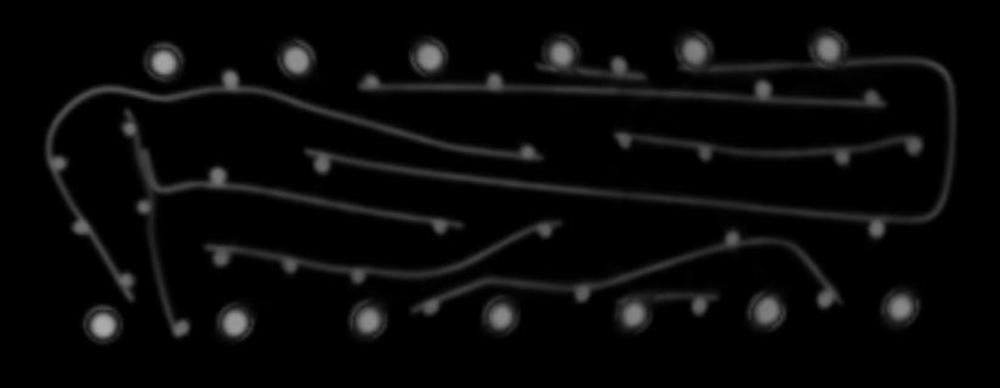
The CT scan (below) provides a high-resolution module of the module, its components, and the wiring. The scan reveals that the module is constructed from two boards, one at the top and one at the bottom, with components mounted vertically, a technique known as cordwood construction. This technique was used in the 1960s when dense packing of components was required, with the cylindrical components stacked together like wooden logs. Unexpectedly, the wiring isn't a printed circuit board (like the previous module that I examined), but spot-welded ribbon wiring. (Note that the wire contacts the side of each pin or lead.) The 13 pins pass vertically through the module, with connections at the top and bottom; the scan shows the shape of each pin in detail.

CT scan of the Motorola LP FF module. In this image, I've used the grayscale color scheme.

CT scan of the Motorola LP FF module. In this image, I've used the grayscale color scheme.

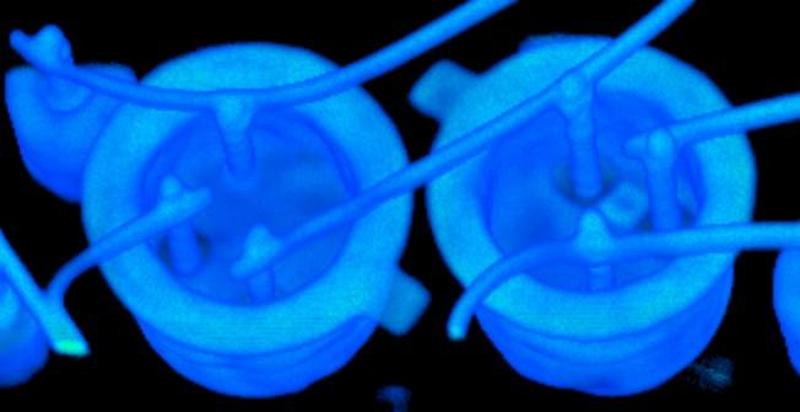
The module contains two NPN transistors, mounted upside down with wires attached to the pins. The transistors are in metal cans, which show up clearly in the X-rays. The small square tab sticking out from a transistor indicates the emitter pin. For the transistor on the right, the tiny silicon die is visible between the pins. The die is connected to the pins by bond wires, but the bond wires are too small to be visible in the X-ray.

Two transistors in the module.

Two transistors in the module.

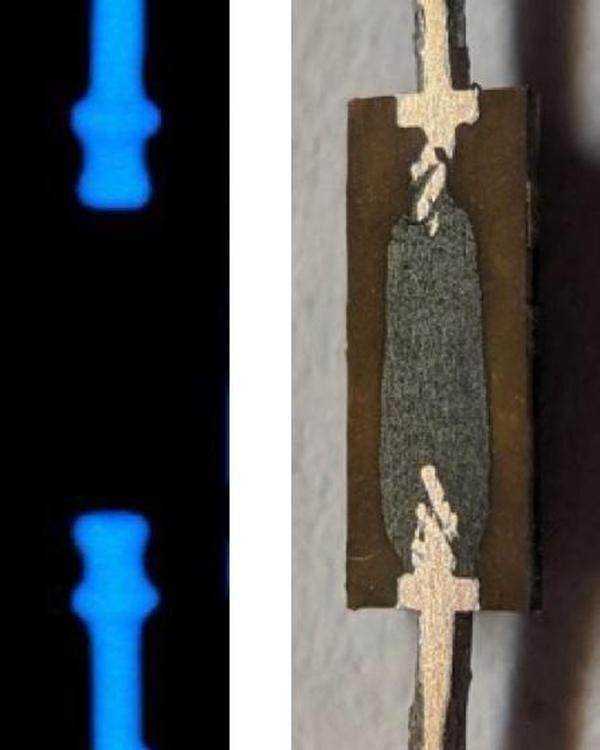
Some components aren't as easy to recognize, such as resistors. A carbon composition resistor is constructed from a resistive carbon cylinder, as shown in the cross section. A metal pin sticks into each end of the cylinder, providing the resistor's leads. The carbon doesn't block X-rays, so it is invisible. Thus, a resistor looks like two dangling metal pins in the scan.

X-ray of a carbon composition resistor and a cross-section of a similar (but not identical) resistor. Photo from the book Open Circuits, Copyright Eric Schlaepfer and Windell Oskay; used with permission of the authors.

X-ray of a carbon composition resistor and a cross-section of a similar (but not identical) resistor. Photo from the book Open Circuits, Copyright Eric Schlaepfer and Windell Oskay; used with permission of the authors.

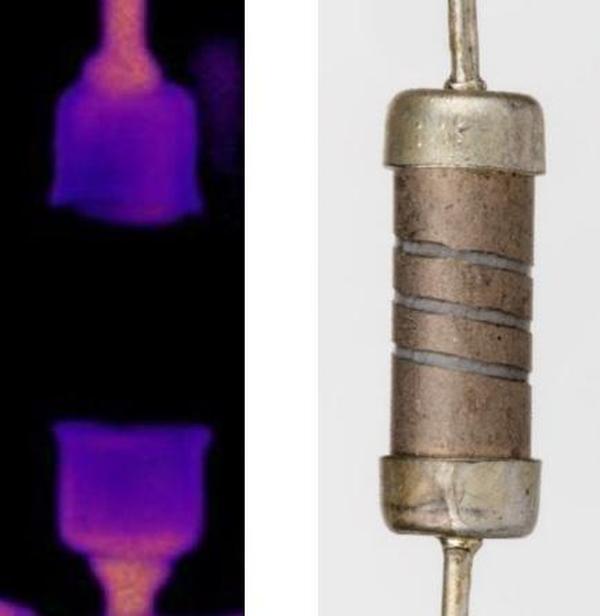
A carbon film resistor, in contrast, is constructed from a spiral of carbon film on a ceramic rod. The carbon and ceramic don't show up in the scan, but the resistor's end-caps are visible. Thus, the two types of resistors appear different in the images. The module uses both types of resistors; I'm not sure why.

X-ray of a carbon film resistor and a photograph of a similar resistor. The spiral cut in the carbon film controls the resistance. Photo from the book Open Circuits, Copyright Eric Schlaepfer and Windell Oskay; used with permission of the authors.

X-ray of a carbon film resistor and a photograph of a similar resistor. The spiral cut in the carbon film controls the resistance. Photo from the book Open Circuits, Copyright Eric Schlaepfer and Windell Oskay; used with permission of the authors.

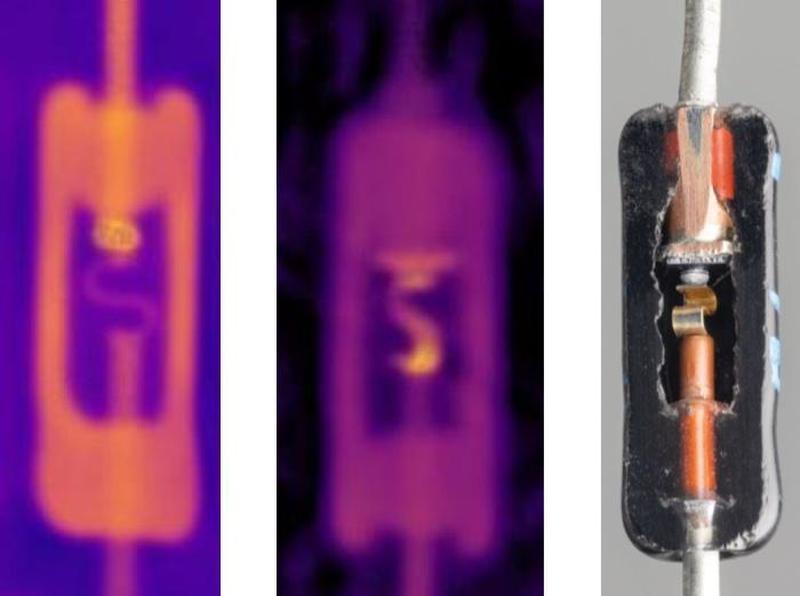
The module contains many diodes and the internal structure of the diode is visible on the scan. A diode is constructed from a semiconductor die, with a metal S-shaped spring making contact with one side of the die. For some reason, the spring is much more visible in Zener diodes; I assume the spring happens to be made from a more radio-opaque metal.

X-ray slice through a diode, a Zener diode, and a cross-section of a diode. Photo from the book Open Circuits, Copyright Eric Schlaepfer and Windell Oskay; used with permission of the authors.

X-ray slice through a diode, a Zener diode, and a cross-section of a diode. Photo from the book Open Circuits, Copyright Eric Schlaepfer and Windell Oskay; used with permission of the authors.

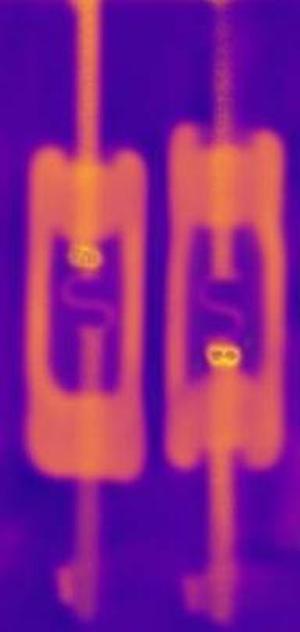
With careful examination, the diode's die can be seen in the scan as a bright spot at one side of the spring. This reveals the orientations of the diode, which is important for creating a schematic. The two diodes below have opposite orientations: the left one has the die on the top, while the right one has the die on the bottom.

Two diodes in the scan. The first diode has the die at the top, while the second has the die at the bottom.

Two diodes in the scan. The first diode has the die at the top, while the second has the die at the bottom.

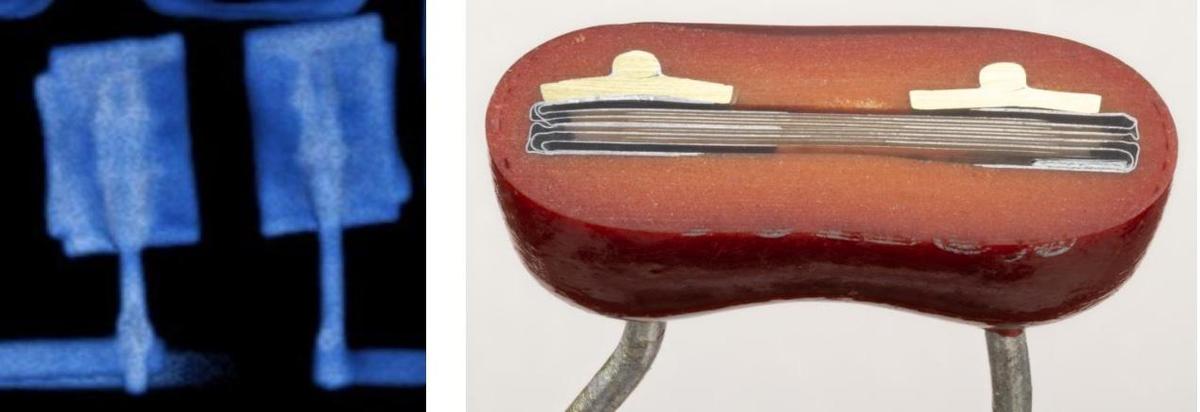
The module's final components are capacitors, probably silver-mica capacitors. As shown in the cross-section, the capacitor consists of layers of foil and mica. These layers are too thin to show up on X-ray, but the rectangular connections to the leads are visible. Thus, a capacitor looks like rectangles attached to pins.

X-ray of a silver-mica capacitor and a cross-section of a similar capacitor. Photo from the book Open Circuits, Copyright Eric Schlaepfer and Windell Oskay; used with permission of the authors.

X-ray of a silver-mica capacitor and a cross-section of a similar capacitor. Photo from the book Open Circuits, Copyright Eric Schlaepfer and Windell Oskay; used with permission of the authors.

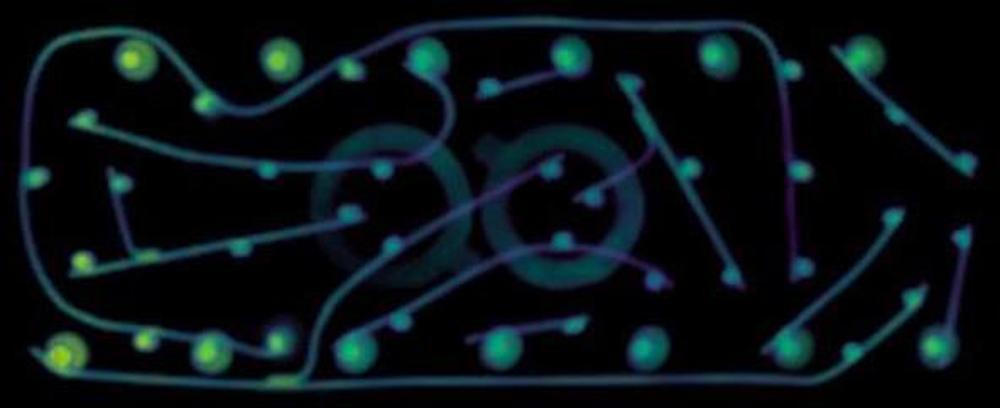
The cross-section image below shows a horizontal slice through the module. Since the components are mounted vertically as cordwood, this cuts through the components. The pins at the top and bottom are bright cyan. The blue circles are diodes. The more ghostly circles are resistors. The large hollow circles in the center are the transistors, on top of the capacitors.

A cross-section through the components.

A cross-section through the components.

It is easy to extract the wiring from the reconstruction.3 By defining a bounding box in the user interface, I obtained the top wiring layer as a slice, separated from the other circuitry. This view also makes it clear that the wiring is spot-welded to the sides of the pins, and not a printed-circuit board. At the bottom left, you can see where two wires have been welded together.

The top wiring layer in the module.

The top wiring layer in the module.

The wiring on the bottom of the module can be extracted similarly by changing the slice bounds in the user interface. I used a different color map for this image.

The bottom wiring of the board.

The bottom wiring of the board.

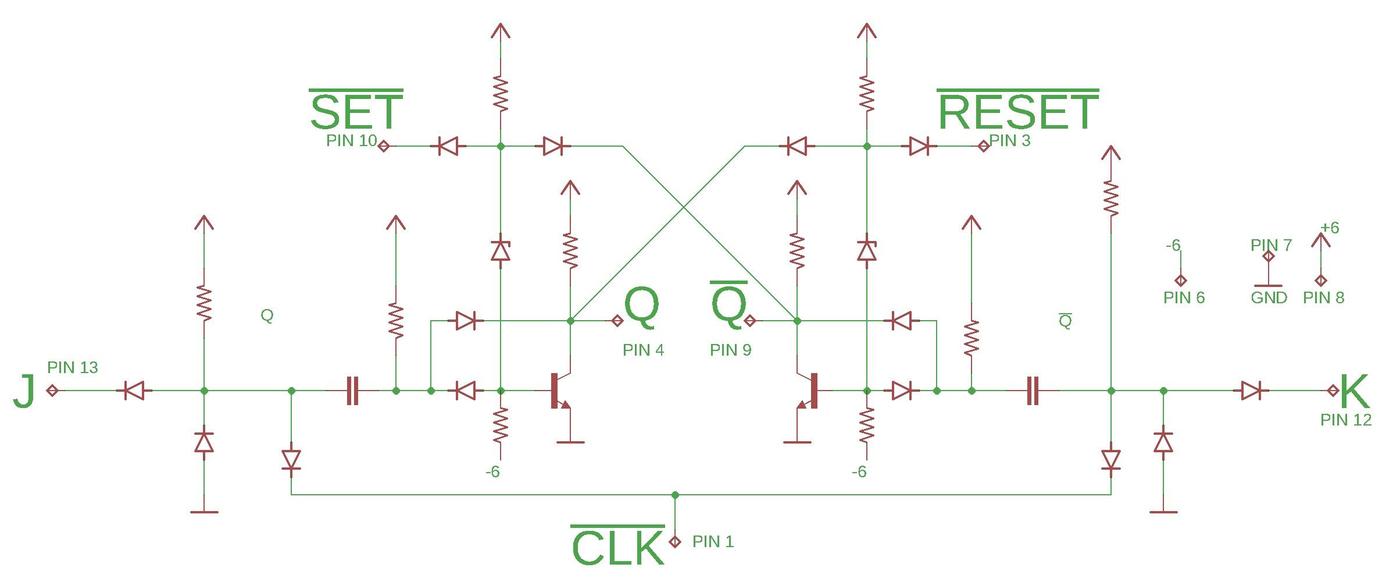
By studying the CT scan, I could reverse-engineer the circuitry. The hardest part was examining the diodes closely to determine their orientation. The resulting schematic is shown below (click for a larger version).

Schematic of the flip-flop module.

Schematic of the flip-flop module.

The core of the flip flop is the two cross-coupled transistors in the center: the output of one transistor is connected (through diodes) to the input (base) of the other. If one transistor is on, it forces the other transistor off. Thus, the flip flop has two stable states with one transistor on and one transistor off. In the remainder of the post, I'll explain the circuit in more detail.

How a J-K flip flop works

A flip flop is a circuit that can be put into two states, outputting a 0 or a 1. A flip flop has many uses, such as storing a bit, providing a delay, implementing a counter, or dividing a frequency by 2. A flip flop is controlled by a clock signal, changing state at the moment when the clock signal switches. (Flip flops often also have asynchronous inputs: Set and Reset inputs that act immediately, regardless of the clock.)

Several different types of flip flops are used for different purposes. A T (toggle) flip flops simply switches from 0 to 1, or 1 to 0, on each clock pulse, dividing the clock frequency by 2. A D (data) flip flop takes a data bit as input, storing it when the clock pulses. The J-K flip flop, however, is a general-purpose flip flop, with its function selected by the J and K control inputs. Its action is defined by the following table.

JKOutput on clock pulse
00Q (no change)
010 (clear)
101 (set)
11Q' (toggle)

Diode-transistor logic NAND gate

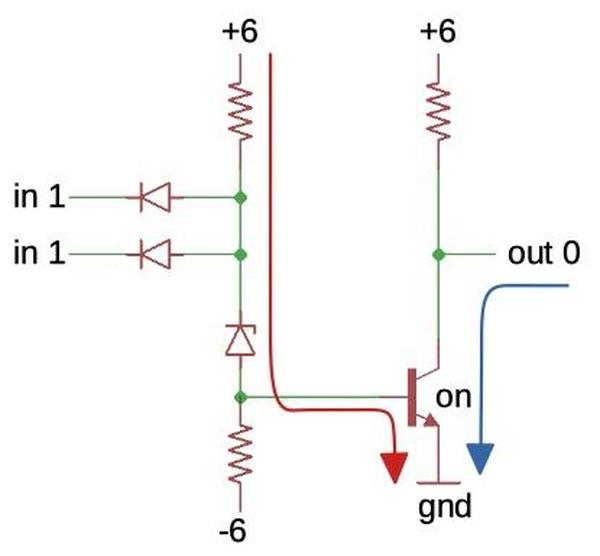
The flip flop is constructed from diode-transistor logic NAND gates. The NAND gate has two inputs, isolated from each other by diodes. If both inputs are high, the transistor's base is pulled high by the first resistor. This turns on the transistor, pulling the output low.

With a 1 for both inputs, the transistor turns on, producing a 0 output.

With a 1 for both inputs, the transistor turns on, producing a 0 output.

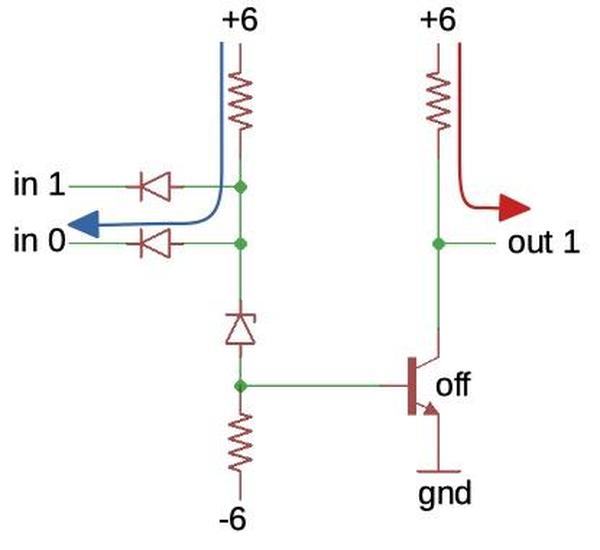
Conversely, if one input (or both) is low, the current passes through the diode and the transistor's base is pulled low. The transistor turns off and the output resistor pulls the output high. Thus, the output is low when both inputs are high, and otherwise high, so the circuit implements a NAND gate.4

With a 0 input, the transistor is turned off, producing a 1 output.

With a 0 input, the transistor is turned off, producing a 1 output.

Since this gate uses diodes and a transistor, it is called diode-transistor logic. This logic family was popular in the 1960s, until it was replaced by transistor-transistor logic (TTL). TTL uses a transistor in place of the input diodes, providing better performance.

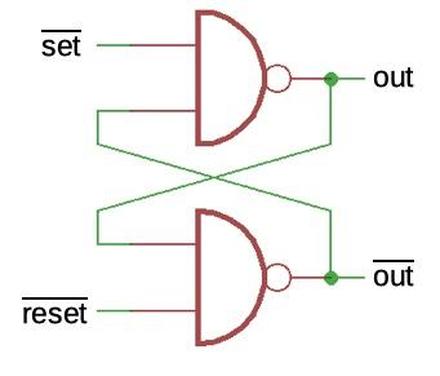
Cross-coupling two NAND gates produces a simple latch, the Set-Reset latch. When one NAND gate is off, it forces the other gate on. Thus, the circuit has two stable states. Pulling the set' line low forces the output low, while pulling reset' low forces the output high. NAND-gate latches are very common circuits, storing one bit.

Cross-coupling two NAND gates creates a latch.

Cross-coupling two NAND gates creates a latch.

Understanding the flip flop circuit

The difference between a flip flop and a latch (by a common definition) is that a latch changes state as soon as an input changes, but a flip flop only changes state when triggered by a clock signal. In this section, I'll explain how the clock is implemented in the flip flop module, controlled by the J-K functionality.

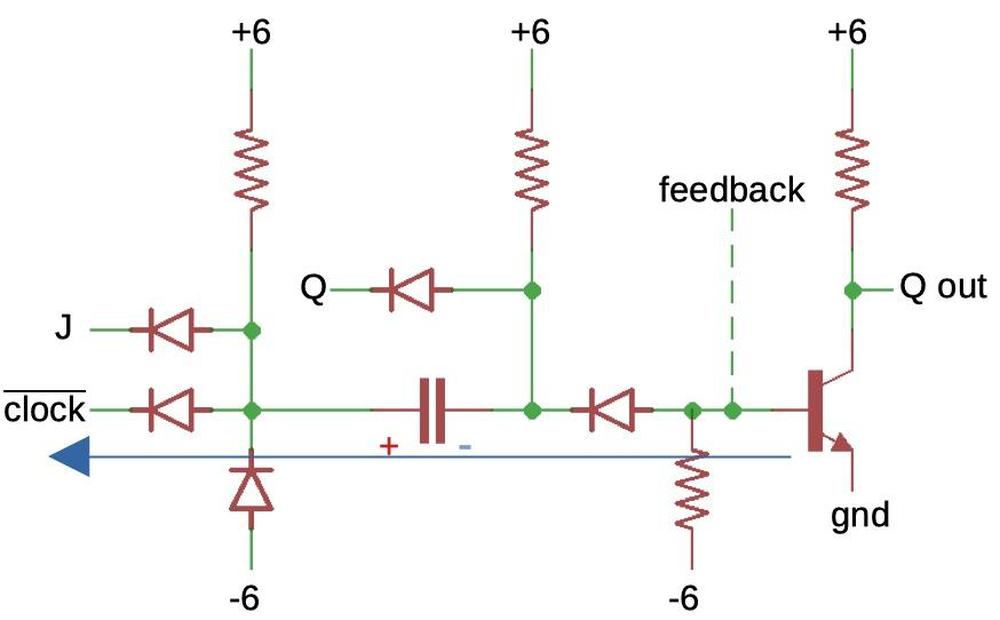
The underlying idea is that the clock input is connected through capacitors, so a sharp negative edge on the clock briefly pulls a transistor's base low, turning off the transistor and switching that output high. This makes the flip flop edge-sensitive.

The schematic below shows one-half of the flip flop, omitting the earlier cross-coupled latch circuitry (shown as "feedback"). If the capacitor is charged as shown, then a negative clock pulse (arrow) will pull the capacitor negative, briefly shutting off the transistor and turning on the output Q.5 The latch circuitry will then keep the flip flop in the new state.

When the clock goes low, this can pull the transistor base low, turning the transistor off.

When the clock goes low, this can pull the transistor base low, turning the transistor off.

The conditions for the capacitor to charge are that J must be high and Q must be low. Otherwise the capacitor will block the clock pulse.6 In other words, if J is high and Q is low, the output will toggle high on the clock pulse. In the mirror-image circuit (not shown), if K is high and Q' is low, the complemented output will toggle high on the clock pulse. This is the desired behavior for a J-K flip flop.7

The reverse-engineering solves one mystery about the flip flop. When I probed the module on a breadboard, touching a ground wire to the J pin immediately set the flip flop. This is very strange behavior because the J and K inputs are supposed to be controlled by the clock. Moreover, a high (not low) J input should set the output. (And conversely with K.) Looking at the reverse-engineered schematic, though, explains that a sharp pulse on the J pin will act like the clock, sending a pulse through the capacitor, turning off the transistor, and causing a high output. I assume this behavior is not intentional, and J inputs are expected not to transition as sharply as when I touched it with a ground wire.8

Conclusion

I was impressed by the quality of the CT scan. It not only provided a crystal-clear view of the components and wiring, but even showed the internal structure of the components. Being able to see inside a module is like having X-ray vision. (That sounds redundant since it literally is X-rays, but I don't know a better way to describe it.) If you have an application that requires looking inside, I give Lumafield a thumbs-up.

For more background on the Up-data Test Box, I have some Twitter threads: power-up, modules, paper tape reader, and clock circuit. Also see CuriousMarc's video on the box:

I announce my latest blog posts on Twitter, so follow me @kenshirriff for updates. I also have an RSS feed. Many thanks to Lumafield and especially Jon Bruner for performing the CT scan of the module. Thanks to Marcel for providing the Up-Data Link Test Box, which contains the modules, and thanks to John McMaster for earlier X-rays. Cross-section photos copyright Windell Oskay and Eric Schlaepfer, from the upcoming book Open Circuits, which you should check out.

Notes and references

  1. Presumably the Motorola modules have documentation somewhere, but we have been unable to find anything. I haven't been able to find even a mention of these modules, let alone details. 

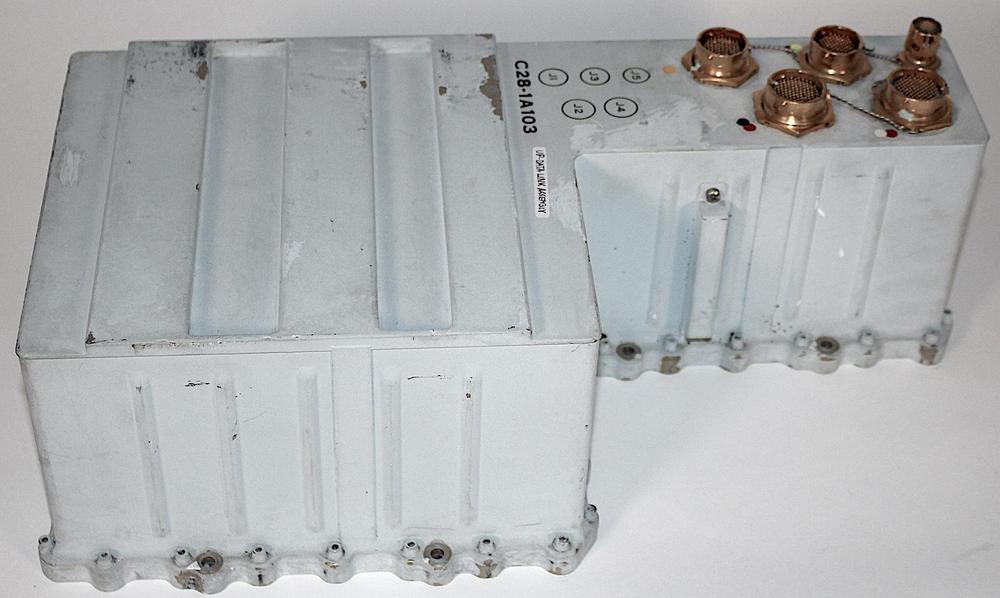
  2. NASA could send digital messages to the spacecraft from the ground. These data messages could perform specific tasks: control spacecraft equipment by activating relays, send commands directly to the Apollo Guidance Computer, or even set the spacecraft's clock. Onboard the Command Module, these messages were decoded by the Up-Data Link, a drab bluish box (below) mounted in the equipment bay.

    The Up-Data Link (UDL) was installed on the Apollo Command Module.

    The Up-Data Link (UDL) was installed on the Apollo Command Module.


  3. For the simpler -3.9V module, I extracted the wiring from traditional 2-dimensional X-rays and it was a pain. Cordwood construction has two layers of wiring, at the top and the bottom, so an X-ray from the top merges the two wiring layers together. The side views are even worse, since you can't see the wiring at all. You need to take X-rays of the module at an angle to separate the wiring layers, but there's still overlap, not to mention obstruction from the components. 

  4. The use of a Zener diode in the gate is a bit unusual. It acts as a level-shifter, raising the input voltage threshold that switches between off and on. (Otherwise the threshold is close to 0 volts, making the inputs too sensitive to noise.) I've found a patent that uses Zener-Coupled Diode Transistor Logic, which is somewhat similar. High Threshold Logic also uses Zener diodes to raise the threshold voltage. 

  5. You might wonder how the flip flop ends up in the right state during a clock pulse, because there will be a moment when both transistors are turned off and both outputs go high. This seems like a metastable race condition. However, the key is that the feedback path is weaker than the clock pulse. Thus, the transistor on the side without the clock pulse will get turned on by the feedback, while the transistor on the side with the clock pulse remains off. This immediately breaks the symmetry, putting the flip flop into the right state. 

  6. For the clock pulse to pass through the capacitor, the capacitor must be charged with the input side positive and the base side negative. Then, a negative clock pulse will pull the capacitor negative. However, if both sides of the capacitor are negative, the clock pulse will have no effect. Conversely, if both sides of the capacitor are positive, the clock pulse will pull the capacitor down, but not far enough to turn off the transistor. 

  7. To understand the J-K action of the flip flop, I've reorganized the standard J-K function table to highlight the state changes.

    JKOutput if Q is lowOutput if Q is high
    000 (no change)1 (no change)
    010 (no change)0 (clear)
    101 (set)1 (no change)
    111 (set)0 (clear)

    In other words, if Q is low and J is 1, the flip flop is set. If Q is high and K is 1, the flip flop is cleared. Otherwise, the state remains unchanged. The implementation of the flip flop directly matches this logic. 

  8. I found that the clock pulse must have a very sharp transition in order to work; my cheap pulse generator wasn't sufficient to act as the clock until I added a buffer transistor. The clock pulse needs to have enough drive current to rapidly discharge the capacitor. If it's too slow, the pulse won't be enough to turn off the transistor. 

Reverse-engineering the Apollo spacecraft's FM radio

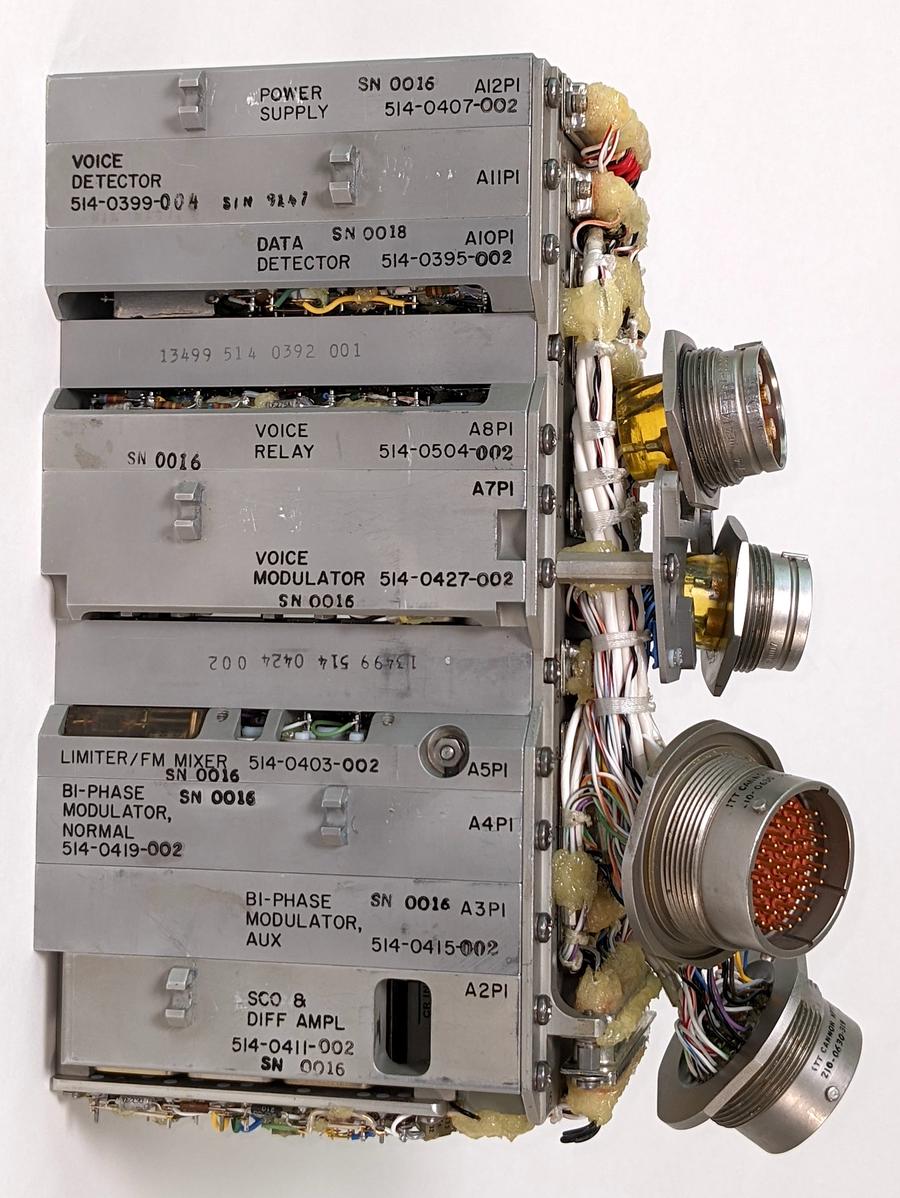
How did NASA communicate with the Apollo astronauts, hundreds of thousands of miles from Earth? The premodulation processor1 (below) was the heart of the communication system onboard the Apollo spacecraft. Its multiple functions included an FM radio for communication to the astronauts, implemented by the Voice Detector, the module second from the top. In this blog post, I reverse-engineer the circuitry for that module and explain how it worked.

With the case of the premodulation processor removed, its internal modules are visible, as well as the wiring harnesses.

With the case of the premodulation processor removed, its internal modules are visible, as well as the wiring harnesses.

The Apollo communication system was complex and full of redundancy. Most communication took place over a high-frequency radio link that supported audio, telemetry, scientific data, and television images.2 NASA's massive 85-foot dish antennas transmitted signals to the spacecraft at 2106.4 megahertz, an S-band frequency, giving the system the name "Unified S-Band". These radio signals were encoded using phase modulation;3 onboard the spacecraft, a complex box called the transponder received the S-band signal and demodulated it.4

The voice and data signals from Earth were combined through a second layer of modulation: voice was frequency-modulated (FM) onto a 30-kilohertz subcarrier while data was on a 70-kilohertz subcarrier, so the two signals wouldn't conflict.5 One of the tasks of the premodulation processor was to extract the voice and data signals from the transponder's output. These voice signals went to yet another box, the Audio Center Equipment, so the astronauts could hear the messages from the ground. The data signals were decoded by the Up-Data Link, allowing NASA to send commands to the Apollo Guidance Computer, control onboard relays, or set the spacecraft's clock.

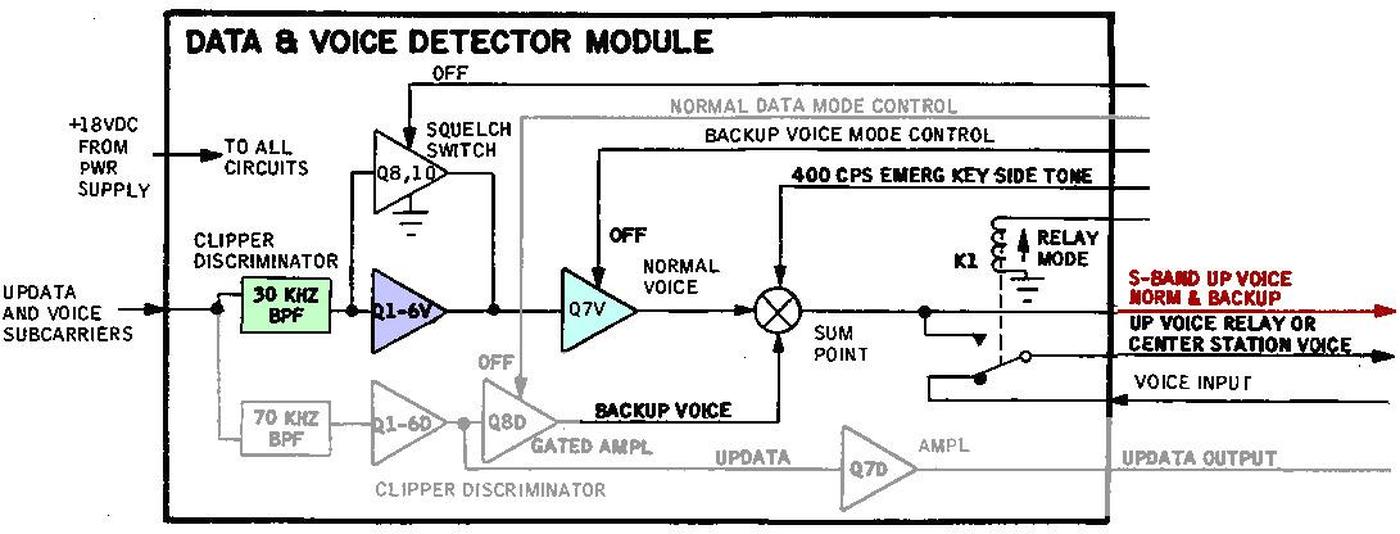
Many systems worked together for communication, but I'm focusing on a single module: the voice detector inside the premodulation processor that performed the FM demodulation. The block diagram below shows the operation of the voice detector; I've grayed out the data detector.6 The input contains the voice signal and the data signal at different frequencies; a band-pass filter (green) separates out the voice signal at 30 kilohertz. Next, the blue triangle7 demodulates the FM signal using a "clipper discriminator" circuit. The cyan triangle is an amplifier, producing the "up voice" output signal (red), so-called because it had been transmitted "up" from a ground station. I'll explain this circuitry in detail below.

Block diagram of the data and voice detectors, with the data detector grayed out. Each "Q" indicates a transistor in the circuit. Click this image (or any other) for a larger version. Based on Command/Service Module Systems Handbook p63.

Block diagram of the data and voice detectors, with the data detector grayed out. Each "Q" indicates a transistor in the circuit. Click this image (or any other) for a larger version. Based on Command/Service Module Systems Handbook p63.

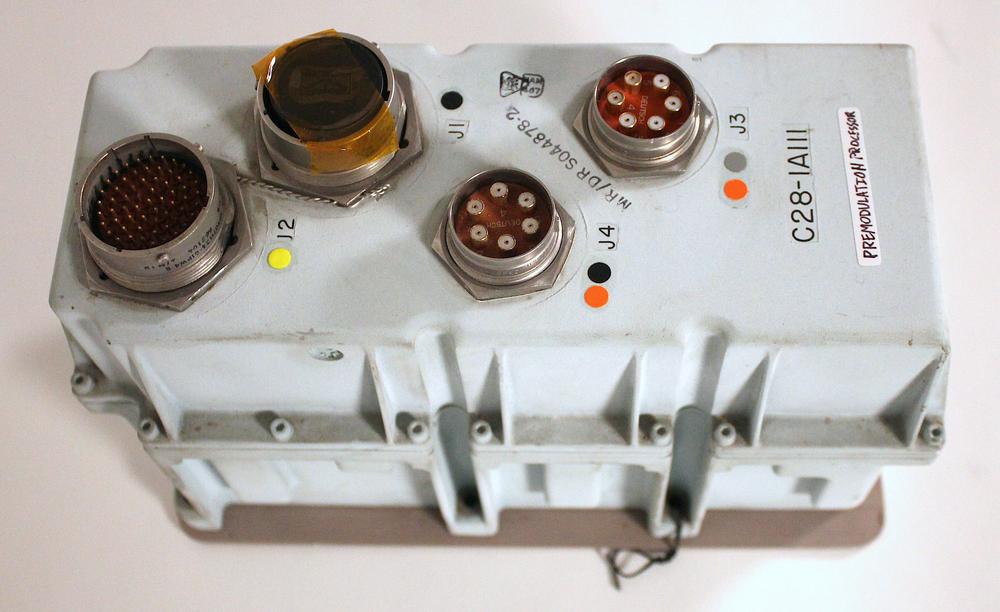
The photo below shows the premodulation processor in its case.1 The premodulation processor (PMP) weighs 14.5 pounds and measures 4.7"×6"×10.5". It used 8.5 watts of power, supplied at 28 volts DC from the spacecraft's hydrogen/oxygen fuel cells or silver-oxide zinc batteries. The PMP was mounted in the Command Module's equipment bay, along with most of the electronic equipment.8 It was fastened to a "cold plate", cooled by water-glycol loops that removed heat through radiators and water evaporators.

The premodulation processor is a bluish box with four round connectors on top.

The premodulation processor is a bluish box with four round connectors on top.

Construction

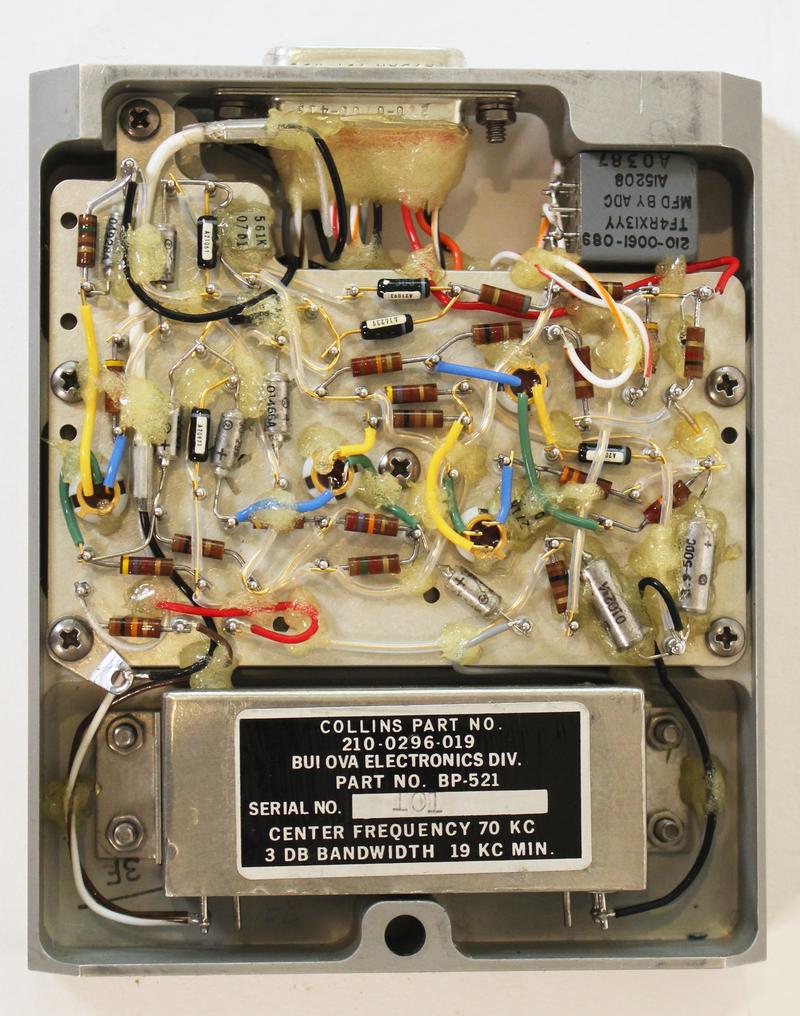
The modules in the premodulation processor don't use printed-circuit boards, but instead are built from components that are soldered to metal pegs, forming a messy jumble of wiring. The circular transistors are mounted upside down with color-coded wiring: yellow for the emitter, green for the base, and blue for the collector. Capacitors are silver cylinders or gray squares, while the orange striped cylinder is a diode. The resistors have colored stripes, indicating their values. Point-to-point wiring provided additional connections, a mixture of color-coded insulated wires, bare wires, and wires in clear sleeves.

A closeup of the wiring in the premodulation processor. These connections are soldered, but others are spot-welded.

A closeup of the wiring in the premodulation processor. These connections are soldered, but others are spot-welded.

Since the components and wiring are visible, it seemed like these modules should be easy to reverse-engineer, but it's trickier than it seems. The components are liberally covered in what looks like hot glue but is probably silicone. (I suspect that this was only used in equipment for ground testing, while modules for spaceflight were fully encapsulated to prevent short circuits.) Much of the wiring is obscured, so I had to beep out many of the connections with a multimeter. As a result, my reverse-engineering probably has a few errors.

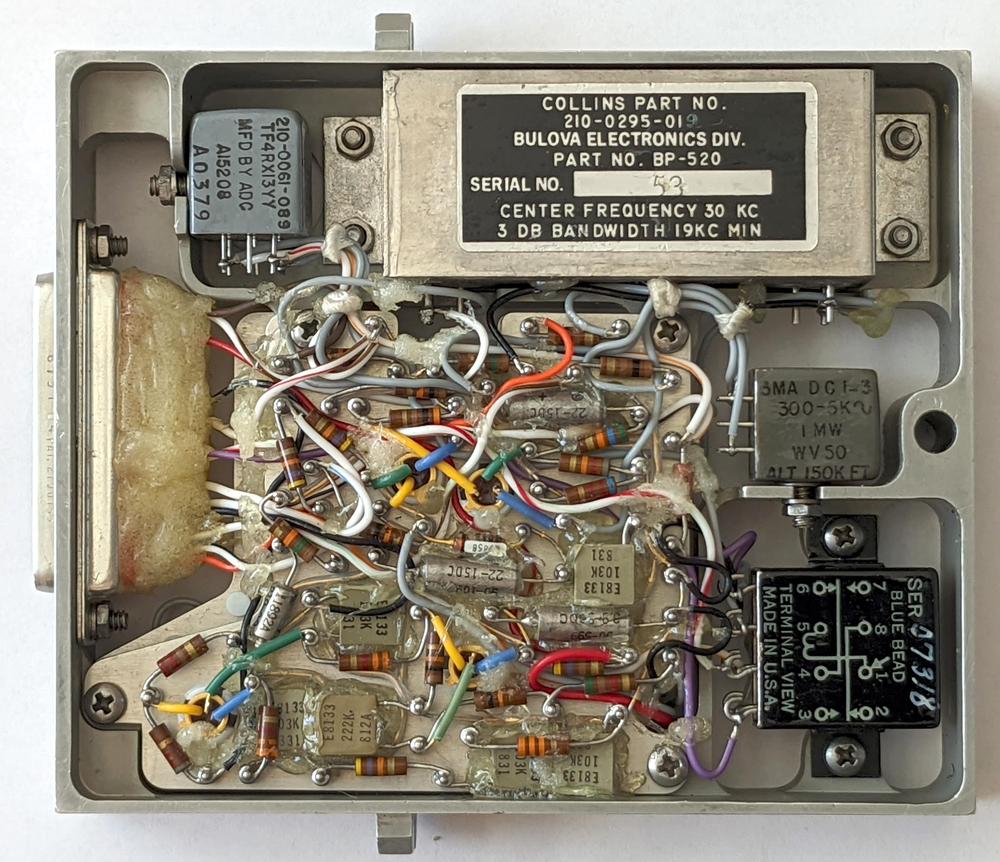
The modules have circuitry on both sides, which increased the density. The photo below shows the top side of the module. This module includes a few larger components that are mounted directly to the chassis, rather than to the circuit board. The large metal box at the top is the bandpass filter, built by Bulova Electronics, a division of the watch company that produced quartz crystals, oscillators, filters, servo amplifiers, and other components. This bandpass filter was built for Collins Radio, the manufacturer of the premodulation processor, and presumably contains a quartz filter, selecting the voice sub-band at 30 kilohertz and rejecting other frequencies. At the lower right is a smaller black box, an electromechanical relay that switched signals. The two grayish boxes are audio transformers to couple the module's output signals. The connector at the left has its wiring completely covered in silicone, inconvenient for reverse engineering.

Top view of the voice detector module.

Top view of the voice detector module.

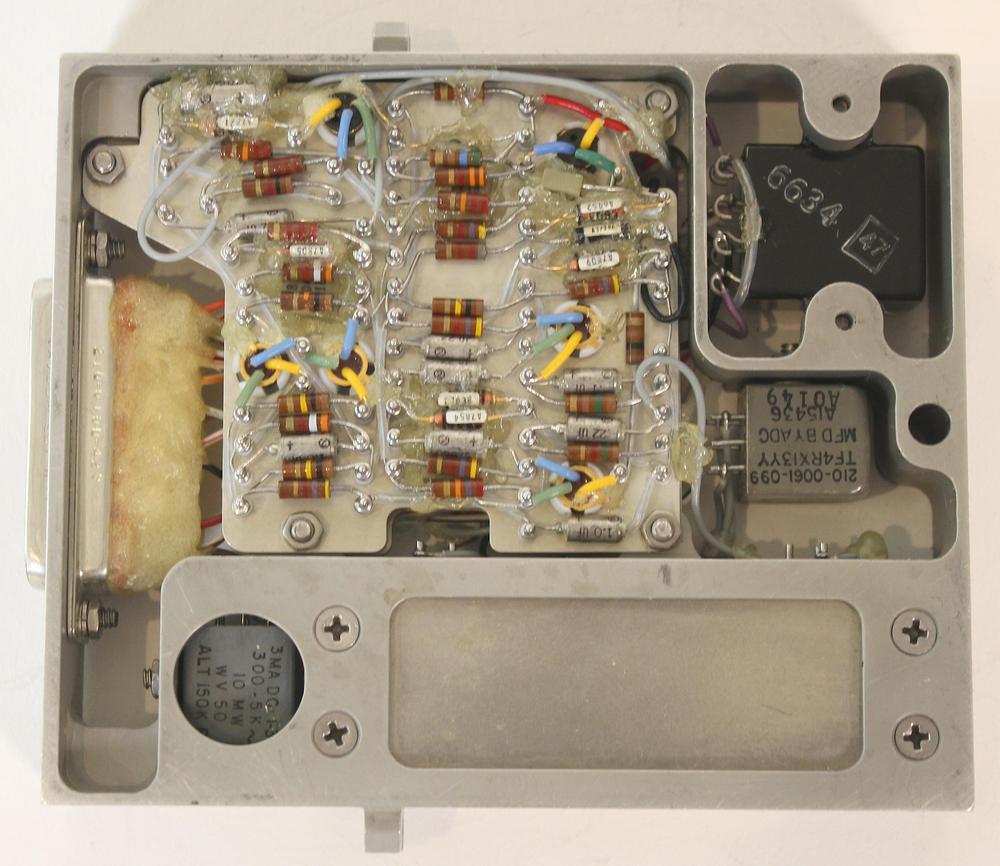
The circuitry on the bottom side of the board is arranged in orderly columns, unlike the other side. I don't know why the design styles of the two sides are so different. However, in a few places they put components under other components, so the circuitry isn't as orderly as it appears. The back of the bandpass filter is visible at the bottom. The two sides of the module are connected by a few gray wires.

Bottom view of the voice detector module.

Bottom view of the voice detector module.

How the FM demodulator works

FM radio has a tragic history. It was invented in 1933 by Edwin Armstrong, a prolific inventor of radio technologies (no relation to Neil Armstrong, first to walk on the Moon). FM was a superior alternative to AM (amplitude modulation), an earlier radio transmission system. Unfortunately, RCA (Radio Corporation of America) had invested heavily in AM radio and lobbied to block the introduction of FM. Armstrong spent years battling RCA in court with little success, resulting in his suicide in 1954. Almost a year later, his wife obtained a million-dollar settlement from RCA (about $8 million in current dollars), followed by successful patent litigation leading to recognition of Armstrong as the inventor of FM. Eventually, in the 1960s, FM radio achieved commercial success, as well as its use in the space program.

In an FM signal, the frequency of a carrier signal is changed (modulated) depending on an input signal. That is, the varying frequency of the transmitted signal indicates the level of the input. An FM demodulation circuit undoes this process, converting a varying frequency input into the corresponding voltage to recover the original signal. Many FM receiver designs have been used with tradeoffs of linearity, noise rejection, and circuit complexity.9 The simple but inaccurate slope detector uses a high pass filter to produce more output at higher frequencies. Several techniques use a circuit tuned to the carrier frequency so the output increases with frequency deviation: the vintage Foster-Seely discriminator dating back to 1936, the ratio detector, and the simple and popular quadrature detector. The complex phase-locked loop (PLL) approach keeps an oscillator locked onto the input frequency while producing the corresponding voltage.

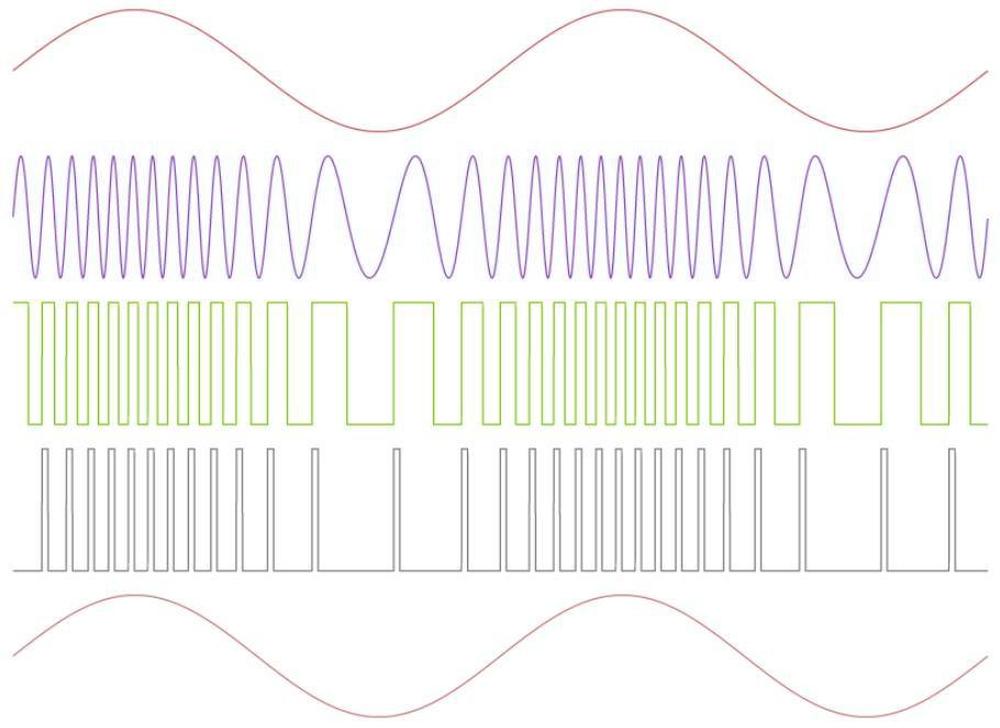
The premodulation processor, however, used a pulse-averaging discriminator, a high-quality but expensive demodulator used in wideband applications such as telemetry. The diagram below illustrates the FM modulation and demodulation process. The red line at the top shows an audio input signal, which modulates the purple signal: when the input is higher, the purple signal has a higher frequency. The FM purple signal is transmitted to the spacecraft. To demodulate the signal, the premodulation processor first amplifies and clips the signal (green). Next, it produces short, fixed-width pulses (gray), triggered by each green pulse; as the input frequency increases, these pulses will be closer together. Applying a low-pass filter smooths out the pulses, resulting in a higher output level when the pulses are close together.10 The result (red, bottom) matches the input.

The FM signal at various stages of processing: input, FM-modulated signal, clipped signal, fixed-width pulses, and output.

The FM signal at various stages of processing: input, FM-modulated signal, clipped signal, fixed-width pulses, and output.

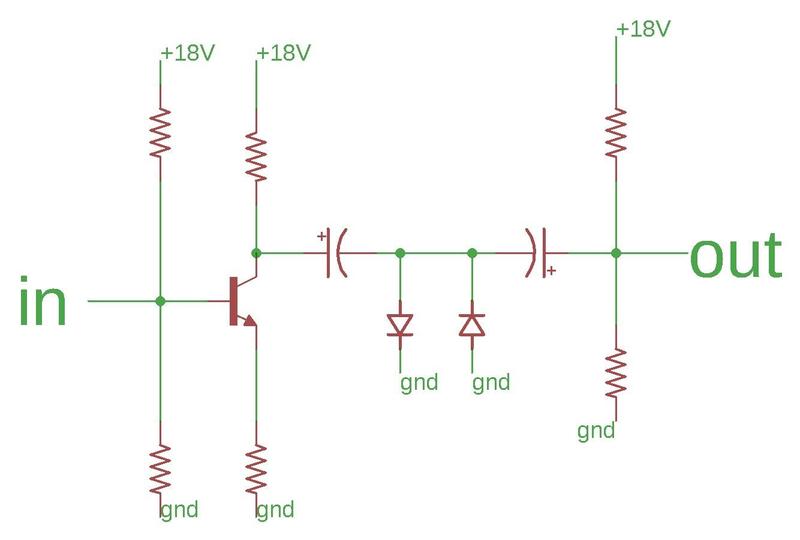
Looking at the premodulation processor's circuitry, the first step is to amplify and clip the input signal, turning the input into square waves. This step removes any variations in the input signal level, reduces the effect of noise, and creates a clean signal for the next phase. Clipping is done with a pair of diodes. A diode will turn on at about 0.6 volts, so the result is that the signal is limited to -0.6 volts to 0.6 volts. You can think of clipping as cutting the peaks off the sine waves and amplifying, so you end up with sharp transitions rather than a smooth wave.11 The schematic below shows one of the two clipping stages. The transistor amplifies the input, using a basic NPN transistor amplifier circuit. The two diodes in the middle clip the signal. The capacitors block the DC component of the signal, ensuring that it is centered around 0 for symmetrical clipping.

Schematic of one stage of the clipper.

Schematic of one stage of the clipper.

The clipper is followed by a two-transistor pulse generator, a "single-shot monostable multivibrator". Each input pulse discharges its capacitor, which then recharges through a resistor. This resistor-capacitor delay creates a fixed-width pulse, and then the circuit waits for the next input pulse. The next stage is a two-transistor low-pass filter that turns the pulses into a smooth output, using a handful of capacitors. It is followed by a transistor amplifier (that can be turned off as needed). This feeds two audio transformers to produce the voice outputs that go to the Audio Center, and thus the astronauts.

More features

In the basic configuration, the voice detector extracts the voice signal, while the data detector extracts the data signal, using a similar circuit. However, in case the voice communication circuitry failed, the system provided an "up voice backup" circuitry, a redundant way for ground stations to send voice to the spacecraft. The backup path transmitted voice over the data sub-band, and the data detector performed the FM demodulation. By flipping a switch, the data detector's output was routed to the voice circuitry, providing a voice path for emergencies. (Backup voice was completely analog, even though it used the data detector module.) During the Apollo 13 incident, the astronauts used backup voice to conserve electricity, which was running critically low.12

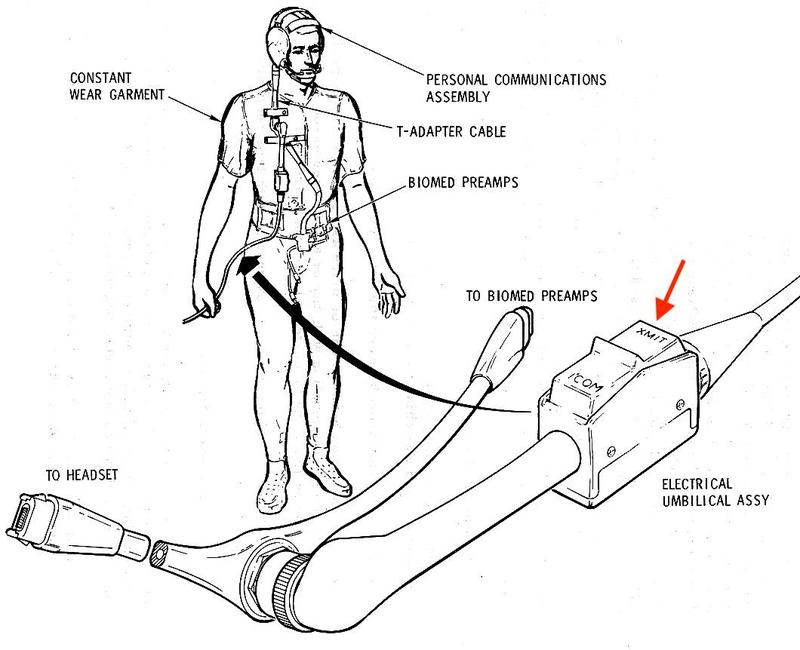
If voice communication failed entirely, the astronauts could switch to "emergency key" mode and transmit Morse code using the push-to-talk button on their umbilical cable. Most of the emergency key circuitry is elsewhere, but the voice detector has an input for the emergency key tone to get mixed into the audio that the astronauts heard.

The XMIT button on the astronaut's umbilical could be used as a key to transmit Morse code in an emergency.
From Apollo operations handbook.

The XMIT button on the astronaut's umbilical could be used as a key to transmit Morse code in an emergency. From Apollo operations handbook.

The communication system also included "squelch", a feature that silenced the audio if the signal strength dropped too low. ("Squelch" is a curious word, an onomatopeic 17th-century word meaning "to crush", later used figuratively as "suppress", and then in the 1930s as a radio circuit to suppress noise.) The S-band radio originally didn't include squelch but NASA soon found that a loss of the carrier signal created high noise levels that could disrupt other audio channels. To avoid this problem, a squelch feature was added to the radio before the Moon landings.

The squelch circuit detected the level of the carrier signal much like an AM radio, using a diode to rectify the sine wave and track the peaks. It used two transistors to amplify the signal and a third transistor to disable the audio, triggering squelch if the carrier level fell too low. A squelch disable switch was provided to ensure that, if necessary, voice could be used even at low signal levels. Moreover, some astronauts liked disabling squelch so they could use the channel noise to determine the channel's status.

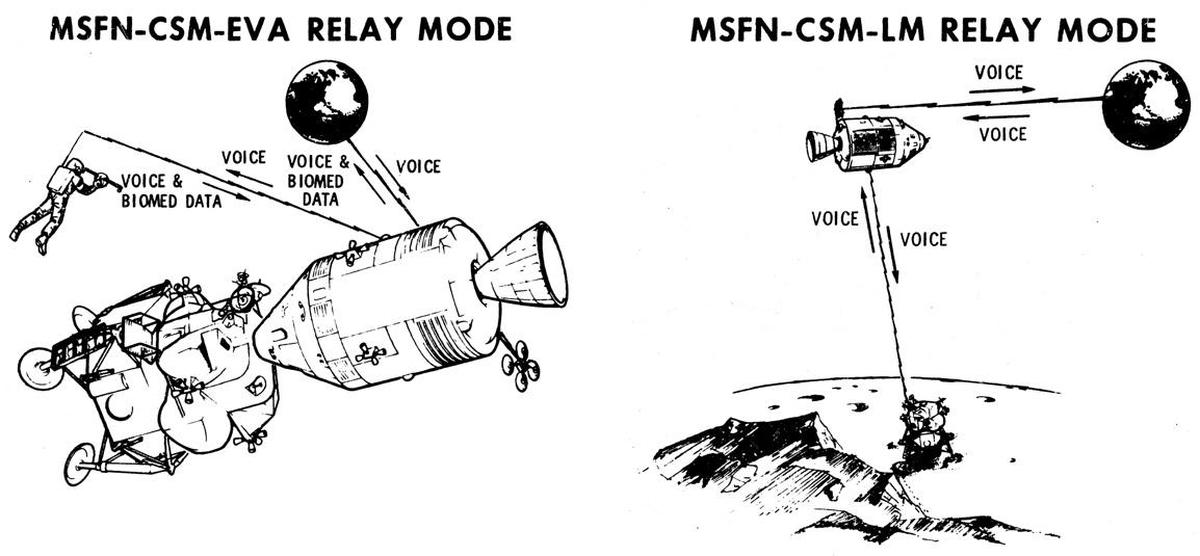
Another important feature for redundancy was relay support. If, for instance, the S-band radio failed on the Lunar Module, the Command Module could relay communication to and from the ground, using the VHF radio, as shown below. The circuit to relay communication from the ground uses a clever implementation trick. By flipping a switch, the ground up-voice signal replaced the Command Module pilot's microphone (#2, center seat), so ground communication could be transmitted just like the astronaut's speech, sending it over the VHF radio to the Lunar Module, for instance. The diagram below illustrates two scenarios: from ground to an extra-vehicular activity or from ground to the Lunar Module, relayed through the Command Module.

Illustrations of how relay mode works from the ground (MSFN, Manned Space Flight Network) to an extra-vehicular activity (EVA), as well as to the Lunar Module (LM). Adapted from Apollo CSM Logistics Training.

Illustrations of how relay mode works from the ground (MSFN, Manned Space Flight Network) to an extra-vehicular activity (EVA), as well as to the Lunar Module (LM). Adapted from Apollo CSM Logistics Training.

The voice relay circuit was implemented with an electromechanical relay in the voice decoder module—don't be confused with the two completely different meanings of "relay" in this system. Flipping a switch caused the electromechanical relay to replace the microphone signal with the up voice signal.13

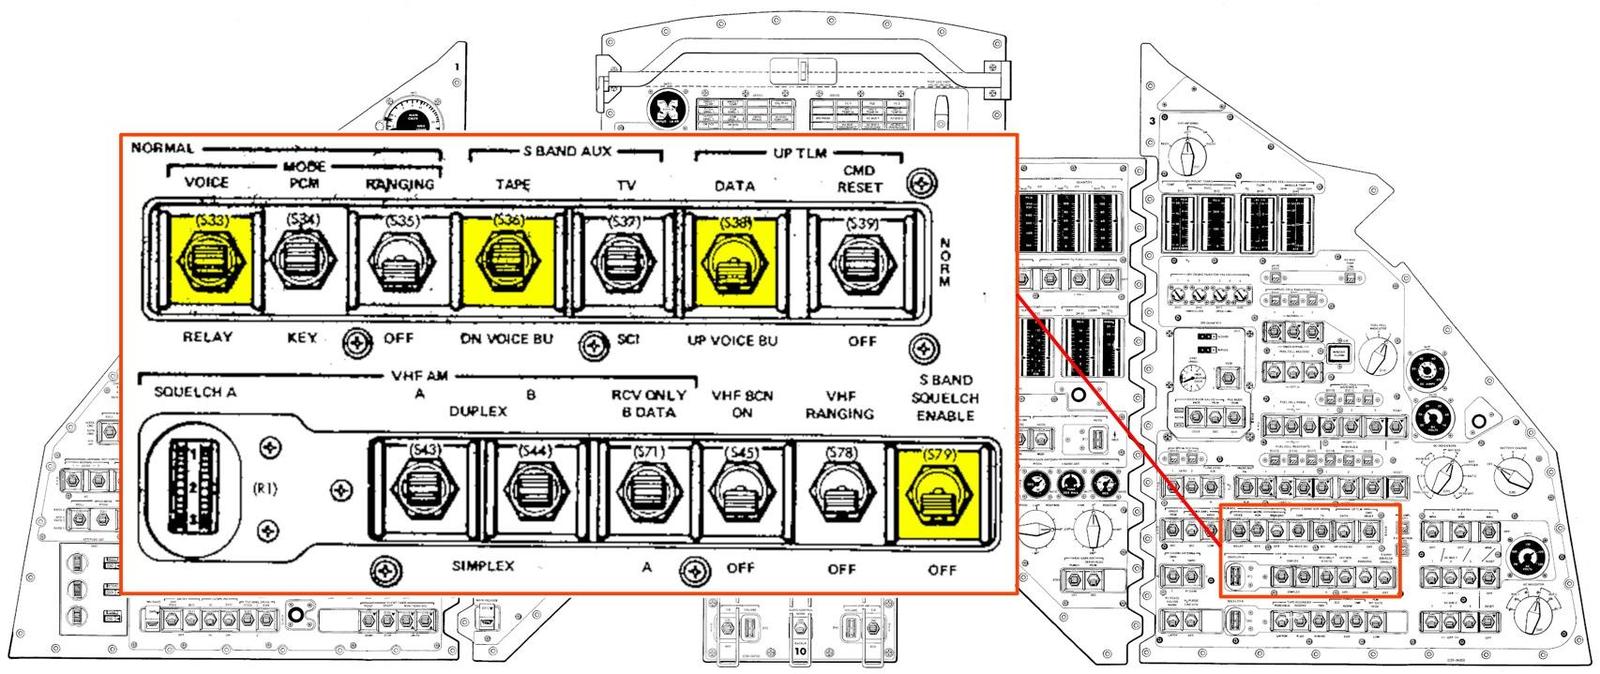
The astronauts sat in front of a complex control panel full of switches and gauges. The controls for the premodulation processor were grouped in the lower-right corner of the console with other communications switches. The diagram below shows the switches that controlled the voice detector features: squelch, backup voice, and voice relay, highlighted in yellow.

The Command Module's control panel with relevant switches highlighted.
  Diagram based on from Command/Service Module Systems Handbook p208.

The Command Module's control panel with relevant switches highlighted. Diagram based on from Command/Service Module Systems Handbook p208.

Schematic

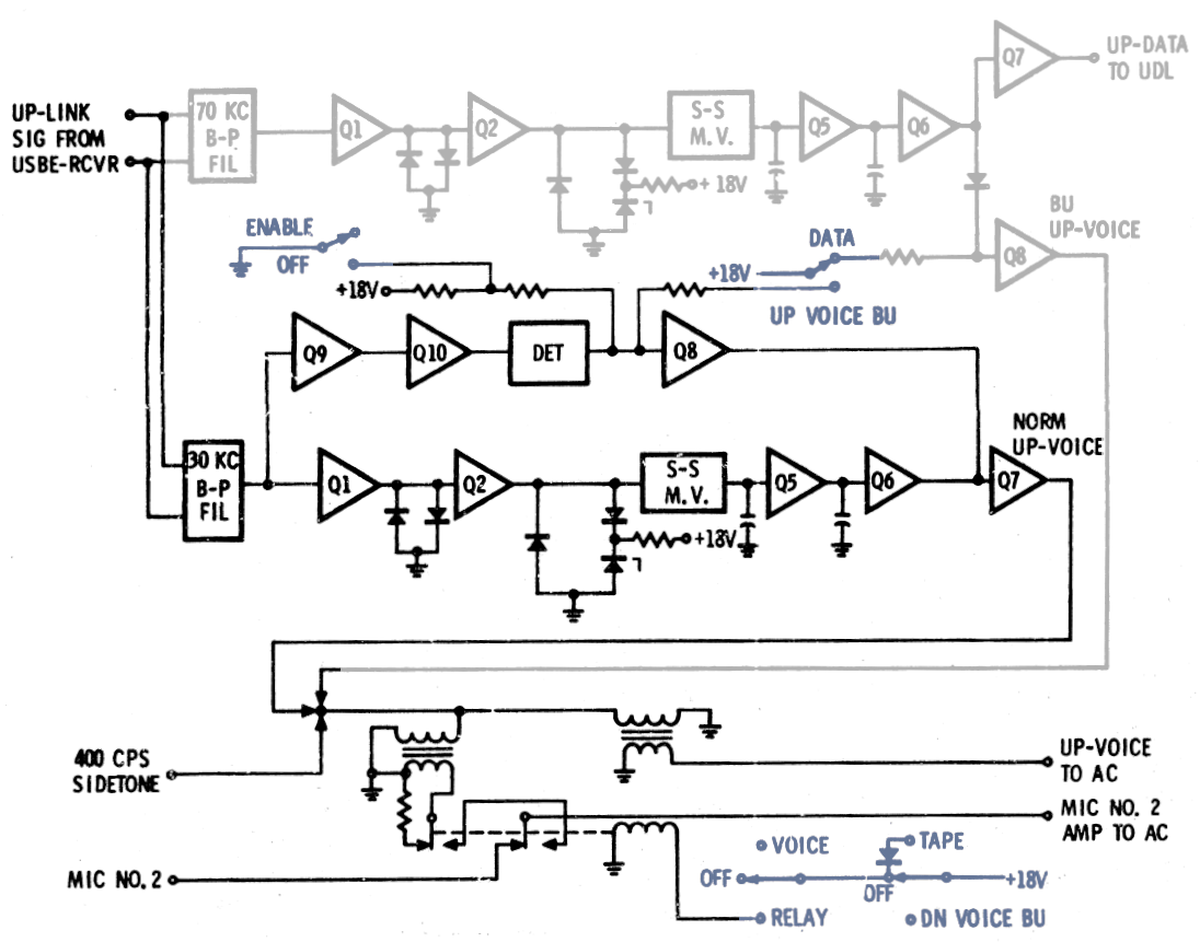
The detailed block diagram shows the construction of the voice detector and data detector modules. Each triangle corresponds to a transistor. I've grayed out the data detector and colored external switching circuitry in blue; these switches match the ones above. You can see how the backup up-voice comes from the data detector module, and then is merged into the voice detector's output, under the control of the "data / up voice BU" switch. At the bottom, the relay switches the voice signal in place of the microphone #2 signal when relaying voice from Earth. ("AC" is the Audio Console, the audio system connected to the astronaut's headphones and microphones.)

Detailed block diagram of the voice detector and data detector modules, data detector grayed out. Based on Apollo Telecommunication System training.

Detailed block diagram of the voice detector and data detector modules, data detector grayed out. Based on Apollo Telecommunication System training.

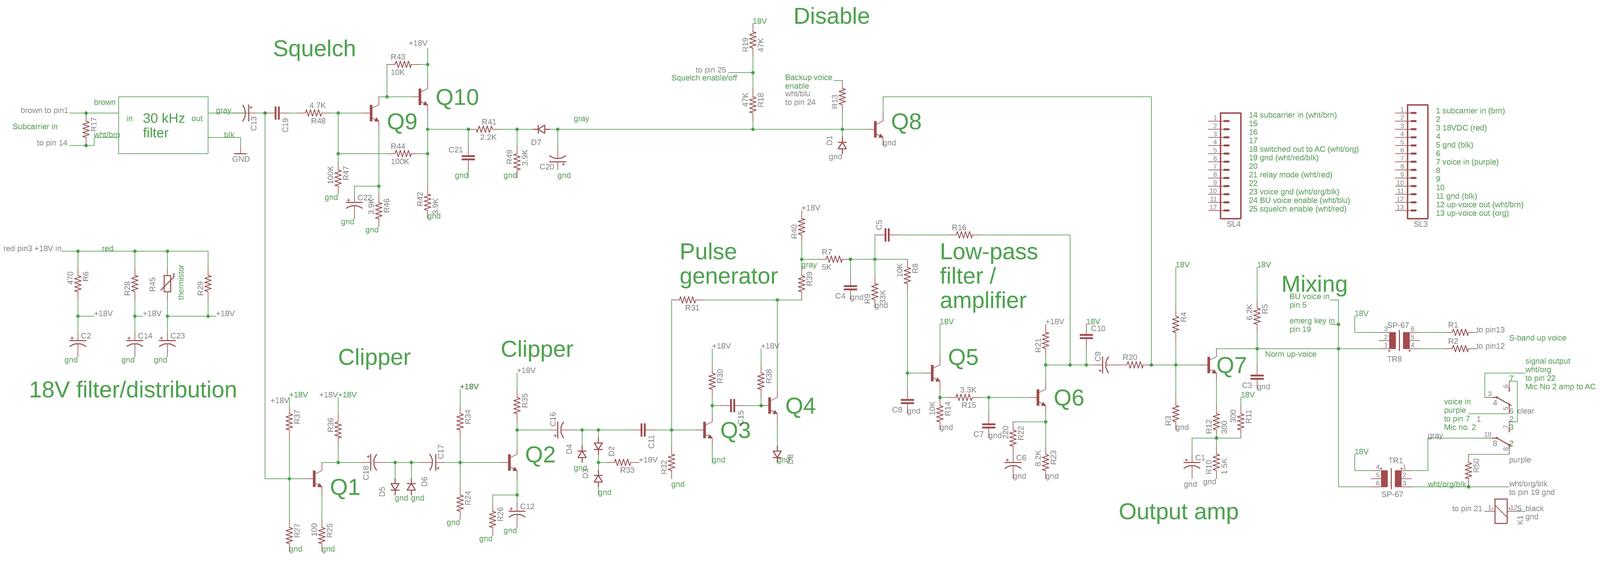
After tracing out the module's circuitry, I generated the schematic below. You can match the schematic against the block diagram to see how the functional blocks are implemented,14 using relatively simple circuits with one or two transistors per function.

My reverse-engineered schematic of the voice detector module. Expect a few errors. Click for a larger version.

My reverse-engineered schematic of the voice detector module. Expect a few errors. Click for a larger version.

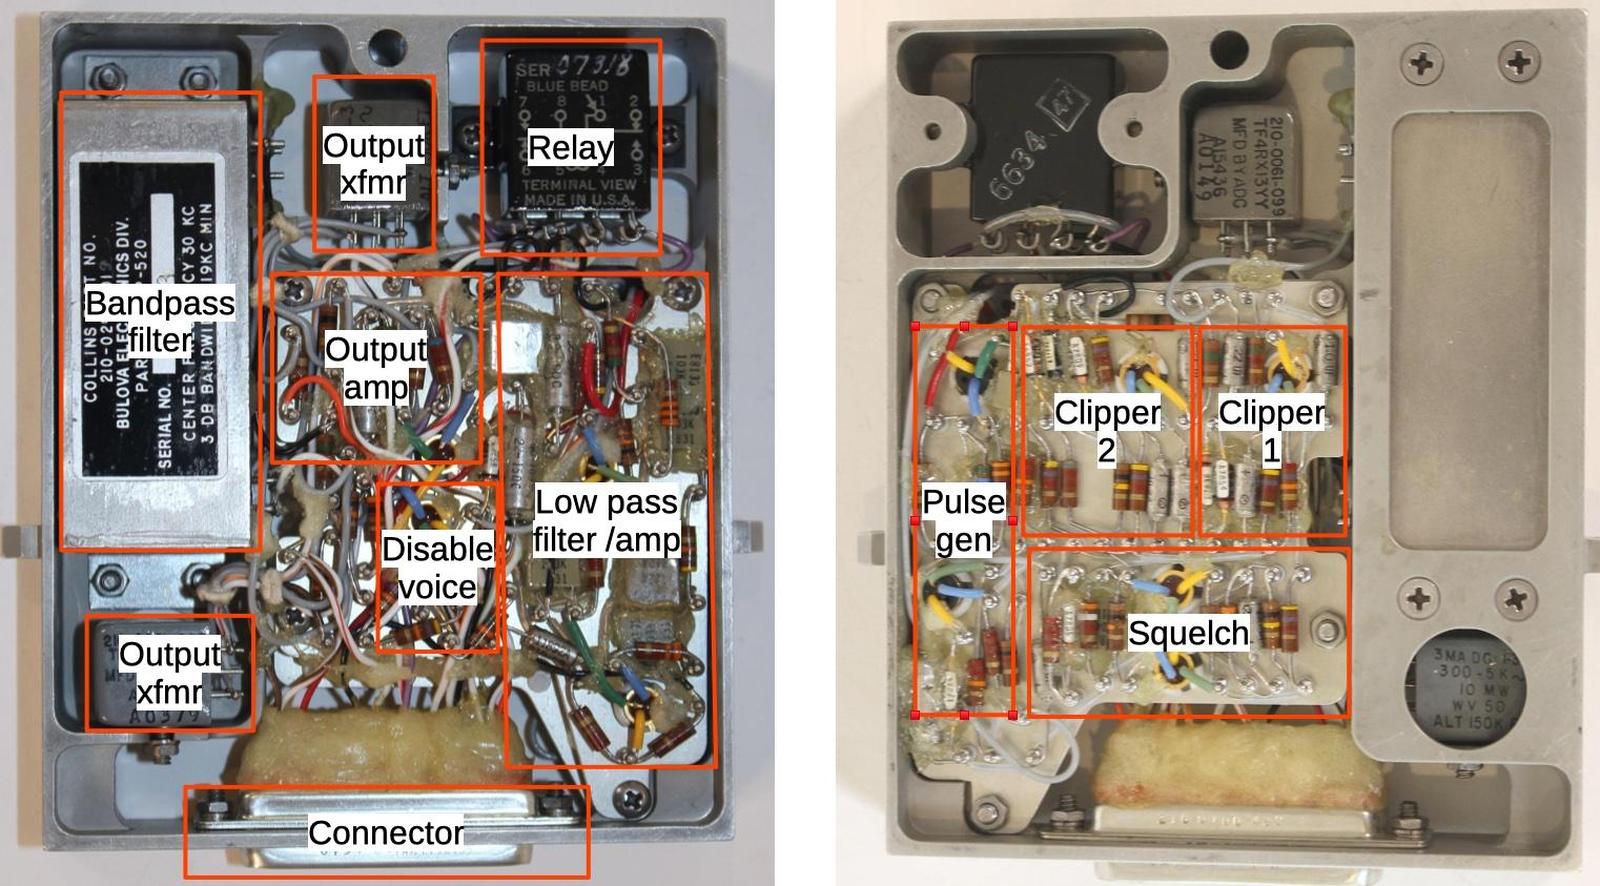
The photos below show how the circuitry maps onto the physical layout of the boards in the voice detector module. Signal processing starts on the right with the FM circuitry (clippers and pulse generator), and the squelch circuit. The low-pass filter and output circuitry is on the left board.

The voice detector with the main functional blocks labeled.

The voice detector with the main functional blocks labeled.

Conclusion

From the outside, the premodulation processor is a mysterious blue box. Opening it up reveals relatively straightforward transistor circuits, implemented with a surprisingly haphazard construction technique.

Although I reverse-engineered this module partly from curiosity, the main motivation was to uncover a pin that was missing from our documentation, specifically the pin to control squelch, missing since squelch was added relatively late in the design. We plan to wire up the premodulation processor, using an elaborate "breakout board" that Eric is designing. We can then use the premodulation processor as it would have operated during a mission, hooking it up to the transponder and giving it radio signals. I announce my latest blog posts on Twitter, so follow me @kenshirriff for updates. I also have an RSS feed.

For an overview of the premodulation processor, see my previous blog post. Also see Curious Marc's video where the premodulation processor is disassembled (below). Thanks to Mike Stewart, Curious Marc, and Eric Schlaepfer for their roles in the premodulation processor investigation. Thanks to Marcel for providing the premodulation processor.

Notes and references

  1. For detailed specifications of the premodulation processor, see Command/Service Module Systems Handbook p73. 

  2. The design standard for the Apollo audio system was 90% word intelligibility for the main links and 70% for the backup links. This standard seems surprisingly poor, with one out of 10 words unintelligible, but achieving this standard was challenging due to the extreme distance to the Moon. For detailed information on the voice communication system, see Apollo Experience Report - Voice Communications Techniques and Performances. It discusses the performance requirements for the Apollo communications system and how the system was designed to achieve the intelligibility requirements. 

  3. Phase modulation (PM) varies the phase of the carrier signal, rather than varying the frequency as in frequency modulation (FM). The techniques are very similar since increasing the phase compresses the waveform, increasing the frequency. Specifically, phase modulation of an input is the same as frequency modulation of the input's derivative. Apollo used phase modulation for the overall signal because it keeps the frequency (mostly) constant so doppler ranging could be used to measure the spacecraft's speed. 

  4. The transponder got its name because it also sent the signals back to Earth after shifting the frequency, so the distance to the spacecraft could be accurately determined; see my discussion here

  5. The data signal from Earth had a third layer of modulation: the binary data was modulated with phase-shift keying at 2 kilohertz to produce an audio signal for transmission. Another box, the Up-Data Link demodulated and decoded this signal after the premodulation processor had demodulated the FM layer. I have another blog post that describes this. 

  6. I'm not covering the data detector in this blog post, but since it's so closely tied to the voice detector, I'll give an overview. Its circuitry is similar to the voice detector, but simpler, since it doesn't have squelch or the relay. It has a similar bandpass filter module, but at 70 kilohertz rather than 30 kilohertz, reflecting the data subcarrier frequency.

    The data detector module.

    The data detector module.


  7. In case anyone is studying the block diagram carefully, I'll explain the labels such as "Q1-6V". This indicates transistors 1 through 6 in the voice module. "Q8D", on the other hand, indicates transistor 8 in the data module. 

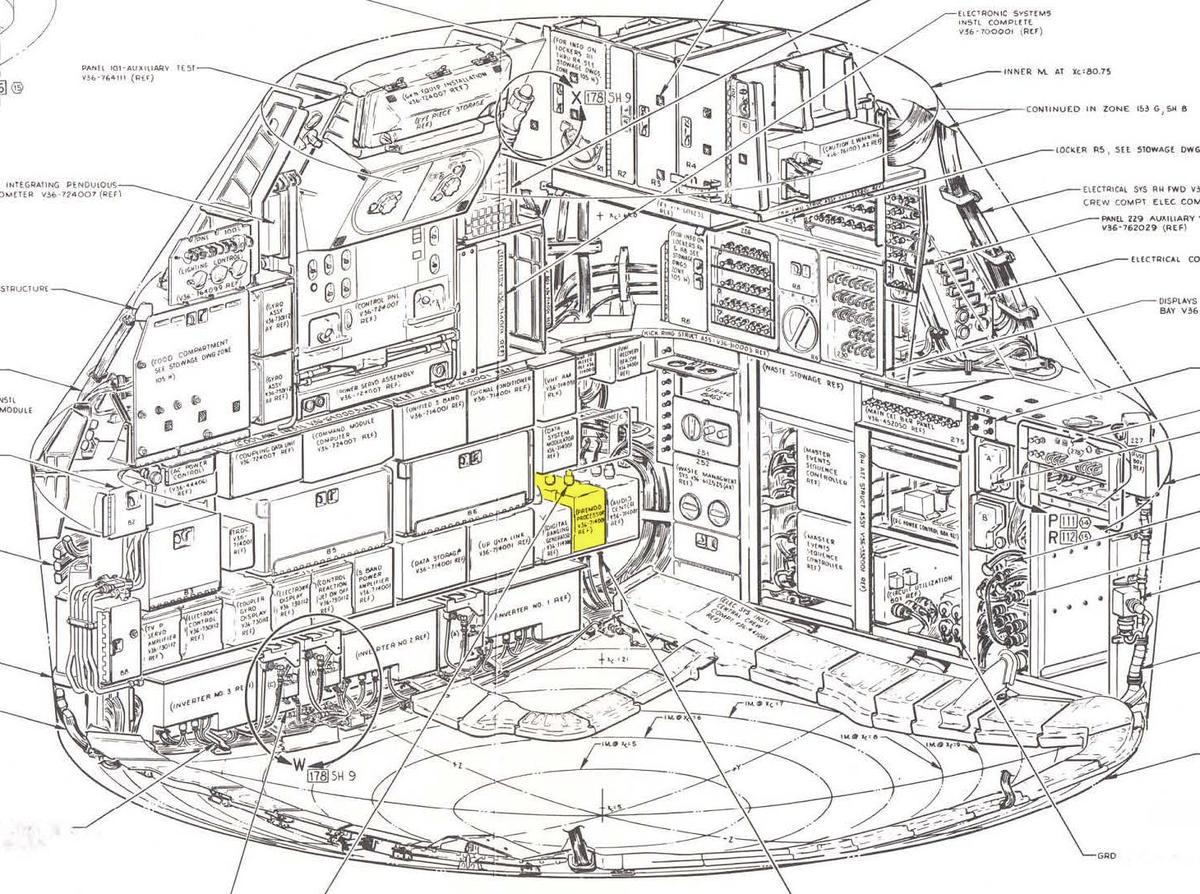
  8. The premodulation processor was one of many boxes of electronic circuitry packed into the spacecraft and linked by thick cables. The diagram below highlights where it was mounted in the lower equipment bay of the Apollo Command Module.

    The premodulation processor was one of many electronic boxes in the Command Module's lower equipment bay. Diagram from Command/Service Module Systems Handbook p212.

    The premodulation processor was one of many electronic boxes in the Command Module's lower equipment bay. Diagram from Command/Service Module Systems Handbook p212.


  9. Various FM detector circuits are described here

  10. The technique of using varying digital pulses to generate an analog signal is similar to the PWM (pulse-width modulation) technique used for analog outputs on the Arduino. The difference is that the Arduino uses pulses with a fixed frequency and varying width, while the FM discriminator uses pulses with a varying frequency and fixed width. 

  11. The clipping process preserves the "zero-crossings", the points where the waveform's voltage crosses zero. This throws away amplitude fluctuations and most of the noise that may be in the signal. 

  12. The idea of backup voice was to provide a voice channel for emergencies that used less power, at the cost of garbling up to 30% of the words. After the explosion, Apollo 13 used the backup voice system so they could turn off the Lunar Module's power amplifier and conserve electrical power. (See Apollo 13 Mission Operations Report pages N-2 and N-7, as well as the transcript.) Backup voice was also used at times during Apollo 16 due to a failure of the Lunar Module's steerable S-band antenna; see Apollo 16 Mission Report page 7-3, which calls this mode "down voice backup". (I should point out that these backup voice incidents involved the Lunar Module, so the Command Module's premodulation processor didn't take part.) 

  13. The relay circuitry was a bit more complicated than I expected. Its main task is to switch between the microphone input and the voice signal. However, it also switches a 50Ω resistor across the transformer if the voice signal is not used, presumably so the impedance remains unchanged and Audio Console level doesn't jump. In other words, the resistor gives the unused voice signal somewhere to go. 

  14. The major difference between the block diagram and my schematic is that the block diagram shows the transformers connected to ground, while I found that they are connected to +18V.