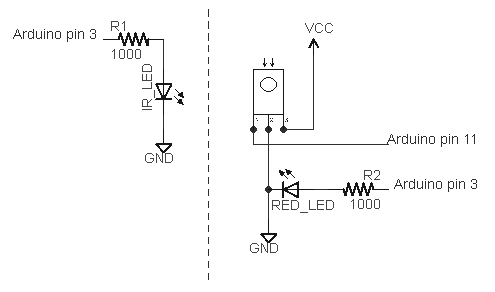
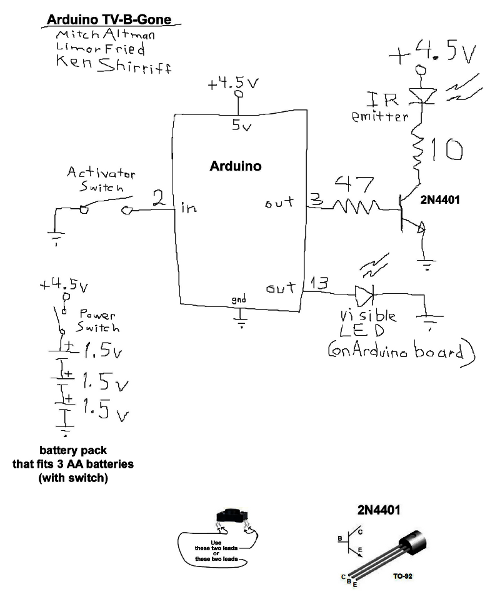
 I've extended my Arduino IRremote library to support RC6 codes up to 64 bits long. Now your Arduino can control your Xbox by acting as an IR remote control. (The previous version of my library only supported 32 bit codes, so it didn't work with the 36-bit Xbox codes.) Details of the IRremote library are here.
Note: I don't actually have an Xbox to test this code with, so please let me know if the code works for you.
Download
This code is in my "experimental" branch since I'd like to get some testing before releasing it to the world. To use it:- Download the IRremote library zip file from GitHub from the Arduino-IRremote experimental branch.
- Unzip the download
- Move/rename the shirriff-Arduino-IRremote-nnnn directory to arduino-000nn/libraries/IRremote.
Sending an Xbox code
The following program simply turns the Xbox on, waits 10 seconds, turns it off, and repeats.
#include <IRremote.h>
IRsend irsend;
unsigned long long OnOff = 0xc800f740cLL;
int toggle = 0;

void sendOnOff() {
  if (toggle == 0) {
    irsend.sendRC6(OnOff, 36);
  } else {
    irsend.sendRC6(OnOff ^ 0x8000, 36);
  }
  toggle = 1 - toggle;
}

void setup() {}

void loop() {
  delay(10000);  // Wait 10 seconds
  sendOnOff();  // Send power signal
}
The first important thing to note is that the On/Off code is "unsigned long long", and the associated constant ends in "LL" to indicate that it is a long long. Because a regular long is only 32 bits, a 64-bit long long must be used to hold the 64 bit code. If you try using a regular long, you'll lose the top 4 bits ("C") from the code.
The second thing to notice is the toggle bit (which is explained in more detail below). Every time you send a RC5 or RC6 code, you must flip the toggle bit. Otherwise the receiver will ignore the code. If you want to send the code multiple times for reliability, don't flip the toggle bit until you're done.
Receiving an Xbox code
The following code will print a message on the serial console if it receives an Xbox power code. It will also dump the received value.
#include <IRremote.h>

int RECV_PIN = 11;
IRrecv irrecv(RECV_PIN);
decode_results results;

void setup()
{
  Serial.begin(9600);
  irrecv.enableIRIn(); // Start the receiver
}

void loop() {
  if (irrecv.decode(&results)) {
    if ((results.value & ~0x8000LL) == 0xc800f740cLL) {
      Serial.println("Got an OnOff code");
    }
    Serial.println(results.value >> 32, HEX);
    Serial.println(results.value, HEX);
    irrecv.resume(); // Receive the next value
  }
}
Two things to note in the above code. First, the received value is anded with ~0x8000LL; this clears out the toggle bit. Second, Serial.println is called twice, first to print the top 32 bits, and second to print the bottom 32 bits.
The output when sent power codes multiple times is:
Got an OnOff code
C
800FF40C
Got an OnOff code
C
800F740C
Got an OnOff code
C
...
Note that the received value is split between the two Serial.println calls. Also note that the output oscillates between ...F740C and ...FF40C as the sender flips the toggle bit. This is why the toggle bit must be cleared when looking for a particular value.
The IRremote/IRrecvDump example code has also been extended to display values up to 64 bits, and can be used for testing.
A quick description of RC6 codes
RC6 codes are somewhat more complicated than the usual IR code. They come in 20 or 36 bit varieties (that I know of). The code consists of a leader pulse, a start bit, and then the 20 (or 36) data bits. A 0 bit is sent as a space (off) followed by a mark (on), while a 1 bit is sent as a mark (on) followed by a space (off).The first complication is the fourth data bit sent (called a trailer bit for some reason), is twice as long as the rest of the bits. The IRremote library handles this transparently.
The second complication is RC5 and RC6 codes use a "toggle bit" to distinguish between a button that is held down and a button that is pressed twice. While a button is held down, a code is sent. When the button is released and pressed a second time, a new code with one bit flipped is sent. On the third press, the original code is sent. When sending with the IRremote library, you must keep track of the toggle bit and flip it each time you send. When receiving with the IRremote library, you will receive one of two different codes, so you must clear out the toggle bit. (I would like the library to handle this transparently, but I haven't figured out a good way to do it.)
For details of the RC6 encoding with diagrams and timings, see SB projects.
The LIRC database
The LIRC project collects IR codes for many different remotes. If you want to use RC6 codes from LIRC, there a few things to know. A typical code is the Xbox360 file, excerpted below:
begin remote
  name  Microsoft_Xbox360
  bits           16
  flags RC6|CONST_LENGTH
  pre_data_bits   21
  pre_data       0x37FF0
  toggle_bit_mask 0x8000
  rc6_mask    0x100000000

      begin codes
          OpenClose                0x8BD7
          XboxFancyButton          0x0B9B
          OnOff                    0x8BF3
...
To use these RC6 code with the Arduino takes a bit of work. First, the codes have been split into 21 bits of pre-data, followed by 16 bits of data. So if you want the OnOff code, you need to concatenate the bits together, to get 37 bits: 0x37ff08bf3. The second factor is the Arduino library provides the first start bit automatically, so you only need to use 36 bits. The third issue is the LIRC files inconveniently have 0 and 1 bits swapped, so you'll need to invert the code. The result is the 36-bit code 0xc800f740c that can be used with the IRremote library.
The rc6_mask specifies which bit is the double-wide "trailer" bit, which is the fourth bit sent (both in 20 and 36 bit RC6 codes). The library handles this bit automatically, so you can ignore it.
The toggle_bit_mask is important, as it indicates which position needs to be toggled every other transmission. For example, to transmit OnOff you will send 0xc800f740c the first time, but the next time you will need to transmit 0xc800ff40c.
More details of the LIRC config file format are at WinLIRC.
Xbox codes
Based on the LIRC file, the following Xbox codes should work with my library:| OpenClose | 0xc800f7428 | XboxFancyButton | 0xc800ff464 | OnOff | 0xc800f740c |
| Stop | 0xc800ff419 | Pause | 0xc800f7418 | Rewind | 0xc800ff415 |
| FastForward | 0xc800f7414 | Prev | 0xc800ff41b | Next | 0xc800f741a |
| Play | 0xc800ff416 | Display | 0xc800f744f | Title | 0xc800ff451 |
| DVD_Menu | 0xc800f7424 | Back | 0xc800ff423 | Info | 0xc800f740f |
| UpArrow | 0xc800ff41e | LeftArrow | 0xc800f7420 | RightArrow | 0xc800ff421 |
| DownArrow | 0xc800f741f | OK | 0xc800ff422 | Y | 0xc800f7426 |
| X | 0xc800ff468 | A | 0xc800f7466 | B | 0xc800ff425 |
| ChUp | 0xc800f7412 | ChDown | 0xc800ff413 | VolDown | 0xc800ff411 |
| VolUp | 0xc800ff410 | Mute | 0xc800ff40e | Start | 0xc800ff40d |
| Play | 0xc800f7416 | Enter | 0xc800ff40b | Record | 0xc800f7417 |
| Clear | 0xc800ff40a | 0 | 0xc800f7400 | 1 | 0xc800f7401 |
| 2 | 0xc800ff402 | 3 | 0xc800f7403 | 4 | 0xc800ff404 |
| 5 | 0xc800f7405 | 6 | 0xc800ff406 | 7 | 0xc800f7407 |
| 8 | 0xc800ff408 | 9 | 0xc800f7409 | 100 | 0xc800ff41d |
| Reload | 0xc800f741c |
Key points for debugging
The following are the main things to remember when dealing with 36-bit RC6 codes:- Any 36-bit hex values must start with "0x" and end with "LL". If you get the error "integer constant is too large for 'long' type", you probably forgot the LL.
- You must use "long long" or "unsigned long long" to hold 36-bit values.
- Serial.print will not properly print 36-bit values; it will only print the lower 32 bits.
- You must flip the toggle bit every other time when you send a RC6 code, or the receiver will ignore your code.
- You will receive two different values for each button depending if the sender has flipped the toggle bit or not.
 You can use an IR remote to control your computer's keyboard and mouse by using my Arduino
  Thanks to Paul Stoffregen of
  I wrote an IR remote library for the Arduino (