Showing posts sorted by date for query 555 timer. Sort by relevance Show all posts

Silicon die teardown: a look inside an early 555 timer chip

If you've played around with electronic circuits, you probably know the 555 timer integrated circuit,1 said to be the world's best-selling integrated circuit with billions sold. Designed by analog IC wizard Hans Camenzind2, the 555 has been called one of the greatest chips of all time.

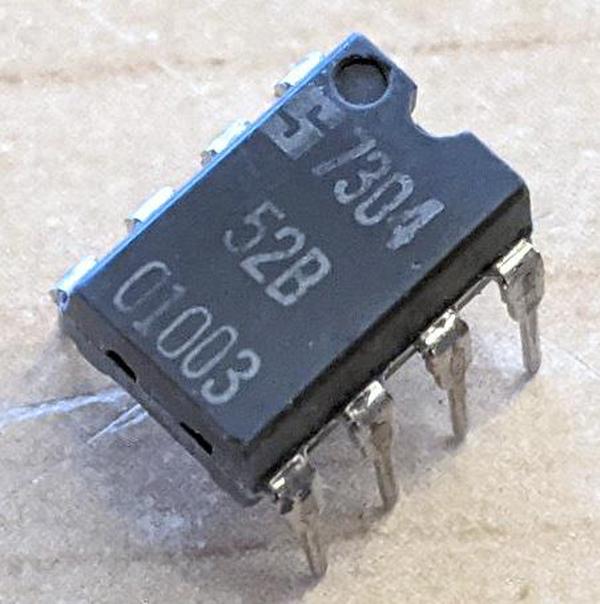
An 8-pin 555 timer with a Signetics logo. It doesn't have a 555 label, but instead is labeled "52B 01003" with a 7304 date code, indicating week 4 of 1973. Photo courtesy of Eric Schlaepfer.

An 8-pin 555 timer with a Signetics logo. It doesn't have a 555 label, but instead is labeled "52B 01003" with a 7304 date code, indicating week 4 of 1973. Photo courtesy of Eric Schlaepfer.

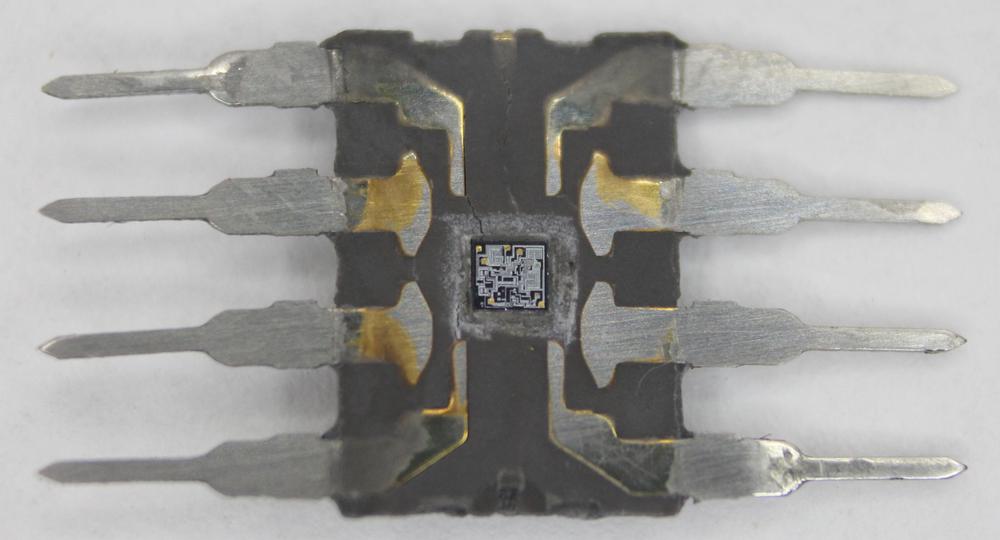
Eric Schlaepfer (@TubeTimeUS) recently came across the chip above, with a mysterious part number. He tediously sanded through the epoxy package to reveal the die (below) and determined that the chip is a 555 timer. Signetics released the 555 timer in mid-1972 4 and the chip below has a January 1973 date code (7304), so it must be one of the first 555 timers. Curiously, it is not labeled 555, so perhaps it is a prototype or internal version.3 I took detailed die photos, which I discuss in this blog post.

The 555 timer with the package sanded down to expose the silicon die, the tiny square in the middle.

The 555 timer with the package sanded down to expose the silicon die, the tiny square in the middle.

A brief explanation of the 555 timer

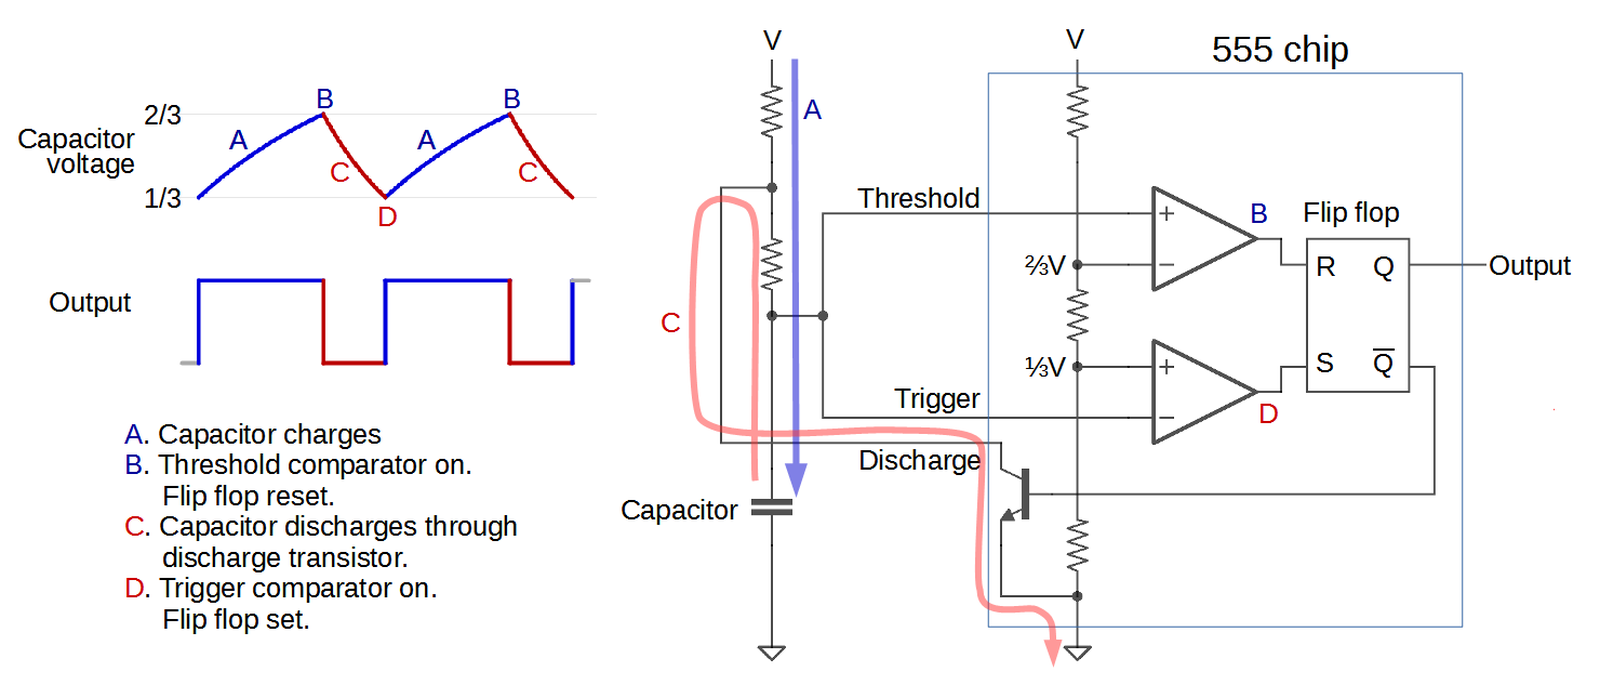
The 555 timer has hundreds of applications, operating as anything from a timer or latch to a voltage-controlled oscillator or modulator. The diagram below illustrates how the 555 timer operates as a simple oscillator. Inside the 555 chip, three resistors form a divider generating references voltages of 1/3 and 2/3 of the supply voltage. The external capacitor will charge and discharge between these limits, producing an oscillation. In more detail, the capacitor will slowly charge (A) through the external resistors until its voltage hits the 2/3 reference. At that point (B), the upper (threshold) comparator switches the flip flop off and the output off. This turns on the discharge transistor, slowly discharging the capacitor (C). When the voltage on the capacitor hits the 1/3 reference (D), the lower (trigger) comparator turns on, setting the flip flop and the output, and the cycle repeats. The values of the resistors and capacitor control the timing, from microseconds to hours.5

Diagram showing how the 555 timer can operate as an oscillator. The external capacitor charges and discharges through the external resistors, under the control of the 555 timer.

Diagram showing how the 555 timer can operate as an oscillator. The external capacitor charges and discharges through the external resistors, under the control of the 555 timer.

To summarize, the key components of the 555 timer are the comparators to detect the upper and lower voltage limits, the three-resistor divider to set these limits, and the flip flop to keep track of whether the circuit is charging or discharging. The 555 timer has two other pins (reset and control voltage) that I haven't covered above; they can be used for more complex circuits.

The structure of the integrated circuit

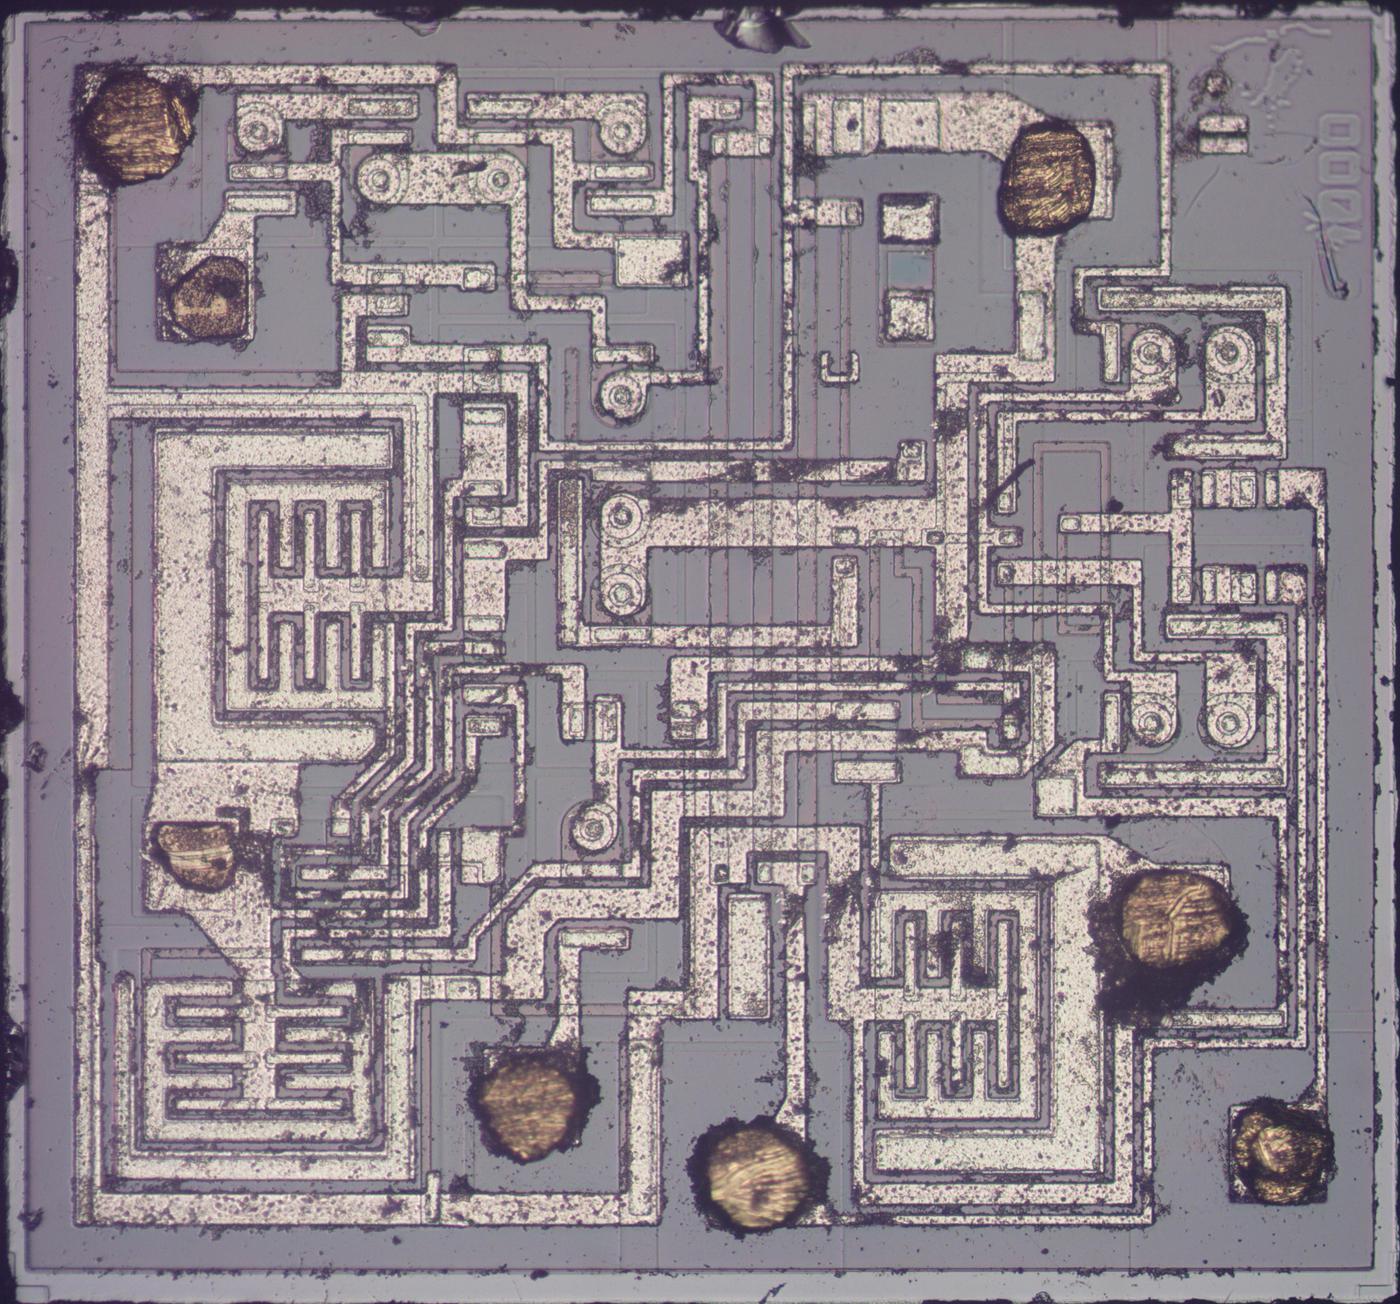
I created the photo below from a composite of microscope images. On top of the silicon, a thin layer of metal connects different parts of the chip. This metal is clearly visible in the photo as light-colored traces. Under the metal, a thin, glassy silicon dioxide layer provides insulation between the metal and the silicon, except where contact holes in the silicon dioxide allow the metal to connect to the silicon. At the edge of the chip, thin wires connect the metal pads to the chip's external pins.

Die photo of the 555 timer. Click this image (or any other) for a larger version.

Die photo of the 555 timer. Click this image (or any other) for a larger version.

The different types of silicon on the chip are harder to see. Regions of the chip are treated (doped) with impurities to change the electrical properties of the silicon. N-type silicon has an excess of electrons (negative), while P-type silicon lacks electrons (positive). In the photo, these regions show up as a slightly different color surrounded by a thin black border. These regions are the building blocks of the chip, forming transistors and resistors.

NPN transistors inside the IC

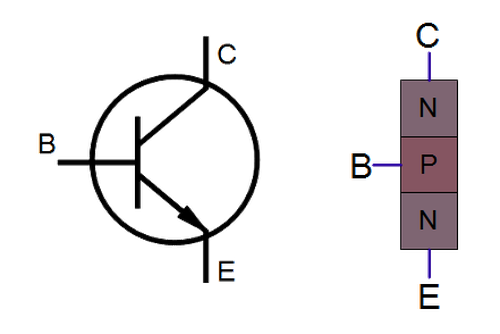
Transistors are the key components in a chip. The 555 timer uses NPN and PNP bipolar transistors. If you've studied electronics, you've probably seen a diagram of an NPN transistor like the one below, showing the collector (C), base (B), and emitter (E) of the transistor, The transistor is illustrated as a sandwich of P silicon in between two symmetric layers of N silicon; the N-P-N layers make an NPN transistor. It turns out that transistors on a chip look nothing like this, and the base often isn't even in the middle!

Schematic symbol for an NPN transistor, along with an oversimplified diagram of its internal structure.

Schematic symbol for an NPN transistor, along with an oversimplified diagram of its internal structure.

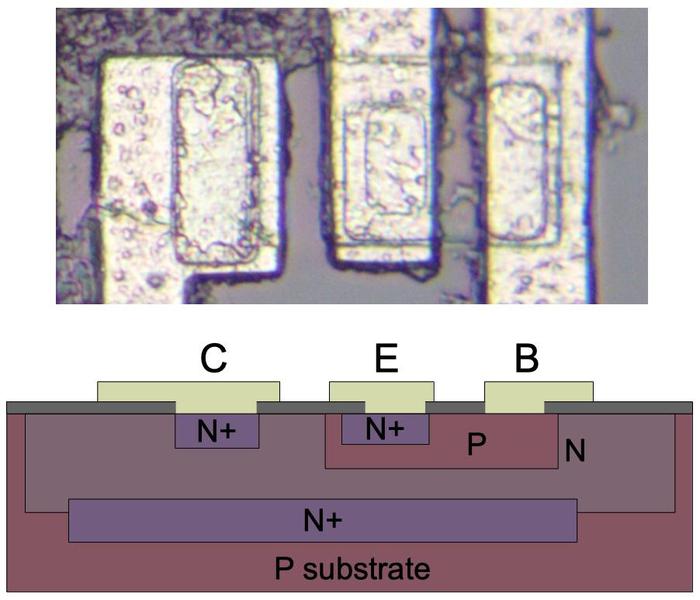
The photo below shows a closeup of one of the transistors in the 555 as it appears on the chip. The slightly different tints in the silicon indicate regions that have been doped to form N and P regions. The whitish areas are the metal layer of the chip on top of the silicon - these form the wires connecting to the collector, emitter, and base.

Structure of an NPN transistor on the die.

Structure of an NPN transistor on the die.

Underneath the photo is a cross-section drawing illustrating how the transistor is constructed. There's a lot more than just the N-P-N sandwich you see in books, but if you look carefully at the vertical cross-section below the 'E', you can find the N-P-N that forms the transistor. The emitter (E) wire is connected to N+ silicon. Below that is a P layer connected to the base contact (B). And below that is an N+ layer connected (indirectly) to the collector (C).6 The transistor is surrounded by a P+ ring that isolates it from neighboring components.

PNP transistors inside the IC

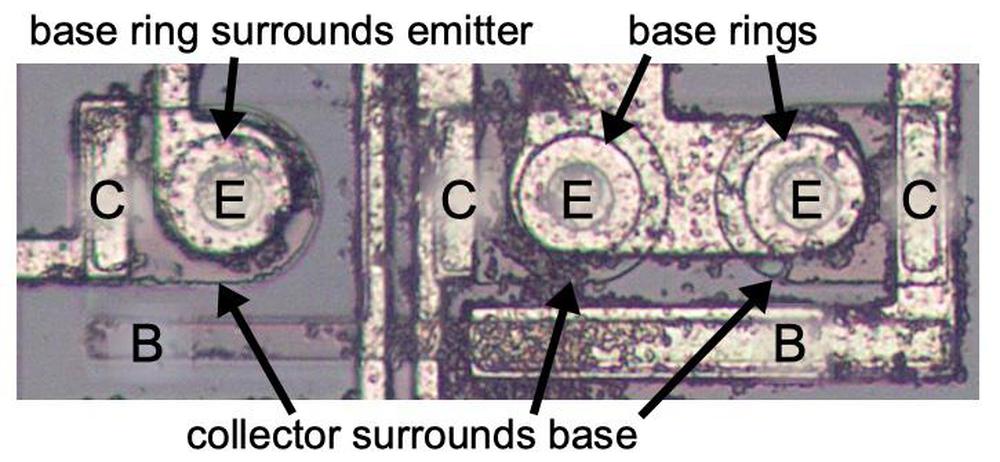
You might expect PNP transistors to be similar to NPN transistors, just swapping the roles of N and P silicon. But for a variety of reasons, PNP transistors have an entirely different construction. They consist of a small circular emitter (P), surrounded by a ring-shaped base (N), which is surrounded by the collector (P). This forms a P-N-P sandwich horizontally (laterally), unlike the vertical structure of the NPN transistors.

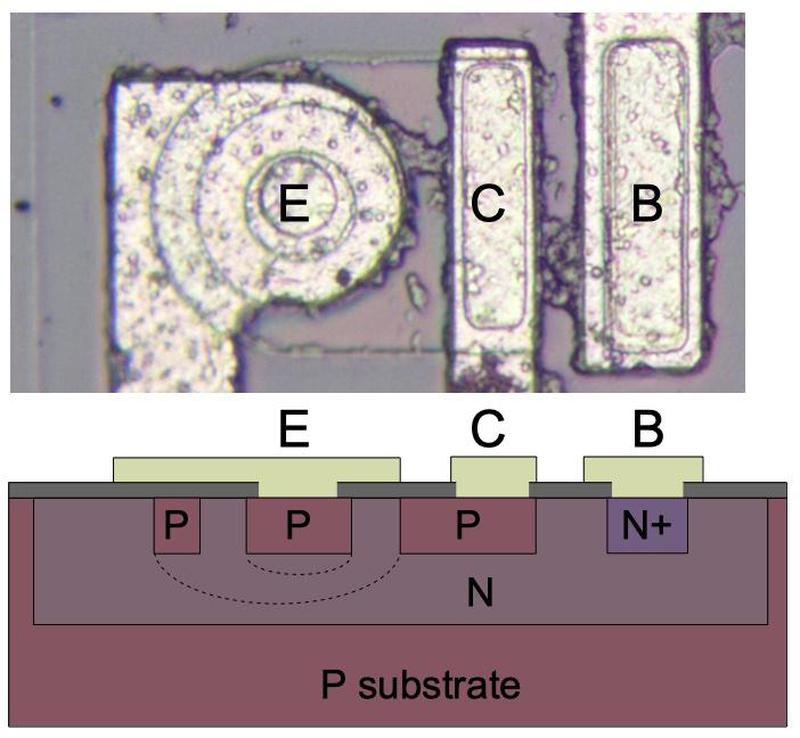
The diagram below shows one of the PNP transistors in the 555, along with a cross-section showing the silicon structure. Note that although the metal contact for the base is on the edge of the transistor, it is electrically connected through the N and N+ regions to its active ring in between the collector and emitter.

A PNP transistor in the 555 timer chip. Connections for the collector (C), emitter (E) and base (B) are labeled, along with N and P doped silicon. The base forms a ring around the emitter, and the collector forms a ring around the base.

A PNP transistor in the 555 timer chip. Connections for the collector (C), emitter (E) and base (B) are labeled, along with N and P doped silicon. The base forms a ring around the emitter, and the collector forms a ring around the base.

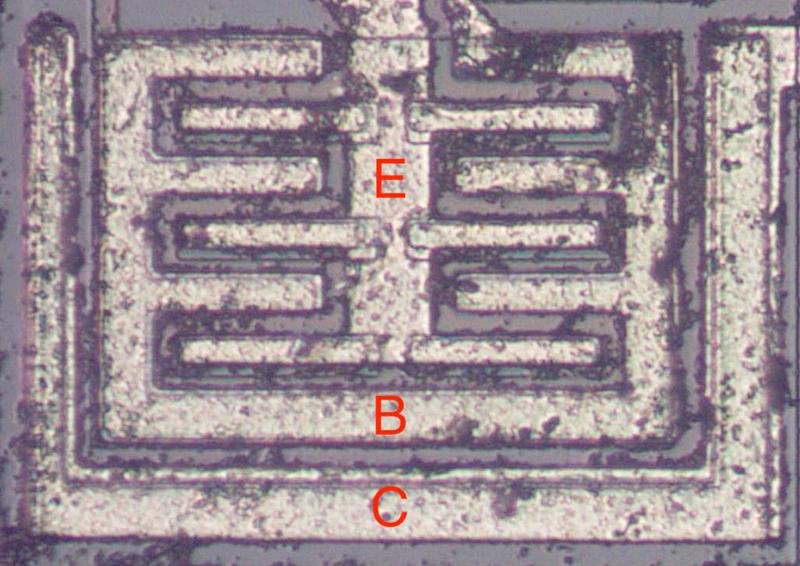
The output transistors in the 555 are much larger than the other transistors and have a different structure in order to produce the high-current output. The photo below shows one of the output transistors. Note the multiple interlocking "fingers" of the emitter and base, surrounded by the large collector.

A large, high-current NPN output transistor in the 555 timer chip. The collector (C), base (B) and emitter (E) are labeled.

A large, high-current NPN output transistor in the 555 timer chip. The collector (C), base (B) and emitter (E) are labeled.

How resistors are implemented in silicon

Resistors are a key component of analog chips. Unfortunately, resistors in ICs are large and inaccurate; the resistances can vary by 50% from chip to chip. Thus, analog ICs are designed so only the ratio of resistors matters, not the absolute values, since the ratios remain nearly constant.

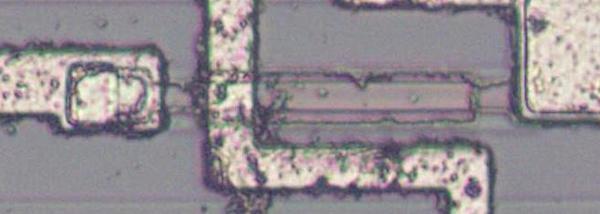
A resistor inside the 555 timer. The resistor is a strip of P silicon between two metal contacts.

A resistor inside the 555 timer. The resistor is a strip of P silicon between two metal contacts.

The photo above shows a 10KΩ resistor in the 555, formed from a strip of P silicon (pinkish gray), contacting metal wiring at either end. Other metal wires cross the resistor. The resistor has a spiral shape to fit its length in the available space. The resistor below is a 100KΩ pinch resistor. A layer of N silicon on top of the pinch resistor makes the conductive region much thinner (i.e. pinches it), forming a much higher but less accurate resistance.

A pinch resistor inside the 555 timer. The resistor is a strip of P silicon between two metal contacts. An N layer on top pinches the resistor and increases the resistance. This resistor is crossed by a vertical metal line.

A pinch resistor inside the 555 timer. The resistor is a strip of P silicon between two metal contacts. An N layer on top pinches the resistor and increases the resistance. This resistor is crossed by a vertical metal line.

IC component: The current mirror

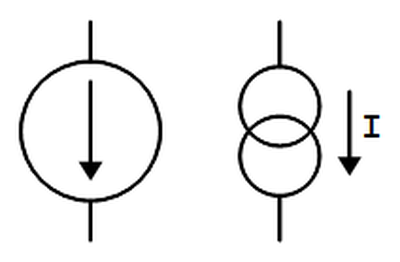
There are some subcircuits that are very common in analog ICs, but may seem mysterious at first. The current mirror is one of these. If you've looked at analog IC block diagrams, you may have seen the symbols below, indicating a current source, and wondered what a current source is and why you'd use one. The idea is you start with one known current and then you can "clone" multiple copies of the current with a simple transistor circuit, the current mirror.

Schematic symbols for a current source.

Schematic symbols for a current source.

The following circuit shows how a current mirror is implemented with two identical transistors.7 A reference current passes through the transistor on the right. (In this case, the current is set by the resistor.) Since both transistors have the same emitter voltage and base voltage, they source the same current, so the current on the right matches the reference current on the left.8

Current mirror circuit. The current on the right copies the current on the left.

Current mirror circuit. The current on the right copies the current on the left.

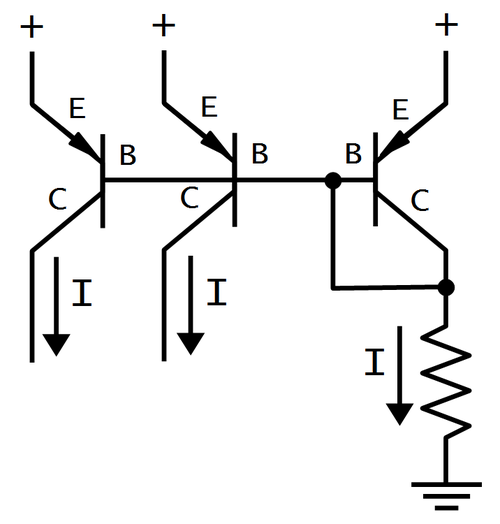
A common use of a current mirror is to replace resistors. As explained earlier, resistors inside ICs are both inconveniently large and inaccurate. It saves space to use a current mirror instead of a resistor whenever possible. Also, the currents produced by a current mirror are nearly identical, unlike the currents produced by two resistors.

Three transistors form a current mirror in the 555 timer chip. They all share the same base and two transistors share emitters.

Three transistors form a current mirror in the 555 timer chip. They all share the same base and two transistors share emitters.

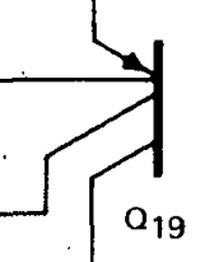
The three transistors above form a current mirror with two outputs. Note the three transistors share the base connection, tied to the collector on the right, and the emitters on the right are tied together. On the schematic, the two transistors on the right are drawn as a single two-collector transistor, Q19.

IC component: The differential pair

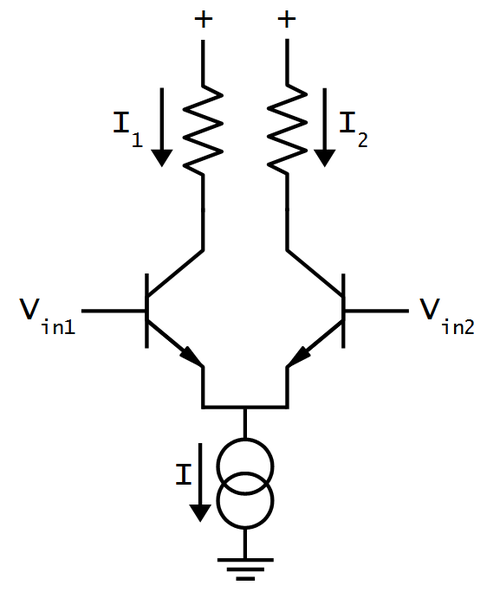
The second important circuit to understand is the differential pair, the most common two-transistor subcircuit used in analog ICs. 9 You may have wondered how a comparator compares two voltages, or an op amp subtracts two voltages. This is the job of the differential pair.

Schematic of a simple differential pair circuit. The current source sends a fixed current I through the differential pair. If the two inputs are equal, the current is split equally.

Schematic of a simple differential pair circuit. The current source sends a fixed current I through the differential pair. If the two inputs are equal, the current is split equally.

The schematic above shows a simple differential pair. The current source at the bottom provides a fixed current I, which is split between the two input transistors. If the input voltages are equal, the current will be split equally into the two branches (I1 and I2). If one of the input voltages is a bit higher than the other, the corresponding transistor will conduct exponentially more current, so one branch gets more current and the other branch gets less. A small input difference is enough to direct most of the current into the "winning" branch, flipping the comparator on or off. The 555 chip uses one differential pair for the threshold comparator and another for the trigger comparator.10

The 555 schematic interactive explorer

The 555 die photo and schematic11 below are interactive. Click on a component in the die or schematic, and a brief explanation of the component will be displayed. (For a thorough discussion of how the 555 timer works, see 555 Principles of Operation.)

For a quick overview, the large output transistors and discharge transistor are the most obvious features on the die. The threshold comparator consists of Q1 through Q8. The trigger comparator consists of Q10 through Q13, along with current mirror Q9. Q16 and Q17 form the flip flop. The three 5KΩ resistors forming the voltage divider are in the middle of the chip.12 Urban legend says that the 555 is named after these three 5K resistors, but according to its designer 555 is just an arbitrary number in the 500 chip series.

Click the die or schematic for details...

Conclusion

I hope you've found this look inside the 555 timer chip interesting. Next time you're building a 555 project, you'll know exactly what's inside the chip. I've written about the 555 timer before; this post is pretty much the same as that one but with a different die. I've also written about a CMOS version. Thanks to Eric Schlaepfer13 for providing the die; see his Twitter thread for background on this chip.

I announce my latest blog posts on Twitter, so follow me @kenshirriff and you won't miss an article! I also have an RSS feed.

Notes and references

  1. The 555 timer is iconic enough to appear on mugs, bags, caps and t-shirts. Whole books are devoted to 555 timer circuits

  2. The book Designing Analog Chips written by the 555's inventor Hans Camenzind is really interesting, and I recommend it if you want to know how analog chips work. Chapter 11 has an extensive discussion of the 555's history and operation. Page 11-3 claims the 555 has been the best-selling IC every year, although I don't know if that is still true. The free PDF is here or get the book

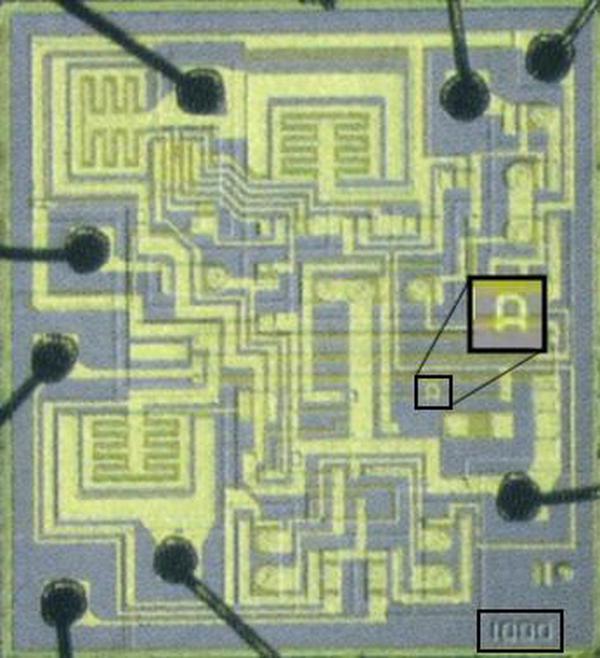
  3. The die has the part number 1000 and revision "C", so this probably corresponds to the 01003 number on the package. I suspect this chip is the third mask revision of the original 555.

    The first 555 die with the part number "1000" highlighted and the revision "A" magnified.

    The first 555 die with the part number "1000" highlighted and the revision "A" magnified.

    The die of the first 555 timer version (above) is marked with the number "1000" and revision "A". I compared this image with the die photo that I took and I couldn't see any differences except the revision changed to "C". The mask changes must have been fairly subtle. (This image is at Wikipedia and IEEE Spectrum. The image is captioned as the die shot of the first 555 timer IC manufactured in 1971.) 

  4. The 555 chip was introduced in mid-1972 according to Signetics Analog Applications page 149. 

  5. The brilliant part of the 555 timer is that the oscillation frequency depends only on the external resistors and capacitor and is insensitive to the supply voltage. If the supply voltage drops, the 1/3 and 2/3 references drop too, so you might expect the oscillations to be faster. But the lower voltage charges the capacitor more slowly, canceling this out and keeping the frequency constant.

    This voltage insensitivity is so tricky that the chip's designer didn't figure it out until near the end of the 555's design, but it made a big difference. The original design was more complex and required nine pins, which is a terrible size for an IC since there are no packages between 8 and 14 pins. The final, simpler 555 design worked with 8 pins, making the chip's packaging much cheaper. (See page 11-3 of Designing Analog Chips for the full story.) 

  6. You might have wondered why there is a distinction between the collector and emitter of a transistor, when the typical diagram of a transistor is symmetrical. As you can see from the die photo, the collector and emitter are very different in a real transistor. In addition to the very large size difference, the silicon doping is different. The result is a transistor will have poor gain if the collector and emitter are swapped. 

  7. For more information about current mirrors, check wikipedia, any analog IC book, or chapter 3 of Designing Analog Chips

  8. The schematic has the unusual symbol below, which indicates a transistor with two collectors. The base is drawn on the same side as the emitter and collectors, which adds to the confusion. On the die, this transistor is implemented with two separate transistors, with the emitters and the bases wired together. Other circuits sometimes use a single transistor that has two physical collectors present.

    This symbol indicates a transistor with two collectors.

    This symbol indicates a transistor with two collectors.


  9. Differential pairs are also called long-tailed pairs. According to Analysis and Design of Analog Integrated Circuits the differential pair is "perhaps the most widely used two-transistor subcircuits in monolithic analog circuits." (p214) For more information about differential pairs, see wikipedia, any analog IC book, or chapter 4 of Designing Analog Chips

  10. In the 555, the threshold comparator uses NPN transistors, while the trigger comparator uses PNP transistors. This allows the threshold comparator to work near the supply voltage and the trigger comparator to work near ground. The 555's comparators also use two transistors on each input (Darlington pair) to buffer the inputs. 

  11. The 555 schematic used in this article is from the Philips datasheet. It is identical to the Signetics schematic p150. 

  12. Note that the three resistors for the voltage divider are parallel and next to each other. This helps ensure they have the same resistance even if there are electrical variations across the silicon. 

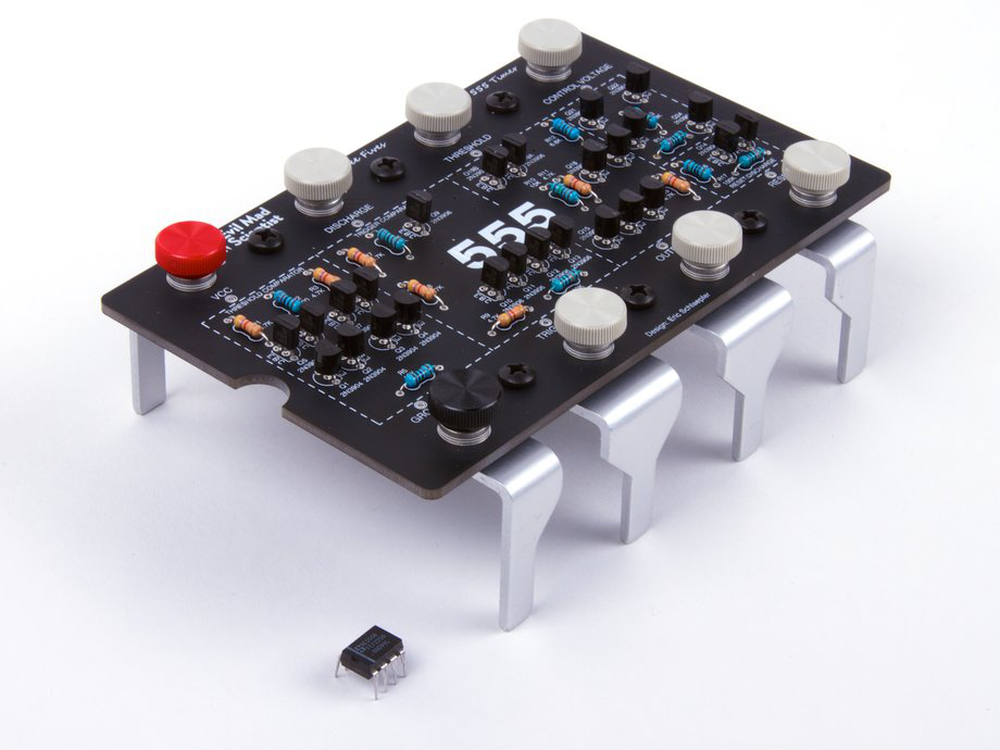
  13. Evil Mad Scientist sells a very cool discrete 555 timer kit, duplicating the 555 circuit on a larger scale with individual transistors and resistors — it actually works as a 555 replacement. Their 555 footstool is also worth a look.

    Large-size 555 timer created by Evil Mad Scientist Lab.
    Large-size 555 timer created by Evil Mad Scientist Lab.
     

Reverse-engineering a vintage power supply chip from die photos

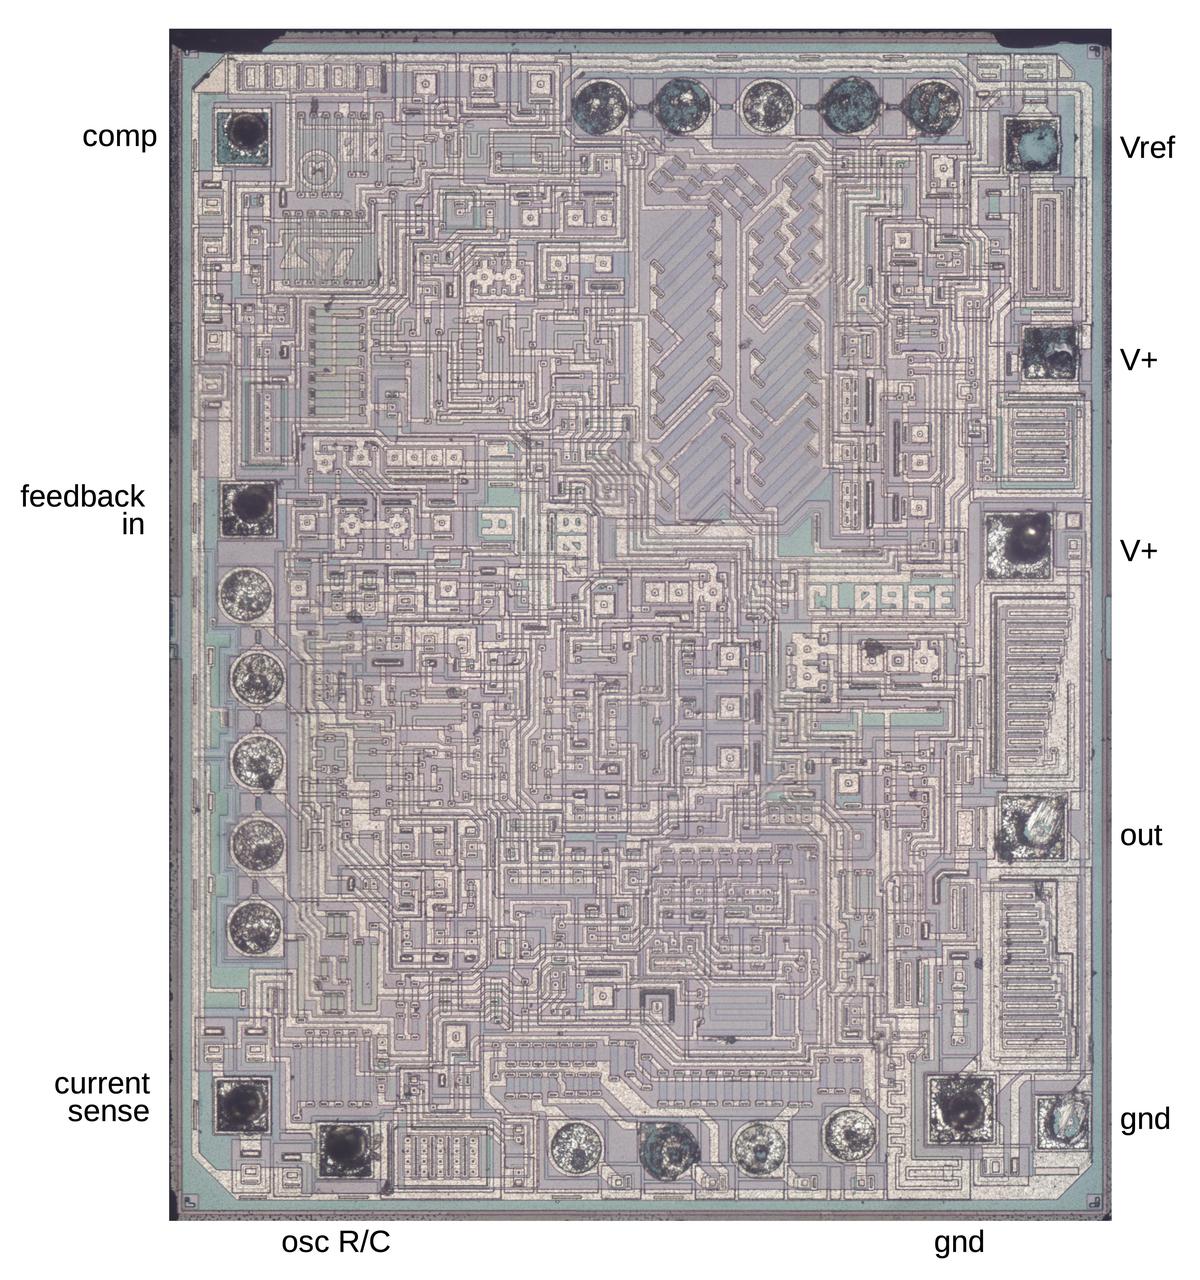
I recently did a PC power supply teardown so I figured it would be interesting to go deeper and see what happens inside the power supply's control IC. The die photo below shows the UC3842 chip, which was very popular in older PC power supplies.1 (The chip was introduced in 1984 but this die has a date of 2000.) The tiny silicon die is patterned to create the transistors, resistors and capacitors that make up the circuit. The lighter-colored lines are the metal layer on top of the silicon, forming the chip's wiring. Around the edges, square pads provide the connections from the die to the IC's external pins; tiny bond wires connect the pads to the chip's external pins.
The UC3842 die. Around the outside, the pins are labeled. (Click this image, or any other, for a larger version.)

The UC3842 die. Around the outside, the pins are labeled. (Click this image, or any other, for a larger version.)

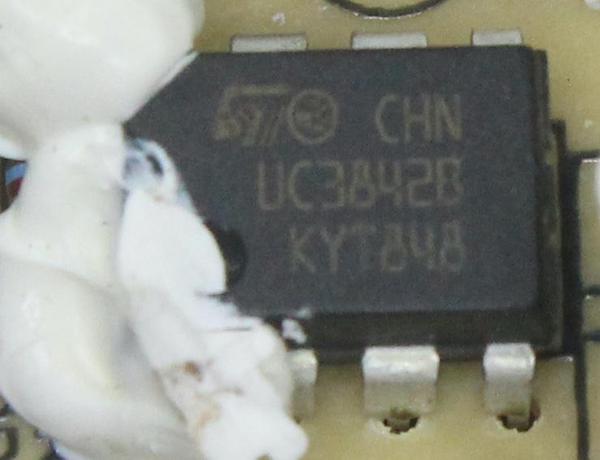
The photo below shows the chip mounted on the power supply board. For the die photos, I extracted the die from the epoxy package by heating it and then cleaned up the die with a few drops of sulfuric acid. I took photos with a microscope and stitched them together to create a high-resolution image.

The UC3842 chip mounted on the power supply's circuit board. The white glob is silicone, which held many of the power supply components in place.

The UC3842 chip mounted on the power supply's circuit board. The white glob is silicone, which held many of the power supply components in place.

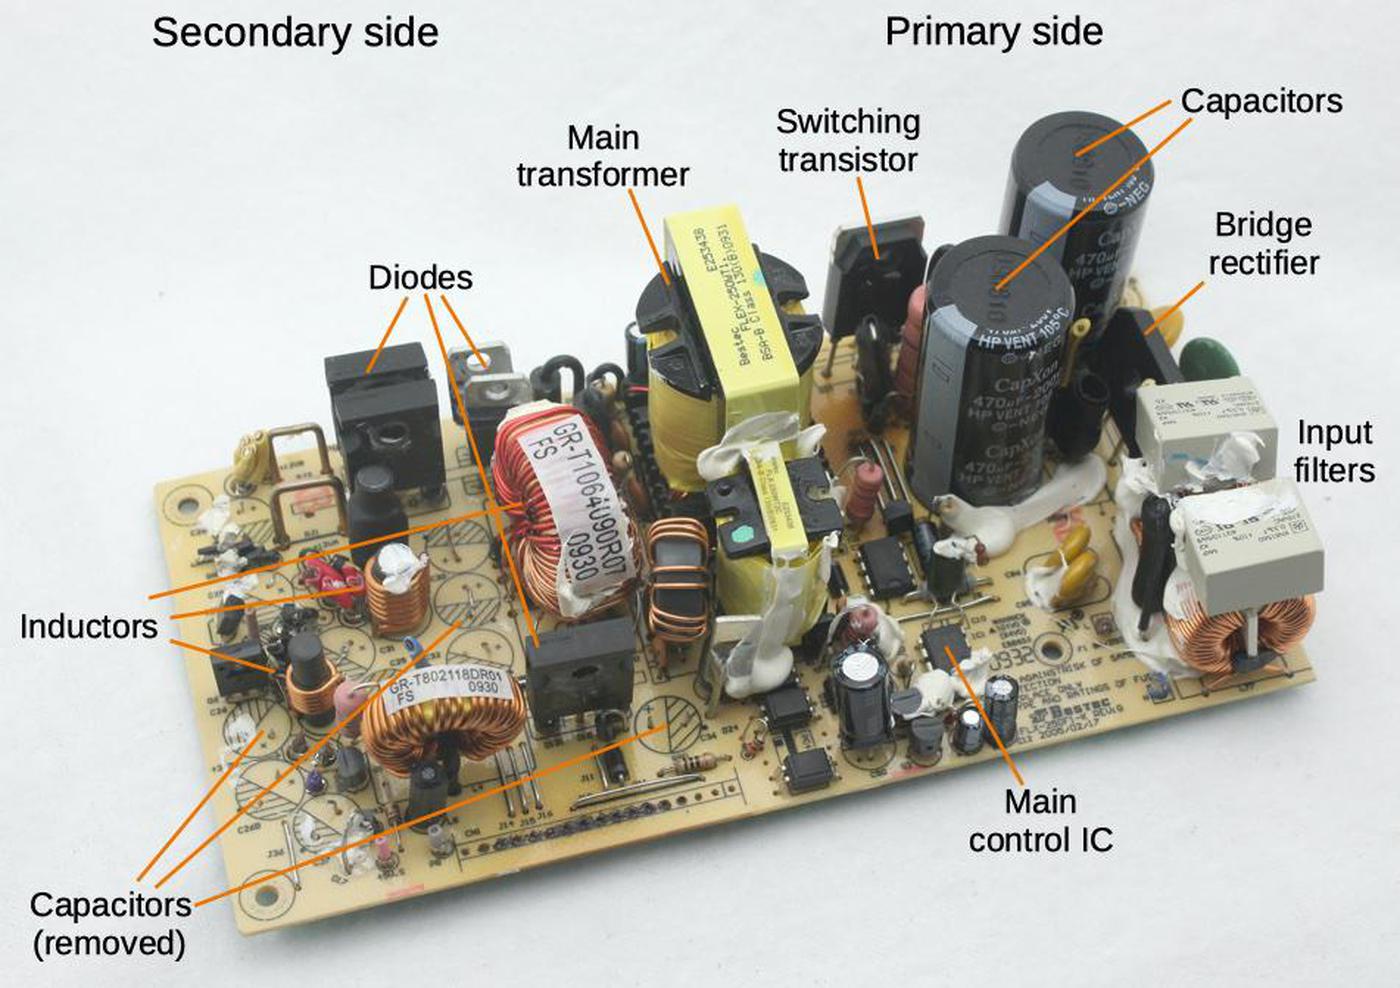
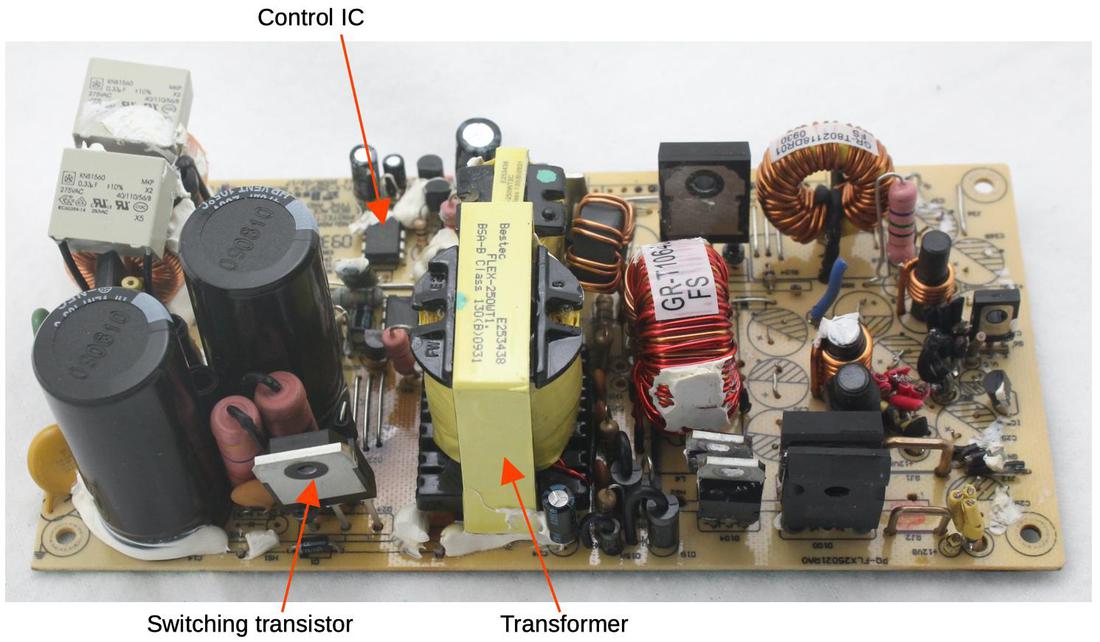
The chip is from the PC power supply below. This is a switching power supply so it uses several steps to produce the output voltages. On the primary side, the input AC is filtered and then converted to high-voltage DC (roughly 170 to 340 volts) by the bridge rectifier, and the large capacitors smooth it out. Next, the DC is chopped into pulses thousands of times a second by the switching transistor. The control IC constantly adjusts the width of the pulses to regulate the output voltage. These pulses go into the transformer, which converts the high-voltage pulses into low-voltage, high-current. The diodes on the secondary side produce the multiple DC outputs, which are smoothed by the inductors and capacitors.

An ATX power supply with the main components labeled. I removed the heat sinks and capacitors to improve visibility.

An ATX power supply with the main components labeled. I removed the heat sinks and capacitors to improve visibility.

This process may seem complex, but it has several advantages over putting the AC from the wall directly into a transformer. First, because the transformer operates at thousands of hertz instead of 60 hertz, a much smaller transformer can be used. Second, chopping the DC into pulses wastes very little energy, compared to a "linear regulator" that converts excess voltage into heat. The result is a power supply that is inexpensive, lightweight, and efficient.

In this blog post, I'll explain the construction of the controller IC, the building blocks of its circuitry, and how it operates. This may be a lot for one blog post, but we'll see how it goes.

Some silicon components

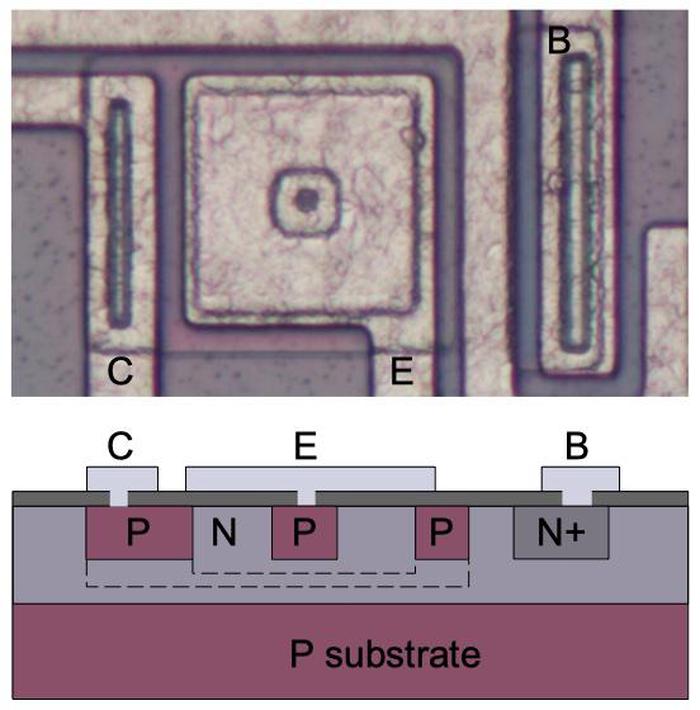
This IC is built from a type of transistor known as bipolar, rather than the MOS transistors that are typically used in modern ICs. The highly-magnified photo below shows an NPN transistor as it appears on the chip, with a cross-section drawing underneath. The metal wiring on top of the transistor is visible as the wide light-colored lines. Different regions of the silicon are doped with impurities to change its electrical properties, yielding N-type and P-type silicon. These regions are faintly visible in the photo. An oxide layer on top of the silicon provides insulation from the metal, except where a contact (black circle or oval) provides a connection between the metal and silicon.

Diagram illustrating the construction of an NPN transistor.

Diagram illustrating the construction of an NPN transistor.

The chip also uses many PNP transistors. Although you might expect a PNP transistor to simply be the reverse of an NPN transistor, it has a different structure, with the regions arranged laterally instead of vertically. The collector and base form concentric square rings around the emitter. The base wire is not connected to the base region directly. Instead, the wire is at a distance, and the base signal travels underneath through the N layer.

Diagram illustrating the construction of a PNP transistor. The dotted lines represent how the collector and base surround the emitter.

Diagram illustrating the construction of a PNP transistor. The dotted lines represent how the collector and base surround the emitter.

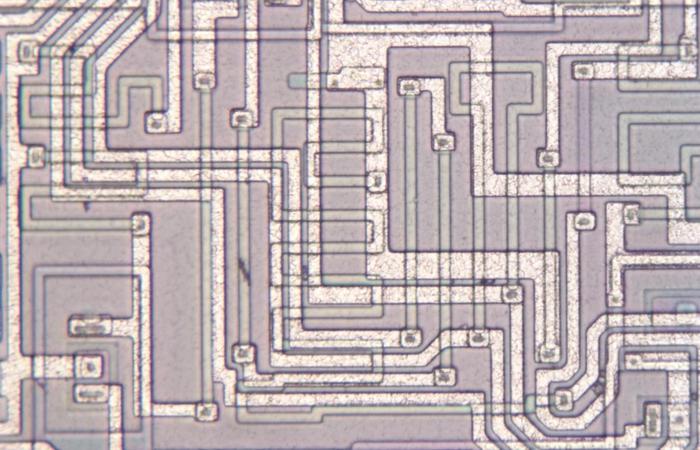
Because this chip consists of mostly analog circuitry, it uses a lot of resistors. The photo below shows several typical resistors, the thin grayish-green lines. The resistors are connected to metal wires at either end, the wider metallic-looking traces. Some resistors are straight lines, while others zig-zag to fit a longer resistor (i.e. higher resistance) into the available space.

Resistors on the die.

Resistors on the die.

Resistors are an inconvenient component for integrated circuits. First, they take up a relatively large amount of room, especially long, high-value resistors. Second, they are inaccurate; their value can vary unpredictably from chip to chip, or even on a single chip. For this reason, circuits are typically designed so they depend on the ratio between two resistors, which is much more stable.

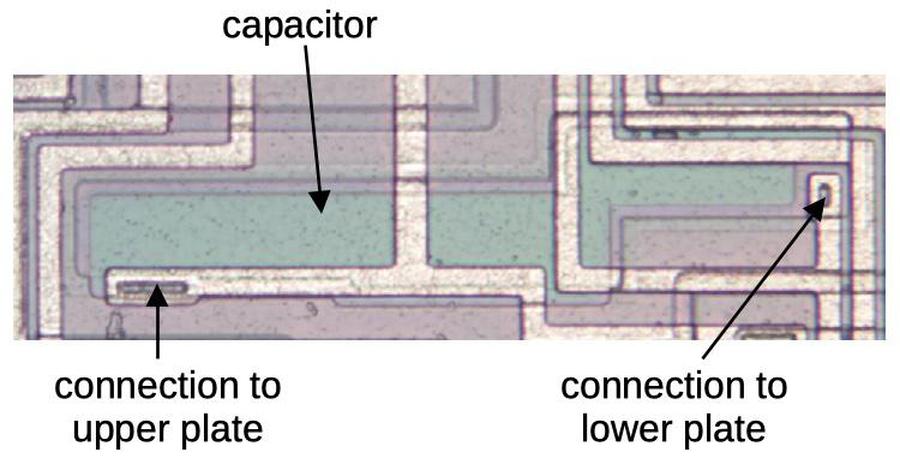
Capacitors are also bulky so the chip uses only a few, to stabilize its amplifiers. A capacitor can be formed by using the underlying silicon as one plate, and then putting a layer of polysilicon on top to form the second plate, separated by a thin layer of insulating oxide. Polysilicon is a special type of silicon, and appears green in the photo.

A capacitor on the die.

A capacitor on the die.

Architecture of the chip

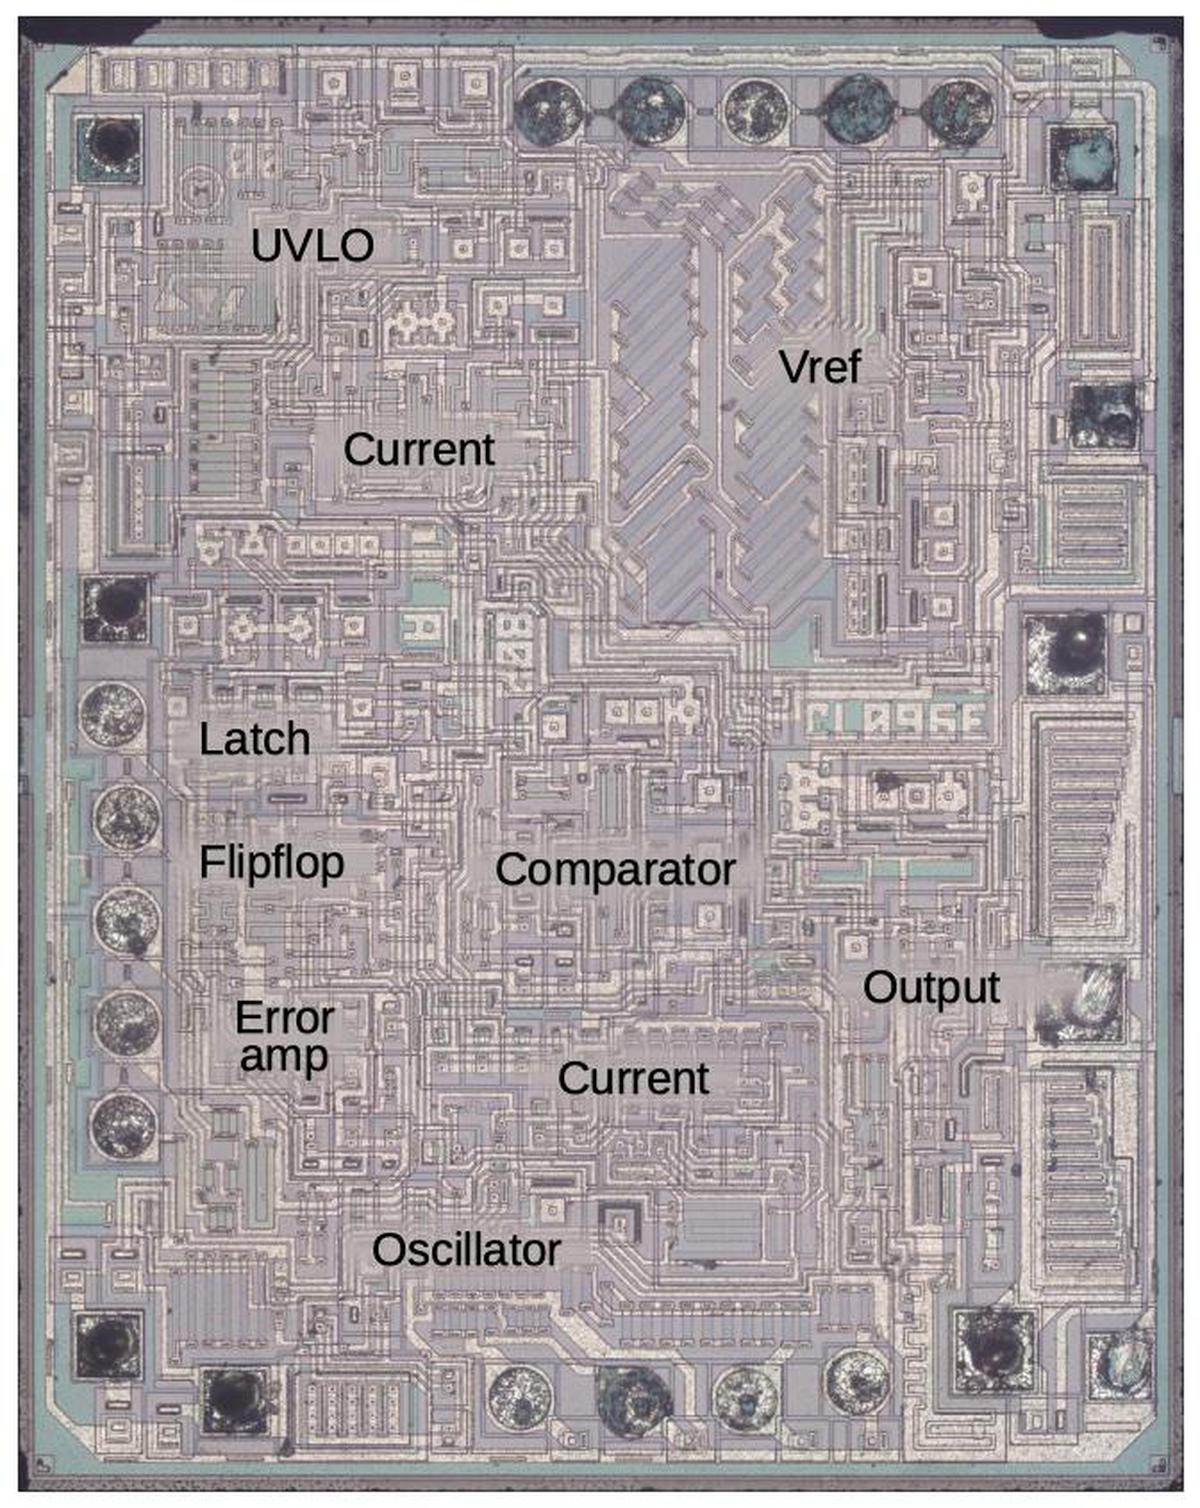
To summarize the chip, it generates pulses to control the switching transistor that feeds the transformer. These pulses are at a fixed frequency (e.g. 52 kHz), but the width of the pulses increases if more power is needed to keep the output voltage constant. The chip constantly adjusts the pulse width based on voltage and current feedback from the power supply, keeping the output voltages stable even as the load changes.

The UC3842 die. Main functional blocks of the die are labeled.

The UC3842 die. Main functional blocks of the die are labeled.

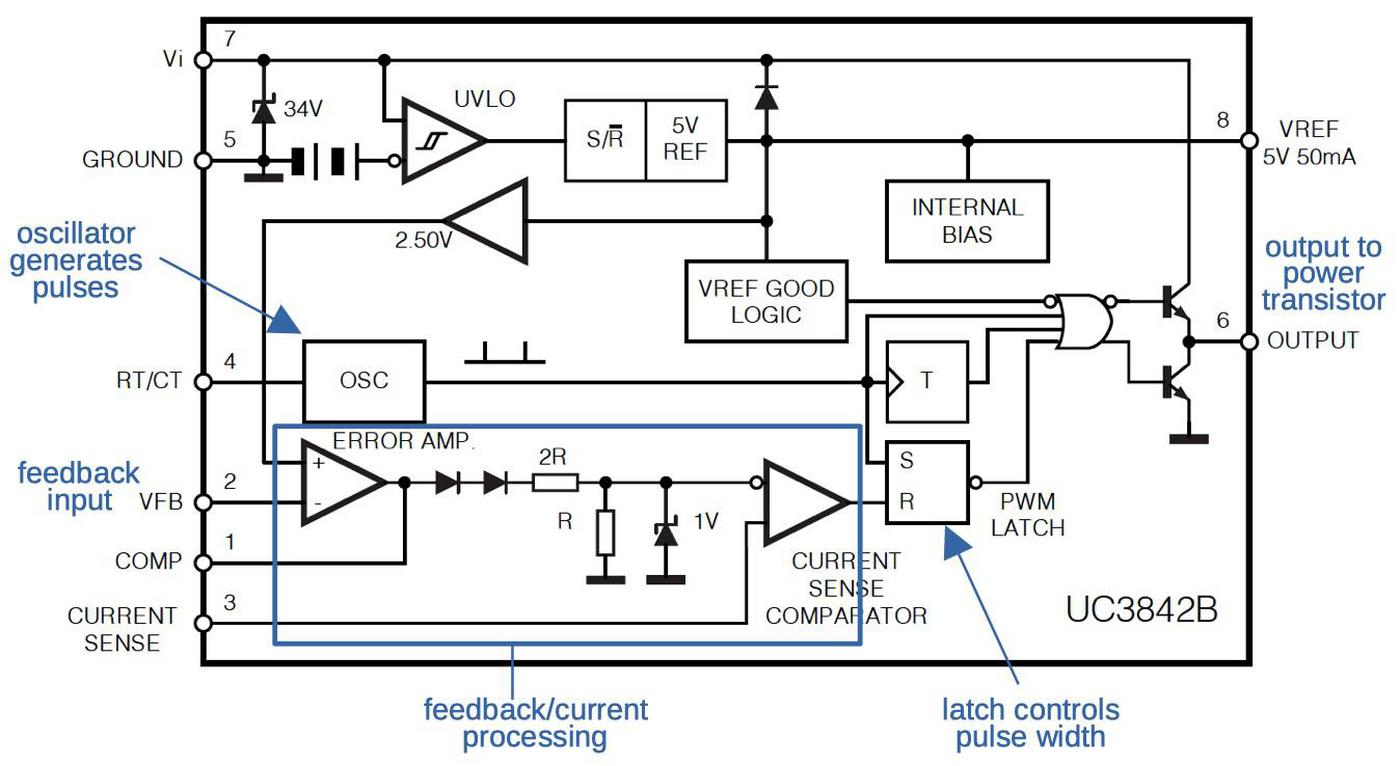
The die image above has been labeled with the main functional blocks of the chip. It can be compared with the block diagram (below) from the datasheet. I'll describe the main functional blocks before explaining how they are implemented.

Block diagram of the UC3842 chip with annotation. Original from the datasheet.

Block diagram of the UC3842 chip with annotation. Original from the datasheet.

The power supply's pulses start with the chip's oscillator, which generates pulses at a frequency controlled by an external resistor and capacitor. Below the oscillator is the feedback circuitry that adjusts the pulse width based on voltage and current feedback. The PWM latch (Pulse Width Modulation) combines the oscillator signal and the feedback to generate pulses of the right duration. These pulses go to the high-current output stage, which drives the external switching transistor.

The chip itself is powered by an auxiliary winding on the transformer that provides 15 to 30 volts. The chip regulates this down to an internal 5-volt supply, using a special circuit called a bandgap regulator to keep this voltage stable within 2%, even with changing temperature. (This regulated reference voltage is also provided externally as Vref for external circuitry that needs a stable voltage.)

A potential problem is that if the power supply is unplugged (for example), the chip may behave unpredictably as the input voltage drops. To guard against this, an Under-Voltage Lock Out (UVLO) feature shuts the chip down cleanly if the input drops too low.

A final interesting feature of the chip is how it starts up. As described above, the chip is powered by the transformer, but the chip generates the pulses that feed the transformer. This seems like a chicken-and-egg problem, since the chip won't receive any power until it is already driving the transformer. The solution is a connection to the rectified line voltage through a very large resistor, so the chip receives hundreds of volts but just microamps of current. A Zener diode (below) drops this startup voltage down to 34 volts, enough for the chip to start generating pulses, at which point the transformer takes over.2

The Zener diode on the chip. It limits the startup voltage to 34 volts. It consists of five diodes in series.

The Zener diode on the chip. It limits the startup voltage to 34 volts. It consists of five diodes in series.

The oscillator

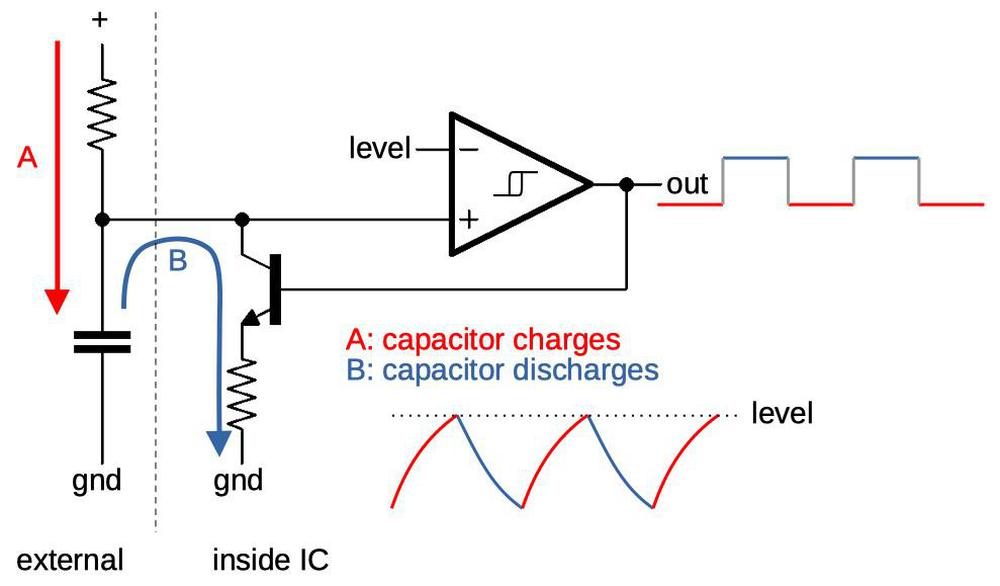
The simplified diagram below shows how the oscillator works. In the first phase (A), the external capacitor is charged through the resistor. When the voltage on the capacitor reaches a fixed level, the comparator (triangle) turns on, energizing the discharge transistor. In the next phase (B), the capacitor discharges through an internal resistor, and then the cycle starts again.3 Thus, by choosing particular values for the external resistor and capacitor, the power supply designer can select the oscillator frequency.

This diagram shows how the oscillator is controlled by an external resistor and capacitor.

This diagram shows how the oscillator is controlled by an external resistor and capacitor.

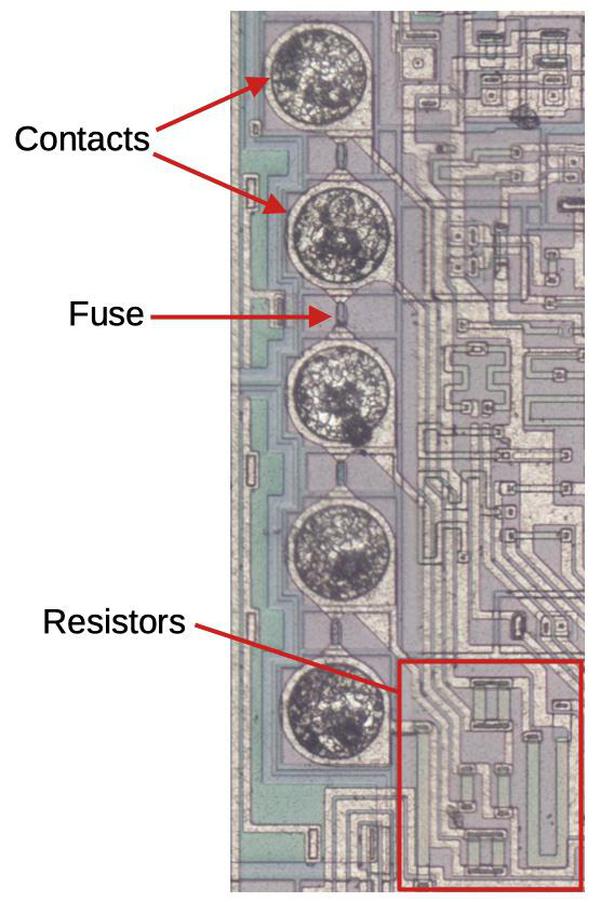
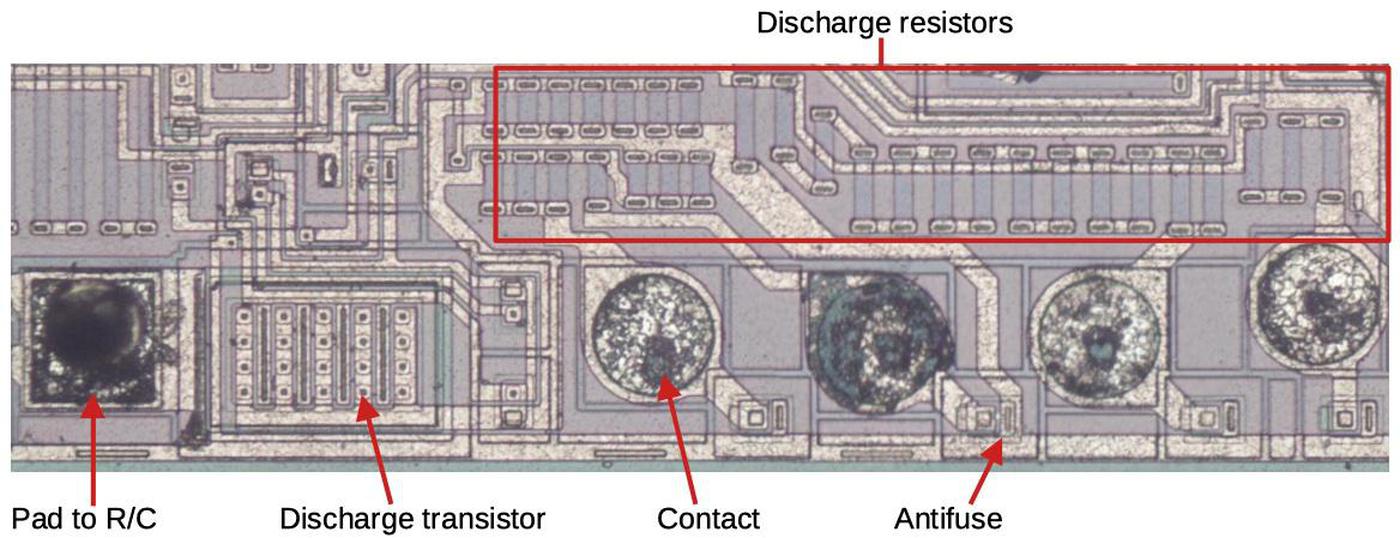
As mentioned earlier, resistors inside an IC are inaccurate. This poses a problem for the oscillator, since the discharge voltage level is set by resistors. The solution is to tune the resistances by putting fuses in parallel with small resistors and selectively blowing fuses to add the resistors to the circuit.4 Specifically, before the chip is packaged, its performance is measured. To blow a fuse, probes are pressed against the circular contacts and a large current is applied. The additional step of blowing fuses increases the manufacturing cost of the chip, but it provides more precise performance.

Fuses to adjust resistance.

Fuses to adjust resistance.

The oscillator has a second set of fuses to tune the discharge resistance (below). These fuses use a different principle: they are "antifuses", which act like fuses in reverse. An antifuse starts off non-conducting, but passing a high current through it creates a conductive metal spike in the antifuse.5

The discharge circuitry of the oscillator. The antifuses adjust resistance in the oscillator.

The discharge circuitry of the oscillator. The antifuses adjust resistance in the oscillator.

Current mirrors

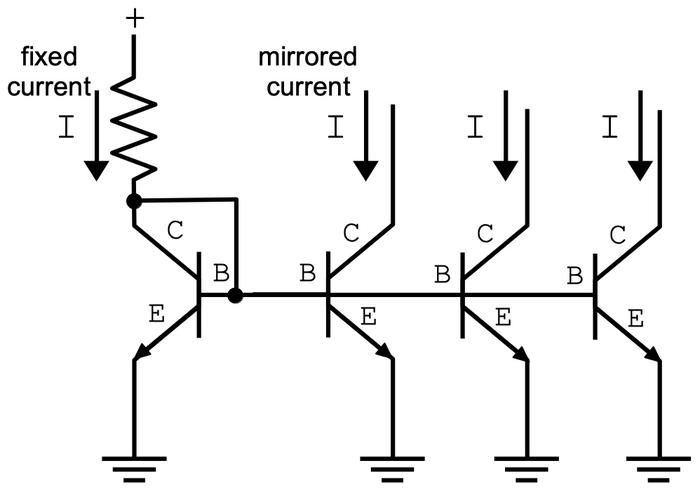
The current mirror is a fundamental building block in analog circuits. This chip, like many analog chips, needs small, steady currents to drive amplifiers, bias circuits, pull signals up, and perform other tasks. Rather than using separate resistors to generate each current, a common solution is the current mirror: you control one current with resistors, and then use transistors to make copies of this current. The schematic below shows a simple current mirror where the fixed current through the transistor on the left is mirrored into three identical copies.

A basic current mirror circuit. The current on the left is mirrored into three current sinks.

A basic current mirror circuit. The current on the left is mirrored into three current sinks.

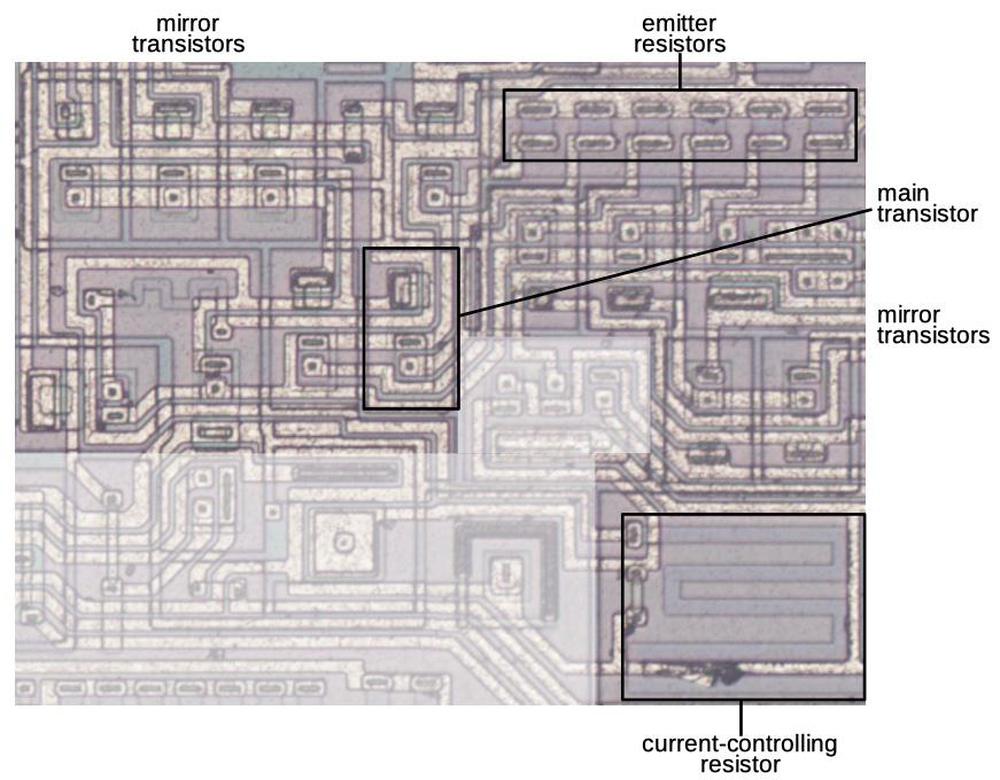
The diagram above shows the main current mirrors for the chip. The large resistor in the lower-right controls the current through the main transistor, and the other transistors copy this current.6 Small emitter resistors improve the performance.

The current-mirror circuitry on the die.

The current-mirror circuitry on the die.

The feedback or error amplifier

Next, I'll look at the voltage feedback circuit, which lets the chip know if the output voltage is too high or too low. The chip receives the output voltage, scaled to form a feedback signal. The error amplifier compares the feedback to a reference voltage to determine if the voltage is too high or too low.

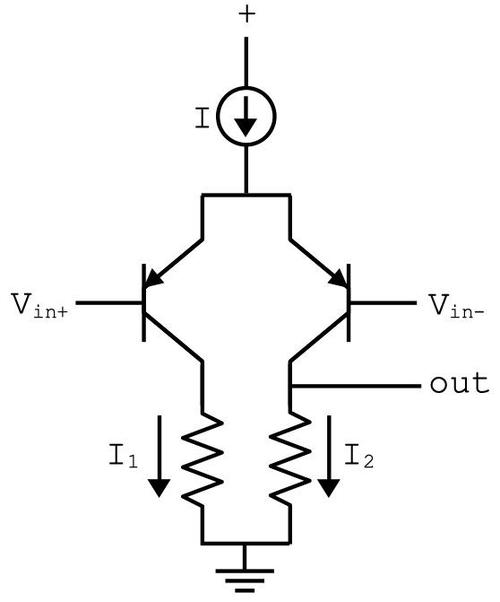
The error amplifier is based on a differential amplifier, which amplifies the difference between its two inputs. This circuit is common in analog circuits, forming the heart of an op-amp or a comparator. The basic idea is that a current mirror (the circle at the top) generates a fixed current I. This current gets split between the left path (I1) and the right path (I2). If the transistor on the left has a higher input voltage than the transistor on the right, most of the current will go to the left. But if the transistor on the right has a higher input, most of the current will go to the right. This circuit amplifies the voltage difference: even a small difference between the two inputs will switch most of the current from one side to the other.

A differential pair amplifies the difference between the two inputs.

A differential pair amplifies the difference between the two inputs.

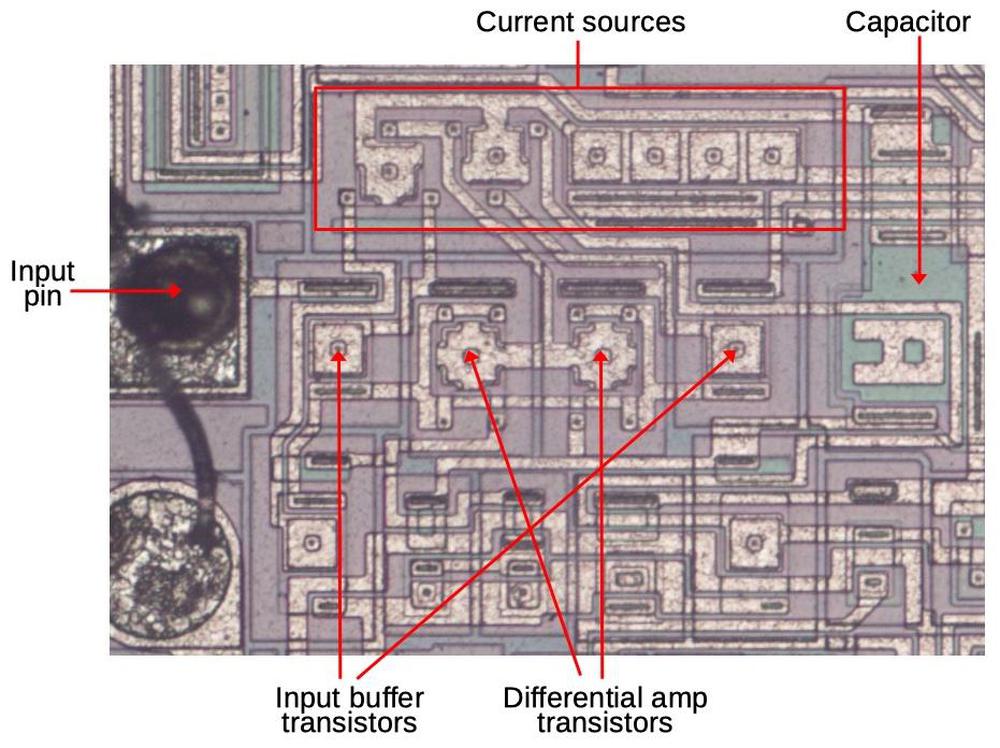
The error amplifier extends this circuit with about a dozen transistors in total. These transistors add buffering to the inputs, control various currents, and provide a second amplification stage. The photo below shows the key components of the error amplifier. The green capacitor on the right stabilizes the amplifier.

The error feedback amplifier as it appears on the die with key components indicated.

The error feedback amplifier as it appears on the die with key components indicated.

The current comparator

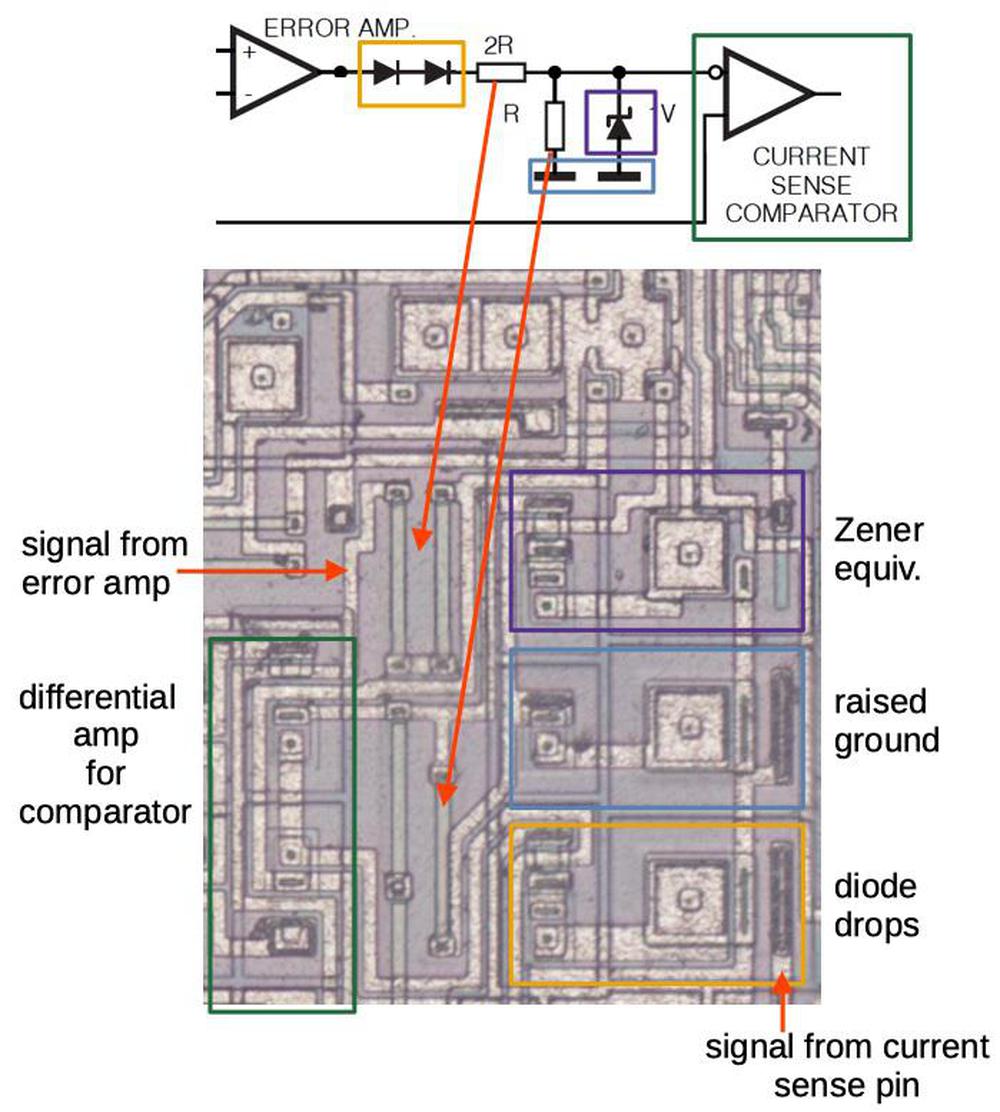
The power supply uses voltage feedback to adjust the pulse width, but it also monitors the current through the transformer so the power supply can respond faster to changes in the load. The current feedback is implemented by the "current sense comparator". This is similar to the feedback amplifier, amplifying the difference between the inputs. (Since it is a comparator, not an amplifier, it is designed to output a binary signal instead of an analog level, but the basic principle is the same.) The diagram below shows the key circuitry for the current comparator on the die and how it relates to the block diagram. The output from the error amplifier goes through some circuitry to adjust the voltage levels before entering the comparator.7

How the current sense circuit maps onto the die components.

How the current sense circuit maps onto the die components.

Under-voltage lockout

Another interesting circuit is the under-voltage lockout (UVLO), in the upper-left of the die. The purpose of this circuit is to shut down the chip cleanly if the input voltage falls too low. (This could happen if there is a power failure or even from unplugging the power supply.)

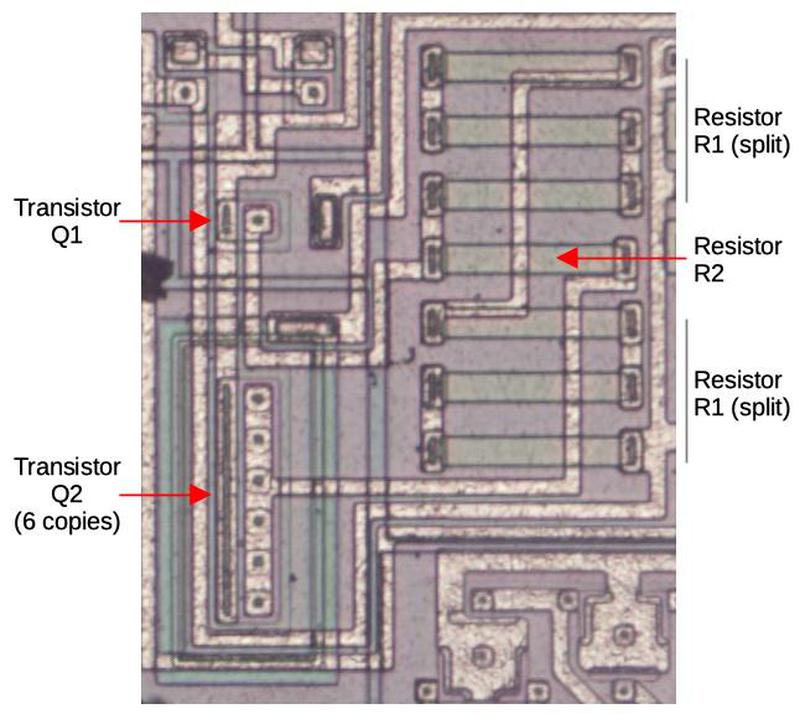
The heart of the UVLO circuit is a bandgap regulator, which provides a voltage reference that will be stable even if the temperature changes. This is surprisingly difficult in an integrated circuit, since the properties of transistors change with temperature. The bandgap regulator uses two transistors of different sizes so they are affected by temperature differently. In the die photo below, Q2 is six times the size of Q1.

The bandgap circuit for the under-voltage lockout.

The bandgap circuit for the under-voltage lockout.

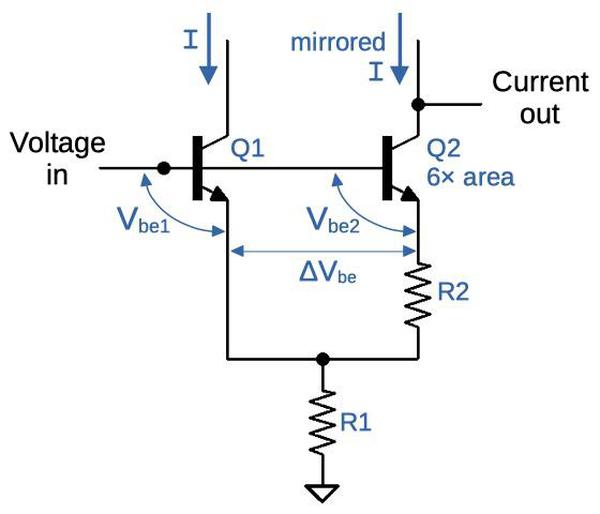
The schematic below shows how the bandgap regulator is constructed. The key factor is the voltage between a transistor's base and its emitter (Vbe), which decreases with temperature. However, ΔVbe, the difference between the two Vbe increases with temperature. With the right resistors, these two factors cancel out, yielding a stable reference voltage. The circuit compares the input voltage to this reference voltage; see the footnote8 for more details.

Schematic of the bandgap regulator. A current mirror directs the same current through both sides of the circuit.

Schematic of the bandgap regulator. A current mirror directs the same current through both sides of the circuit.

In the UVLO circuit, the bandgap reference is used to detect if the chip's input voltage falls too low. Since the input voltage is around 30 volts, a network of resistors (below) scales it to the bandgap voltage (about 1.2 volts) for comparison.9

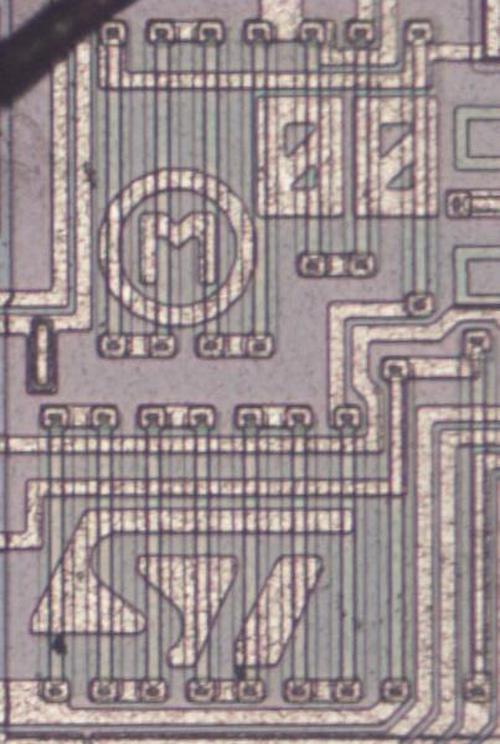
This set of resistors forms voltage dividers to reduce the input voltage for the bandgap comparator. Note the mask date of "00" as well as the ST Microelectronics logo at the bottom.

This set of resistors forms voltage dividers to reduce the input voltage for the bandgap comparator. Note the mask date of "00" as well as the ST Microelectronics logo at the bottom.

The bandgap voltage reference

The chip uses a second bandgap reference to create an internally-regulated 5 volt supply to power the chip's circuitry. This voltage is also made available to external circuitry that may need an accurate voltage.

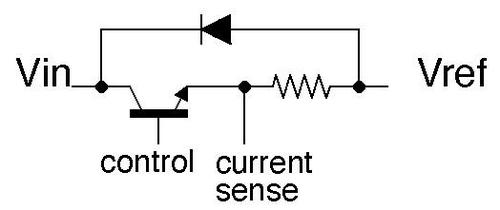
At a high level, this voltage reference is a linear power supply, with a power transistor controlling how much of the input voltage passes through to the regulated Vref. The control signal comes from the bandgap regulator, which I'll explain below. The output circuit also has a current-sense resistor to measure the output current. This limits the output current to 50 mA in case of a short circuit. A diode clamps the output if the input voltage suddenly drops.

Schematic of the Vref output circuit. The transistor limits the voltage.

Schematic of the Vref output circuit. The transistor limits the voltage.

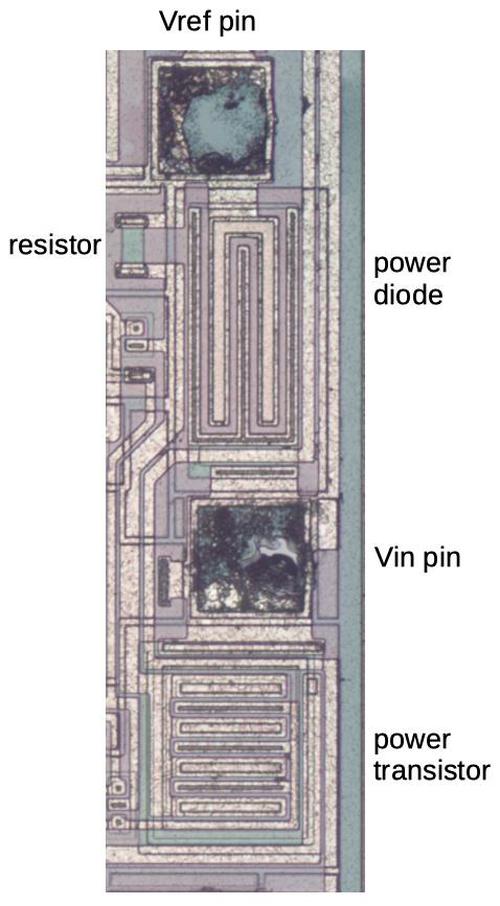
The photo below shows how this circuit is implemented on the die. The power transistor is much larger than the other transistors, so it can support a high-current output. The construction of the diode is similar to the power transistor, but without a collector. The current-sense resistor is short and wide, giving it a low resistance.

Vref output circuit on the die.

Vref output circuit on the die.

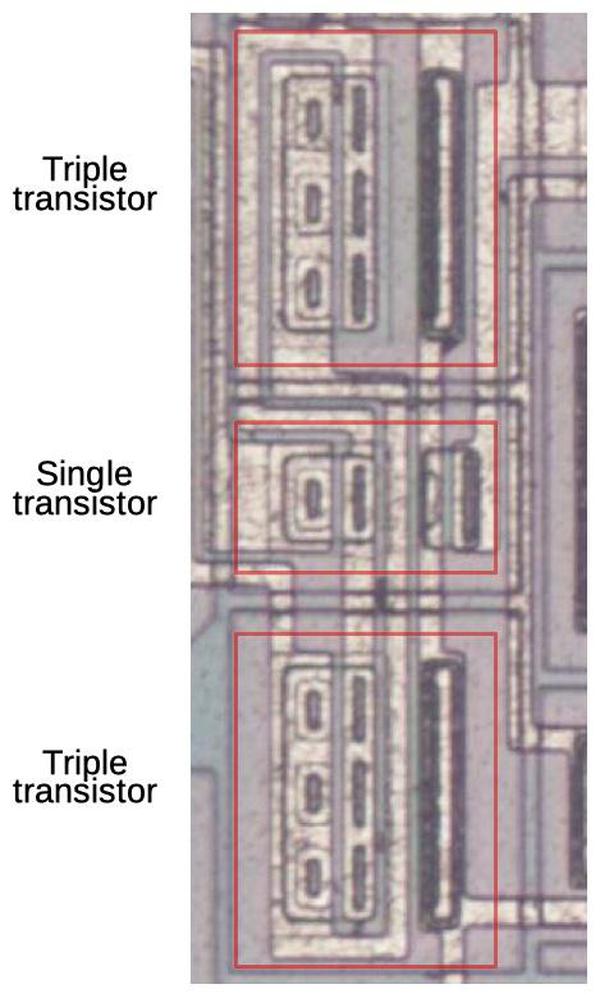
The heart of the circuit is the bandgap voltage reference below. The circuit is similar to the bandgap voltage reference for the under-voltage lockout circuit, using two transistors, one with six times the area of the other. However, the six-way transistor has been split into two and surrounds the single transistor. With this layout, even if there is a temperature gradient across the die, the single-transistor and the six-transistor will be at the same average temperature.

The transistors at the heart of the bandgap reference.

The transistors at the heart of the bandgap reference.

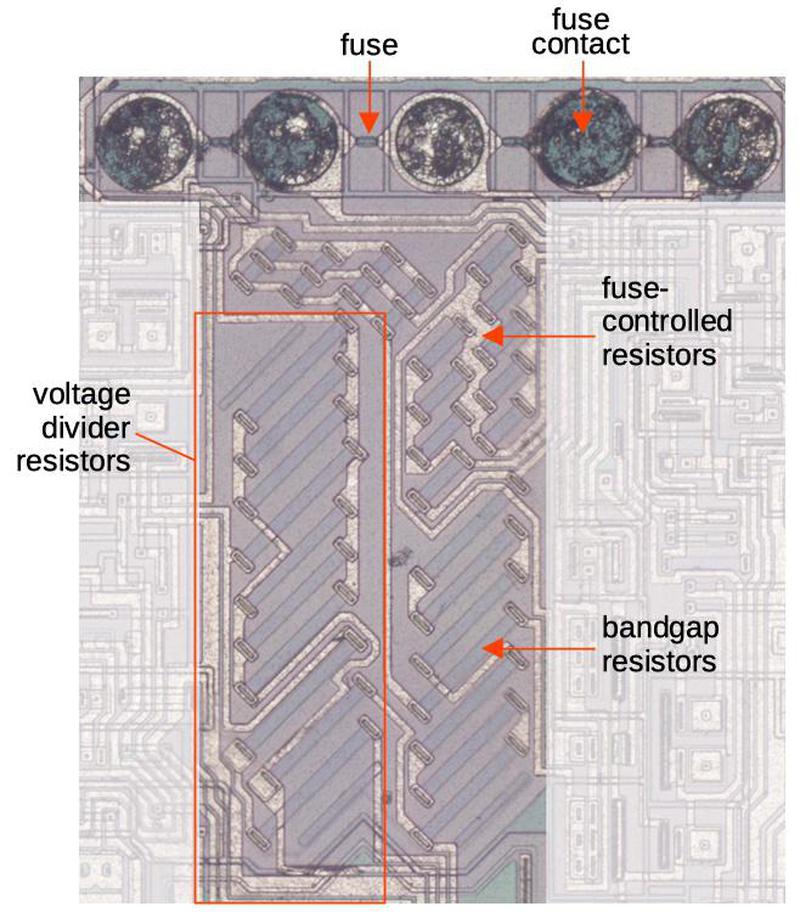
The accuracy of the bandgap regulator depends on the accuracy of its resistors. During manufacturing, fuses are blown to tune the resistance, as with the oscillator's resistors. The photo below also shows the resistors that form a voltage divider to reduce the 5-volt output to the 1.2-volt bandgap voltage. In contrast to the thin meandering resistors used elsewhere, these resistors are thick and uniform length to improve their accuracy.

Resistors that control the bandgap reference.

Resistors that control the bandgap reference.

Output

At this point, I'll step back and review the chip's function in the power supply. It controls the switching transistor, causing the transistor to send high-voltage pulses through the transformer. The chip does this by producing control pulses on its output pin. Since the switching transistor is fairly large, the chip outputs a relatively high current (200 milliamps) control signal. This requires fairly large output transistors inside the IC.

The controller chip directs the switching transistor to send pulses through the transformer.

The controller chip directs the switching transistor to send pulses through the transformer.

The die photo below shows the IC's two output transistors: the upper one pulls the output high, and the lower one pulls the output to ground. One interesting feature of the chip is that it has two pads on the die for Vin and two pads for ground. The purpose of this is that the output transistors draw a lot of current, which could cause noise fluctuations on the power and ground lines, interfering with the rest of the chip. By providing separate pads, the output transistor is somewhat isolated from the rest of the circuitry.10

Two large transistors drive the output pin.

Two large transistors drive the output pin.

Variants

One interesting thing about this chip is that four different chips are manufactured from the same silicon. The UC3842 has a 16-volt UVLO threshold, while the UC3843 has an 8.5-volt threshold for lower-voltage applications. Other variants of the chip (UC3844 and UC3845) have a flip flop to reduce the pulse duty cycle. These different chips use slightly different metal wiring over the same silicon base. (It's easier to customize the metal layer than the silicon.) The photo below shows some places where the metal wiring has been severed in the UC3842 to change the wiring.

Closeup of the die with some broken connections indicated with arrows.

Closeup of the die with some broken connections indicated with arrows.

Conclusion

Power supplies are usually taken for granted, but they contain a lot of interesting technology. The invention of the power supply control chip in 1975 is a key step in the history of power supply improvements. Modern power supply chips are much more complex, with features to improve efficiency and reduce interference, but the chip that I examined uses the same basic principles.11 Analog chips are built from several important building blocks such as differential amplifiers, current sources, current mirrors, and bandgap voltage references. The UC3842 chip illustrates all of these building blocks, and how they are combined to build complex circuits.

I announce my latest blog posts on Twitter, so follow me at kenshirriff. I also have an RSS feed.

Notes and references

  1. For schematics of power supplies using this UC3842 chip, see this site, near the bottom of the page. 

  2. The idea of a Zener diode is that it blocks current like a normal diode until it reaches the "breakdown voltage", where it starts conducting. Zener diodes are often formed on chips from the emitter-base junction of NPN transistors, which commonly results in a 6.8-volt breakdown voltage. Looking at the photo, you can see 5 transistor-like structures in series. At 6.8 volts each, this generates the 34-volt breakdown voltage shown in the block diagram. 

  3. The oscillator's comparator is set to turn off about 1.6 volts below the level at which it turns on, that is it has hysteresis. This ensures that the capacitor discharges significantly rather than settling around the discharge level. The oscillator design is a bit like the 555 timer, with discharge and charge phases triggered by the capacitor voltage. 

  4. Many of the resistors in the fuse network are made of fixed-length resistors in various combinations. For example, two in parallel gives twice the resistance, while two in series give half the resistance. The advantage of combining fixed-length resistors is that the resistances are more predictable than making resistors of different lengths. The different resistors have roughly binary values, so different combinations of blown fuses select a variety of resistances. 

  5. I think that the chip uses Zener antifuses, since they look similar to NPN transistors without a collector. The process of blowing the antifuse to make it conductive is called a "Zener zap." 

  6. The current mirror uses a buffered-feedback design with emitter degeneration resistors (details). The small emitter resistors improve the output impedance. Three of the transistors in the current mirror are set up to split current, so each sinks one-third of the regular current. Another transistor has a larger emitter resistor, reducing the current; a small change in resistance yields a large change in the current. This illustrates the flexibility of a current mirror to produce different currents. 

  7. The block diagram shows a resistor-diode network between the error amplifier and the current sense comparator. This network scales and clips the error amplifier output to make its levels more useful. The circuitry isn't particularly interesting, so I won't discuss it in detail. I'll mention, though, that the block diagram shows the error amplifier output uses two diodes to drop its voltage. The circuit, on the other hand, raises the other signals by two diode levels instead, which works out the same mathematically. (Transistors are used to implement the diode drops as well as the 1-volt Zener.) 

  8. The details of a bandgap reference are too complex to explain here, but I'll give a brief overview in this footnote. The basis is that the voltage between a transistor's base and emitter scales drops linearly with the temperature (in Kelvin). But since the two transistors have different areas, the two transistors have different scale factors. The difference between the two transistors' base-emitter voltages increases linearly with temperature. By combining a voltage that decreases linearly with temperature and a voltage that increases linearly with temperature, you can create a voltage that remains almost constant with temperature. This voltage turns out to be the bandgap voltage of silicon, about 1.2 volts.

    Scaling and combining these voltages is done by two resistors, so it is important that temperature doesn't affect the resistances. The circuit is designed so that only the ratio between resistances matters, so if temperature affects both resistors equally, the circuit is unaffected. A problem is that a temperature gradient on the chip could affect some resistors more than others, but the chip uses a clever layout technique to avoid this. There are seven resistor segments: one forms a resistor and six are in series to form a resistor with six times the resistance. The one-unit resistor is put in the middle with three segments above and three segments below. If a temperature gradient, for instance, increases the upper resistances, the resistor in the middle will have an "average" increase, while the 6-unit resistor will have three resistor segments with a large increase and three with a small increase, which will cancel out.

    The bandgap circuit doesn't explicitly generate a 1.2-volt output. Instead, it implicitly compares the input voltage with 1.2 volts. The circuit is set up so a 1.2-volt input balances the currents through both transistors. If the voltage increases, the single transistor passes more current than the six-unit transistor. A current mirror forces each side of the circuit to have the same current, with the result that the "extra" current flows through the output. Thus, if the input voltage is high enough, the circuit produces an output current, activating the chip. But if the input voltage is too low, the circuit doesn't produce an output current, shutting down the chip.

    For more information, see the optimistically-titled How to make a bandgap voltage reference in one easy lesson

  9. Another feature of the under-voltage lockout circuit is hysteresis; it has a higher voltage to turn on than to shut off. The purpose of this is to make sure the power supply doesn't oscillate on and off if the input voltage is near the threshold. Hysteresis is implemented through the input voltage divider, which uses three resistors. If the chip is activated, a transistor feeds the supply voltage into the second resistor, increasing the divider's output voltage. The result is that once the chip is active, the supply voltage must drop more to turn the chip off. 

  10. Surprisingly, the chip has two pads for power and two pads for ground, but only single power and ground pins. Instead, two bond wires go from the pads to each external power and ground pin. Although this doesn't provide complete separation between the chip's power and the output circuit's power, it is still beneficial since the bond wires are thicker than the metal traces and have lower resistance.

    Although this IC is usually packaged in an 8-pin package, some manufacturers, such as Fairchild, make versions of the UC3842 in 14-pin packages. The extra pins allow separate pins to be used for the circuitry and output power and grounds. 

  11. While the UC3842 chip was introduced in 1984, the one I examined has a mask date of "00", so this design is from 2000. The power supply itself was from 2005. 

Silicon die analysis: inside an op amp with interesting "butterfly" transistors

Some integrated circuits have very interesting dies under a microscope, like the chip below with designs that look kind of like butterflies. These patterns are special JFET input transistors that improved the chip's performance. This chip is a Texas Instruments TL084 quad op amp and the symmetry of the four op amps is visible in the photo. (You can also see four big irregular rectangular regions; these are capacitors to stabilize the op amps.) In this article, I describe these components and the other circuitry in the chip and explain how it works. This article also includes an interactive chip explorer that shows each schematic component on the die and explains what it does.

Die photo of the TL084 quad op amp. The bond wires got a bit bent while cleaning the chip.

Die photo of the TL084 quad op amp. The bond wires got a bit bent while cleaning the chip.

An integrated circuit consists of a tiny piece of silicon. To make an integrated circuit, regions are treated with various atoms to change the properties of the silicon, giving them different colors under a microscope. On top of the silicon, a thin layer of metal connects different parts of the chip. This metal is clearly visible in the photo as yellowish traces and regions. Under the metal, a thin, glassy silicon dioxide layer provides insulation between the metal and the silicon, except where contact holes in the silicon dioxide allow the metal to connect to the silicon. Around the edge of the chip, thin bond wires connect the metal pads to the chip's external pins.

NPN transistors inside the IC

Transistors are the key components in a chip. This op amp chip uses several types of transistors: NPN and PNP bipolar transistors as well as JFETs. (Many newer op amps use low-power CMOS transistors instead.) If you've studied electronics, you've probably seen a diagram of an NPN transistor like the one below, showing the collector (C), base (B), and emitter (E) of the transistor, The transistor is illustrated as a sandwich of P silicon in between two layers of N silicon; the N-P-N layers make an NPN transistor. It turns out that transistors on a chip look nothing like this, and the base often isn't even in the middle!

Symbol and simplified structure of an NPN transistor.

Symbol and simplified structure of an NPN transistor.

The photo below shows one of the transistors in the TL084 as it appears on the chip. The different brown, purple and green colors are regions of silicon that has been doped differently, forming areas called N and P regions (negative with an excess of electrons, and positive lacking electrons). The yellow areas are the metal layer of the chip on top of the silicon—these form the wires connected to the collector, emitter, and base. Underneath the photo is a cross-section drawing showing approximately how the transistor is constructed. There's a lot more going on than just the N-P-N sandwich you see in books, but if you look carefully at the vertical cross section below the 'E', you can find the N-P-N that forms the transistor. The emitter (E) wire is connected to N+ silicon. Below that is a P layer connected to the P+ base contact (B). And below that is an N layer connected (indirectly) to the collector (C).1

Structure of an NPN transistor in the TL084 op amp

Structure of an NPN transistor in the TL084 op amp

While most of the transistors follow the above pattern, some of the transistors in the TL084 chip are optimized in confusing ways, such as the part of the die below. In this circuit, two transistors share one collector (C), while a resistor (blue line) runs between them. (This took me a while to figure out, even with the schematic.)

A complex part of the TL084, where two transistors share a collector while a resistor runs through them.

A complex part of the TL084, where two transistors share a collector while a resistor runs through them.

The output transistors (below) in the TL084 are larger than the other transistors and have a different structure in order to produce the chip's high-current output. The output transistors must provide milliamps of current, compared to microamps for the internal transistors. Note the interlocking "fingers" of the emitter (E) and base (B), surrounded by the large collector (C). Although the NPN and PNP transistors look similar, the dark purple P silicon is visible on the base of the NPN transistor and the emitter and collector of the PNP transistor, showing their opposite construction.

High-current NPN and PNP transistors drive the output of the TL084 op amp

High-current NPN and PNP transistors drive the output of the TL084 op amp

How capacitors are implemented in silicon

The TL084 contains four capacitors to provide stability for the op amps. You can see the four capacitors in the die photo; they are the largest structures on the chip. A capacitor in the chip is essentially a large metal plate separated from the silicon by an insulating layer. The main drawback of capacitors on ICs is they are physically very large. The TL084's capacitors have a very small capacitance value (a few picofarads) but take up a large fraction of the chip's area.2

JFET transistors3

A special type of transistor called a JFET is the key to the high performance of the TL084 chip. The JFET transistor is related to the more common MOSFET transistor: they both controls current between the source and the drain, under control of the gate. But while the MOSFET has has an insulating oxide layer between the gate and the body of the device, the JFET lacks this layer and has a silicon P-N junction instead (and thus is called a Junction FET). The chip used P-channel JFETS, where current flows through a channel of P silicon; the schematic symbol and basic structure is shown below. Normally, current flows between the source (S) and drain (D) through the channel. As the voltage on the gate increases, it "pinches" the channel closed, reducing and then stopping the current flow. An important feature of a JFET is that very, very little current flows through the gate; the gate resistance is an amazingly large 1012Ω. (This is because the gate junction acts as a reverse-biased diode, blocking current flow.) This high input impedance is an important feature for an op amp.

Symbol and simplified structure of a JFET transistor (P-channel).

Symbol and simplified structure of a JFET transistor (P-channel).

On the chip, the JFETs are constructed like the diagram above but rotated horizontally. The diagram below shows a JFET as it appears on the die (left), along with a close-up slice. (The JFET channel is wide and snakes around in order to pass more current. It also has drains on both sides of the source.) The cross section below shows the internal structure of the JFET. The P region connects the source and the drain, and it is surrounded above and below by the gate's N region. (The connection to the lower N region is outside the region shown.) The JFETs in this chip are built with ion implantation, which shoots accelerated ions into the chip to produce the P and N regions. Ion implantation provides accurate control of the doping and dimensions of the P channel between the source and drain, allowing the input JFETs to be built for high performance.

Cross section of an input JFET transistor, showing the construction of the JFET.

Cross section of an input JFET transistor, showing the construction of the JFET.

Manufacturing JFET op amp ICs was difficult when they were first sold decades ago. Hybrid (two separate dies in one package) JFET op amps were introduced in 1970. These were followed shortly afterwards by monolithic (i.e. a single die) op amps, but difficulties in manufacturing consistent JFETs caused these op amps to have poor characteristics. In 1974, National Semiconductor engineers developed the ion implantation technique for fabricating consistent, high quality JFETs and used this "BIFET" technique to build better JFET op amps. Two years later Texas Instruments introduced their JFET op amps, including the TL084 which was the first four-in-one op amp using the BIFET process.4

You might have noticed that each op amp has four input JFETs on the die (forming the butterfly pattern below), even though the op amp only has two inputs. The explanation for this is that for good performance the input transistors in an op amps should have identical electrical characteristics. But unfortunately chips can have thermal gradients (i.e. hotter on one side than the other) that affect the transistor characteristics and unbalance the inputs. A standard solution used in the TL084 is that each input uses two cross-coupled transistors, diagonally opposite from each other. If one side of the chip is hotter than the other, both inputs will have an affected transistor, canceling out the effect of the temperature gradient.

To insure the input transistors are matched, each input transistor is actually two connected transistors, diagonally opposite. Wiring connects each transistor pair.

To insure the input transistors are matched, each input transistor is actually two connected transistors, diagonally opposite. Wiring connects each transistor pair.

IC component: The current mirror

There are some subcircuits that are very common in analog ICs, but may seem mysterious at first. Before explaining how the TL084 works, I'll first give a brief overview of the current mirror and differential pair circuits.

Schematic symbols for a current source.

Schematic symbols for a current source.

If you've looked at analog IC block diagrams, you may have seen the above symbols for a current source and wondered what a current source is and why you'd use one. The idea of a current source is you start with one known current and then you can "clone" multiple copies of the current with a simple transistor circuit.

The following circuit shows how a current mirror is implemented.5 A reference current passes through the transistor on the left. (In this case, the current is set by the resistor.) Since both transistors have the same emitter voltage and base voltage, they source the same current, so the current on the right matches the reference current on the left.

Current mirror circuit. The current on the right copies the current on the left.

Current mirror circuit. The current on the right copies the current on the left.

A common use of a current mirror is to replace pull-up resistors. Resistors inside ICs are both inconveniently large and inaccurate. It saves space to use a current mirror instead of a resistor whenever possible. Also, the currents produced by a current mirror are nearly identical, unlike the currents produced by two resistors.

IC component: The differential pair

The second important circuit to understand is the differential pair, the most common two-transistor subcircuit used in analog ICs.6 You may have wondered how the op amp subtracts two voltages since it's not obvious how to make a subtraction circuit. This is the job of the differential pair.

Schematic of a simple differential pair circuit. The current source sends a fixed current I through the differential pair. If the two inputs are equal, the current is split equally.

Schematic of a simple differential pair circuit. The current source sends a fixed current I through the differential pair. If the two inputs are equal, the current is split equally.

The schematic above shows a simple differential pair. The key is the current source at the top provides a fixed current I, which is split between the two input transistors. If the input voltages are equal, the current will be split equally into the two branches (I1 and I2). If one of the input voltages is a bit lower than the other, the corresponding transistor will conduct more current, so one branch gets more current and the other branch gets less. As one input continues to increase, more current gets pulled into that branch. Thus, the differential pair is a surprisingly simple circuit that routes current based on the difference in input voltages. The TL084 uses JFETS instead of bipolar transistors in the differential pair, but the principle is the same.

The internal blocks of the op amp

The internal circuitry of the TL084 op amp is similar to the 741 op amp, which has been explained in many places7, so I'll just give a brief description of the main blocks. The interactive chip viewer below provides more explanation.

The two input pins are connected to the differential amplifier, which is based on the differential pair described above. The output from the differential amplifier goes to the second (gain) stage, which provides additional amplification of the signal. Finally, the output stage has large transistors to generate the high-current output, which is fed to the output pin. The capacitor stabilizes the op amp to avoid oscillation. The current mirror at the top provides currents to other parts of the chip. The current mirror at the bottom functions as an active load increasing the gain of the differential pair.

Die for the TL084 op amp, showing the main functional units.

Die for the TL084 op amp, showing the main functional units.

Interactive chip viewer

The image and schematic8 below are an interactive exploration of the TL084. Click a component to see its location on the die and in the schematic highlighted. The box below will give an explanation of the component. The die image below shows one of the four op amps on the chip; the others are essentially identical.

Click components in the image below for more information.

How I photographed the die

Getting to the die of an integrated circuit can be difficult since integrated circuit usually come in a black epoxy package. I'd rather avoid using dangerous concentrated acid to dissolve the epoxy package and see the die. Fortunately some ICs, such as the TL084, are available in ceramic packages that can be easily opened with a chisel. The photo below shows the chip package after removing the lid. The four large capacitors are visible on the die even without a microscope.

The TL084 op amp. The ceramic package has been opened, exposing the die inside. A couple pins fell off when the package was opened.

The TL084 op amp. The ceramic package has been opened, exposing the die inside. A couple pins fell off when the package was opened.

To obtain the die photos, I used a metallurgical microscope, which shines light from above through the lens, unlike a normal microscope which shines light from below. A metallurgical microscope is the secret to getting clear photos at higher magnification, since the die is brightly illuminated. I used Hugin to stitch multiple images together into high-resolution pictures. Below is a second die photo; the bond wires are removed in this one.

Die photo of the TL084 op amp with the bond wires removed.

Die photo of the TL084 op amp with the bond wires removed.

Conclusions

Texas Instruments introduced the TL084 in 1976 as one of the first high-performance quad op amps. I was motivated to study this chip by the pretty butterfly-like patterns on the die, but found some interesting circuitry inside the chip. The butterfly-like structures turned out to be JFET transistors that improved the chip's performance by providing high impedance for the op amp inputs. If you enjoyed this look inside an analog silicon chip, you may also like my analysis of the 741 op amp and 555 timer. Follow me on Twitter at @kenshirriff for my latest blog posts, or use my RSS feed. The chip was provided by Eric Schlaepfer (@TubeTimeUS).

Notes and references

  1. You might have wondered why there is a distinction between the collector and emitter of a transistor, when the simple picture of a transistor is totally symmetrical. Both connect to an N layer, so why does it matter? As you can see from the die photo, the collector and emitter are very different in a real transistor. In addition to the very large size difference, the silicon doping is different. The result is a transistor will have poor gain if the collector and emitter are swapped. 

  2. The capacitor in the op amp is located at a special point in the circuit where the effect of the capacitance is amplified due to something called the Miller effect. This allows the capacitor to be much smaller than it would be otherwise. Given how much of the die is used for the capacitor already, taking advantage of the Miller effect is very important. 

  3. Yes, I realize that "JFET transistor" is a redundant acronym. Since some readers may not be familiar with JFETs, I want to remind them that JFETs are transistors. 

  4. For an extremely detailed history of op amps, including the development of JFET op amps in the 1970s, see Op Amp History by Walt Jung. My section on JFET op amp history is based on this source. 

  5. For more information about current mirrors, you can check Wikipedia or chapter 3 of Designing Analog Chips. If you're interested in how analog chips work, I strongly recommend you take a look at Designing Analog Chips. 

  6. Differential pairs are also called long-tailed pairs. According to Analysis and Design of Analog Integrated Circuits differential pairs are "perhaps the most widely used two-transistor subcircuits in monolithic analog circuits." (p214) For more information about differential pairs, see Wikipedia, any analog IC book, or chapter 4 of Designing Analog Chips

  7. The TL084 op amp's design is similar to the 741 op amp, which is described in Wikipedia, Operational Amplifiers, IC Op-Amps Through the Ages and UNCC class notes. See any of those sources for more details on how op amps are constructed. 

  8. The schematic is from the TL084 datasheet