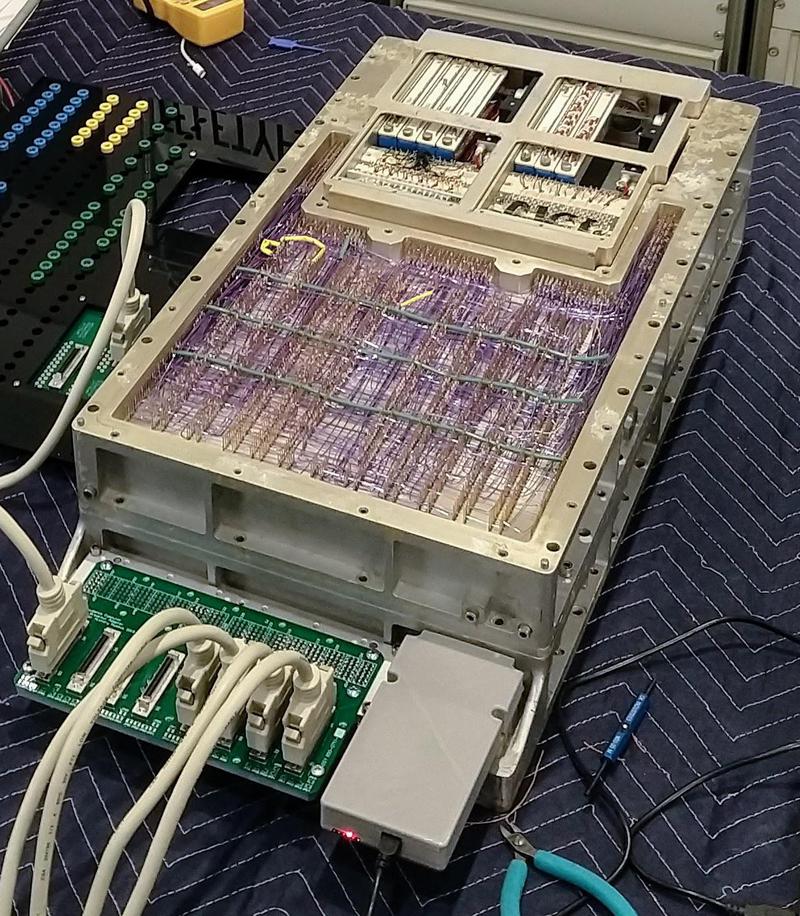
Onboard the Apollo spacecraft, the revolutionary Apollo Guidance Computer helped navigate to the Moon and land on its surface. The AGC's software was physically woven into permanent storage called core rope memory. We1 are restoring an Apollo Guidance Computer (below), which is missing the core ropes, but instead has core rope simulator boxes. These boxes were used during development and ground testing to avoid constantly manufacturing ropes. The core rope simulator is undocumented, so I reverse-engineered it, built an interface, and we used the simulator to run programs on our Apollo Guidance Computer. But we ran into some complications along the way.
The AGC's core ropes
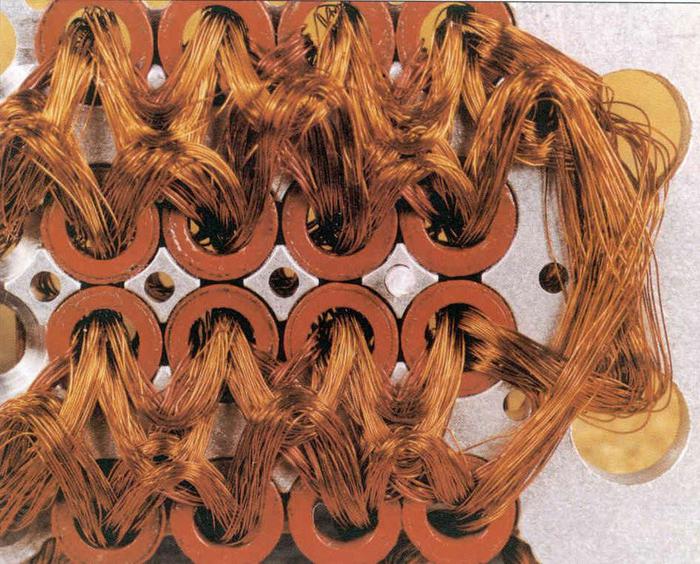
The Apollo Guidance Computer held six core rope modules, each storing just 6 kilowords of program information (about 12 kilobytes).2 Core rope modules were a bit like a video game ROM cartridge, holding software in a permanent yet removable format. Programs were hard-wired into core rope by weaving wires through magnetic cores. A wire passed through a core for a 1 bit, while a wire going around a core was a 0 bit. By weaving 192 wires through or around each core, each core stored 192 bits, achieving much higher density than read/write core memory that held 1 bit per core.
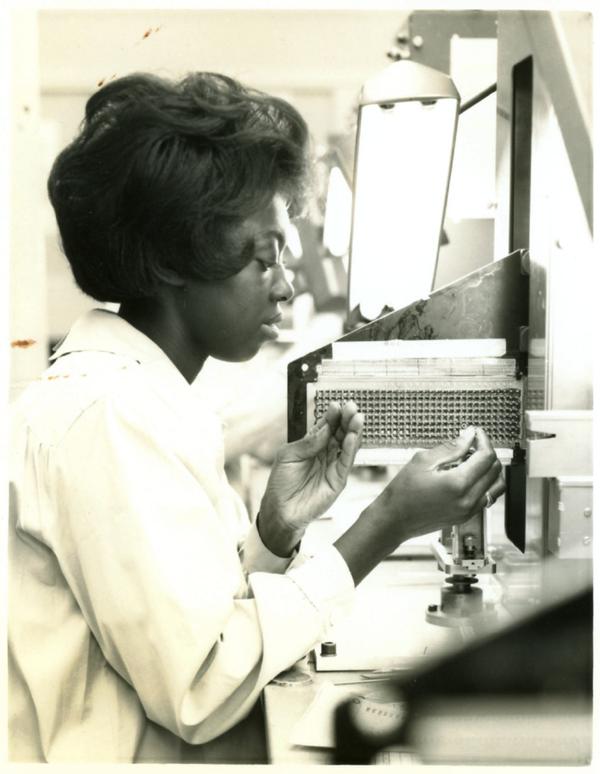
Manufacturing a core rope was a tedious process that took about 8 weeks and cost $15,000 per module. Skilled women wove the rope by hand, threading a hollow wire-filled needle back and forth through the cores, as shown below3. They had the assistance of an automated system that read the program from a punched tape and positioned an aperture over the matrix of cores. The weaver threaded the needle through the aperture to install the wire in the right location. Once completed, the core rope was mounted in a module along with hundreds of resistors and diodes and encased in epoxy to make it solid for flight. (See my earlier article on core rope for details.)
The core rope simulator
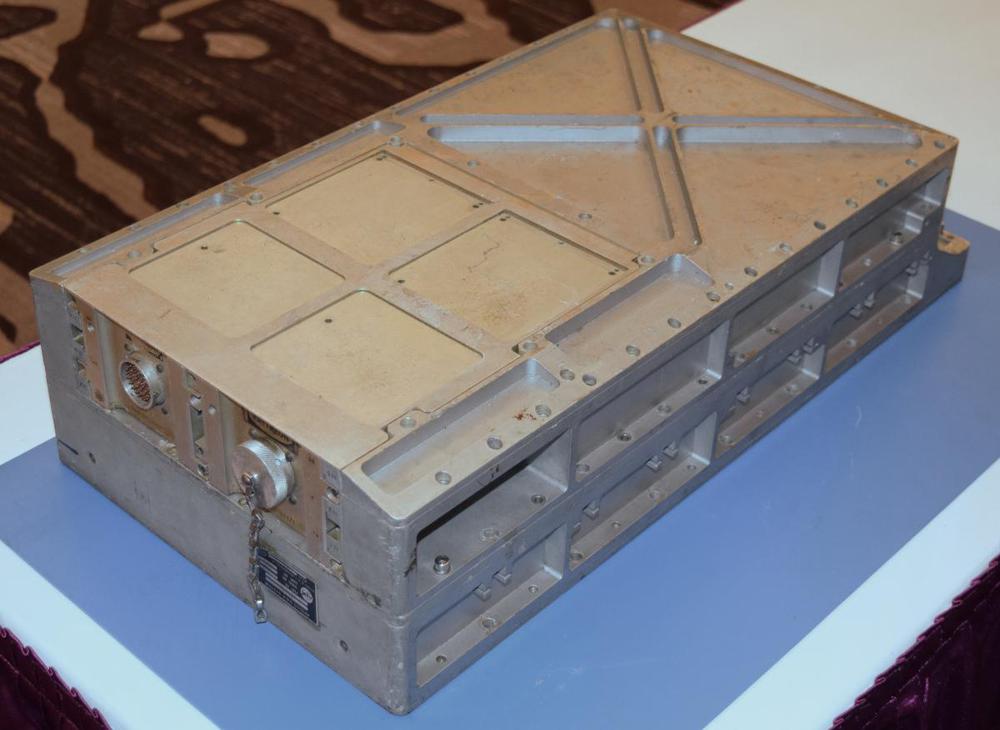
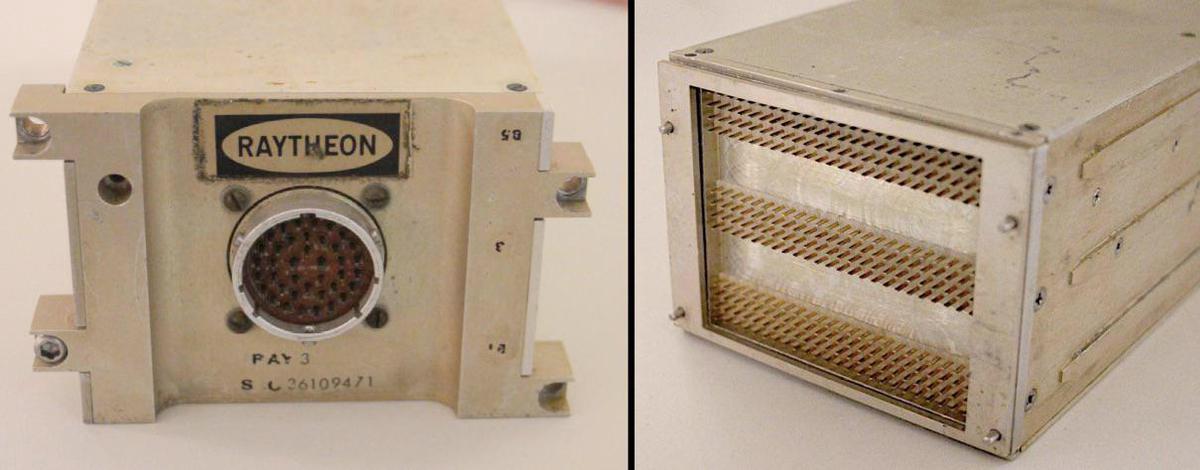
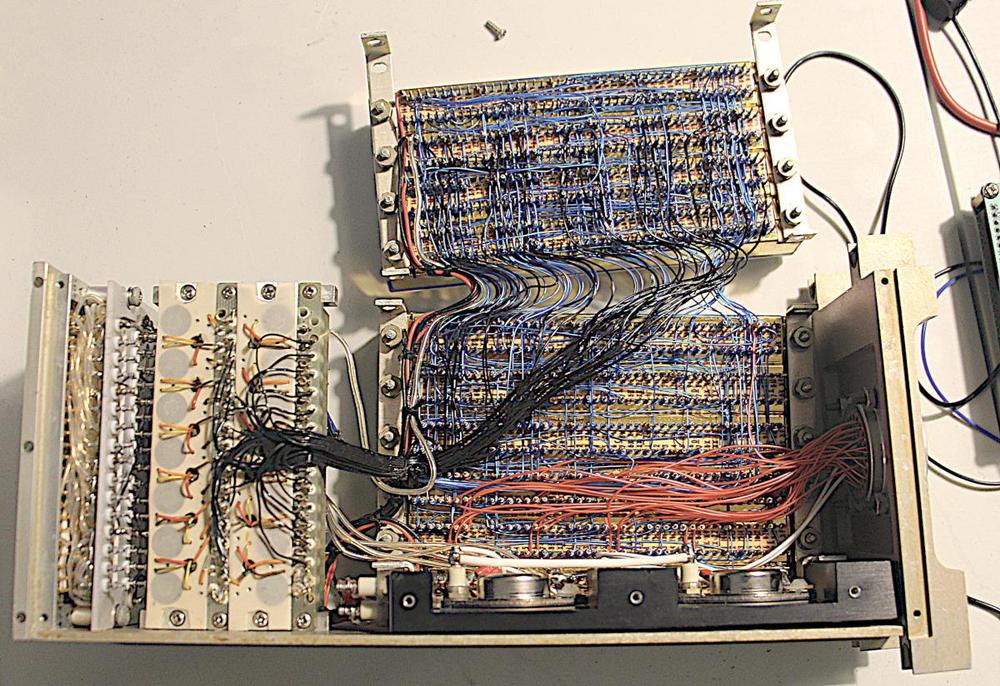
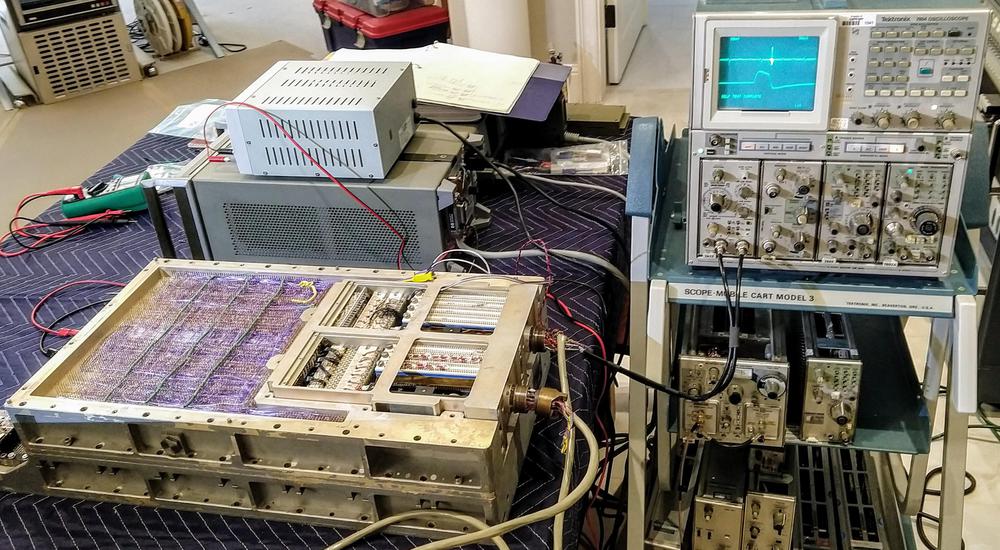
Since weaving a core rope was a time-consuming and expensive process, an alternative was required during development and ground testing. In place of the core ropes, NASA used rope simulators4 that allowed the AGC to load data from an external system. Our Apollo Guidance Computer was used for ground testing so it didn't have core ropes but instead had a core rope simulator. The simulator consists of two boxes that plugged into the AGC's core rope slots, each box filling three rope slots. These boxes are visible in the upper-left side of the AGC below, with round military-style connectors for connection to the external computer.
Although we have extensive documentation for the Apollo Guidance Computer, I couldn't find any documentation on the simulator boxes. Thus, I had to reverse engineer the boxes by tracing out all the circuitry and then figuring out what the boxes were doing. From the outside, the boxes didn't reveal much. One end of each box has a round MIL-Spec plug for connection to an external system. The other end has three groups of 96 pins that plugged into the AGC. Each group of pins took the place of one core rope module.
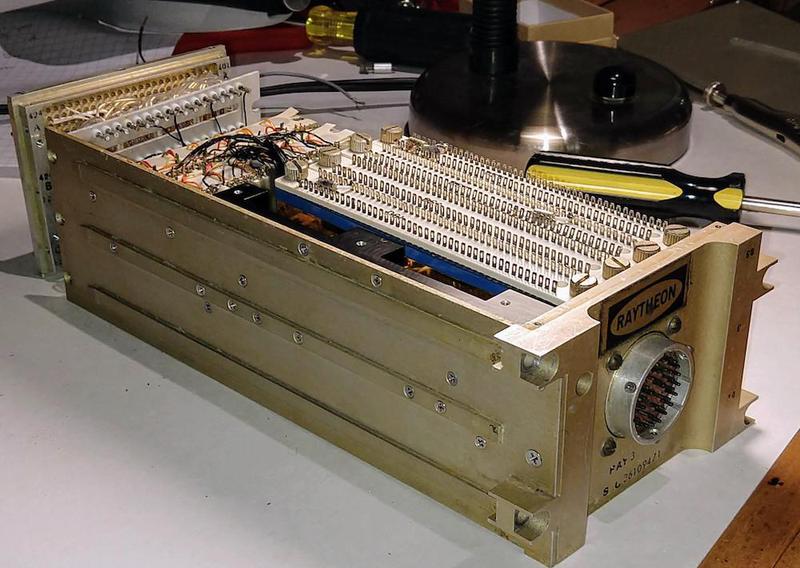
Opening up the boxes showed their unusual construction techniques. Part of the circuitry used high-density cordwood construction which mounted components vertically through holes in a metal block. On either side of the block, the component leads were welded to point-to-point wiring. Other circuitry in the boxes used standard integrated circuits (7400-series TTL). But unlike modern printed circuit boards, the chips were mounted inside plastic units called Dipstiks and wire-wrapped together.
Cordwood construction
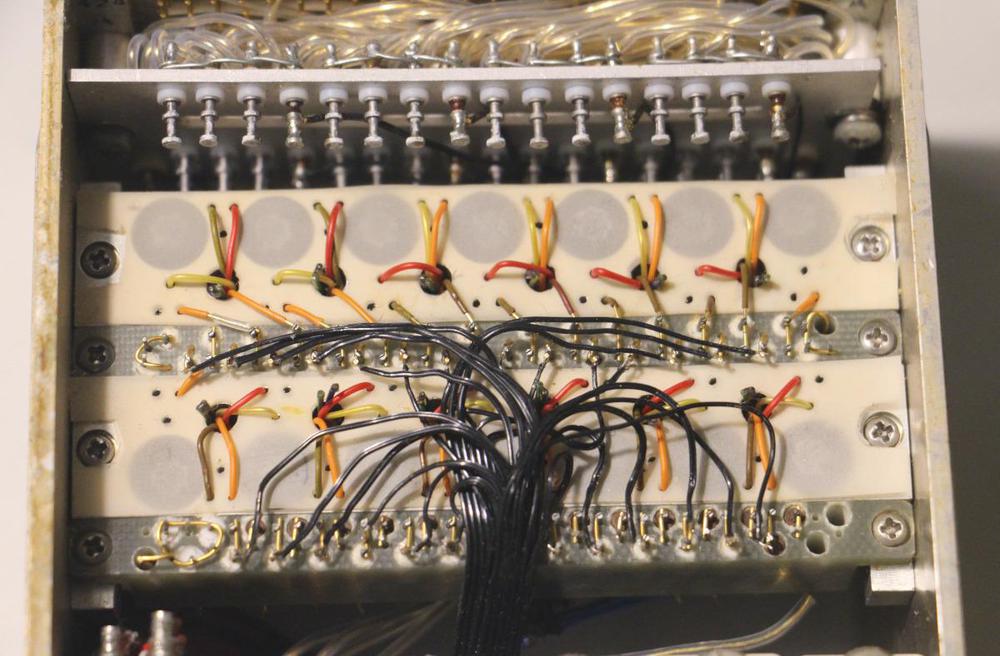
Cordwood construction was extensively used in the Apollo Guidance Computer for analog circuitry, and the cordwood construction in the rope simulators is similar (below). The white circles in the center are the ends of resistors and diodes mounted vertically through the module, with connections welded on either side. These components are stacked together densely, like wood logs, giving cordwood construction its name. Pulse transformers are under the large gray circles. Similar pulse transformers are on the other side of the module with their orange, yellow, red, and brown wires emerging from the holes. The black wires connect the cordwood circuitry to the digital logic. At the top of the photo, the posts have diodes and resistors mounted behind them, along with connections to the pins that plug into the AGC.
The main purpose of the cordwood circuitry was to provide electrical isolation between the Apollo Guidance Computer's circuitry and the rope simulator boxes. In modern circuitry, this function would be implemented with optoisolators but the rope simulator used small pulse transformers instead. Because each box receives signals directed to three different rope modules, numerous diodes merge the three signals into one. Resistors control the current through the pulse transformers.
Reverse-engineering the analog cordwood circuitry was a pain. First, none of the components were visible since they are embedded in the module. I had to use a multimeter to try to figure out what the components were. Second, since cordwood construction has connections on both sides, I spent a lot of time flipping the box back and forth to find the connection I wanted. Finally, I couldn't come up with a good way of drawing a diagram of cordwood construction without ending up in a maze of lines.
Digital logic and the Dipstiks
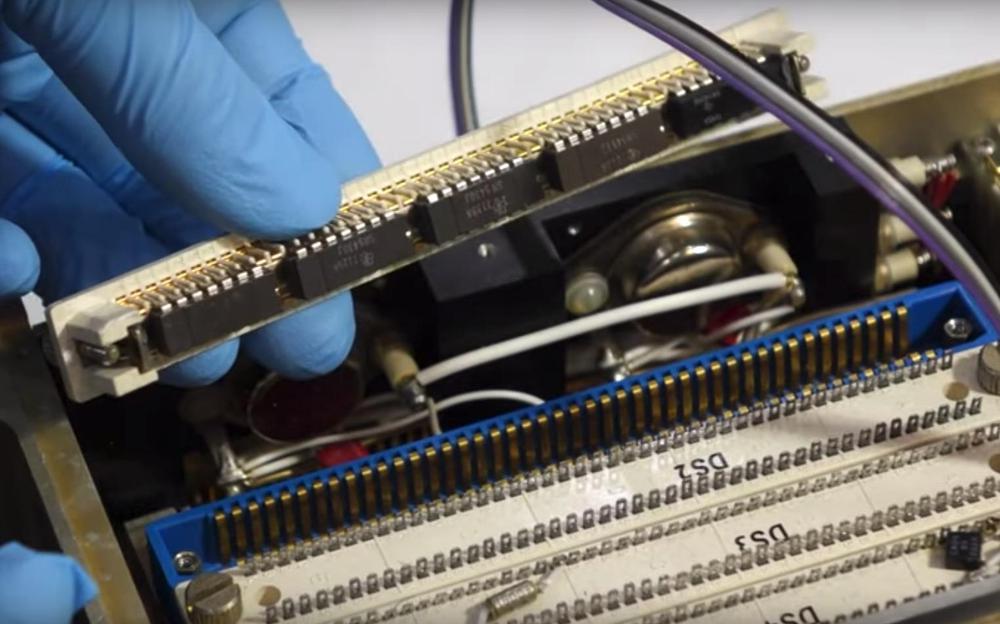
The Dipstik was a plug-in module introduced in 1968 to simplify prototyping with integrated circuits. It replaced printed circuit boards with a packaging system that provided twice the density. (See this vintage Dipstik ad.) The idea of the Dipstik was a plastic connector block with wire-wrap pins on the bottom for wiring up the circuit. The integrated circuits were clipped into a carrier that fit into the connector block. The carrier had solder lugs on top for additional components, such as decoupling capacitors. (The photo below shows Dipstik modules with one IC carrier removed. Each carrier held 5 integrated circuits.) The pins of the integrated circuit were sandwiched between contacts on the carrier and contacts on the connector block. It seemed like a great idea but turned out to be unreliable. As the plastic flexed and bowed out, the contacts with the pins became unreliable. (This was a problem both for contemporary Dipstik users and for us decades later.) The Dipstik was a stock market failure.
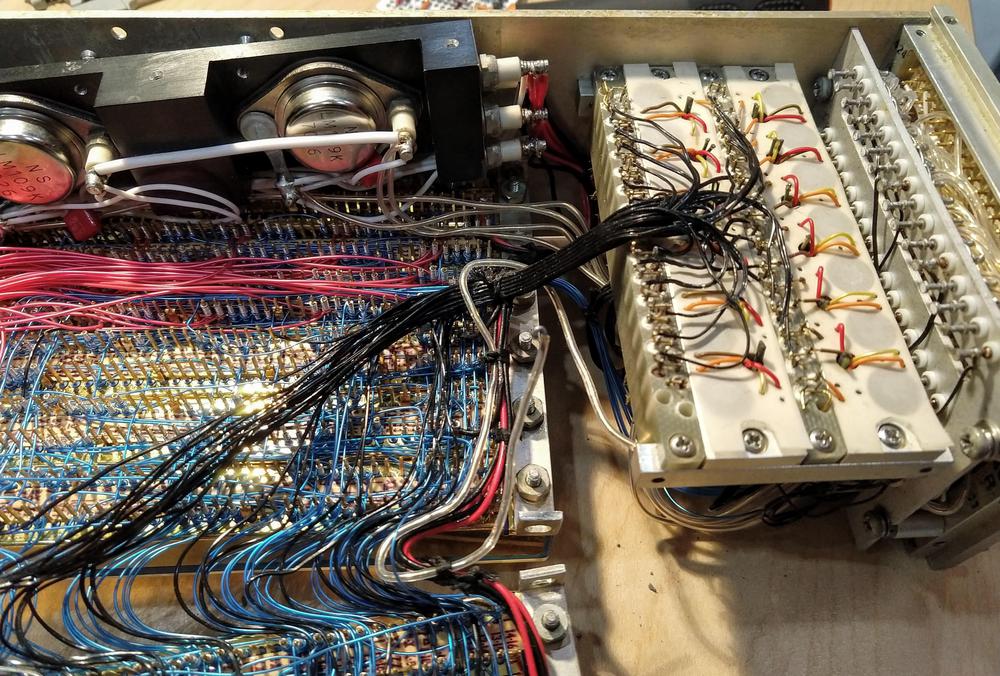
The photo below shows the wire-wrapped connections on the underside of the Dipstiks. Tracing this was extremely tedious since I couldn't follow a wire through the sea of identical blue wires. Instead, I had to beep everything out with a multimeter to find what was connected to what. Then I could construct a schematic diagram of the logic circuitry and ponder what it was doing.5 In total, the rope simulator used about 50 ICs.
Based on the dates on the components, the simulator boxes were built in 1971. Even though this is just a few years after the design of the AGC, the technology in the simulator boxes is much more advanced, illustrating the rapid changes in IC design between the mid-1960s and the early 1970s. The AGC was built with simple integrated circuits, each containing two NOR gates and built with primitive resistor-transistor logic (RTL). The simulator boxes, on the other hand, were built from more complex 7400-series chips6 containing up to a dozen TTL (transistor-transistor logic) gates. Unlike the obsolete flat-pack integrated circuits in the AGC, the simulator boxes used DIP (dual in-line package) ICs, a packaging style that is still in use.
Results of reverse engineering
After tracing out all the circuitry, I figured out how the rope simulator worked and created a schematic.
Essentially, one box decodes the address being accessed, while the second box sends the desired data to the AGC. (I'll call these the "address box" and "data box".)7The address box takes the rope signals and converts them into a binary address. This task is not straightforward because the signals it receives are 14-volt high-current pulses designed to flip the rope cores. These pulses are also separated in time since some flip the core and others flip the core back. Finally, the pulses sent to the ropes are not a simple address, but also signals to select one of the 6 rope modules, signals to select one of 12 strands in a module.
The address box uses pulse transformers to convert the 14-volt pulses into TTL signals. It has a bunch of AND-OR logic to convert the signals into a binary address. (This is not trivial because each module holds 6 kilowords, not a power of 2, so a lot of bit manipulation is required.) A flip flop latches the address when it is available. Finally, resistor-capacitor one-shots control the timing, determining from the various signals when the address is ready and when the result should be sent to the AGC.
The data box is simpler. It receives 16 bits of data from the external system and sends signals to the AGC's sense amplifiers simulating the millivolt output from a core. These signals are generated via pulse transformers. The address box and data box communicate with each other via wires on the AGC backplane.
The boxes communicate with the external system via differential signals, to avoid picking up noise on long cables. The boxes contain LM109 5-volt regulators to power their TTL circuits. One box receives unregulated DC through the external connector, and sends unregulated DC to the other box through the AGC's backplane wiring. (This seems strange to me.)
The BeagleBone interface
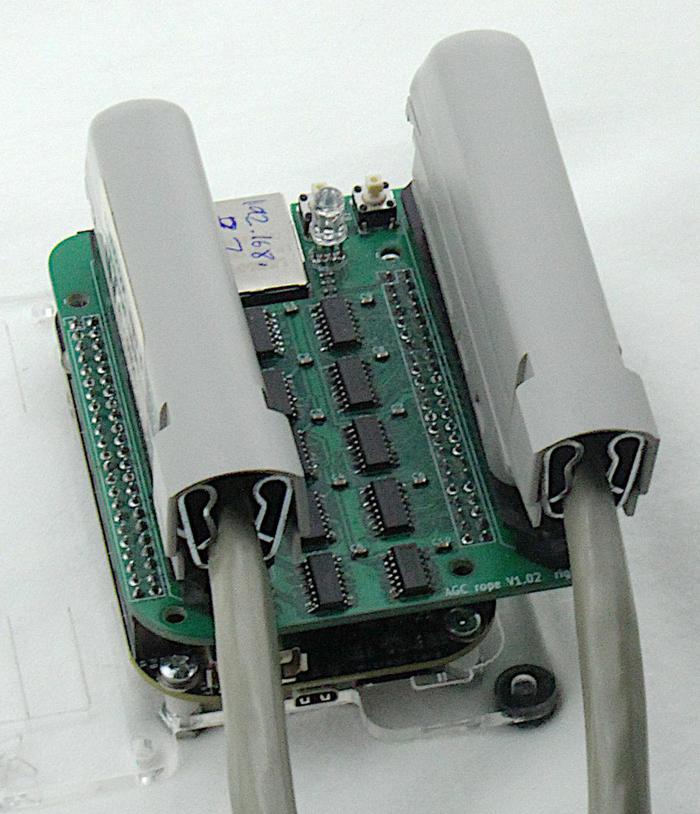
Once I had reverse-engineered the core rope simulator, the next step was to build an interface that could provide program data to the simulator. I used a BeagleBone, a tiny single-board Linux system. The advantage of the BeagleBone is that it includes fast microcontrollers that could respond to the AGC's memory requests quickly, in real time. (I've written about the BeagleBone's PRU microcontrollers before, and used them to make a Xerox Alto Ethernet interface.)
I designed an interface board that plugged into the BeagleBone. The board is pretty straightforward: some AM26C32 differential line receivers to convert the differential signals from the simulator into 3.3V logic signals for the BeagleBone, and some AM26C31 differential line drivers to send signals to the simulator.8 I designed the board in KiCad and PCBWay manufactured it. They are a sponsor of our AGC restoration, so send them some business :-)
I wrote some software that runs on the PRU, the BeagleBone's microcontroller. This software is basically a state machine that waits for an address from the simulator box, waits for the timing signal, reads the word from BeagleBone RAM, and sends the word to the simulator box. The software is on Github.
Problems with the core rope simulator
The core rope simulator boxes were not built to the standard of the Apollo Guidance Computer, and I ended up spending a lot of time debugging them.10 Many welds in the cordwood circuitry were broken and needed to be soldered. (I don't know if the welds went bad over time or if we broke connections while reverse engineering.) We also found a short circuit on a Dipstik and a bad IC.
The Dipstiks were the worst problem, as many of the contacts between a Dipstik and the IC were intermittent. The problem was that the IC pins are sandwiched between contacts in the Dipstik carrier and contacts in the Dipstik connector block. The plastic Dipstiks tended to bow outwards, resulting in intermittent bad contacts. By bending the IC pins into S curves, Marc was able to keep the pins in contact with both sides, at least for a little while. But after a few hours, the soft IC pins would bend back and connections became unreliable again, so we don't have a good long-term fix.
The most interesting problem was a race condition between two signals from the AGC that should have dropped simultaneously. They fed two ends of a pulse transformer coil, so the transformer should have produced no signal. However, one signal dropped a bit slower than the other, causing a glitch pulse from the pulse transformer.5 Unfortunately, the digital logic in the simulator box was asynchronous, so the glitch latched a bad address bit into the box's flip flops, causing an access to the wrong memory location. Eventually, we tracked the problem down and put capacitors across the offending signals to filter out the glitch. Unfortunately, we used capacitors that were a bit too large and delayed the address signal too much in other circumstances, causing different errors. We put in smaller capacitors and we were finally able to successfully run programs on the AGC, using the vintage core rope simulator.
Conclusion
The Apollo Guidance Computer used core ropes for program storage. Since it wasn't practical to constantly manufacture core ropes during development, rope simulators were used in place of the core rope modules. I reverse-engineered the rope simulator and built a BeagleBone-based interface to drive it. We successfully ran programs on the AGC through the rope simulator. The rope simulator, however, had many problems and wasn't very reliable.
We will be demonstrating the Apollo Guidance Computer next week to celebrate the 50th anniversary of the Moon landing. Come see these historic demos at the Cradle Of Aviation Museum (Long Island) on July 18 and the MIT Museum on July 20.
@CuriousMarc made a video (below) showing our work with the core rope simulator. I announce my latest blog posts on Twitter, so follow me @kenshirriff for future articles. I also have an RSS feed. My rope simulator files are on Github. Thanks to PCBWay for sponsoring this board.
Notes and references
-
The AGC restoration team consists of Mike Stewart (creator of FPGA AGC), Carl Claunch, Marc Verdiell (CuriousMarc on YouTube) and myself. The AGC that we're restoring belongs to a private owner who picked it up at a scrapyard in the 1970s after NASA scrapped it. For simplicity, I refer to the AGC we're restoring as "our AGC". ↩
-
The AGC was a 15-bit machine: each word consisted of 15 data bits and a parity bit. While a word that isn't a power of two may seem bizarre now, computers in the 1960s were designed with whatever word size fit the problem. ↩
-
The original caption on the photo was: "Space age needleworker 'weaves' core rope memory for guidance computers used in Apollo missions. Memory modules will permanently store mission profile data on which critical maneuvers in space are based. Core rope memories are fabricated by passing needle-like, hollow rod containing a length of fine wire through cores in the module frame. Module frame is moved automatically by computer-controlled machinery to position proper cores for weaving operation. Apollo guidance computer and associated display keyboard are produced at Raytheon Company plant in Waltham, Massachusetts." Caption and photo are from a Raytheon document, courtesy of Transistor Museum. ↩
-
Several different core rope simulators were built for the AGC. The AGC monitor provided a debugging console with lights and switches along with the rope simulator. The Portafam was a rope simulator that could load programs from magnetic tape. While these rope simulators had some documentation, unfortunately, I couldn't find any documentation on the Raytheon rope simulator that we had, so I had to reverse engineer everything. ↩
-
I figured out all the circuitry except for two mysteries. The first mystery is the parity circuit, using two uncommon 74180 parity generator chips. These are not used for the memory parity bit, which is supplied externally. They do not check the address parity supplied by the AGC. It appears that based on an external switch they will optionally replace address bit 7 with the parity of the other address bits. Lacking an address bit, the system would then be unusable. We left the parity switched off and everything worked fine.
The second mystery is a transistor that looks like it would amplify the strand select signal. The problem is that the transistor's collector isn't connected to anything, so the transistor is unpowered and doesn't function. When we encountered timing issues with the strand select signal, we powered up this transistor to see if it helped, but it made things worse. In addition, the transistor appears to have been added to the cordwood circuitry at a later date. We ended up ignoring the transistor. ↩
-
The TTL chips in the interface boxes were 5400-series chips. These are the military version of the well-known 7400-series, identical except operating over a wider temperature range. ↩
-
The split into "address box" and "data box" isn't exact. Due to the way the rope slots are wired, the data box determines which of the 6 modules are being addressed and provides this information to the address box. ↩
-
I had some difficulty getting the round MIL-spec 20-39S connectors to attach to the simulator boxes, since they have unusual keying. There are a zillion slightly-different variants of these connectors, many costing hundreds of dollars. I ended up getting connectors off eBay and Marc milled the keying off so the connectors worked. I used 25-pair Amphenol telco cables between the BeagleBone and the simulator. Soldering the wires to the connectors was more of a pain than I expected. ↩
-
Viewing the pulse transformer signals on a scope was difficult because you need to see the small differential signal across the transformer. Since we didn't have a differential probe for the modern scopes, we used Marc's vintage scope that did have a differential probe. (You might think you could subtract the two signals with a modern scope, but the problem was that the difference was much smaller than the common-mode voltage, so you essentially get zero when you subtract.) ↩
-
We built some infrastructure to help debug the simulator boxes. I tested the boxes extensively outside the AGC, using an Arduino and a power transistor to generate test signals. I added debugging code to the BeagleBone to detect when something went wrong, and illuminated a status LED on my interface board. I also used the BeagleBone to generate an oscilloscope trigger signal at a known-bad address, letting us see the analog signals at that specific point. Mike wrote some FPGA code to check the data from the simulator box against the data the AGC should have read, detecting whenever something went wrong. Finally, I logged the addresses that the BeagleBone saw, while Mike logged that addresses that the AGC was sending. By comparing the addresses, we could see which addresses were bad.
I learned a few lessons from my interface board that I'll apply to future boards. Putting an RGB status LED on the board was my best idea, since it made it much easier to tell what was happening. I should have exposed the BeagleBone's serial port connector on my interface board. As it was, if I ran into any problems booting the BeagleBone, I had to pull off the interface board, attach the FTDI serial adapter, fix the problem via the serial console, remove the serial adapter, and then reinstall the interface board. Finally, I should have exposed a couple generic I/O pins for functions such as oscilloscope triggering. Instead, I had to solder temporary wires onto my interface board. ↩
They might have been using the base-emitter junction of the transistor as a fast low leakage diode or to compensate the Vbe of a different transistor.
ReplyDeleteHi Ken, Do you have any more details about the demo at the Cradle Of Aviation Museum? I can't find any more about this on their website or anywhere else. I live nearby and would love to see it!
ReplyDeleteJesse: we are demonstrating the AGC July 18 at the Cradle of Aviation Museum from 12 to 5pm. Details here.
ReplyDeleteKen,
ReplyDeleteSo nice to meet you and the rest of the team at MIT Museum earlier today. I'm in awe of how much you have all accomplished! Please keep up the good work!
John
Hello,
ReplyDeleteThat transistor looks like attempt at diagnostic mod. Maybe author of modification thought that there is an issue with signal and thought that adding transistor for amplification might fix it. After mod not fixing issue, collector got disconnected and left there for any future use.
Another great article, which was good, just got better.
ReplyDeleteThe conquest of the moon was a feat that brought admiration all over the world.
In most vintage equipment, creativity is more apparent than today's.
Thanks again for the article.
Another use for an extra diode, in series with a base or emitter, is to raise the input threshold of bipolar logic to increase noise immunity. The old 1488 quad line driver which is still commonly used for RS-232 does this.
ReplyDelete