This project has several pieces: a simple Python web server running on your computer, an Arduino with my infrared library, and an IR LED or other emitter. The Python web server provides a web page with a graphical remote control. Clicking on the web page sends a code to the web server, which sends it over the serial port to the Arduino, which sends it to the IR LED, which controls your device.
The web server
I used a rather trivial Python web server (based on SimpleHTTPServer) that performs two tasks. First, it provides the static HTML pages and images. Second, it receives the POST requests and sends them to the Arduino using the pyserial library.
The following code excerpt shows the handler that processes POSTs to /arduino by extracting the code value out of the POST data and sending it to the Arduino over the serial line. The Python server automatically provides static pages out of the current directory by default; this is how the HTML files and images are served. The code assumes the serial port is /dev/ttyUSB0, which is typically the case on Linux.
class MyHandler(SimpleHTTPRequestHandler):
  def do_POST(self):
    if self.path == '/arduino':
      form = cgi.FieldStorage(fp=self.rfile, headers=self.headers,
        environ={'REQUEST_METHOD':'POST'})
      code = form['code'].value
      arduino.write(code)
      self.send_response(200)
      self.send_header('Content-type', 'text/html')
      return
    return self.do_GET()

arduino = serial.Serial('/dev/ttyUSB0', 9600, timeout=2)
server = HTTPServer(('', 8080), MyHandler).serve_forever()
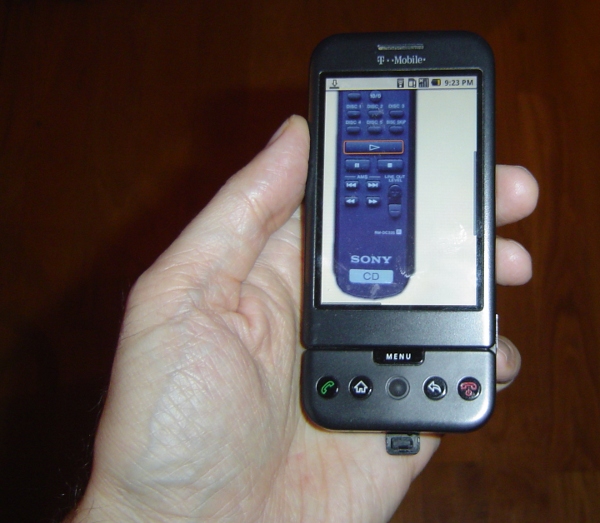
The server can be accessed locally at http://localhost:8080. You may need to mess around with your firewall and router to access it externally; this is left as an exercise for the reader. I found that using my cell phone's browser via Wi-Fi worked surprisingly well, and over the cellular network there was just a slight lag (maybe 1/3 second).
The Arduino code
The code on the Arduino is pretty simple. It reads a command from the serial port and makes the appropriate IR library call. Commands consist of a character indicating the type of code, followed by 8 hex characters. For instance, "S0000004d1" sends the code 4d1 using Sony protocol; this is "play" on my Sony CD player. "N010e03fc" sends 010e03fc using NEC protocol; this turns my Harman Kardon stereo on. The full code is here, but some highlights:
void processSerialCode() {
  if (Serial.available() < 9) return;
  char type = Serial.read();
  unsigned long code = 0;
  // Read 8 hex characters into code (omitted)
  if (type == 'N') {
    irsend.sendNEC(code, 32);
  }
  else if (type == 'S') {
    // Send Sony code 3 times
    irsend.sendSony(code, 12);
    delay(50);
    irsend.sendSony(code, 12);
    delay(50);
    irsend.sendSony(code, 12);
  }
  // More code for RC5 and RC6
}
In more detail, the Arduino waits for 9 characters to be available on the serial port. It then parses the hex value and calls the appropriate IR library send routine. The Arduino code does some special-case stuff for the different code types. Sony codes are transmitted three times as the protocol requires. The RC5 and RC6 protocol uses a toggle bit that is flipped on each transmission. (Disclaimer: I don't have RC5/RC6 devices, so this code is untested.) If your device uses a different protocol that the library doesn't support, you're out of luck unless you add the protocol to the library. That's probably not too hard; a couple people have already implemented new protocols.
The web page
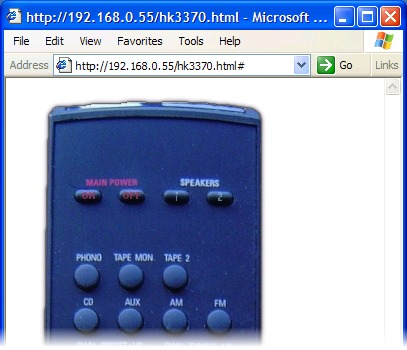
Most of the smarts of the system are in the web page. In my setup, I have a HK-3370 stereo, and a Sony CDP-CE335 CD player. I took a picture of the remote for each and used an HTML image map to make each button clickable. Clicking on a button uses Ajax to POST the appropriate IR code to the server.I use Ajax to send the code to the server to avoid reloading the web page on every click. The Javascript code is verbose but straightforward. The first part of the code creates the XML request object; unfortunately different browsers use different objects. The next part of the code creates and sends the POST request. The actual data sent to the server is, for instance, "code=N12345678" to send 0x12345678 using NEC protocol.
function button(value) {
  if (window.XMLHttpRequest) {
   request = new XMLHttpRequest();
  } else if (window.ActiveXObject) {
    try {
      request = new ActiveXObject("Msxml2.XMLHTTP");
    } catch (e) {
      try {
        request = new ActiveXObject("Microsoft.XMLHTTP");
      } catch (e) {}
    }
  }
  request.open('POST', '/arduino', true);
  request.setRequestHeader('Content-type', 'application/x-www-form-urlencoded');
  request.setRequestHeader('Content-length', value.length);
  request.setRequestHeader('Connection', 'close');
  request.send('code=' + value);
}
The clickable buttons are defined in the HTML through an image and an image map. Generating the image and the image map is the hard part of the whole project:
<img src="hk3370.png" width="268" height="800" border="0" usemap="#map" />
<map name="map">
<area shape="rect" coords="60,97,85,111" href="#" alt="on" onClick="button('N010e03fc')" />
<area shape="rect" coords="104,98,129,109" href="#" alt="off" onClick="button('N010ef906')" />
...
Each line in the map defines a region of the image as a button with a particular code. When clicked, this region will call the button function with the appropriate code, causing the code to be sent to the web server, the Arduino, and finally to the stereo. The alt text isn't actually used, but I recommend it to keep track of what button is associated with each line. The href causes the cursor to change when you go over the region, but isn't necessary.
In this approach, the Arduino code and web server code are very simple, as they don't need to know the functions of the codes. A different way to implement this system would be to put the table of codes ("SONY_CD_ON" = 4d1, etc.) either in the web server code or the Arduino code.
To generate the web pages, I took a picture of the remote with my camera and cleaned up the picture with GIMP. I used the GIMP image map plugin to create the image map. I outlined each button, then filled in the URL with the appropriate IR code, and filled in the alt text with the name of the button. Finally, I copied the map file into the HTML file and edited it to use the Javascript function.
The easiest way to obtain the IR codes is to use the IRrecvDump example sketch included in my IR library. Simply press the button on your remote, see what code was sent, and put that code into the image map. Alternatively, you may be able to find codes in the LIRC database.
Once you get going, it's actually fairly quick to generate the image map. Select a button in the editor, click the physical button on the remote, copy the displayed value into the editor, and move on to the next button. As long as you don't get obsessive and start tweaking the regions to line up perfectly, it's pretty quick.
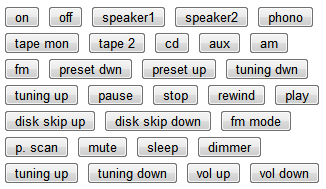
If you don't want to mess around with the image map, take a look at simple.html. This file shows how to use standard HTML buttons. Not as cool as the image, but much easier:
<input type="button" value="on" onClick="button('N010e03fc')" >
<input type="button" value="off" onClick="button('N010ef906')" >
...
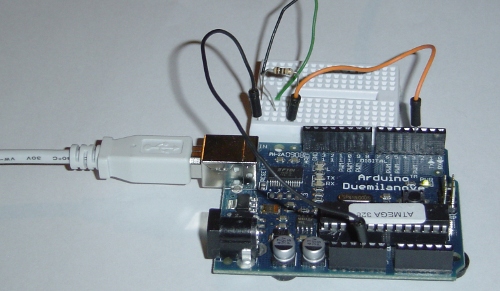
The hardware
The Arduino does the work of converting the hex code into an IR signal. The IR library uses digital PWM pin 3 as output, which must be connected to your IR emitter. I use a 100 ohm resistor to limit current. Wiring it up is trivial.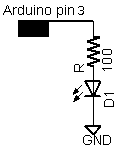
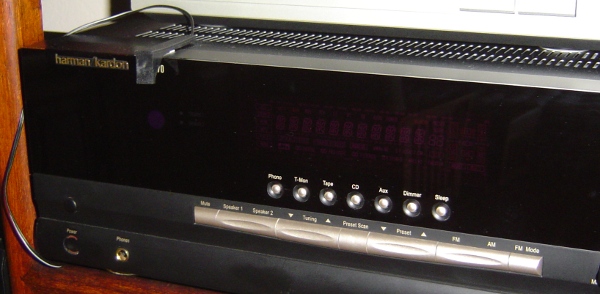
I used a Tivo IR blaster that I had lying around, but a plain IR LED will work too. The following picture shows an IR blaster attached to my sterero. Note that the blaster needs to be positioned about the stereo's IR receiver; it may be easier to see the receiver with a flashlight.
Putting it all together
To summarize the steps:- Download the files and unpack them.
- Get the infrared library and install it.
- Aim the IR source at the device(s) to control, and connect it to the Arduino. (You may want to use a visible LED for testing.)
- Connect the Arduino to the computer's USB port.
- Compile and install
IRwebremote.pdeusing the Arduino IDE. - Create HTML files for your remote controls. (This is the hard step.)
- Run the Python server:
python server.py - Go to
http://localhost:8080and control the devices.
41 comments:
Hi,
on page http://www.arcfn.com/2009/11/controlling-your-stereo-over-web-with.html
the link "infrared library" http://www.arcfn.com/2009/11/arcfn.com/2009/08/multi-protocol-infrared-remote-library.html is dead
thanks for your work and gretings from Berlin, Germany
Mike
This really a neat project. I've gotten it to control the mini and my Samsung TV (the latter I had to change 9000 to 4500). Playing around with RC5 which it receives but have not gotten it to control the device (yet). Thanks much.
Great idea for a project.
I am dreaming about making one set of the web remote using arduino, however I don't know how to wired all parts together and where to connect, description of that process and a picture is not enough for me to figure out. Can any one help me and draw a sketch of how to connect LEDs and receivers etc? Something similar to this http://lgusbporthackwitharduino.wikispaces.com/file/view/Arduino-IR-emiter.png/163877791/Arduino-IR-emiter.png
that will be helpful not only me I guess.
This project is great! just similar to what I want to do.
I am planning to do a universal IR remoter with Arduino. It should be combined with two parts; first one is for recording varies IR remoter via Arduino, and then store the code by PC program; the second part is to replay the code via PC program, and then transmit via Arduino.
My goal is the system should be able to adapt for NEC, SONY, Philips...IR protocol, and able to control many kinds of appliances.
Is someone also interested on that?
i wanted to use an actual remote to control the computer, make it swich on,switch off or use it to control the windows media player. Could u please tell me how to go about it.the only place in lirc for linux which makes this possible. can i use windows 7 and try this?
Hello Im using the IRwebremote PDE and have inserted it within the IRremote library. Im developing a php script so that I can control the Ardruino to a similar way that you have done. Iam having a problem with code flashing to pin 3, the TX and RX flash when taking code from the script, but no joy with Pin 3. Im just wondering where do I find the setup for PIN 3 in the libaries just to confirm its my php script is a problem. As I cannot find the output in any of the sketches or libaries. Thank you and great work, as you gave me a clue what to do for my project :)
I'm having problems sending codes for changing the TV channel. How to change the code for sending the command, for example, go to channel 31?
Hello :) i need little help with html/java
How to make with one click button to send 2,3,4 or more different IR codes to board ??
possible or not ?
it is possible to send RAW data from web ? if its how ?
Hi. I'm trying to do the same but I was thinking to change the ir transmitter with an optocoupler and wire it in the device board. Any of you have experience of doing this way? Whats the maximum optocouplers an output accepts?
Sorry for my english.
Thank you SO much! I was actually researching how to build a device allowing me to control my parents' home entertainment system from halfway across the state. Having me manage it for them so long left them totally inept, poor things. :(
This is a major leap ahead for me. Thanks!
Thank you SO much! I was actually researching how to build a device allowing me to control my parents' home entertainment system from halfway across the state. Having me manage it for them so long left them totally inept, poor things. :(
This is a major leap ahead for me. Thanks!
Your work has really helped me progress with my own project, I am interested in using this sketch to control my Xbox 360.
How would I go about implementing the unsigned long long into this sketch?.
Thanks,
Martin.
Great work Ken, thanks a lot.
For some reason, the application is very slow in my chromebook running Ubuntu, so I ported your idea and parts of your code to apache/php, the result is fantastic, it runs a lot faster even in my small chromebook.
Now my wife can watch the tv in the ironing room, controlling the cable box located in my bedroom (in the opposite side of the house) using her iphone.
Thanks again.
Hello Mr. Ken,
i have been using your infrared library for 3 months now and understand many things in your source code, but i'm very weak in web development, so i was just asking a simple question for this infrared web based code....
does your library need an Ethernet shield for arduino or does it need the computer connected to arduino to be operated "ON" since i get the internet from the computer, or something else?
thank you
sorry, i meant to say "does the infrared web based code need"...instead of "library"
The example above is communicating with the arduino over USB, USB is a form of serial communication...
I used a raspberry pi instead of an ethernet shield, it can run the python web server ken has above plus power & communicate with the arduino over USB... Feel free to ask any questions, I'll do my best to answer them.
Hi, I am having a lot of fun with the IRremote library! thanks.
But now I am stuck trying to send code to a Yamaha HTR-5550 receiver. I bought it without the remote (RAV-242). Without the remote I can't turn of the "Set Menu" options.
I found the service manual from hifi-engine and the manual has hex codes for the remote.
i.e. Power: Custom Code (hex) 7A and Data 1F. I tried all the send methods :) such as SendNEC(0x7a1f, 32). I have ran out of combinations to try. Please help!
For "Set Menu" Custom Code (Hex) 7A and Data 9C.
Hi, Wei Wu...
Here are the codes I dumped from my Yamaha Remote a few months ago, I'm just heading out the door to go to work...
If you have any questions post them here & I'll get back to you as quickly as I can...
Yamaha Remote for Amp Model No. VR11270
Button Code
Power------------------NEC: BE41F10E
Tape Mon-------------NEC: BE4131CE
1-------------------------NEC: BE410BF4
2-------------------------NEC: BE418B74
3-------------------------NEC: BE414BB4
4-------------------------NEC: BE41CB34
5-------------------------NEC: BE412BD4
6-------------------------NEC: BE41AB54
7-------------------------NEC: BE416B94
8-------------------------NEC: BE41EB14
9-------------------------NEC: BE411BE4
10-----------------------NEC: BE419B64
11-----------------------NEC: BE415BA4
12-----------------------NEC: BE41DB24
13-----------------------NEC: BE413BC4
14-----------------------NEC: BE41BB44
15-----------------------NEC: BE417B84
16-----------------------NEC: BE41FB04
Test---------------------NEC: BE4153AC
Effect-------------------NEC: BE41837C
Up-----------------------NEC: BE41A35C
Down-------------------NEC: BE4123DC
Left----------------------NEC: BE41E31C
Right--------------------NEC: BE41639C
Vol Up------------------NEC: BE41B14E
Vol Down--------------NEC: BE41718E
32 bits
Hi, Wei Wu
Just got home, the code you are using looks to be too small to be 32bit, more like 16...
I bought the remote for receiver so I could decode it & get on with my project...
If buying a replacement remote isn't an option for you them I suggest you use the link below, there you will find a list of remote codes for Yamaha devices.
I have used it in the past to copy codes and transmit them to a device until I found a set that worked...
http://lirc.sourceforge.net/remotes/yamaha/
Hi Martin Boyle,
Thanks for the quick response :)
I don't want to buy a $39 to $49 remote to just getting into some menu setting. Plus, I have the service manual with the code. I thought I can build my own remote with arduino.
http://lirc.sourceforge.net/remotes/yamaha/RAV243 is the closest one matches the remote code for HTR-5550. Notice it has Pre-data 0xF7 and POWER on is 0x0000000000000002 (that is like 0x02) so the number of bit is similar to mine.
Hi, Wei Wu...
I have a multi remote, I have used it to dump all the power on codes it has for Yamaha receivers & put them in a sketch for you...
I hope that one of the power on codes works for the receiver you have, if so let me know...
good luck :)
/*
* IRremote: IRsendDemo - demonstrates sending IR codes with IRsend
* An IR LED must be connected to Arduino PWM pin 3.
* Version 0.1 July, 2009
* Copyright 2009 Ken Shirriff
* http://arcfn.com
*/
#include
IRsend irsend;
void setup()
{
Serial.begin(9600);
}
void loop() {
if (Serial.read() != -1) {
for (int i = 0; i < 3; i++) {
irsend.sendNEC(0x5ea1f807, 32);
delay(1000);
irsend.sendNEC(0x7e817e81, 32);
delay(1000);
irsend.sendNEC(0x1ee1f00f, 32);
delay(1000);
irsend.sendNEC(0x7e81fe01, 32);
delay(1000);
irsend.sendNEC(0x5ea17887, 32);
delay(1000);
irsend.sendNEC(0x7e8154ab, 32);
delay(4000);
}
}
}
Hi, Wei Wu...
I have a multi remote, I have used it to dump all the power on codes it has for Yamaha receivers & put them in a sketch for you...
I hope that one of the power on codes works for the receiver you have, if so let me know...
good luck :)
open the serial monitor, enter a character into the text box & hit enter to start the sketch. it will run for around 30 seconds....
/*
* IRremote: IRsendDemo - demonstrates sending IR codes with IRsend
* An IR LED must be connected to Arduino PWM pin 3.
* Version 0.1 July, 2009
* Copyright 2009 Ken Shirriff
* http://arcfn.com
*/
#include
IRsend irsend;
void setup()
{
Serial.begin(9600);
}
void loop() {
if (Serial.read() != -1) {
for (int i = 0; i < 3; i++) {
irsend.sendNEC(0x5ea1f807, 32);
delay(1000);
irsend.sendNEC(0x7e817e81, 32);
delay(1000);
irsend.sendNEC(0x1ee1f00f, 32);
delay(1000);
irsend.sendNEC(0x7e81fe01, 32);
delay(1000);
irsend.sendNEC(0x5ea17887, 32);
delay(1000);
irsend.sendNEC(0x7e8154ab, 32);
delay(4000);
}
}
}
:D :D :D :D
Calling Houston, we have established communication with receiver toggling on/off with 0x5EA1F807 NEC.
I am so excited haha...
Hi Martin Boyle,
Got the rest of the code here :-)
http://lirc.sourceforge.net/remotes/yamaha/RAV16
This stupid receiver's menu for setting speakers is only in the remote! Perhaps that was the reason for the $10 receiver price haha.
Brilliant..... I'm glad you are back on track ;)
Somebody figured it out here:
http://nobbin.net/2012/12/08/converting-yamaha-nec-infrared-codes-to-lirc-format/
Service manual spec for Power is 7A-1F.
7A = 01111010 then reverse the bits = 01011110 = 5E (byte 1)
FF - 5E = A1 (byte 2)
1F = 00011111 then reverse the bits = 11111000 = F8 (byte 3)
FF - F8 = 07 (byte 4)
Final answer: 5EA1F807
Im not sure why I'm finding this so hard but I can't seem to capture and replay any codes.
For example I have a volume up key on a Sony CD remote;
481
Decoded SONY: 481 (12 bits)
Raw (26): 2174 2450 -550 650 -550 1200 -600 600 -550 650 -550 1250 -550 650 -550 700 -500 650 -550 600 -550 650 -550 700 -500 1250
And a volume up key on a Samsung TV;
68733A46
Unknown encoding: 68733A46 (32 bits)
Raw (68): -29974 4500 -4350 600 -1600 600 -1600 600 -1650 600 -500 600 -500 600 -500 600 -500 600 -500 600 -1600 600 -1600 600 -1650 600 -500 600 -500 600 -500 550 -550 600 -500 600 -1600 600 -1650 600 -1600 600 -500 600 -500 600 -500 600 -500 650 -450 600 -500 600 -500 650 -500 600 -1600 600 -1600 600 -1600 600 -1600 650 -1600 600
How on earth do I translate these to the char+hex code used in these examples? Thanks Dan
@Dan Miles:
Samsung is nearly NEC Format but with different Start/End Header. I have modified the code as seen here: http://www.spech.de/blog/article/universalfernbedienung
Maybe someone can add this to the library.
First of all thanks Ken for this great post! Your library works very good and thanks for the examples. However I have a small problem with my Aiwa stereo, I receive the IR codes form the remote but when I send them trough Arduino the stereo doesn't recognize them.
Here is on\off code that your library translates as NEC 32 bit code: 76044FC0
And this are lirc codes: http://lirc.sourceforge.net/remotes/aiwa/RC-7AS06
Neither code is accepted from the stereo.
Is it possible that the Aiwa stereo can't accept this codes because it uses different IR receiver form that I'm using on my Arduino?
And can someone adjust the arduino code to accept raw codes?
Hi Anonymous, Can you post your Arduino code?
Martin I'm using Ken's original Arduino code.
It would be very useful if someone could adapt this Arduino code to accept raw IR codes.
For example to implement this code in Ken's code:
http://www.instructables.com/files/orig/F7A/SNFL/GVOW4WOZ/F7ASNFLGVOW4WOZ.pde
Hi Anon.
Try this script...
/*
* IRremote: IRsendDemo - demonstrates sending IR codes with IRsend
* An IR LED must be connected to Arduino PWM pin 3.
* Version 0.1 July, 2009
* Copyright 2009 Ken Shirriff
* http://arcfn.com
*/
#include
IRsend irsend;
void setup()
{
Serial.begin(9600);
}
void loop() {
if (Serial.read() != -1) {
for (int i = 0; i < 3; i++) {
irsend.sendNEC(0x76044c0, 32);
delay(4000);
}
}
}
What Arduino are you using?
Thanks Martin for your help.
I tried your code, but no luck. I think the problem is that the Arduino, for some reason, don't receives the wright code and that's why my stereo doesn't understands the codes. I can send codes from 3 other remotes but not this Aiwa remote. Du you think that is possible to send this lirc codes?
http://lirc.sourceforge.net/remotes/aiwa/RC-7AS06
Is it a cd player/stereo or a receiver?
It is cd player/stereo, this codes worked from my Nokia E51 mobile phone.
this is my project, only the first remote doesn't work.
http://darko84.dyndns.org:8099/
Hi Anon, This is a long shot... The only code I had for your make of stereo was coded as RC5...
Can you try the script below...
The comment box keeps removing the IRremote.h from the script because it thinks its a HTML tag, you'll need to include it yourself...
Entering a char in the serial monitor txt box will send the code...
/*
* IRremote: IRsendDemo - demonstrates sending IR codes with IRsend
* An IR LED must be connected to Arduino PWM pin 3.
* Version 0.1 July, 2009
* Copyright 2009 Ken Shirriff
* http://arcfn.com
*/
#include
IRsend irsend;
void setup()
{
Serial.begin(9600);
}
void loop() {
if (Serial.read() != -1) {
for (int i = 0; i < 3; i++) {
irsend.sendRC5(0xd0c, 12);
delay(4000);
}
}
}
Greetings someone here?
I can lend a hand, there will be an example of how to send codes panasonic right through the web, following the irwebremote example, or I can add that you can send codes panasonic
Aiwa Issue
Refering to Anon's isseu using AIWA-Remotecodes. I also tried to decode Aiwa and was happy to find out that the lib showed NEC-Codes coming from the Aiwa-remote but in fact they are not!
You can identify a real NEC-Code by checking every other byte of the received code e.g. NEC:1D-E2-10-EF where E2 is inverted 1D and EF is inverted 10. If you check the Aiwa-Codes you'll find out that those codes are not following this rule. That's why sending out NEC-Codes to Aiwa will not work.
In my current project I want to translate Kenwood remote codes to Aiwa codes. As a workaround for above problem I'm sending raw-codes to the Aiwa, which works fine on the Arduino MEGA but on the breadboard UNO I'm stucked using the SWITCH-CASE command. It only works for 9 cases if I have more than 10 cases there ist now code transmitted at all. :(
Thanks! I was given a Harman receiver without the remote and was able to learn a cheap programmable remote the important buttons (volume, power) through an Arduino! Best regards, Gregor van Egdom (www.krekr.nl)
Post a Comment