A Multi-Protocol Infrared Remote Library for the Arduino

Code now on github

The most recent code is at github.com/shirriff/Arduino-IRremote. If you have any issues, please report them there.

Do you want to control your Arduino with an IR remote? Do you want to use your Arduino to control your stereo or other devices? This IR remote library lets you both send and receive IR remote codes in multiple protocols. It supports NEC, Sony SIRC, Philips RC5, Philips RC6, and raw protocols. If you want additional protocols, they are straightforward to add. The library can even be used to record codes from your remote and re-transmit them, as a minimal universal remote.

Arduino IR remote

To use the library, download from github and follow the installation instructions in the readme.

How to send

This infrared remote library consists of two parts: IRsend transmits IR remote packets, while IRrecv receives and decodes an IR message. IRsend uses an infrared LED connected to output pin 3. To send a message, call the send method for the desired protocol with the data to send and the number of bits to send. The examples/IRsendDemo sketch provides a simple example of how to send codes:
#include <IRremote.h>
IRsend irsend;

void setup()
{
  Serial.begin(9600);
}

void loop() {
  if (Serial.read() != -1) {
    for (int i = 0; i < 3; i++) {
      irsend.sendSony(0xa90, 12); // Sony TV power code
      delay(100);
    }
  }
} 
This sketch sends a Sony TV power on/off code whenever a character is sent to the serial port, allowing the Arduino to turn the TV on or off. (Note that Sony codes must be sent 3 times according to the protocol.)

How to receive

IRrecv uses an infrared detector connected to any digital input pin.

The examples/IRrecvDemo sketch provides a simple example of how to receive codes:

#include <IRremote.h>

int RECV_PIN = 11;
IRrecv irrecv(RECV_PIN);
decode_results results;

void setup()
{
  Serial.begin(9600);
  irrecv.enableIRIn(); // Start the receiver
}

void loop() {
  if (irrecv.decode(&results)) {
    Serial.println(results.value, HEX);
    irrecv.resume(); // Receive the next value
  }
}
The IRrecv class performs the decoding, and is initialized with enableIRIn(). The decode() method is called to see if a code has been received; if so, it returns a nonzero value and puts the results into the decode_results structure. (For details of this structure, see the examples/IRrecvDump sketch.) Once a code has been decoded, the resume() method must be called to resume receiving codes. Note that decode() does not block; the sketch can perform other operations while waiting for a code because the codes are received by an interrupt routine.

Hardware setup

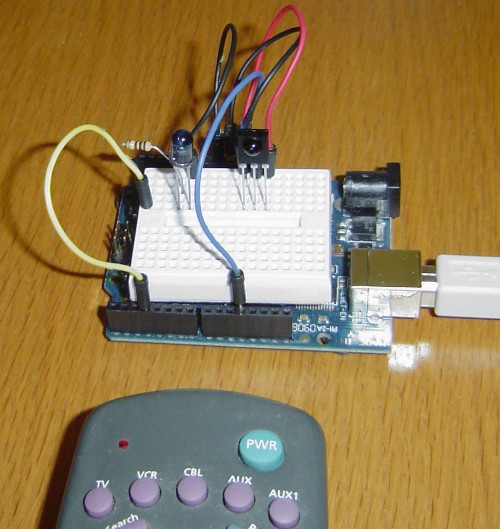
The library can use any of the digital input signals to receive the input from a 38KHz IR receiver module. It has been tested with the Radio Shack 276-640 IR receiver and the Panasonic PNA4602. Simply wire power to pin 1, ground to pin 2, and the pin 3 output to an Arduino digital input pin, e.g. 11. These receivers provide a filtered and demodulated inverted logic level output; you can't just use a photodiode or phototransistor. I have found these detectors have pretty good range and easily work across a room.

IR wiring

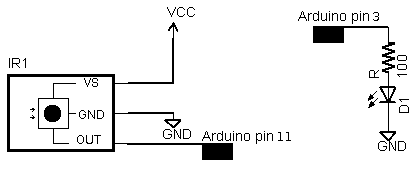
For output, connect an IR LED and appropriate resistor to PWM output pin 3. Make sure the polarity of the LED is correct, or it won't illuminate - the long lead is positive. I used a NTE 3027 LED (because that's what was handy) and 100 ohm resistor; the range is about 15 feet. For additional range, you can amplify the output with a transistor.

Some background on IR codes

An IR remote works by turning the LED on and off in a particular pattern. However, to prevent inteference from IR sources such as sunlight or lights, the LED is not turned on steadily, but is turned on and off at a modulation frequency (typically 36, 38, or 40KHz). The time when a modulated signal is being sent will be called a mark, and when the LED is off will be called a space.

Each key on the remote has a particular code (typically 12 to 32 bits) associated with it, and broadcasts this code when the key is pressed. If the key is held down, the remote usually repeatedly broadcasts the key code. For an NEC remote, a special repeat code is sent as the key is held down, rather than repeatedly sending the code. For Philips RC5 or RC6 remotes, a bit in the code is toggled each time a key is pressed; the receiver uses this toggle bit to determine when a key is pressed down a second time.

On the receiving end, the IR detector demodulates this signal, and outputs a logic-level signal indicating if it is receiving a signal or not. The IR detector will work best when its frequency matches the sender's frequency, but in practice it doesn't matter a whole lot.

The best source I've found for details on the various types of IR codes is SB IR knowledge base.

Handling raw codes

The library provides support for sending and receiving raw durations. This is intended mainly for debugging, but can also be used for protocols the library doesn't implement, or to provide universal remote functionality.

The raw data for received IR measures the duration of successive spaces and marks in 50us ticks. The first measurement is the gap, the space before the transmission starts. The last measurement is the final mark.

The raw data for sending IR holds the duration of successive marks and spaces in microseconds. The first value is the first mark, and the last value is the last mark.

There are two differences between the raw buffers for sending and for receiving. The send buffer values are in microseconds, while the receive buffer values are in 50 microsecond ticks. The send buffer starts with the duration of the first mark, while the receive buffer starts with the duration of the gap space before the first mark. The formats are different because I considered it useful for the library to measure gaps between transmissions, but not useful for the library to provide these gaps when transmitting. For receiving, 50us granularity is sufficient for decoding and avoids overflow of the gaps, while for transmitting, 50us granularity is more than 10% error so 1us granularity seemed better.

Obtaining codes for your remote

The easiest way to obtain codes to work with your device is to use this library to decode and print the codes from your existing remote.

Various libraries of codes are available online, often in proprietary formats. The Linux Infrared Remote Control project (LIRC), however, has an open format for describing codes for many remotes. Note that even if you can't find codes for your exact device model, a particular manufacturer will usually use the same codes for multiple products.

Beware that other sources may be inconsistent in how they handle these protocols, for instance reversing the order, flipping 1 and 0 bits, making start bits explicit, dropping leading or trailing bits, etc. In other words, if the IRremote library yields different codes than you find listed elsewhere, these inconsistencies are probably why.

Details of the receiving library

The IRrecv library consists of two parts. An interrupt routine is called every 50 microseconds, measures the length of the marks and spaces, and saves the durations in a buffer. The user calls a decoding routine to decode the buffered measurements into the code value that was sent (typically 11 to 32 bits).

The decode library tries decoding different protocols in succession, stopping if one succeeds. It returns a structure that contains the raw data, the decoded data, the number of bits in the decoded data, and the protocol used to decode the data.

For decoding, the MATCH macro determine if the measured mark or space time is approximately equal to the expected time.

The RC5/6 decoding is a bit different from the others because RC5/6 encode bits with mark + space or space + mark, rather than by durations of marks and spaces. The getRClevel helper method splits up the durations and gets the mark/space level of a single time interval.

For repeated transmissions (button held down), the decoding code will return the same decoded value over and over. The exception is NEC, which sends a special repeat code instead of repeating the transmission of the value. In this case, the decode routine returns a special REPEAT value.

In more detail, the receiver's interrupt code is called every time the TIMER1 overflows, which is set to happen after 50 microseconds. At each interrupt, the input status is checked and the timer counter is incremented. The interrupt routine times the durations of marks (receiving a modulated signal) and spaces (no signal received), and records the durations in a buffer. The first duration is the length of the gap before the transmission starts. This is followed by alternating mark and space measurements. All measurements are in "ticks" of 50 microseconds.

The interrupt routine is implemented as a state machine. It starts in STATE_IDLE, which waits for the gap to end. When a mark is received, it moves to STATE_MARK which times the duration of the mark. It then alternates between STATE_MARK and STATE_SPACE to time marks and spaces. When a space of sufficiently long duration is received, the state moves to STATE_STOP, indicating a full transmission is received. The interrupt routine continues to time the gap, but blocks in this state.

The STATE_STOP is used a a flag to indicate to the decode routine that a full transmission is available. When processing is done, the resume() method sets the state to STATE_IDLE so the interrupt routine can start recording the next transmission. There are a few things to note here. Gap timing continues during STATE_STOP and STATE_IDLE so an accurate measurement of the time between transmissions can be obtained. If resume() is not called before the next transmission starts, the partial transmission will be discarded. The motivation behind the stop/resume is to ensure the receive buffer is not overwritten while it is still being processed; debugging becomes very difficult if the buffer is constantly changing.

Details of the sending library

The transmission code is straightforward. To ensure accurate output frequencies and duty cycles, I use the PWM timer, rather than delay loops to modulate the output LED at the appropriate frequency. (See my Arduino PWM Secrets article for more details on the PWM timers.) At the low level, enableIROut sets up the timer for PWM output on pin 3 at the proper frequency. The mark() method sends a mark by enabling PWM output and delaying the specified time. The space() method sends a space by disabling PWM output and delaying the specified time.

The IRremote library treats the different protocols as follows:

NEC: 32 bits are transmitted, most-significant bit first. (protocol details)

Sony: 12 or more bits are transmitted, most-significant bit first. Typically 12 or 20 bits are used. Note that the official protocol is least-significant bit first. (protocol details) For more details, I've written an article that describes the Sony protocol in much more detail: Understanding Sony IR remote codes.

RC5: 12 or more bits are transmitted most-significant bit first. The message starts with the two start bits, which are not part of the code values. (protocol details)

RC6: 20 (typically) bits are transmitted, most-significant bit first. The message starts with a leader pulse, and a start bit, which is not part of the code values. The fourth bit is transmitted double-wide, since it is the trailer bit. (protocol details)

For Sony and RC5/6, each transmission must be repeated 3 times as specified in the protocol. The transmission code does not implement the RC5/6 toggle bit; that is up to the caller.

Adding new protocols

Manufacturers have implemented many more protocols than this library supports. Adding new protocols should be straightforward if you look at the existing library code. A few tips: It will be easier to work with a description of the protocol rather than trying to entirely reverse-engineer the protocol. The durations you receive are likely to be longer for marks and shorter for spaces than the protocol suggests. It's easy to be off-by-one with the last bit; the last space may be implicit.

Troubleshooting

To make it easier to debug problems with IR communication, I have optional debugging code in the library. Add #define DEBUG to the beginning of your code to enable debugging output on the serial console. You will need to delete the .o files and/or restart the IDE to force recompilation.

Problems with Transmission

If sending isn't working, first make sure your IR LED is actually transmitting. IR will usually show up on a video camera or cell phone camera, so this is a simple way to check. Try putting the LED right up to the receiver; don't expect a lot of range unless you amplify the output.

The next potential problem is if the receiver doesn't understand the transmitter, for instance if you are sending the wrong data or using the wrong protocol. If you have a remote, use this library to check what data it is sending and what protocol it is using.

An oscilloscope will provide a good view of what the Arduino or a remote is transmitting. You can use an IR photodiode to see what is getting transmitted; connect it directly to the oscilloscope and hold the transmitter right up to the photodiode. If you have an oscilloscope, just connect the oscilloscope to the photodiode. If you don't have an oscilloscope, you can use a sound card oscilloscope program such as xoscope.

The Sony and RC5/6 protocols specify that messages must be sent three times. I have found that receivers will ignore the message if only sent once, but will work if it is sent twice. For RC5/6, the toggle bit must be flipped by the calling code in successive transmissions, or else the receiver may only respond to a code once.

Finally, there may be bugs in this library. In particular, I don't have anything that receives RC5/RC6, so they are untested.

Problems with Receiving

If receiving isn't working, first make sure the Arduino is at least receiving raw codes. The LED on pin 13 of the Arduino will blink when IR is being received. If not, then there's probably a hardware issue.

If the codes are getting received but cannot be decoded, make sure the codes are in one of the supported protocols. If codes should be getting decoded, but are not, some of the measured times are probably not within the 20% tolerance of the expected times. You can print out the minimum and maximum expected values and compare with the raw measured values.

The examples/IRrecvDump sketch will dump out details of the received data. The dump method dumps out these durations but converts them to microseconds, and uses the convention of prefixing a space measurement with a minus sign. This makes it easier to keep the mark and space measurements straight.

IR sensors typically cause the mark to be measured as longer than expected and the space to be shorter than expected. The code extends marks by 100us to account for this (the value MARK_EXCESS). You may need to tweak the expected values or tolerances in this case.

The library does not support simultaneous sending and receiving of codes; transmitting will disable receiving.

Applications

I've used this library for several applications:

Other projects that use this library

Other Arduino IR projects

I was inspired by Building a Universal Remote with an Arduino; this doesn't live up to being a universal remote, but has a lot of information. The NECIRrcv library provided the interrupt handling code I use.

Arc + Arduino + ARM: Temperature monitoring

I'm using my Arc web server running on an ARM-based SheevaPlug to get analog data from my Arduino. The frame below and the graph of temperature and illumination are coming live are a screenshot from the SheevaPlug; they are dynamically generated by some simple Arc code which also collects the data from the Arduino. (Note: this is currently a screenshot, as I'm currently using the SheevaPlug for another project.)
screenshot
The graph shows the daily cycle of illumination (green line), as well as temperature climbing during the day (red line). The temperature goes way, way up when the sun hits the temperature sensor directly. Perhaps I should find some shade for it. For one day, the data went crazy; this is where the wires from the sensor got knocked out of the Arduino by the vacuum cleaner.

The SheevaPlug and Arduino

The Arc web server is running on the ARM-based SheevaPlug, a small Linux server that plugs into the wall. It is connected by USB to an Arduino microcontoller, which does the analog to digital conversion. In the photo, the SheevaPlug also has an Ethernet cable attached. A 4-conductor wire connects the Arduino to the temperature and light sensors outside. This wire is old phone cable, but as described below, I probably should have used something more shielded.

The Arduino code

The Arduino sketch (download) simply reads the voltages and writes them to the serial port:
#define SUPPLY 5.14 // Supply voltage (measured)

void setup() {
  Serial.begin(9600);
}

void loop() {
  float v = analogRead(TEMP_PIN) * SUPPLY / 1024;
  float c = (v - .5) * 100;
  Serial.print(c); 
  Serial.print(" ");
  Serial.println(analogRead(SUN_PIN), DEC);
  delay(5000);
}
Note that I've hardwired the supply voltage, as it's needed for the conversion. The Celsius temperature is obtained directly from the measured voltage (10mV per degree, and offset by .5V to allow negative temperatures).

The Arc code

The Arc server code (download) is straightforward. It leverages my earlier Arc example server code (download).

A background thread fetches the time / sun data lines from the serial port and writes the data to a file. It converts Celsius to Fahrenheit and limits the updates to one per minute:

(def logdata ()
  (w/appendfile outf "/tmp/data"
    (w/stdout outf
      (w/infile serial "/dev/ttyUSB0"
        (let oldtimestamp nil
          (while 1
            (with ((degc sun) (tokens (readline serial))
                  timestamp (gettimestamp))
              (when (isnt timestamp oldtimestamp)
                (let degf (+ 32 (* 9. (/ (coerce degc 'num) 5.)))
               (prn timestamp " " (num degf 2) " " sun)
                  (= oldtimestamp timestamp))))))))))

(new-bgthread 'logdata (fn () (logdata)) 0)
The simple web page is generated in Arc, but the graph itself is generated by gnuplot. Since this is currently a static page, it's a bit of overkill to use the Arc functions to generate the page.
(defop temperature req
  (system "gnuplot < gnuplotcmd")
  (page
    (tag h1 (prn "Temperature and light: Arc + Arduino + ARM"))
    (gentag img src "/graph.png")
    (tag br)
    (prn "This web page is being served by the") (link "Arc language" "http://www.righto.com/doc/index.html") (pr " web server running on a ")
    (link "SheevaPlug" "http://www.righto.com/2009/06/arduino-sheevaplug-cool-hardware.html")
    (pr " plug computer.") (pr "  For more details see ")
    (link "arcfn.com" "http://www.righto.com")
    (pr ".")
    (para)
    (link "View source code for this page" "/source-t")))

Arc vs. Python

I implemented a similar Arduino graph server in Python a few weeks ago. Overall, both Python and Arc make it easy to set up a simple web server. Comparing the Python code with the Arc code reveals Arc's lack of libraries.

The first problem with Arc is it doesn't have a serial library, so I can't configure the baud rate and parameters on my serial port from Arc. I'm just assuming it's set up right, and that's working but not very robust.

The second problem I encountered was creating the timestamps on the data. The latest version of Arc has a timedate function to generate a timestamp but unfortunately that's only in GMT. I tried writing a routine to convert the time to the local timezone, but that got rather annoying. In addition, Arc doesn't have any printf-like formatting, so I had to make my own formatting routine to generate zero-padded strings of the form "12:05". I rapidly decided that writing timezone functions wasn't what I wanted to do, and ended up just using the Unix date command. (This confirm's "kens' law": Any sufficiently complicated Arc application requries the use of 'system to get things done.)

; return a timestamp of the form 2009-08-20 19:22
(= tz "America/Los_Angeles")
(def gettimestamp ()
  (trim (tostring (system (string "TZ=" tz " date +'%m-%d-%Y %H:%M'")))))
I'd have to say that Python is clearly the easier solution overall.

Hardware details

sensors 
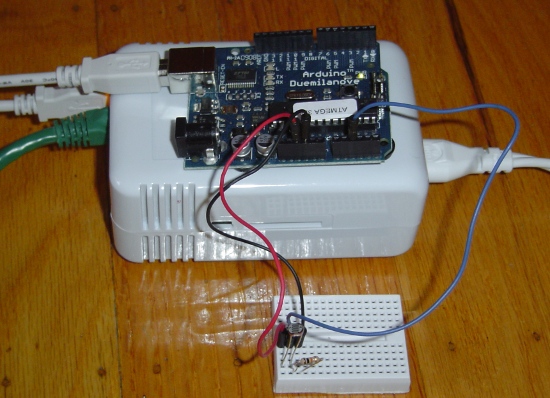
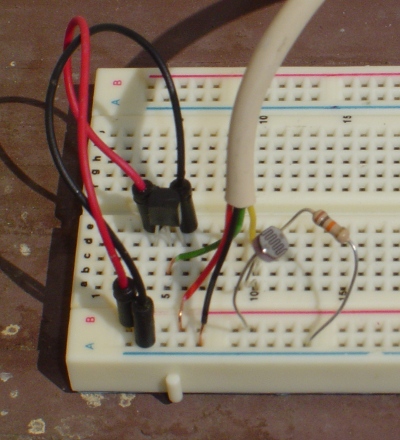
The circuit is pretty trivial. It measures light with a photocell and temperature with a TMP36 temperature sensor (tutorial). (The TMP36 is the three-wire black part that looks like a transistor.) These parts generate voltages that are read by the Arduino's analog-to-digital converters. The temperature sensor's voltage directly gives the Celsius temperature, while the photocell's light measurement is not calibrated to anything.

I had several problems with temperature measurement. First, the Arduino's A/D converter converts relative to its power supply voltage, so the temperature is only as stable as the power supply, and must be manually calibrated. Second, the 10 feet of unshielded phone wire between the Arduino and the temperature sensor introduced a lot of noise. Notice the 10 degree fluctuations on the first day of measurement. I added bypass capacitors after the first day, and the measurements are much smoother. Finally, the temperature sensor heats up a lot when the direct sun hits it in the late afternoon, apparently reaching 140° F. I guess there's a reason why real meteorologists put their temperature sensors in sheltered boxes instead of directly in the sun.

If I were doing this again, I'd probably use a digital temperature sensor such as the One-wire DS18B20; this would avoid the analog calibration and noise issues.

It would be cool to replace the wire between the Arduino and the sensors with Xbee wireless networking. Since I don't have any Xbees, the wire will have to suffice for now.

The photocell voltage is generated from a simple resistor divider. After the second day I changed the resistor from 10K to 1K so the curve wouldn't saturate in the bright sun. (10K worked fine indoors, but outdoors is much brighter.) You can see the break in the green line where I changed resistors.
Schematic

Conclusion

Arc and the SheevaPlug have been more reliable than I expected; my code has been running for a couple of weeks without problems. I think the SheevaPlug makes a good platform for this sort of project. Using Arc, however, is more of an "experimental curiosity"; I'd recommend a different language unless you really want to use Arc.

I have a few other related postings:

World's smallest Arc server

The frame below is being served was being served by the Arc language web server running on a SheevaPlug plug computer. (I've replaced the live connection with a screenshot, as I needed to use the SheevaPlug for something else.) Screenshot

The SheevaPlug

SheevaPlug in the wall 
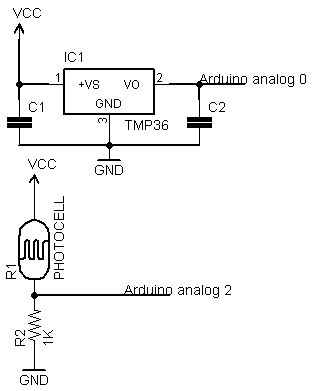
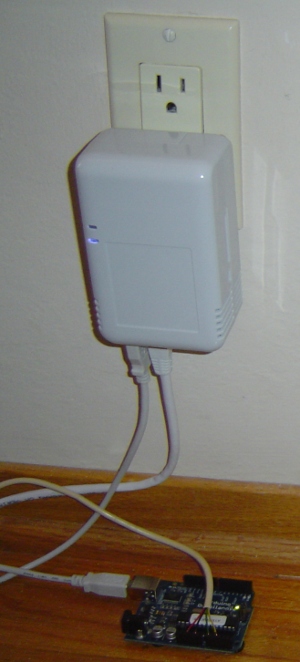
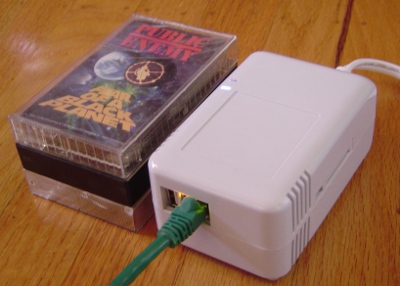
The SheevaPlug is a compact, inexpensive ($99), low-power (5W), ARM-based Linux server built into a wall-plug. It's fairly powerful despite its size, with an Ethernet port, Flash storage, and a 1.2GHz processor. See plugcomputer.org for more information.

Marvell gave me a SheevaPlug and I thought it would be an interesting platform for experimenting with Arc as a web server. The SheevaPlug seems like a good platform for an always-running web server.

The picture shows the SheevaPlug plugged into the wall, with the Ethernet cable at the bottom. That's not a wall-wart power supply; that's the whole computer.

Since the plug runs Linux, I can just ssh into it and use it like any other Linux server. I installed mzscheme on the SheevaPlug (apt-get install mzscheme), downloaded the Arc language with wget, used iptables to map port 80 to port 8080, and so on. Dynamic DNS provides a DNS name for my SheevaPlug.

Arc

Arc is a new dialect of Lisp, designed by Paul Graham and Robert Morris. It's designed to be compact, flexible, and useful for exploratory programming.

The Arc language now (finally) runs on the current version of mzscheme (link). The ARM version of mzscheme 4.1.3 is easily installable on the SheevaPlug, making it straightforward to run Arc on the SheevaPlug.

The demo is a simple program using the Arc web server. It lets you vote on a set of choices and then graphs the result using a simple HTML/CSS graph. The Arc demo also serves its own source code here.

I'm using Arc on the SheevaPlug mostly to see if it works, since I've been using Arc for a while. For normal SheevaPlug use, you'd probably want to use Apache, PHP, Python, or another normal web server configuration; they all have ARM packages that you can simply install.

I'm just assuming this is the world's smallest Arc server; we'll see if anyone runs Arc on something smaller.

If the server is not working, either I shut it down to do something else or it crashed. Send me email and let me know. You can access the server without the iframe here.

I've also used a Python web server on the SheevaPlug, which is a more mainstream way to go than Arc. In that case, I connected an Arduino to the SheevaPlug, so my Arduino could be accessed over the web.

Admittedly, the demo is just a proof-of concept. The next step is to do something non-trivial with the SheevaPlug and Arc.

Secrets of Arduino PWM

Pulse-width modulation (PWM) can be implemented on the Arduino in several ways. This article explains simple PWM techniques, as well as how to use the PWM registers directly for more control over the duty cycle and frequency. This article focuses on the Arduino Diecimila and Duemilanove models, which use the ATmega168 or ATmega328.

If you're unfamiliar with Pulse Width Modulation, see the tutorial. Briefly, a PWM signal is a digital square wave, where the frequency is constant, but that fraction of the time the signal is on (the duty cycle) can be varied between 0 and 100%.
PWM examples
PWM has several uses:

  • Dimming an LED
  • Providing an analog output; if the digital output is filtered, it will provide an analog voltage between 0% and 100% .
  • Generating audio signals.
  • Providing variable speed control for motors.
  • Generating a modulated signal, for example to drive an infrared LED for a remote control.

Simple Pulse Width Modulation with analogWrite

The Arduino's programming language makes PWM easy to use; simply call analogWrite(pin, dutyCycle), where dutyCycle is a value from 0 to 255, and pin is one of the PWM pins (3, 5, 6, 9, 10, or 11). The analogWrite function provides a simple interface to the hardware PWM, but doesn't provide any control over frequency. (Note that despite the function name, the output is a digital signal.)

Probably 99% of the readers can stop here, and just use analogWrite, but there are other options that provide more flexibility.

Bit-banging Pulse Width Modulation

You can "manually" implement PWM on any pin by repeatedly turning the pin on and off for the desired times. e.g.
void setup()
{
  pinMode(13, OUTPUT);
}

void loop()
{
  digitalWrite(13, HIGH);
  delayMicroseconds(100); // Approximately 10% duty cycle @ 1KHz
  digitalWrite(13, LOW);
  delayMicroseconds(900);
}
This technique has the advantage that it can use any digital output pin. In addition, you have full control the duty cycle and frequency. One major disadvantage is that any interrupts will affect the timing, which can cause considerable jitter unless you disable interrupts. A second disadvantage is you can't leave the output running while the processor does something else. Finally, it's difficult to determine the appropriate constants for a particular duty cycle and frequency unless you either carefully count cycles, or tweak the values while watching an oscilloscope.

Using the ATmega PWM registers directly

The ATmega168P/328P chip has three PWM timers, controlling 6 PWM outputs. By manipulating the chip's timer registers directly, you can obtain more control than the analogWrite function provides.

The AVR ATmega328P datasheet provides a detailed description of the PWM timers, but the datasheet can be difficult to understand, due to the many different control and output modes of the timers. The following attempts to clarify the use of the timers.

The ATmega328P has three timers known as Timer 0, Timer 1, and Timer 2. Each timer has two output compare registers that control the PWM width for the timer's two outputs: when the timer reaches the compare register value, the corresponding output is toggled. The two outputs for each timer will normally have the same frequency, but can have different duty cycles (depending on the respective output compare register).

Each of the timers has a prescaler that generates the timer clock by dividing the system clock by a prescale factor such as 1, 8, 64, 256, or 1024. The Arduino has a system clock of 16MHz and the timer clock frequency will be the system clock frequency divided by the prescale factor. Note that Timer 2 has a different set of prescale values from the other timers.

The timers are complicated by several different modes. The main PWM modes are "Fast PWM" and "Phase-correct PWM", which will be described below. The timer can either run from 0 to 255, or from 0 to a fixed value. (The 16-bit Timer 1 has additional modes to supports timer values up to 16 bits.) Each output can also be inverted.

The timers can also generate interrupts on overflow and/or match against either output compare register, but that's beyond the scope of this article.

Timer Registers

Several registers are used to control each timer. The Timer/Counter Control Registers TCCRnA and TCCRnB hold the main control bits for the timer. (Note that TCCRnA and TCCRnB do not correspond to the outputs A and B.) These registers hold several groups of bits:
  • Waveform Generation Mode bits (WGM): these control the overall mode of the timer. (These bits are split between TCCRnA and TCCRnB.)
  • Clock Select bits (CS): these control the clock prescaler
  • Compare Match Output A Mode bits (COMnA): these enable/disable/invert output A
  • Compare Match Output B Mode bits (COMnB): these enable/disable/invert output B
The Output Compare Registers OCRnA and OCRnB set the levels at which outputs A and B will be affected. When the timer value matches the register value, the corresponding output will be modified as specified by the mode.

The bits are slightly different for each timer, so consult the datasheet for details. Timer 1 is a 16-bit timer and has additional modes. Timer 2 has different prescaler values.

Fast PWM

In the simplest PWM mode, the timer repeatedly counts from 0 to 255. The output turns on when the timer is at 0, and turns off when the timer matches the output compare register. The higher the value in the output compare register, the higher the duty cycle. This mode is known as Fast PWM Mode.
The following diagram shows the outputs for two particular values of OCRnA and OCRnB. Note that both outputs have the same frequency, matching the frequency of a complete timer cycle.
Fast PWM Mode
The following code fragment sets up fast PWM on pins 3 and 11 (Timer 2). To summarize the register settings, setting the waveform generation mode bits WGM to 011 selects fast PWM. Setting the COM2A bits and COM2B bits to 10 provides non-inverted PWM for outputs A and B. Setting the CS bits to 100 sets the prescaler to divide the clock by 64. (Since the bits are different for the different timers, consult the datasheet for the right values.) The output compare registers are arbitrarily set to 180 and 50 to control the PWM duty cycle of outputs A and B. (Of course, you can modify the registers directly instead of using pinMode, but you do need to set the pins to output.)
  pinMode(3, OUTPUT);
  pinMode(11, OUTPUT);
  TCCR2A = _BV(COM2A1) | _BV(COM2B1) | _BV(WGM21) | _BV(WGM20);
  TCCR2B = _BV(CS22);
  OCR2A = 180;
  OCR2B = 50;
On the Arduino Duemilanove, these values yield:
  • Output A frequency: 16 MHz / 64 / 256 = 976.5625Hz
  • Output A duty cycle: (180+1) / 256 = 70.7%
  • Output B frequency: 16 MHz / 64 / 256 = 976.5625Hz
  • Output B duty cycle: (50+1) / 256 = 19.9%

The output frequency is the 16MHz system clock frequency, divided by the prescaler value (64), divided by the 256 cycles it takes for the timer to wrap around. Note that fast PWM holds the output high one cycle longer than the compare register value.

Phase-Correct PWM

The second PWM mode is called phase-correct PWM. In this mode, the timer counts from 0 to 255 and then back down to 0. The output turns off as the timer hits the output compare register value on the way up, and turns back on as the timer hits the output compare register value on the way down. The result is a more symmetrical output. The output frequency will be approximately half of the value for fast PWM mode, because the timer runs both up and down.
Phase-Correct PWM
The following code fragment sets up phase-correct PWM on pins 3 and 11 (Timer 2). The waveform generation mode bits WGM are set to to 001 for phase-correct PWM. The other bits are the same as for fast PWM.
  pinMode(3, OUTPUT);
  pinMode(11, OUTPUT);
  TCCR2A = _BV(COM2A1) | _BV(COM2B1) | _BV(WGM20);
  TCCR2B = _BV(CS22);
  OCR2A = 180;
  OCR2B = 50;
On the Arduino Duemilanove, these values yield:
  • Output A frequency: 16 MHz / 64 / 255 / 2 = 490.196Hz
  • Output A duty cycle: 180 / 255 = 70.6%
  • Output B frequency: 16 MHz / 64 / 255 / 2 = 490.196Hz
  • Output B duty cycle: 50 / 255 = 19.6%

Phase-correct PWM divides the frequency by two compared to fast PWM, because the timer goes both up and down. Somewhat surprisingly, the frequency is divided by 255 instead of 256, and the duty cycle calculations do not add one as for fast PWM. See the explanation below under "Off-by-one".

Varying the timer top limit: fast PWM

Both fast PWM and phase correct PWM have an additional mode that gives control over the output frequency. In this mode, the timer counts from 0 to OCRA (the value of output compare register A), rather than from 0 to 255. This gives much more control over the output frequency than the previous modes. (For even more frequency control, use the 16-bit Timer 1.)

Note that in this mode, only output B can be used for PWM; OCRA cannot be used both as the top value and the PWM compare value. However, there is a special-case mode "Toggle OCnA on Compare Match" that will toggle output A at the end of each cycle, generating a fixed 50% duty cycle and half frequency in this case. The examples will use this mode.

In the following diagram, the timer resets when it matches OCRnA, yielding a faster output frequency for OCnB than in the previous diagrams. Note how OCnA toggles once for each timer reset.
Fast PWM Mode with OCRA top
The following code fragment sets up fast PWM on pins 3 and 11 (Timer 2), using OCR2A as the top value for the timer. The waveform generation mode bits WGM are set to to 111 for fast PWM with OCRA controlling the top limit. The OCR2A top limit is arbitrarily set to 180, and the OCR2B compare register is arbitrarily set to 50. OCR2A's mode is set to "Toggle on Compare Match" by setting the COM2A bits to 01.

  pinMode(3, OUTPUT);
  pinMode(11, OUTPUT);
  TCCR2A = _BV(COM2A0) | _BV(COM2B1) | _BV(WGM21) | _BV(WGM20);
  TCCR2B = _BV(WGM22) | _BV(CS22);
  OCR2A = 180;
  OCR2B = 50;
On the Arduino Duemilanove, these values yield:
  • Output A frequency: 16 MHz / 64 / (180+1) / 2 = 690.6Hz
  • Output A duty cycle: 50%
  • Output B frequency: 16 MHz / 64 / (180+1) = 1381.2Hz
  • Output B duty cycle: (50+1) / (180+1) = 28.2%
Note that in this example, the timer goes from 0 to 180, which takes 181 clock cycles, so the output frequency is divided by 181. Output A has half the frequency of Output B because the Toggle on Compare Match mode toggles Output A once each complete timer cycle.

Varying the timer top limit: phase-correct PWM

Similarly, the timer can be configured in phase-correct PWM mode to reset when it reaches OCRnA.
Phase-Correct PWM with OCRA top
The following code fragment sets up phase-correct PWM on pins 3 and 11 (Timer 2), using OCR2A as the top value for the timer. The waveform generation mode bits WGM are set to to 101 for phase-correct PWM with OCRA controlling the top limit. The OCR2A top limit is arbitrarily set to 180, and the OCR2B compare register is arbitrarily set to 50. OCR2A's mode is set to "Toggle on Compare Match" by setting the COM2A bits to 01.
  pinMode(3, OUTPUT);
  pinMode(11, OUTPUT);
  TCCR2A = _BV(COM2A0) | _BV(COM2B1) | _BV(WGM20);
  TCCR2B = _BV(WGM22) | _BV(CS22);
  OCR2A = 180;
  OCR2B = 50;
On the Arduino Duemilanove, these values yield:
  • Output A frequency: 16 MHz / 64 / 180 / 2 / 2 = 347.2Hz
  • Output A duty cycle: 50%
  • Output B frequency: 16 MHz / 64 / 180 / 2 = 694.4Hz
  • Output B duty cycle: 50 / 180 = 27.8%
Note that in this example, the timer goes from 0 to 180 and back to 0, which takes 360 clock cycles. Thus, everything is divided by 180 or 360, unlike the fast PWM case, which divided everything by 181; see below for details.

Off-by-one

You may have noticed that fast PWM and phase-correct PWM seem to be off-by-one with respect to each other, dividing by 256 versus 255 and adding one in various places. The documentation is a bit opaque here, so I'll explain in a bit of detail.

Suppose the timer is set to fast PWM mode and is set to count up to an OCRnA value of 3. The timer will take on the values 012301230123... Note that there are 4 clock cycles in each timer cycle. Thus, the frequency will be divided by 4, not 3. The duty cycle will be a multiple of 25%, since the output can be high for 0, 1, 2, 3, or 4 cycles out of the four. Likewise, if the timer counts up to 255, there will be 256 clock cycles in each timer cycle, and the duty cycle will be a multiple of 1/256. To summarize, fast PWM divides by N+1 where N is the maximum timer value (either OCRnA or 255).

Now consider phase-correct PWM mode with the timer counting up to an OCRnA value of 3. The timer values will be 012321012321... There are 6 clock cycles in each timer cycle (012321). Thus the frequency will be divided by 6. The duty cycle will be a multiple of 33%, since the output can be high for 0, 2, 4, or 6 of the 6 cycles. Likewise, if the timer counts up to 255 and back down, there will be 510 clock cycles in each timer cycle, and the duty cycle will be a multiple of 1/255. To summarize, phase-correct PWM divides by 2N, where N is the maximum timer value.

The second important timing difference is that fast PWM holds the output high for one cycle longer than the output compare register value. The motivation for this is that for fast PWM counting to 255, the duty cycle can be from 0 to 256 cycles, but the output compare register can only hold a value from 0 to 255. What happens to the missing value? The fast PWM mode keeps the output high for N+1 cycles when the output compare register is set to N so an output compare register value of 255 is 100% duty cycle, but an output compare register value of 0 is not 0% duty cycle but 1/256 duty cycle. This is unlike phase-correct PWM, where a register value of 255 is 100% duty cycle and a value of 0 is a 0% duty cycle.

Timers and the Arduino

The Arduino supports PWM on a subset of its output pins. It may not be immediately obvious which timer controls which output, but the following table will clarify the situation. It gives for each timer output the output pin on the Arduino (i.e. the silkscreened label on the board), the pin on the ATmega chip, and the name and bit of the output port. For instance Timer 0 output OC0A is connected to the Arduino output pin 6; it uses chip pin 12 which is also known as PD6.
Timer outputArduino outputChip pinPin name
OC0A612PD6
OC0B511PD5
OC1A915PB1
OC1B1016PB2
OC2A1117PB3
OC2B35PD3

The Arduino performs some initialization of the timers. The Arduino initializes the prescaler on all three timers to divide the clock by 64. Timer 0 is initialized to Fast PWM, while Timer 1 and Timer 2 is initialized to Phase Correct PWM. See the Arduino source file wiring.c for details.

The Arduino uses Timer 0 internally for the millis() and delay() functions, so be warned that changing the frequency of this timer will cause those functions to be erroneous. Using the PWM outputs is safe if you don't change the frequency, though.

The analogWrite(pin, duty_cycle) function sets the appropriate pin to PWM and sets the appropriate output compare register to duty_cycle (with the special case for duty cycle of 0 on Timer 0). The digitalWrite() function turns off PWM output if called on a timer pin. The relevant code is wiring_analog.c and wiring_digital.c.

If you use analogWrite(5, 0) you get a duty cycle of 0%, even though pin 5's timer (Timer 0) is using fast PWM. How can this be, when a fast PWM value of 0 yields a duty cycle of 1/256 as explained above? The answer is that analogWrite "cheats"; it has special-case code to explicitly turn off the pin when called on Timer 0 with a duty cycle of 0. As a consequency, the duty cycle of 1/256 is unavailable when you use analogWrite on Timer0, and there is a jump in the actual duty cycle between values of 0 and 1.

Some other Arduino models use dfferent AVR processors with similar timers. The Arduino Mega uses the ATmega1280 (datasheet), which has four 16-bit timers with 3 outputs each and two 8-bit timers with 2 outputs each. Only 14 of the PWM outputs are supported by the Arduino Wiring library, however. Some older Arduino models use the ATmega8 (datasheet), which has three timers but only 3 PWM outputs: Timer 0 has no PWM, Timer 1 is 16 bits and has two PWM outputs, and Timer 2 is 8 bits and has one PWM output.

Troubleshooting

It can be tricky to get the PWM outputs to work. Some tips:
  • You need to both enable the pin for output and enable the PWM mode on the pin in order to get any output. I.e. you need to do pinMode() and set the COM bits.
  • The different timers use the control bits and prescaler differently; check the documentation for the appropriate timer.
  • Some combinations of bits that you might expect to work are reserved, which means if you try to use them, they won't work. For example, toggle mode doesn't work with fast PWM to 255, or with output B.
  • Make sure the bits are set the way you think. Bit operations can be tricky, so print out the register values and make sure they are what you expect.
  • Make sure you're using the right output pins. See the table above.
  • You'll probably want a decoupling capacitor to avoid spikes on the output.
An oscilloscope is very handy for debugging PWM if you have access to one. If you don't have one, I recommend using your sound card and a program such as xoscope.

Conclusion

I hope this article helps explain the PWM modes of the Arduino. I found the documentation of the different modes somewhat opaque, and the off-by-one issues unexplained. Please let me know if you encounter any errors.

Arduino + SheevaPlug = Cool Hardware Platform

I recently started using an Arduino in combination with a SheevaPlug as a convenient platform for hardware hacking. The two work together well, with complementary strengths. This describes my experience.

The Arduino

The Arduino is a popular microcontroller platform consisting of a small, inexpensive board and an easy-to-use C-based development environment. The board has multiple digital I/O pins and analog inputs, and a USB serial port connection for programming and communication. The Arduino can be interfaced with a wide variety of hardware. (The Arduino is kind of like a Microchip PIC development board, but uses the ATmega328 AVR microcontroller.) The Arduino is about the size of a credit card (but thick). It has connectors on top which will receive a daughter board (inexplicably called a "shield"), or jumper wires.
The Arduino board
The Arduino is very easy to program and use. The Arduino is programmed using the Wiring language, which is an extension of C with many libraries to interface with various types of hardware. The Arduino IDE provides an editor and compiler for a "sketch" (which is the name for an Arduino program), and downloads the code to the Arduino board over USB. After seeing the Arduino hype at the Maker Faire, I got a Adafruit Arduino Starter Pack, and I've been happy with it. More information about the Arduino is at www.arduino.cc; the playground is a good place to start.

You can do a lot with an Arduino, but it has some limitations. There's only 30KB of memory for programming (yes, kilobytes). Many things you might want to connect (Ethernet, SD card, USB hard drive or flash) require additional hardware, and even then are pretty limited.

The SheevaPlug

The Marvell SheevaPlug is a very small Linux server with a 1.2GHz 88F6281 ARM processor and 512MB of RAM and 512MB of flash storage. The SheevaPlug has a Gigabit Ethernet connection, a SD card slot, and a serial USB console connection. This all fits into a box the size of three cassette tapes that sells for $99 and uses about 5 watts of power.
The SheevaPlug
The SheevaPlug is designed to be plugged directly into the wall as a wall-wart, but the plug snaps out and can be replaced by a power coard. I'm currently using the "desktop" configuration with a power cord, since it's easier to connect things. Marvell recently gave me a SheevaPlug, and I've been enjoying it a lot.

Because the SheevaPlug is a full Linux system, the standard Linux software packages are available and easily installed with apt-get (full list). You can run X-windows (of course you need to VPN in). You can run Apache and PHP on the SheevaPlug and use it as a web server. The GCC toolchain runs on it. You can program it in C++, Python, Scheme, or whatever.

The main information source on the SheevaPlug is plugcomputer.org. Another useful site is computingplugs.com, a wiki about the SheevaPlug which is actually served by a SheevaPlug.

There are a few limitations of the SheevaPlug. The SheevaPlug is headless, so you need to access it via ssh or VNC. You can't run x86 binaries. The SheevaPlug's performance is roughly at the Pentium III level (benchmark), so it won't replace a state-of the-art server. Also, floating point performance is poor since there's no hardware FPU. The Linux install has some annoying minor issues with apt-get, DNS, NTP, and passwd (fixes). The SheevaPlug isn't really suited for low-level electronics projects because it doesn't have any accessible general-purpose I/O pins. (The CPU has 50 digital GPIO pins, but the SheevaPlug doesn't expose them.)

Arduino + SheevaPlug

The SheevaPlug and Arduino make a great pair together for hardware hacking projects since the SheevaPlug can easily provide the web server, computing, and storage functionality that the Arduino lacks, while the Arduino makes it easy to interface to hardware circuits. Moreover, the two are easily connected with a USB cable, and then they can communicate through simple serial communication (modulo kernel details below).
SheevaPlug with Arduino
The above picture shows the SheevaPlug and Arduino connected together by a USB cable. The SheevaPlug also has an Ethernet connection (green) and power (on the right). The Arduino has some jumpers to a breadboard circuit (described below).

A sample project: illumination recording

For an initial project, I decided to collect data on the illumnination in my room. (Temperature would have been more useful, but I didn't have a temperature sensor handy.) I implemented a simple Arduino sketch (i.e. program) to read illumination from a photocell and write it to the serial port. The SheevaPlug collects the data, generates a graph using gnuplot, and provides the data as a web page on the Internet. (Sorry, no URL to access it since I'm not currently running this.)

The screenshot below shows the web page that the SheevaPlug serves showing illumination across a few days. There are a lot of spikes due to turning lights on and off, but you can see where the sun rises, light increases through the day, peaking shortly before sunset. This web page illustrates the ability of the Arduino to measure analog data combined with the SheevaPlug's ability to collect data, plot it, and serve web pages.
SheevaPlug screenshot of browser

The Arduino code

Hooking up the Arduino to measure illumination was trivial; I used a 10K resistor and a photocell connected to an analog input pin. (I made the following schematic with Eagle.)
schematic of photocell connection

The Arduino sketch below (download) simply reads the analog input once a second and writes the value to the serial port as a decimal number. (One annoyance is the Arduino IDE won't run on the ARM processor, so I have to connect the Arduino to a separate computer to download the sketch.)

int ainPin = 2;     // select the analog input pin

void setup() {
  Serial.begin(9600);
}

void loop() {
  Serial.println(analogRead(ainPin), DEC);    // read the value from the sensor and write to serial
  delay(1000);
}

The Python code

The Python code that runs on the SheevaPlug (download) is straightforward. I used a simple Python web server to provide the graph page and some static files. It uses gnuplot to generate the graph. Some highlights of the code:

The pyserial library (apt-get install python-serial) provides simple access to the serial port. One thread reads lines from the serial port and dumps them to the data file along with a timestamp. Only one sample per minute is kept, and the others discarded. The Arduino may appear as a different device, e.g. /dev/ttyUSB0. If no such device appears when you plug the Arduino into the SheevaPlug, you probably need the kernel update below.

class Arduino(threading.Thread):
  def run(self):
    f = open('/tmp/data', 'a')
    # Port may vary from /dev/ttyUSB1
    self.ser = serial.Serial('/dev/ttyUSB1', 9600, timeout=10)
    self.ser.flushInput()
    old_timestamp = None
    while 1:
      data = self.ser.readline().strip()
      if data:
        timestamp = time.strftime("%m/%d/%Y %H:%M", time.localtime())
        if timestamp != old_timestamp:
          # Only log once per minute
          print >>f, timestamp, data.strip()
          old_timestamp = timestamp
        f.flush()

The other part of the Python code is an HTTP server using SimpleHTTPServer; a /graph URL runs gnuplot on the data file to generate a png image file. The returned web page loads the image, which is served by the Python server as a static file. (Since the SheevaPlug supports Apache, PHP, and mysql, I could have used them, but it seems like overkill for a simple demo.)

 def graph(self):
    g = os.popen('gnuplot', 'w')
    print >>g, GNUPLOT_CMD
    self.send_response(200)
    self.send_header('Content-type', 'text/html')
    self.end_headers()
    self.wfile.write(GRAPH_HTML)

Kernel with FTDI Serial support

The one stumbling block I encountered when using the SheevaPlug and Arduino together is the SheevaPlug kernel doesn't include FTDI support, which is necessary to access the Arduino via USB. An upgraded kernel is available, and much to my surprise it installed with no problems.

Where from here?

So far, I've found the Arduino and SheevaPlug to work together well. I have various plans to use the Arduino + SheevaPlug for home monitoring and control, solar panel monitoring, IR remote control, and other random projects. If there's interest, maybe I'll write about them in the future.

Inside the news.yc ranking formula

The recent arc3 release of Arc includes news.arc, the Arc source code for the Hacker News forum. Examining this code can give some insight into the ranking algorithm that selects the top articles on the Hacker News forum.

The ranking formula

In outline, each item is given a ranking, and the articles are sorted according to the ranking. The simplistic way to think about ranking is the number of votes is divided by time, so more votes results in a higher ranking, but the ranking also drops over time. The votes are raised to a power less than one, while the time is raised to a power greater than one, so time has more effect than votes. Some additional penalties also may be applied to the ranking.

To be specific, the following is the ranking code from news.arc:

(= gravity* 1.8 timebase* 120 front-threshold* 1
   nourl-factor* .4 lightweight-factor* .3 )

(def frontpage-rank (s (o scorefn realscore) (o gravity gravity*))
  (* (/ (let base (- (scorefn s) 1)
          (if (> base 0) (expt base .8) base))
        (expt (/ (+ (item-age s) timebase*) 60) gravity))
     (if (no (in s!type 'story 'poll))  1
         (blank s!url)                  nourl-factor*
         (lightweight s)                (min lightweight-factor*
                                             (contro-factor s))
                                        (contro-factor s))))

This algorithm can be expressed as a (slightly simplified) equation:

rank=\frac{ \left( score-1 \right) ^{.8}}{ \left( age _{hours} + 2 \right) ^ {1.8}} * penalties

This ranking algorithm is used for items on the front page as well as for ordering the comments on an item.

The key factor in the ranking formula is the exponent on time (i.e. the optional parameter gravity) is higher than the exponent on the votes. As a result, even if an item keeps getting a large number of votes, eventually the denominator will overwhelm it and its ranking will drop. For example, if a popular item gets 100 votes an hour, eventually it won't be able to keep pace with a new item getting 10 votes an hour. This ensures that even the most popular items won't stay on the list forever. In other words, gravity controls how fast articles get pulled down in ranking.

By default, the scoring function scorefn is the realscore, which is the net votes for an item ignoring any upvotes from pontential sockpuppet accounts. Sockpuppet accounts are accounts created to manipulate voting, and an account is considered potentially a sockpuppet based on several simple factors.

Because the score is given an exponent of .8 (for positive scores), the benefit of large numbers of votes is reduced. Mathematically, though, this exponent could be eliminated. Since only relative rankings matter, raise everything to the 1/.8 power, and the numerator's exponent disappears, along with the need for the negative check. This would be a win from the "code golf" perspective.

A few other constants are of interest. Since 1 is subtracted from the score, an item starts off with a rank of 0. In the denominator, 120 minutes are added to the time. Thus, an article can be considered two hours old at time of posting, limiting the ranking boost for very recent articles. The front-threshold* specifies a minimum ranking score for articles to appear.

Penalties

A story (i.e. a normal posting) or poll can receive additional ranking penalties. The penalties are not applied to comments or poll options. The penalties are as follows:
  • An item with a blank url is penalized by nourl-factor*. This lowers the ranking of an "Ask HN" item, for instance.
  • A "lightweight" item is penalized.
  • A "controversial" item is penalized.
An item is considered lightweight if the title is a "rallying cry", the post is an image, or the URL's site is in a list of lightweight sites. A lightweight item is penalized by lightweight-factor*. (The code doesn't show how a "rallying cry" is determined.)

The contro-factor penalty is applied to controversial articles. The contro-factor is computed as:

(def contro-factor (s)
  (aif (check (visible-family nil s) [> _ 20])
       (min 1 (expt (/ (realscore s) it) 2))
       1))
An item with too many comments (at least 20 and more comments than upvotes) gets the contro-factor penalty. An item's visible-family is the number of visible comments (plus one for the item itself). If the visible-family is more than 20, the penalty is:

min\left[ 1, \left( \frac{realscore}{visible\-family}\right) ^{2} \right]

A lightweight item gets the worse of the "lightweight" and "contro-factor" penalties. The contro-factor penalty is only applied if less than 1; i.e. an item can't get a boost from it. Because the ratio is squared, the effect of the penalty is more substantial. I would have expected contro-factor to penalize controversial comment subthreads too, but apparently it doesn't.

How the ranking is performed

When the server starts up, it loads the top stories from a topstories file. If the file is not present, it uses the ranking algorithm to select the top 180 stories out of the most recent 1000 stories. Stories normally are re-ranked by adjust-rank only when they receive a vote. Interestingly, only the updated item is re-ranked, rather than doing a global re-rank, probably for efficiency reasons. The adjust-rank function also saves the top 180 items to thetopstories file to disk.

There's also a background reranking thread to rerank a random story from the top 50 every 30 seconds (again using adjust-rank). This ensures that stories that are no longer receiving any votes at all get reranked occasionally.

As far as I can tell, the list of ranked stories never gets shrunk (except on restarts), but the number of displayed stories is capped at 210; you will hit this limit if you keep paging through the top stories.

Comparison with Arc2

The old code in arc2 is much simpler:
(= gravity* 1.4 timebase* 120 front-threshold* 1)

(def frontpage-rank (s (o gravity gravity*))
  (/ (- (realscore s) 1)
     (expt (/ (+ (item-age s) timebase*) 60) gravity)))
The main differences are that arc3 has higher gravity, so articles will drop off faster; arc3 has an exponent on the numerator, and arc3 adds the various penalties. This illustrates that the ranking formula is changing and gaining complexity over time.

Conclusions

There may be differences there are between the live Hacker News server and news.arc, so my analysis may not exactly describe what's really happening. I'd assume the code is constantly being modified; comparison with arc2 shows that the ranking formula has become considerably more complex. In addition, news.arc has some YC-specific stuff removed.. Finally, since this is Arc, the ranking constants and even the algorithms can be changed at the REPL while the server is running. Thus, the live ranking algorithm might never actually exist in a source file.

So, what's the secret to getting a high-ranked article? I don't see any magic bullets in the code, just the obvious: get lots of upvotes in a short period of time, avoid penalties (don't post fluff), and don't use sockpuppets.

What's new in arc3?

The long-awaited new update of Arc (arc3) has been made available. I've examined the release to determine what's new in arc3 beyond the mysterious new logo: arc logo.

arc3 is a major change from arc2, with about 3000 lines and most files changed. The following gratuitous pie chart illustrates that the largest number of changes are in the news server (news.arc), with many changes to the fundamental language (ac.scm and arc.arc) as well as the web and application servers (app.arc and srv.arc).
Summary of changes
The news server has been heavily modified with new ranking, support for polls, and improved spam rejection, among other features. A new "how-to-run-news" file explains how to set up your own Hacker News-like server. I will discuss the news server, web server, app server, and html library in more detail in a future article. I will focus this article on the language and main libraries.

If you're looking to try arc3, it can be downloaded here. Arc3 has significant incompatibilities with previous versions that will cause problems if you're not prepared.

Incompatibilities

  • Arc now requires mzscheme 372. Arc will not work with the version 352 required by arc2, or with the newer versions of mzscheme.
  • flush-output is disabled by default on write, disp, and functions that use these. See declare below.
  • The result of accum is no longer in reverse order.
  • news.arc is no longer loaded as part of arc.
  • a.b.c is now ((a b) c), not (a b c)
  • a!b!c is now ((a 'b) 'c), not (a 'b 'c)
  • The set function has been renamed assign, and the assert function has been renamed set.
  • writefile1 removed.
  • flat no longer supports stringstoo option.
  • to-nearest renamed to nearest.
  • random-elt renamed to rand-elt.
  • firstn-that renamed to retrieve.
  • plural renamed to pluralize.

New functions

  • int function coerces to an integer.
  • force-close discards buffered output and closes the descriptor.
  • mvfile moves a file.
  • memory returns the current memory use.
  • sin, cos, tan, and log are finally available.
  • declare is used to set system variables: explicit-flush to control automatic output flushing, and direct-calls for the function call optimization.
  • timedate converts seconds to date.
  • copylist copies a list.
  • defs applies def to name, args, body triples to define multiple functions at once.
  • get provides simpler table / array lookup. get!foo creates a function that takes a table and looks up 'foo. (Actually, it's a generic mechanism to create a function to apply an argument to something.)
  • writefile writes to a temporary file first.
  • letter tests if a character is a letter.
  • sum sums up function results.
  • med returns median of list.
  • minutes-since returns minutes since a time.
  • defcache wrapper around cache to reduce boilerplate.
  • datestring creates "y - m - d" string.
  • or= modifies a variable if the variable is false.
  • out evaluates and prints an expression.
  • fromdisk, diskvar, disktable, and todisk provide a simplified mechanism for loading and storing data.
  • halve splits a string in two on the first separator.
  • positions returns a list of positions where a test is true.
  • lines splits a string into lines.
  • urlencode urlencodes a string.
  • nonblank returns a string if it's nonblank.
  • plural returns a count and pluralized word.

Bug fixes

  • atomic-invoke fixed.
  • socket-accept uses custodians so web servers can forcibly close connections if the clients aren't reading data.
  • coerce of string into int rounds the value as does number to char.
  • list modified to copy the list.
  • safeset now writes warnings to stderr.
  • each fixed to avoid conflict with afn.
  • cut fixed.
  • trues fixed.
  • whiler fixed.
  • rand-string now more random to help fix huge security hole.
  • split fixed for negative positions..
  • memo now memoizes nil results too.
  • readline will terminate on nil.
  • copy fixed.
  • hours-since fixed.
  • date fixed to avoid system operation.
  • intersperse now works with nil.
  • load fixed.
  • posmatch fixed.
  • num fixed to handle negative numbers.

Optimizations

  • complement in function position
  • The <, >, and + operations when applied to two arguments.
  • (foo bar) is optimized to call foo directly if foo is a global bound to a function. This is controlled by declare.

Other changes

  • Debugging has been improved by giving the Arc names of things to Scheme, and turning on line counting.
  • A default value can be provided when accessing a hash table.
  • Currying was largely implemented but not enabled.
In conclusion, arc3 has some nice improvements, bug fixes, and optimizations, but nothing too dramatic in the language itself. If you're using the Arc news server, you'll definitely want arc3 for the security fixes. On the other hand, the unofficial Anarki release of Arc has a lot of interesting features too.

Disclaimers: I have provided my interpretations of the changes in arc3, and I'm sure there are some errors; please provide feedback if you find mistakes. Note that I am not connected with the arc team in any way, and this is not an "official" list of changes. In addition, arc3 may change without warning, so any of the above can be obsoleted. (There are some good reasons for real version numbers, bug tracking, and source code control, but I won't belabor that point.)