Showing posts with label analog. Show all posts

Reverse-engineering an analog Bendix air data computer: part 4, the Mach section

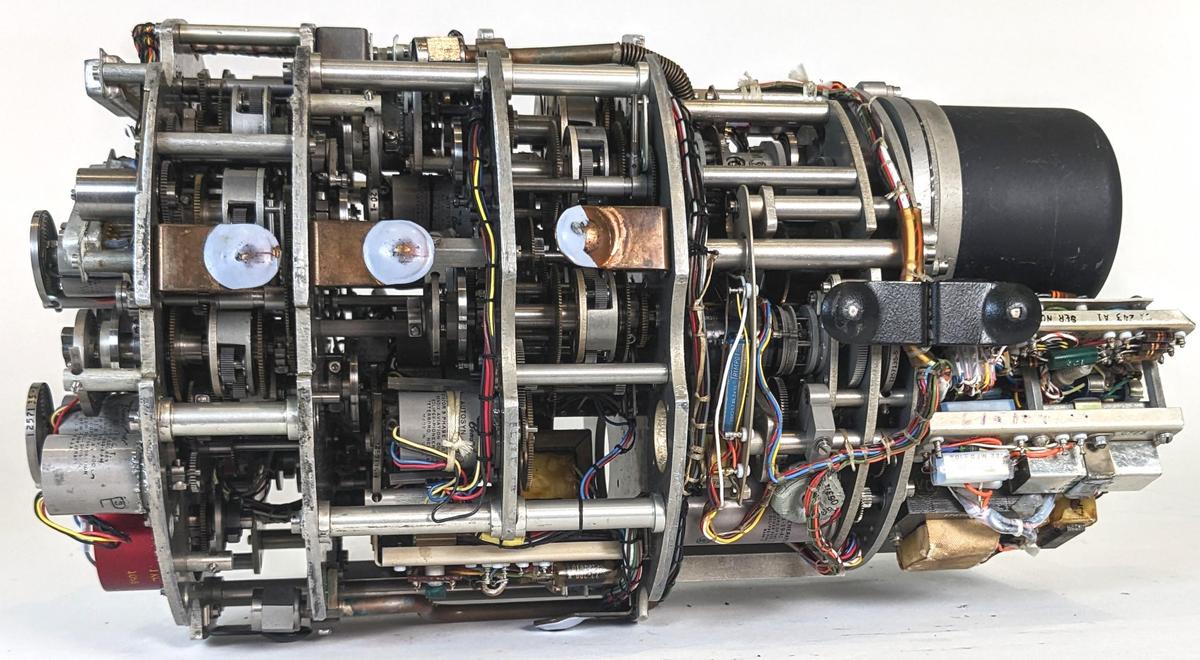
In the 1950s, many fighter planes used the Bendix Central Air Data Computer (CADC) to compute airspeed, Mach number, and other "air data". The CADC is an analog computer, using tiny gears and specially-machined cams for its mathematics. In this article, part 4 of my series,1 I reverse engineer the Mach section of the CADC and explain its calculations. (In the photo below, the Mach section is the middle section of the CADC.)

The Bendix MG-1A Central Air Data Computer with the case removed, showing the compact gear mechanisms inside. Click this image (or any other) for a larger version.

The Bendix MG-1A Central Air Data Computer with the case removed, showing the compact gear mechanisms inside. Click this image (or any other) for a larger version.

Aircraft have determined airspeed from air pressure for over a century. A port in the side of the plane provides the static air pressure,2 the air pressure outside the aircraft. A pitot tube points forward and receives the "total" air pressure, a higher pressure due to the air forced into the tube by the speed of the airplane. The airspeed can be determined from the ratio of these two pressures, while the altitude can be determined from the static pressure.

But as you approach the speed of sound, the fluid dynamics of air change and the calculations become very complicated. With the development of supersonic fighter planes in the 1950s, simple mechanical instruments were no longer sufficient. Instead, an analog computer calculated the "air data" (airspeed, air density, Mach number, and so forth) from the pressure measurements. This computer then transmitted the air data electrically to the systems that needed it: instruments, weapons targeting, engine control, and so forth. Since the computer was centralized, the system was called a Central Air Data Computer or CADC, manufactured by Bendix and other companies.

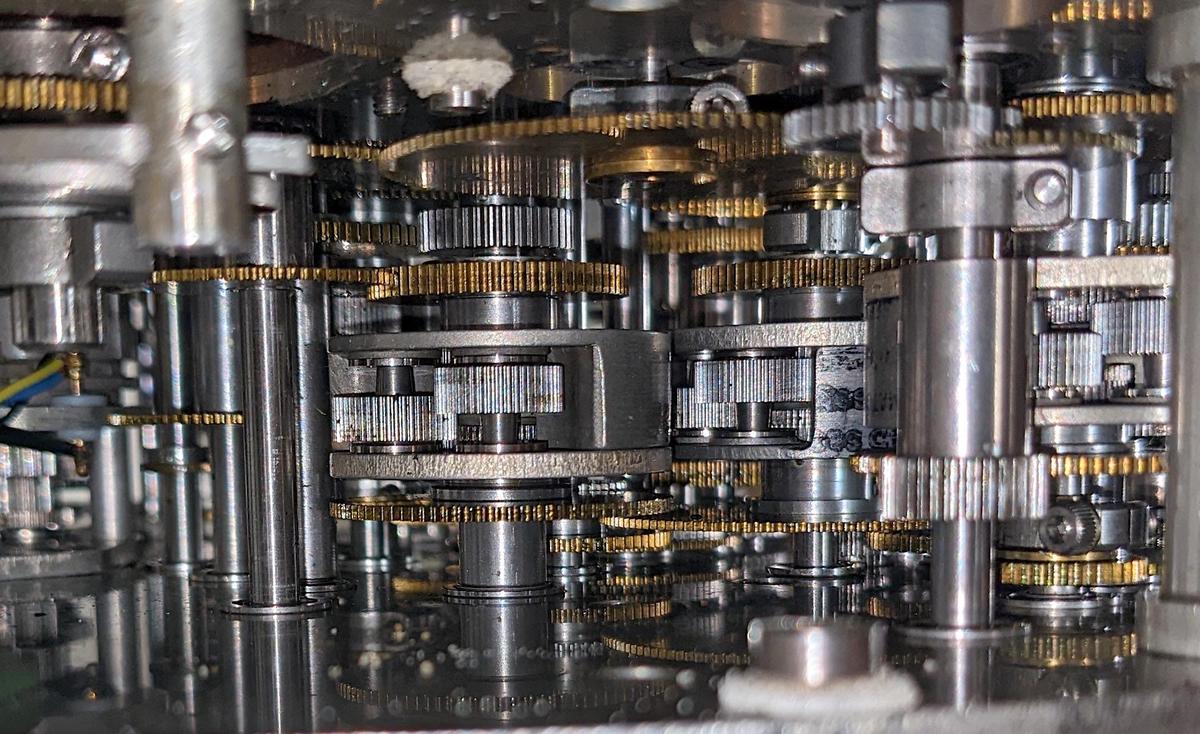
A closeup of the numerous gears inside the CADC. Three differential gear mechanisms are visible.

A closeup of the numerous gears inside the CADC. Three differential gear mechanisms are visible.

Each value in the Bendix CADC is indicated by the rotational position of a shaft. Compact electric motors rotate the shafts, controlled by the pressure inputs. Gears, cams, and differentials perform computations, with the results indicated by more rotations. Devices called synchros converted the rotations to electrical outputs that are connected to other aircraft systems. The CADC is said to contain 46 synchros, 511 gears, 820 ball bearings, and a total of 2,781 major parts (but I haven't counted). These components are crammed into a compact cylinder: just 15 inches long and weighing 28.7 pounds.

The equations computed by the CADC are impressively complicated. For instance, one equation is:

\[~~~\frac{P_t}{P_s} = \frac{166.9215M^7}{( 7M^2-1)^{2.5}}\]

It seems incredible that these functions could be computed mechanically, but three techniques make this possible. The fundamental mechanism is the differential gear, which adds or subtracts values. Second, logarithms are used extensively, so multiplications and divisions are implemented by additions and subtractions performed by a differential, while square roots are calculated by gearing down by a factor of 2. Finally, specially-shaped cams implement functions: logarithm, exponential, and application-specific functions. By combining these mechanisms, complicated functions can be computed mechanically, as I will explain below.

The differential

The differential gear assembly is the mathematical component of the CADC, as it performs addition or subtraction.3 The differential takes two input rotations and produces an output rotation that is the sum or difference of these rotations.4 Since most values in the CADC are expressed logarithmically, the differential computes multiplication and division when it adds or subtracts its inputs.

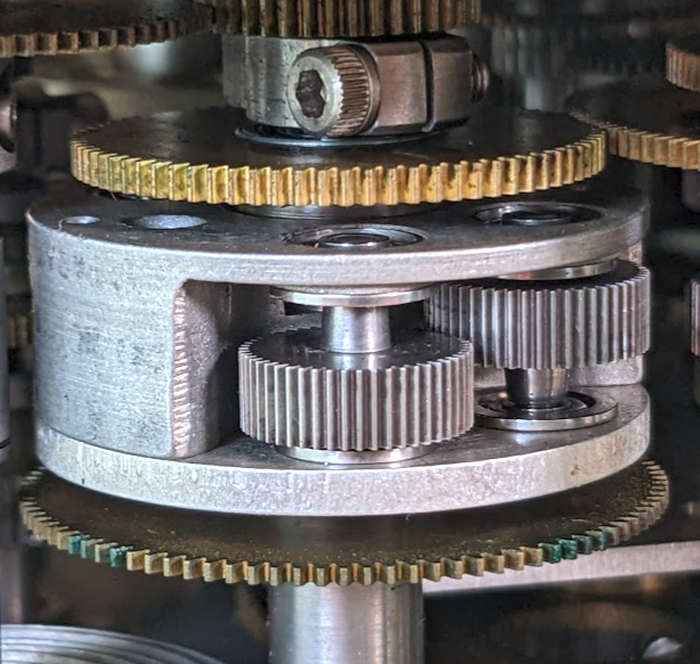
A closeup of a differential mechanism.

A closeup of a differential mechanism.

While the differential functions like the differential in a car, it is constructed differently, with a spur-gear design. This compact arrangement of gears is about 1 cm thick and 3 cm in diameter. The differential is mounted on a shaft along with three co-axial gears: two gears provide the inputs to the differential and the third provides the output. In the photo, the gears above and below the differential are the input gears. The entire differential body rotates with the sum, connected to the output gear at the top through a concentric shaft. (In practice, any of the three gears can be used as the output.) The two thick gears inside the differential body are part of the mechanism.

The cams

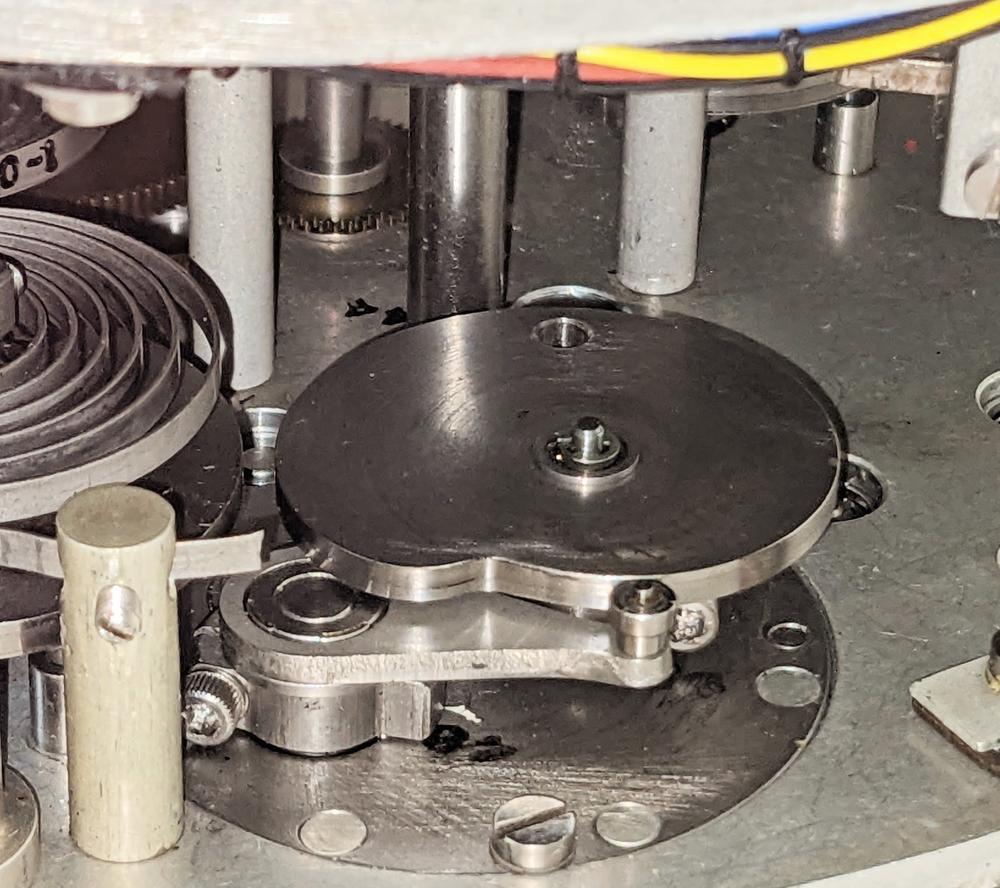
The CADC uses cams to implement various functions. Most importantly, cams compute logarithms and exponentials. Cams also implement complicated functions of one variable such as ${M}/{\sqrt{1 + .2 M^2}}$. The function is encoded into the cam's shape during manufacturing, so a hard-to-compute nonlinear function isn't a problem for the CADC. The photo below shows a cam with the follower arm in front. As the cam rotates, the follower moves in and out according to the cam's radius.

A cam inside the CADC implements a function.

A cam inside the CADC implements a function.

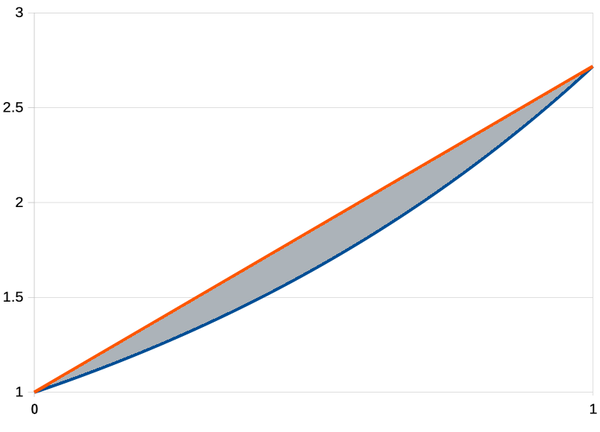
However, the shape of the cam doesn't provide the function directly, as you might expect. The main problem with the straightforward approach is the discontinuity when the cam wraps around. For example, if the cam implemented an exponential directly, its radius would spiral exponentially and there would be a jump back to the starting value when it wraps around. Instead, the CADC uses a clever patented method: the cam encodes the difference between the desired function and a straight line. For example, an exponential curve is shown below (blue), with a line (red) between the endpoints. The height of the gray segment, the difference, specifies the radius of the cam (added to the cam's fixed minimum radius). The point is that this difference goes to 0 at the extremes, so the cam will no longer have a discontinuity when it wraps around. Moreover, this technique significantly reduces the size of the value (i.e. the height of the gray region is smaller than the height of the blue line), increasing the cam's accuracy.5

An exponential curve (blue), linear curve (red), and the difference (gray).

An exponential curve (blue), linear curve (red), and the difference (gray).

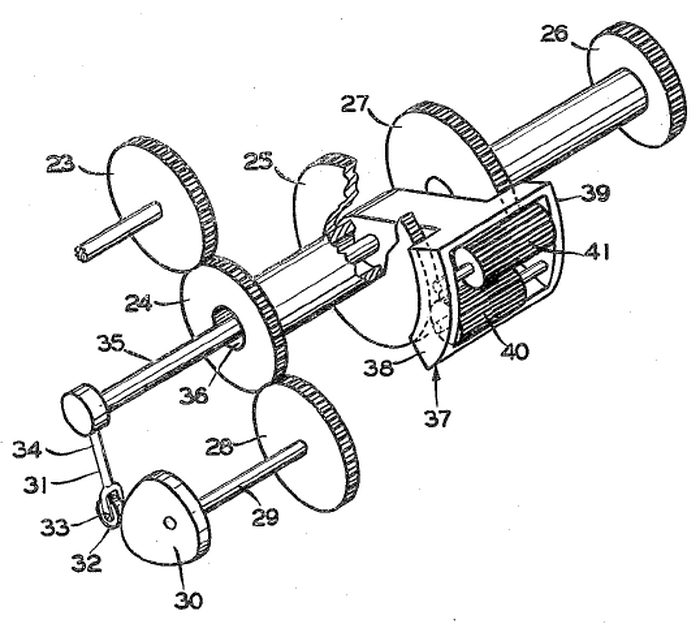
To make this work, the cam position must be added to the linear value to yield the result. This is implemented by combining each cam with a differential gear; watch for the paired cams and differentials below. As the diagram below shows, the input (23) drives the cam (30) and the differential (25, 37-41). The follower (32) tracks the cam and provides a second input (35) to the differential. The sum from the differential produces the desired function (26).

This diagram, from Patent 2969910, shows how the cam and follower are connected to a differential.

This diagram, from Patent 2969910, shows how the cam and follower are connected to a differential.

The synchro outputs

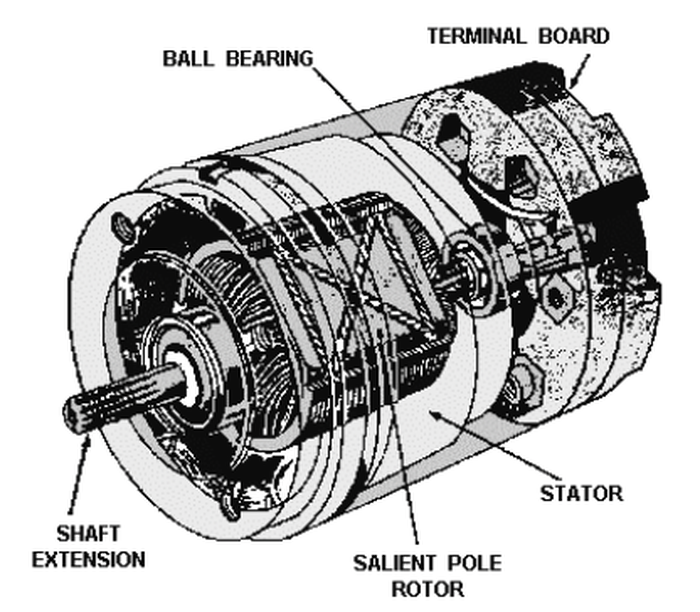
A synchro is an interesting device that can transmit a rotational position electrically over three wires. In appearance, a synchro is similar to an electric motor, but its internal construction is different, as shown below. Before digital systems, synchros were very popular for transmitting signals electrically through an aircraft. For instance, a synchro could transmit an altitude reading to a cockpit display or a targeting system. Two synchros at different locations have their stator windings connected together, while the rotor windings are driven with AC. Rotating the shaft of one synchro causes the other to rotate to the same position.6

Cross-section diagram of a synchro showing the rotor and stators.

Cross-section diagram of a synchro showing the rotor and stators.

For the CADC, most of the outputs are synchro signals, using compact synchros that are about 3 cm in length. For improved resolution, many of the CADC outputs use two synchros: a coarse synchro and a fine synchro. The two synchros are typically geared in an 11:1 ratio, so the fine synchro rotates 11 times as fast as the coarse synchro. Over the output range, the coarse synchro may turn 180°, providing the approximate output unambiguously, while the fine synchro spins multiple times to provide more accuracy.

Examining the Mach section of the CADC

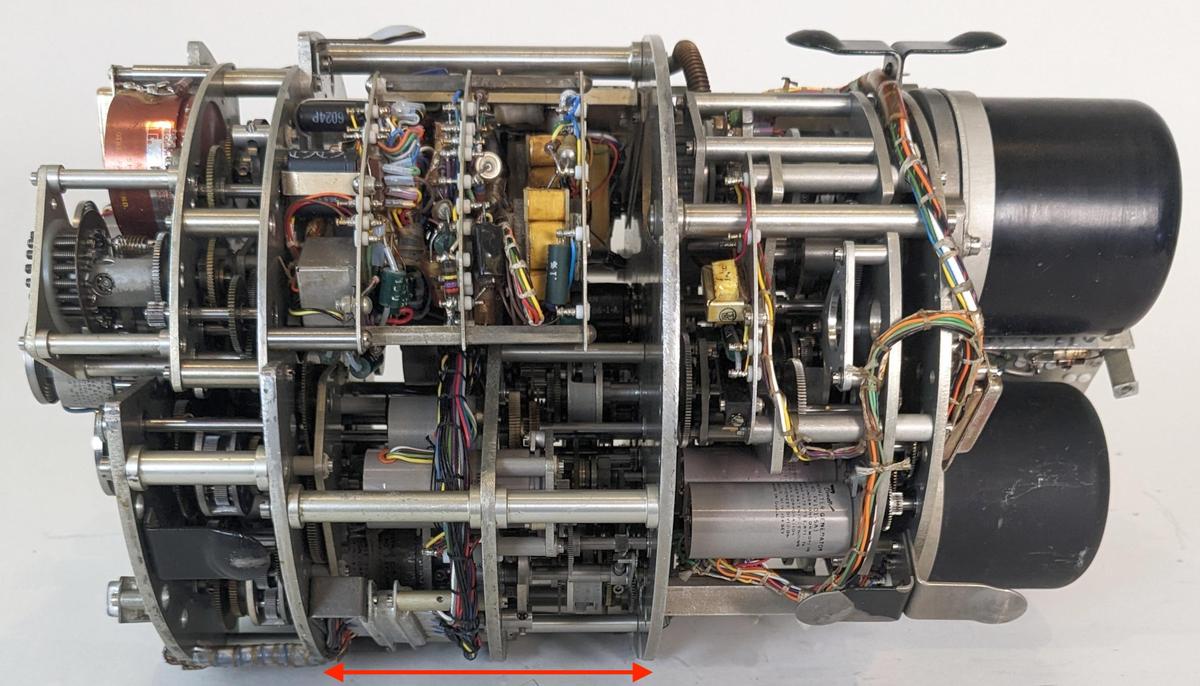
Another view of the CADC.

Another view of the CADC.

The Bendix CADC is constructed from modular sections. In this blog post, I'm focusing on the middle section, called the "Mach section" and indicated by the arrow above. This section computes log static pressure, impact pressure, pressure ratio, and Mach number and provides these outputs electrically as synchro signals. It also provides the log pressure ratio and log static pressure to the rest of the CADC as shaft rotations. The left section of the CADC computes values related to airspeed, air density, and temperature.7 The right section has the pressure sensors (the black domes), along with the servo mechanisms that control them.

I had feared that any attempt at disassembly would result in tiny gears flying in every direction, but the CADC was designed to be taken apart for maintenance. Thus, I could remove the left section of the CADC for analysis. Unfortunately, we lost the gear alignment between the sections and don't have the calibration instructions, so the CADC no longer produces accurate results.

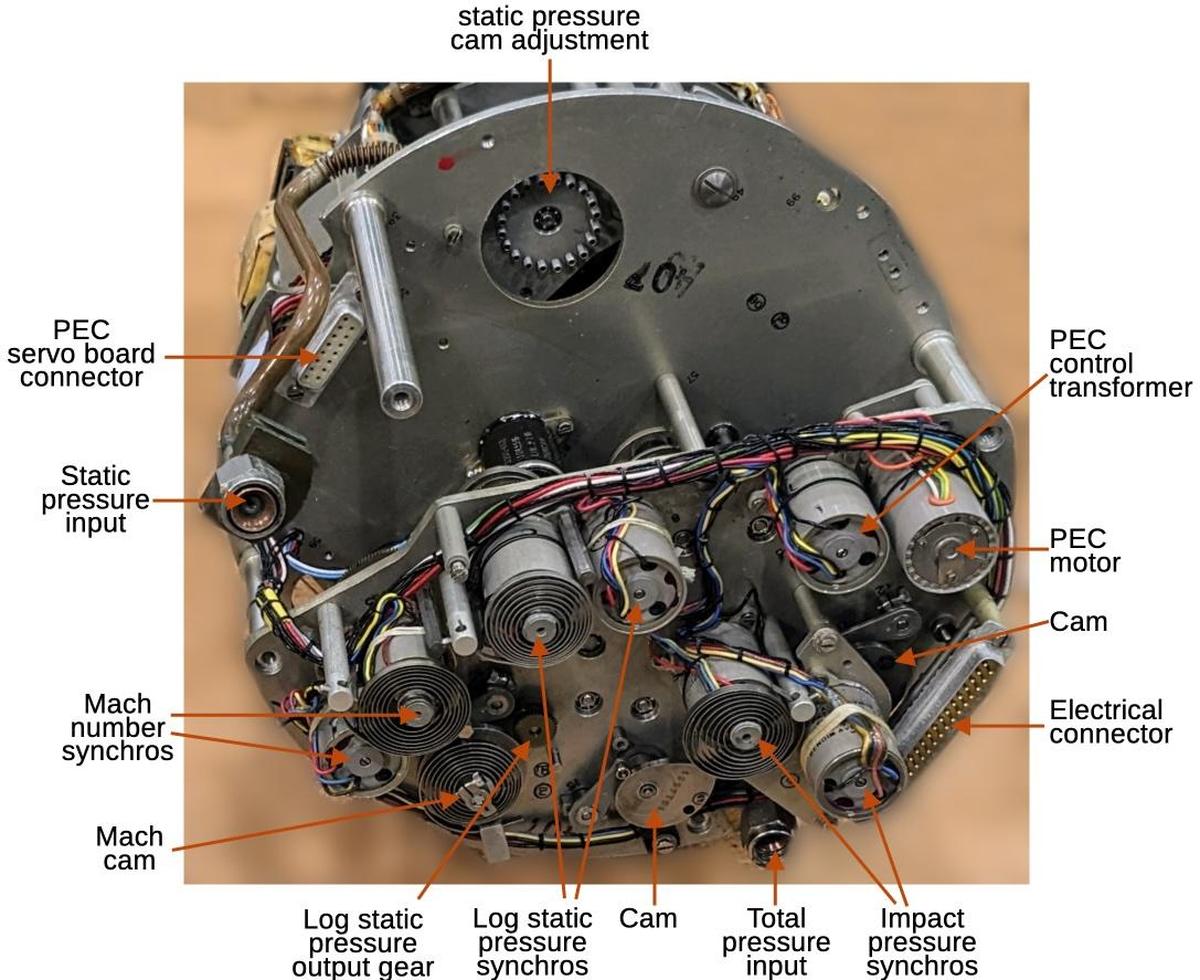
The diagram below shows the internal components of the Mach section after disassembly. The synchros are in pairs to generate coarse and fine outputs; the coarse synchros can be distinguished because they have spiral anti-backlash springs installed. These springs prevent wobble in the synchro and gear train as the gears change direction. The gears and differentials are not visible from this angle as they are underneath the metal plate. The Pressure Error Correction (PEC) subsystem has a motor to drive the shaft and a control transformer for feedback. The Mach section has two D-sub connectors. The one on the right links the Mach section and pressure section to the front section of the CADC. The Position Error Correction (PEC) servo amplifier board plugs into the left connector. The static pressure and total pressure input lines have fittings so the lines can be disconnected from the lines from the front of the CADC.8

The Mach section with components labeled.

The Mach section with components labeled.

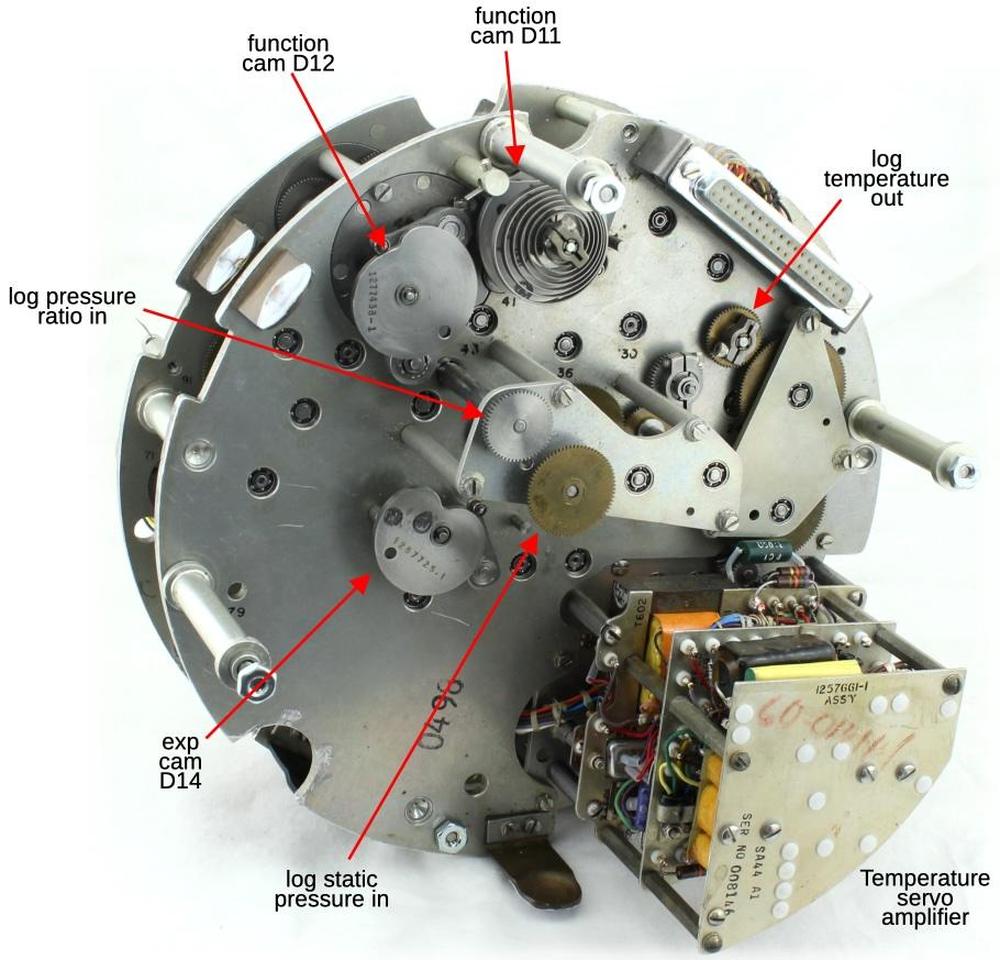
The photo below shows the left section of the CADC. This section meshes with the Mach section shown above. The two sections have parts at various heights, so they join in a complicated way. Two gears receive the pressure signals \( log ~ P_t / P_s \) and \( log ~ P_s \) from the Mach section. The third gear sends the log total temperature to the rest of the CADC. The electrical connector (a standard 37-pin D-sub) supplies 120 V 400 Hz power to the Mach section and pressure transducers and passes synchro signals to the output connectors.

The left part of the CADC that meshes with the Mach section.

The left part of the CADC that meshes with the Mach section.

The position error correction servo loop

The CADC receives two pressure inputs and two pressure transducers convert the pressures into rotational positions, providing the indicated static pressure \( P_{si} \) and the total pressure \( P_t \) as shaft rotations to the rest of the CADC. (I explained the pressure transducers in detail in the previous article.)

There's one complication though. The static pressure \( P_s \) is the atmospheric pressure outside the aircraft. The problem is that the static pressure measurement is perturbed by the airflow around the aircraft, so the measured pressure (called the indicated static pressure \( P_{si} \)) doesn't match the real pressure. This is bad because a "static-pressure error manifests itself as errors in indicated airspeed, altitude, and Mach number to the pilot."9

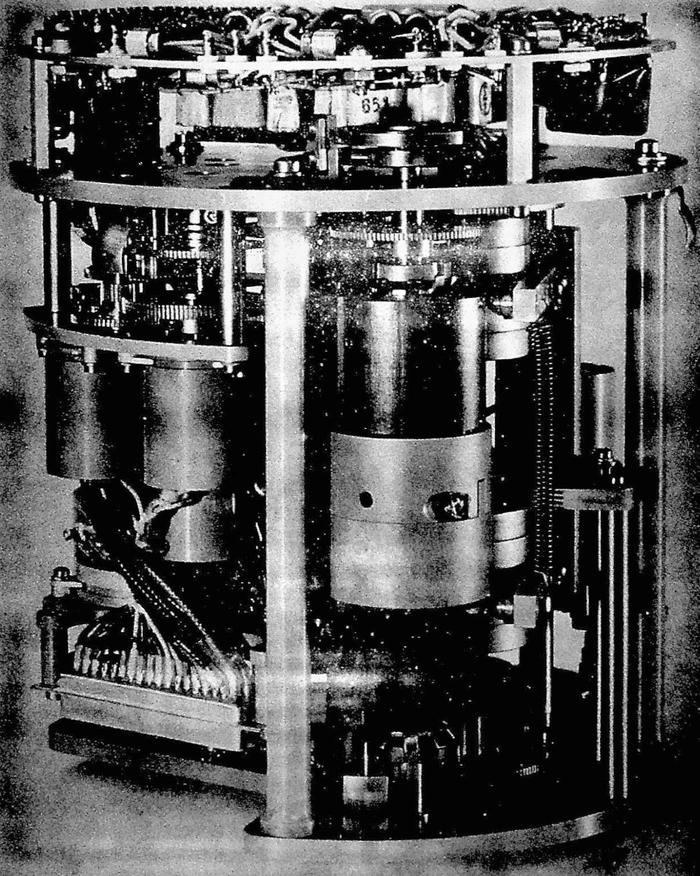
The solution is a correction factor called the Position Error Correction. This factor gives the ratio between the real pressure \( P_s \) and the measured pressure \( P_{si} \). By applying this correction factor to the indicated (i.e. measured) pressure, the true pressure can be obtained. Since this correction factor depends on the shape of the aircraft, it is generated outside the CADC by a separate cylindrical unit called the Compensator, customized to the aircraft type. The position error computation depends on two parameters: the Mach number provided by the CADC and the angle of attack provided by an aircraft sensor. The compensator determines the correction factor by using a three-dimensional cam. The vintage photo below shows the components inside the compensator.

"Static Pressure and Angle of Attack Compensator Type X1254115-1 (Cover Removed)" from Air Data Computer Mechanization.

"Static Pressure and Angle of Attack Compensator Type X1254115-1 (Cover Removed)" from Air Data Computer Mechanization.

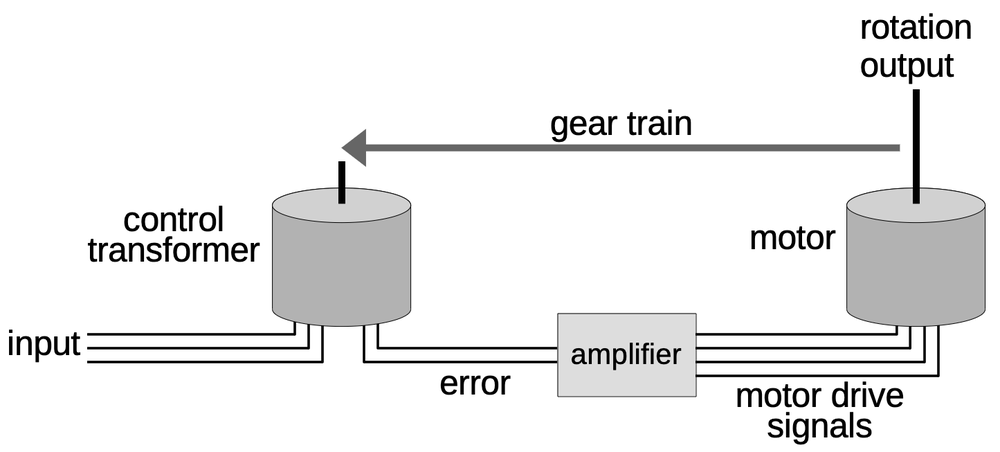
The correction factor is transmitted from the compensator to the CADC as a synchro signal over three wires. To use this value, the CADC must convert the synchro signal to a shaft rotation. The CADC uses a motorized servo loop that rotates the shaft until the shaft position matches the angle specified by the synchro input.

The servo loop ensures that the shaft position matches the input angle.

The servo loop ensures that the shaft position matches the input angle.

The key to the servo loop is a control transformer. This device looks like a synchro and has five wires like a synchro, but its function is different. Like the synchro motor, the control transformer has three stator wires that provide the angle input. Unlike the synchro, the control transformer also uses the shaft position as an input, while the rotor winding generates an output voltage indicating the error. This output voltage indicates the error between the control transformer's shaft position and the three-wire angle input. The control transformer provides its error signal as a 400 Hz sine wave, with a larger signal indicating more error.10

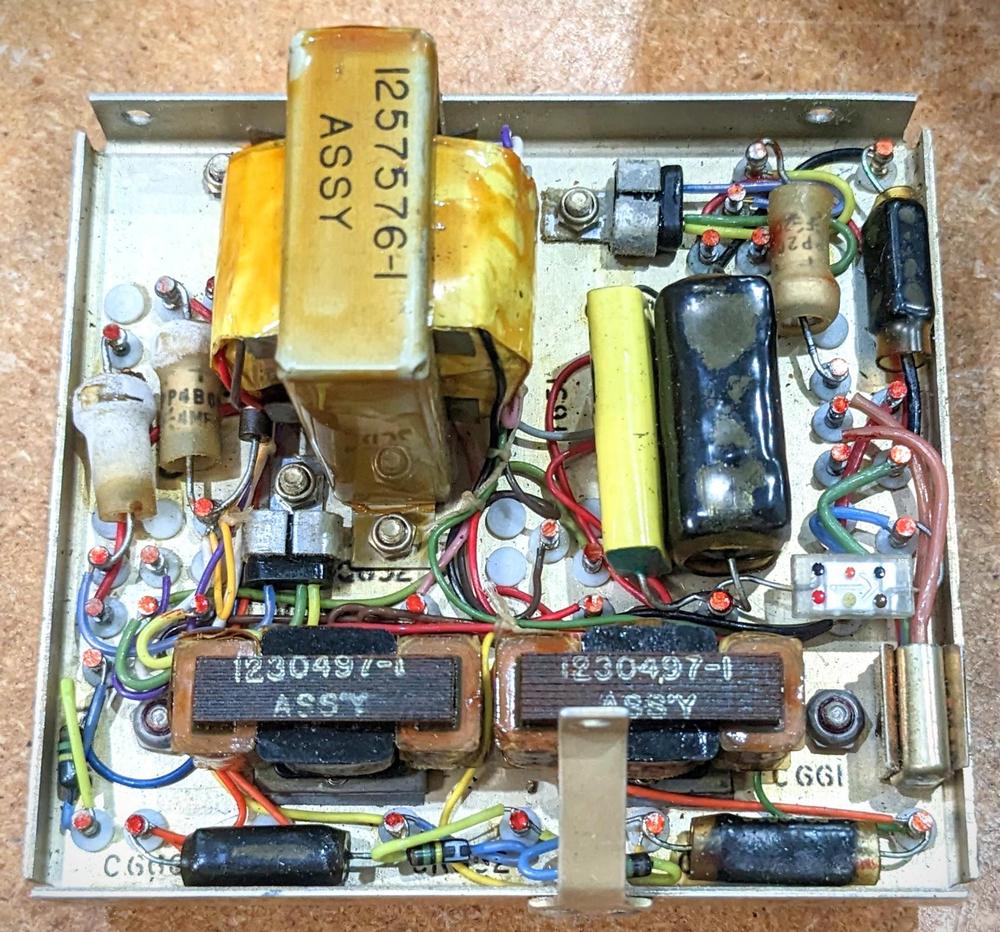
The amplifier board (below) drives the motor in the appropriate direction to cancel out the error. The power transformer in the upper left is the largest component, powering the amplifier board from the CADC's 115-volt, 400 Hertz aviation power. Below it are two transformer-like components; these are the magnetic amplifiers. The relay in the lower-right corner switches the amplifier into test mode. The rest of the circuitry consists of transistors, resistors, capacitors, and diodes. The construction is completely different from modern printed circuit boards. Instead, the amplifier uses point-to-point wiring between plastic-insulated metal pegs. Both sides of the board have components, with connections between the sides through the metal pegs.

The amplifier board for the position error correction.

The amplifier board for the position error correction.

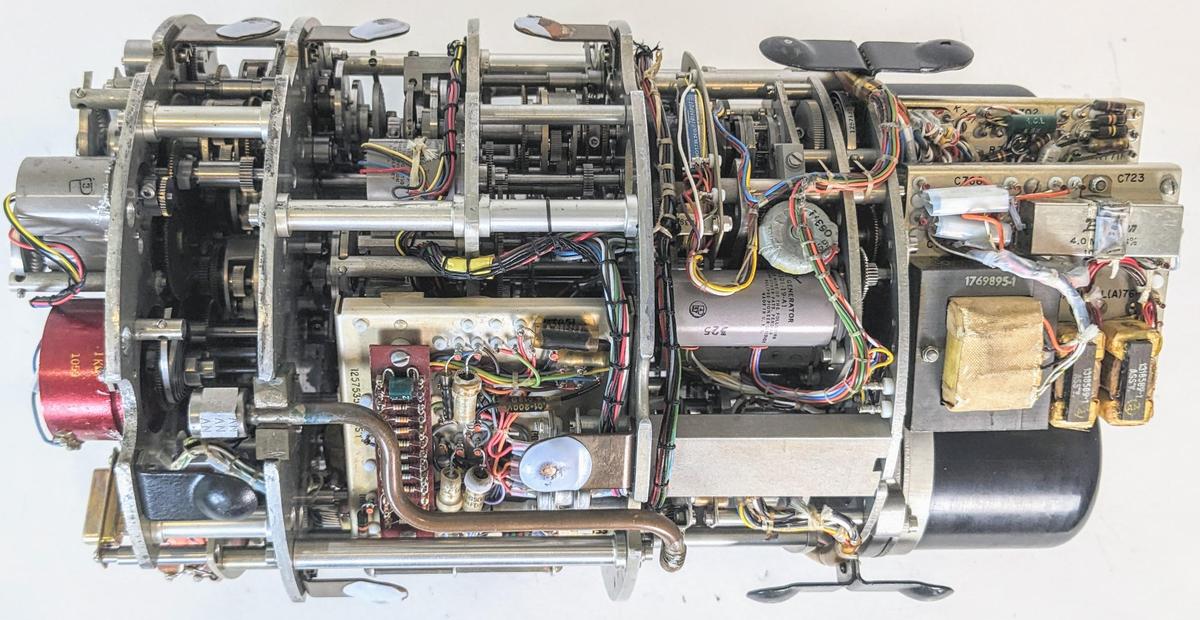
The amplifier board is implemented with a transistor amplifier driving two magnetic amplifiers, which control the motor.11 (Magnetic amplifiers are an old technology that can amplify AC signals, allowing the relatively weak transistor output to control a larger AC output.12) The motor is a "Motor / Tachometer Generator" unit that also generates a voltage based on the motor's speed. This speed signal provides negative feedback, limiting the motor speed as the error becomes smaller and ensuring that the feedback loop doesn't overshoot. The photo below shows how the amplifier board is mounted in the middle of the CADC, behind the static pressure tubing.

Side view of the CADC.

Side view of the CADC.

The equations

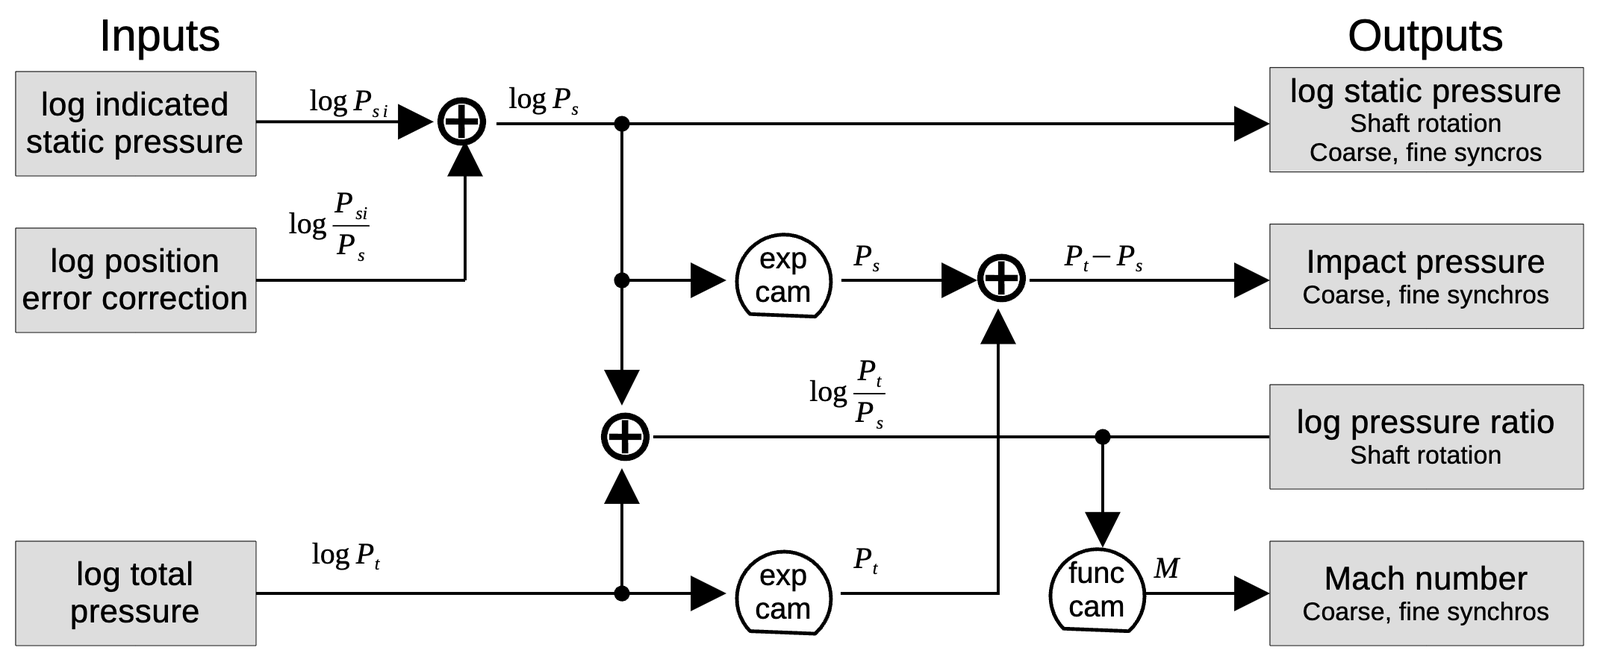
Although the CADC looks like an inscrutable conglomeration of tiny gears, it is possible to trace out the gearing and see exactly how it computes the air data functions. With considerable effort, I have reverse-engineered the mechanisms to create the diagram below, showing how each computation is broken down into mechanical steps. Each line indicates a particular value, specified by a shaft rotation. The ⊕ symbol indicates a differential gear, adding or subtracting its inputs to produce another value. The cam symbol indicates a cam coupled to a differential gear. Each cam computes either a specific function or an exponential, providing the value as a rotation. At the right, the outputs are either shaft rotations to the rest of the CADC or synchro outputs.

This diagram shows how the values are computed. The differential numbers are my own arbitrary numbers. Click for a larger version.

This diagram shows how the values are computed. The differential numbers are my own arbitrary numbers. Click for a larger version.

I'll go through each calculation briefly.

log static pressure

The static pressure is calculated by dividing the indicated static pressure by the pressure error correction factor. Since these values are all represented logarithmically, the division turns into a subtraction, performed by a differential gear. The output goes to two synchros, geared to provide coarse and fine outputs.13

\[log ~ P_s = log ~ P_{si} - log ~ P_{si} / P_s \]

Impact pressure

The impact pressure is the pressure due to the aircraft's speed, the difference between the total pressure and the static pressure. To compute the impact pressure, the log pressure values are first converted to linear values by exponentiation, performed by cams. The linear pressure values are then subtracted by a differential gear. Finally, the impact pressure is output through two synchros, coarse and fine in an 11:1 ratio.

\[ P_t - P_s = exp(log ~ P_t) - exp(log ~ P_s) \]

log pressure ratio

The log pressure ratio \( P_t/P_s \) is the ratio of total pressure to static pressure. This value is important because it is used to compute the Mach number, true airspeed, and log free air temperature. The Mach number is computed in the Mach section as described below. The true airspeed and log free air temperature are computed in the left section. The left section receives the log pressure ratio as a rotation. Since the left section and Mach section can be separated for maintenance, a direct shaft connection is not used. Instead, each section has a gear and the gears mesh when the sections are joined.

Computing the log pressure ratio is straightforward. Since the log total pressure and log static pressure are both available, subtracting the logs with a differential yields the desired value. That is,

\[log ~ P_t/P_s = log ~ P_t - log ~ P_s \]

Mach number

The Mach number is defined in terms of \(P_t/P_s \), with separate cases for subsonic and supersonic:14

\[M<1:\] \[~~~\frac{P_t}{P_s} = ( 1+.2M^2)^{3.5}\]

\[M > 1:\]

\[~~~\frac{P_t}{P_s} = \frac{166.9215M^7}{( 7M^2-1)^{2.5}}\]

Although these equations are very complicated, the solution is a function of one variable \(P_t/P_s\) so M can be computed with a single cam. In other words, the mathematics needed to be done when the CADC was manufactured, but once the cam exists, computing M is easy, using the log pressure ratio computed earlier:

\[ M = f(log ~ P_t / P_s) \]

Conclusions

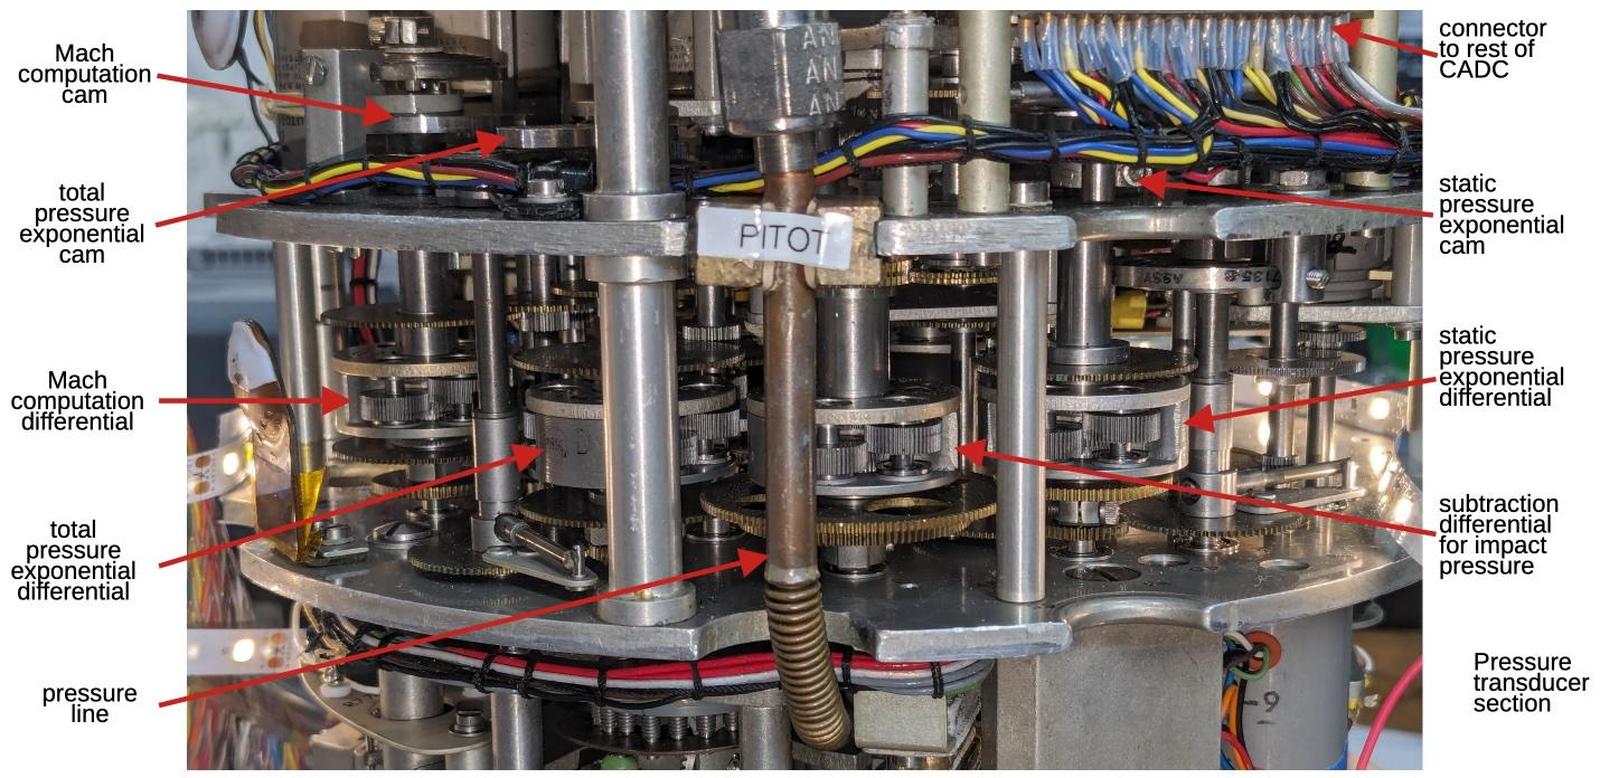
The CADC performs nonlinear calculations that seem way too complicated to solve with mechanical gearing. But reverse-engineering the mechanism shows how the equations are broken down into steps that can be performed with cams and differentials, using logarithms for multiplication and division. The diagram below shows the complex gearing in the Mach section. Each differential below corresponds to a differential in the earlier equation diagram.

A closeup of the gears and cams in the Mach section. The differential for the pressure ratio is hidden in the middle.

A closeup of the gears and cams in the Mach section. The differential for the pressure ratio is hidden in the middle.

Follow me on Twitter @kenshirriff or RSS for more reverse engineering. I'm also on Mastodon as @oldbytes.space@kenshirriff. Thanks to Joe for providing the CADC. Thanks to Nancy Chen for obtaining a hard-to-find document for me.15 Marc Verdiell and Eric Schlaepfer are working on the CADC with me. CuriousMarc's video shows the CADC in action:

Notes and references

  1. My articles on the CADC are:

    There is a lot of overlap between the articles, so skip over parts that seem repetitive :-) 

  2. The static air pressure can also be provided by holes in the side of the pitot tube; this is the typical approach in fighter planes. 

  3. Multiplying a rotation by a constant factor doesn't require a differential; it can be done simply with the ratio between two gears. (If a large gear rotates a small gear, the small gear rotates faster according to the size ratio.) Adding a constant to a rotation is even easier, just a matter of defining what shaft position indicates 0. For this reason, I will ignore constants in the equations. 

  4. Strictly speaking, the output of the differential is the sum of the inputs divided by two. I'm ignoring the factor of 2 because the gear ratios can easily cancel it out. It's also arbitrary whether you think of the differential as adding or subtracting, since it depends on which rotation direction is defined as positive. 

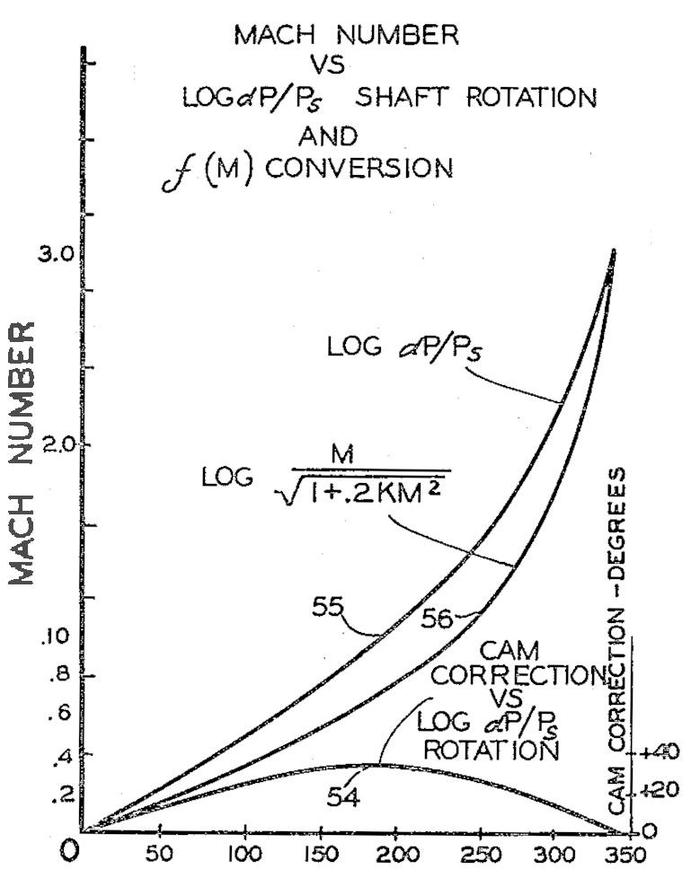
  5. The diagram below shows a typical cam function in more detail. The input is \(log~ dP/P_s\) and the output is \(log~M / \sqrt{1+.2KM^2}\). The small humped curve at the bottom is the cam correction. Although the input and output functions cover a wide range, the difference that is encoded in the cam is much smaller and drops to zero at both ends.

    This diagram, from Patent 2969910, shows how a cam implements a complicated function.

    This diagram, from Patent 2969910, shows how a cam implements a complicated function.


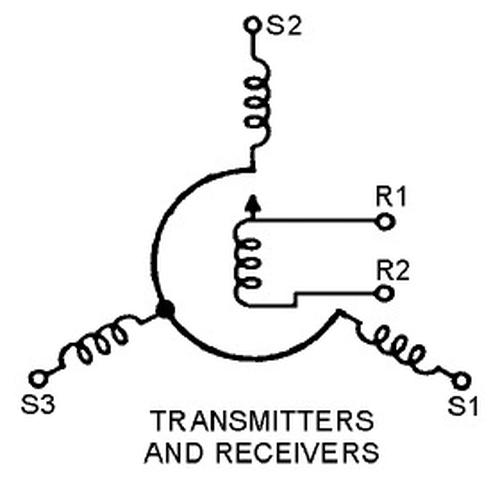
  6. Internally, a synchro has a moving rotor winding and three fixed stator windings. When AC is applied to the rotor, voltages are developed on the stator windings depending on the position of the rotor. These voltages produce a torque that rotates the synchros to the same position. In other words, the rotor receives power (26 V, 400 Hz in this case), while the three stator wires transmit the position. The diagram below shows how a synchro is represented schematically, with rotor and stator coils.

    The schematic symbol for a synchro.

    The schematic symbol for a synchro.

    A control transformer has a similar structure, but the rotor winding provides an output, instead of being powered. 

  7. Specifically, the left part of the CADC computes true airspeed, air density, total temperature, log true free air temperature, and air density × speed of sound. I discussed the left section in detail here

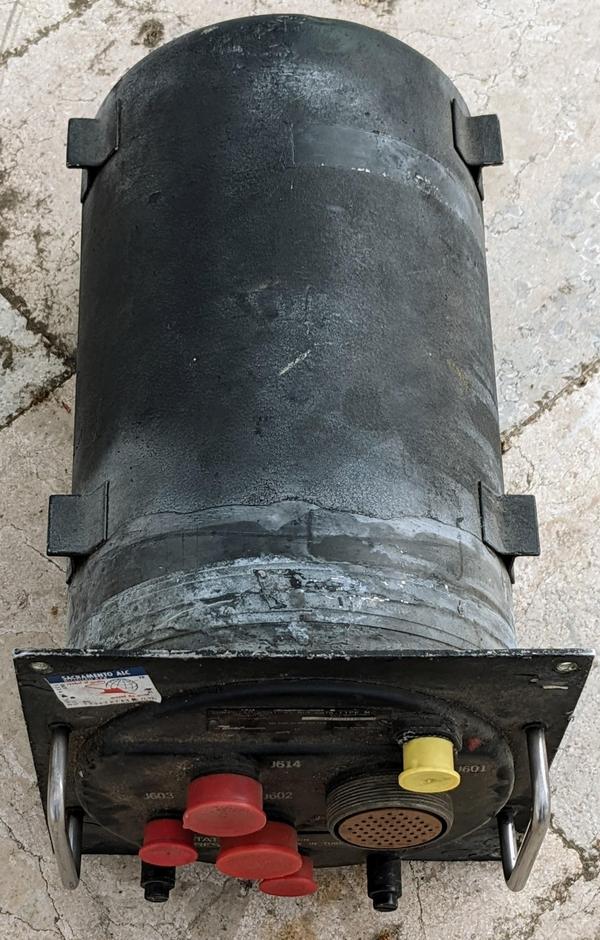
  8. From the outside, the CADC is a boring black cylinder, with no hint of the complex gearing inside. The CADC is wired to the rest of the aircraft through round military connectors. The front panel interfaces these connectors to the D-sub connectors used internally. The two pressure inputs are the black cylinders at the bottom of the photo.

    The exterior of the CADC. It is packaged in a rugged metal cylinder. It is sealed by a soldered metal band, so we needed a blowtorch to open it.

    The exterior of the CADC. It is packaged in a rugged metal cylinder. It is sealed by a soldered metal band, so we needed a blowtorch to open it.


  9. The concepts of position error correction are described here

  10. The phase of the signal is 0° or 180°, depending on the direction of the error. In other words, the error signal is proportional to the driving AC signal in one direction and flipped when the error is in the other direction. This is important since it indicates which direction the motor should turn. When the error is eliminated, the signal is zero. 

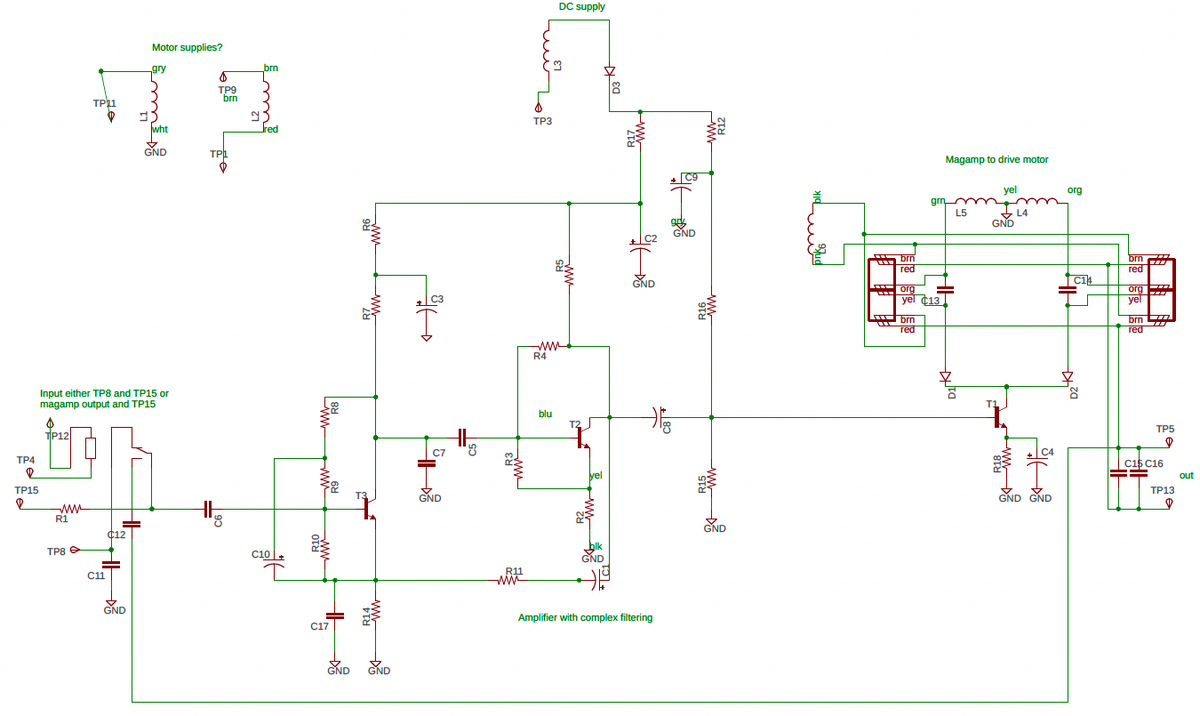
  11. I reverse-engineered the circuit board to create the schematic below for the amplifier. The idea is that one magnetic amplifier or the other is selected, depending on the phase of the error signal, causing the motor to turn counterclockwise or clockwise as needed. To implement this, the magnetic amplifier control windings are connected to opposite phases of the 400 Hz power. The transistor is connected to both magnetic amplifiers through diodes, so current will flow only if the transistor pulls the winding low during the half-cycle that the winding is powered high. Thus, depending on the phase of the transistor output, one winding or the other will be powered, allowing that magnetic amplifier to pass AC to the motor.

    This reverse-engineered schematic probably has a few errors. Click the schematic for a larger version.

    This reverse-engineered schematic probably has a few errors. Click the schematic for a larger version.

    The CADC has four servo amplifiers: this one for pressure error correction, one for temperature, and two for pressure. The amplifiers have different types of inputs: the temperature input is the probe resistance, the pressure error correction uses an error voltage from the control transformer, and the pressure inputs are voltages from the inductive pickups in the sensor. The circuitry is roughly the same for each amplifier—a transistor amplifier driving two magnetic amplifiers—but the details are different. The largest difference is that each pressure transducer amplifier drives two motors (coarse and fine) so each has two transistor stages and four magnetic amplifiers. 

  12. The basic idea of a magnetic amplifier is a controllable inductor. Normally, the inductor blocks alternating current. But applying a relatively small DC signal to a control winding causes the inductor to saturate, permitting the flow of AC. Since the magnetic amplifier uses a small signal to control a much larger signal, it provides amplification.

    In the early 1900s, magnetic amplifiers were used in applications such as dimming lights. Germany improved the technology in World War II, using magnetic amplifiers in ships, rockets, and trains. The magnetic amplifier had a resurgence in the 1950s; the Univac Solid State computer used magnetic amplifiers (rather than vacuum tubes or transistors) as its logic elements. However, improvements in transistors made the magnetic amplifier obsolete except for specialized applications. (See my IEEE Spectrum article on magnetic amplifiers for more history of magnetic amplifiers.) 

  13. The CADC specification defines how the parameter values correspond to rotation angles of the synchros. For instance, for the log static pressure synchros, the CADC supports the parameter range 0.8099 to 31.0185 inches of mercury. The spec defines the corresponding synchro outputs as 16,320° rotation of the fine synchro and 175.48° rotation of the coarse synchro over this range. The synchro null point corresponds to 29.92 inches of mercury (i.e. zero altitude). The fine synchro is geared to rotate 93 times as fast as the coarse synchro, so it rotates over 45 times during this range, providing higher resolution than a single synchro would provide. The other synchro pairs use a much smaller 11:1 ratio; presumably high accuracy of the static pressure was important. 

  14. Although the CADC's equations may seem ad hoc, they can be derived from fluid dynamics principles. These equations were standardized in the 1950s by various government organizations including the National Bureau of Standards and NACA (the precursor of NASA). 

  15. It was very difficult to find information about the CADC. The official military specification is MIL-C-25653C(USAF). After searching everywhere, I was finally able to get a copy from the Technical Reports & Standards unit of the Library of Congress. The other useful document was in an obscure conference proceedings from 1958: "Air Data Computer Mechanization" (Hazen), Symposium on the USAF Flight Control Data Integration Program, Wright Air Dev Center US Air Force, Feb 3-4, 1958, pp 171-194. 

Reverse-engineering the Globus INK, a Soviet spaceflight navigation computer

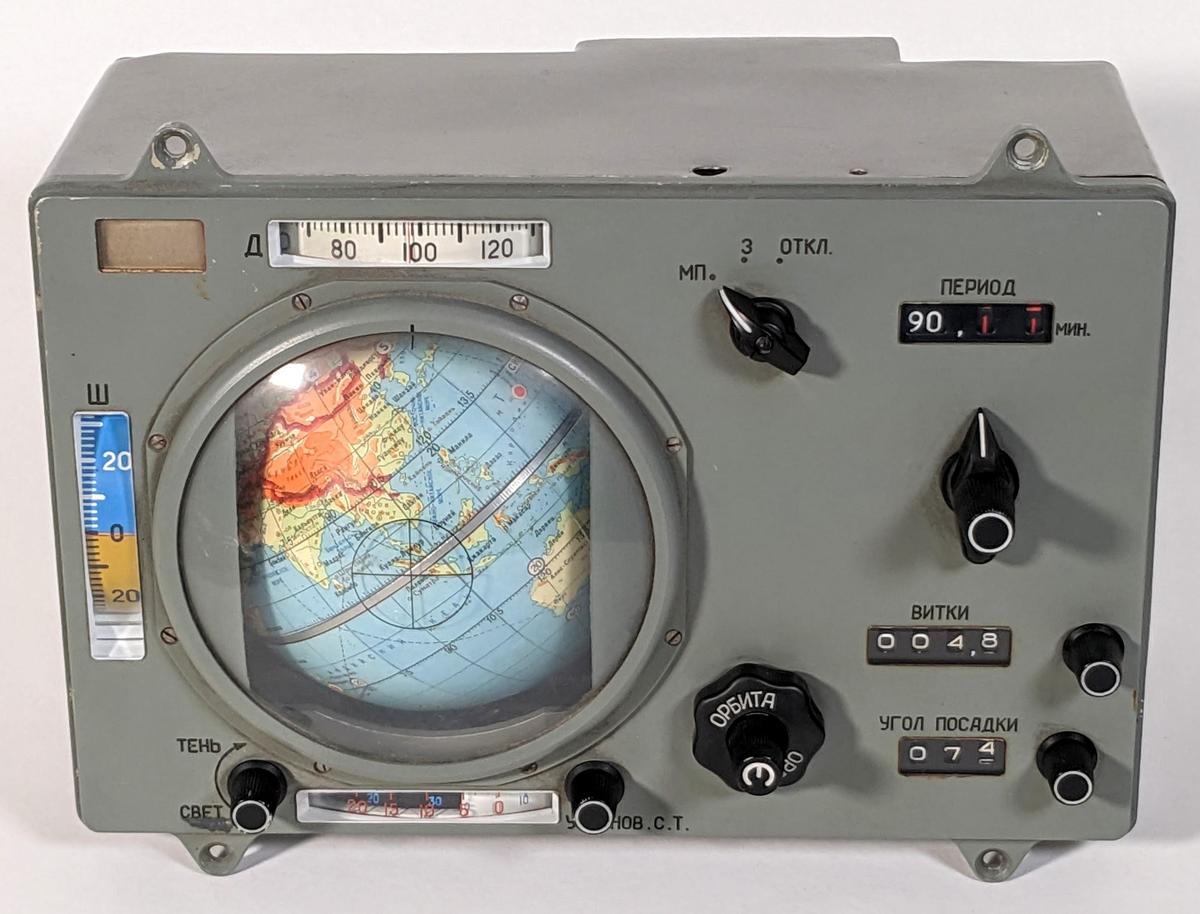
One of the most interesting navigation instruments onboard Soyuz spacecraft was the Globus INK,1 which used a rotating globe to indicate the spacecraft's position above the Earth. This electromechanical analog computer used an elaborate system of gears, cams, and differentials to compute the spacecraft's position. The globe rotates in two dimensions: it spins end-over-end to indicate the spacecraft's orbit, while the globe's hemispheres rotate according to the Earth's daily rotation around its axis.2 The spacecraft's position above the Earth was represented by the fixed crosshairs on the plastic dome. The Globus also has latitude and longitude dials next to the globe to show the position numerically, while the light/shadow dial below the globe indicated when the spacecraft would enter or leave the Earth's shadow.

The INK-2S "Globus" space navigation indicator.

The INK-2S "Globus" space navigation indicator.

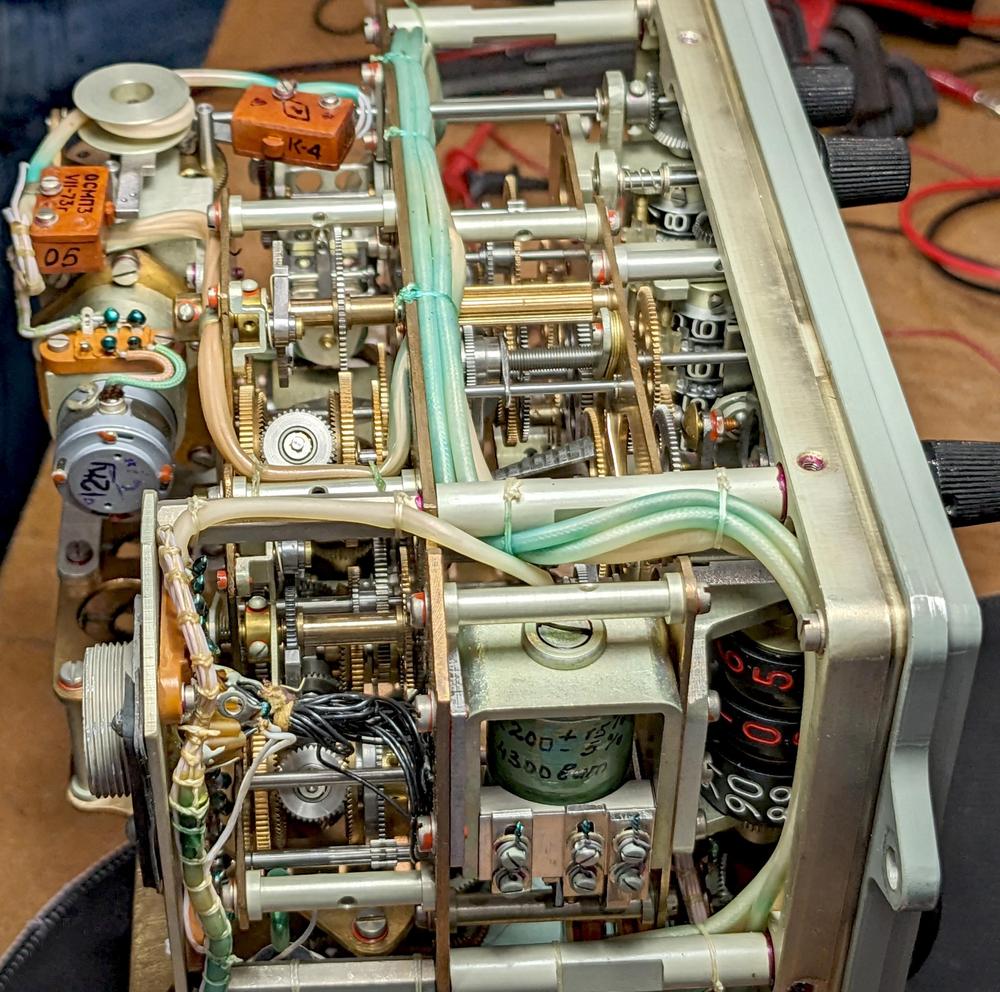
Opening up the Globus reveals that it is packed with complicated gears and mechanisms. It's amazing that this mechanical technology was used from the 1960s into the 21st century. But what are all those gears doing? How can orbital functions be implemented with gears? To answer these questions, I reverse-engineered the Globus and traced out its system of gears.

The Globus with the case removed, showing the complex gearing inside.

The Globus with the case removed, showing the complex gearing inside.

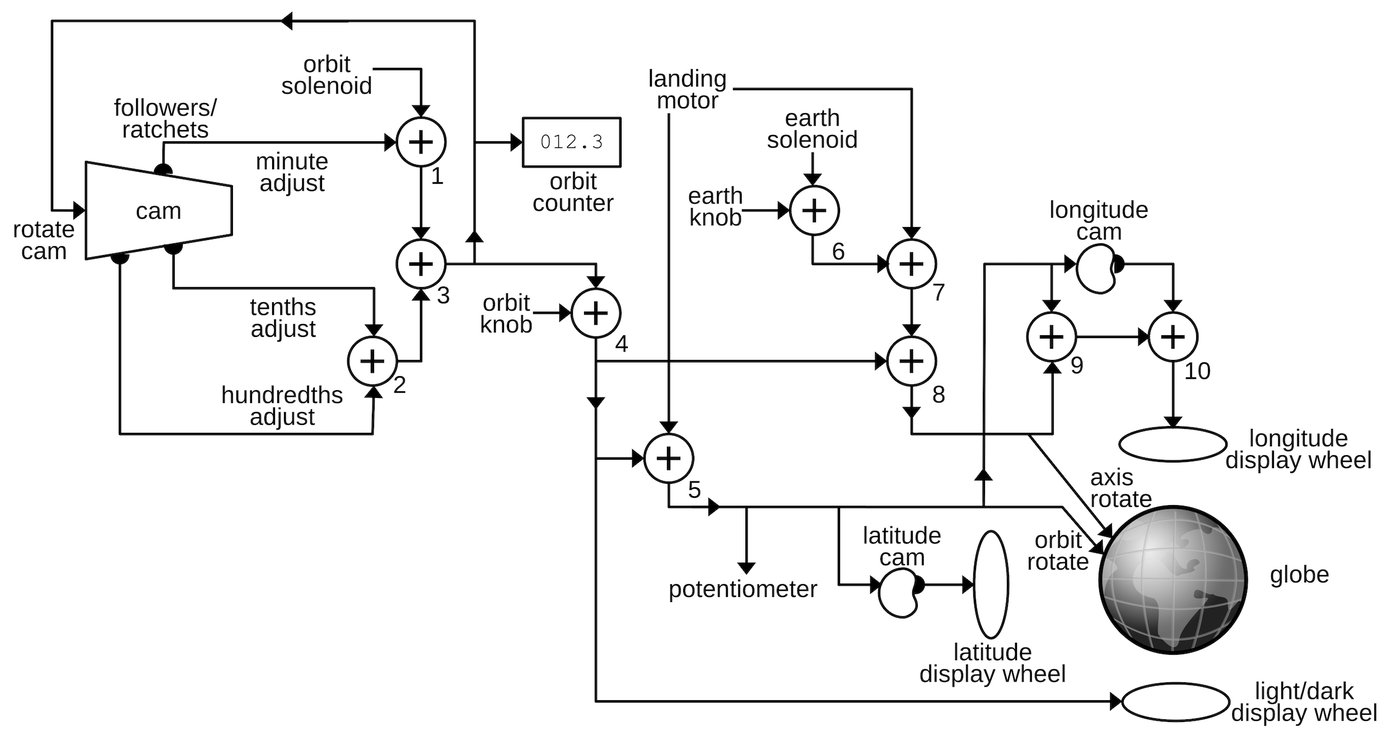
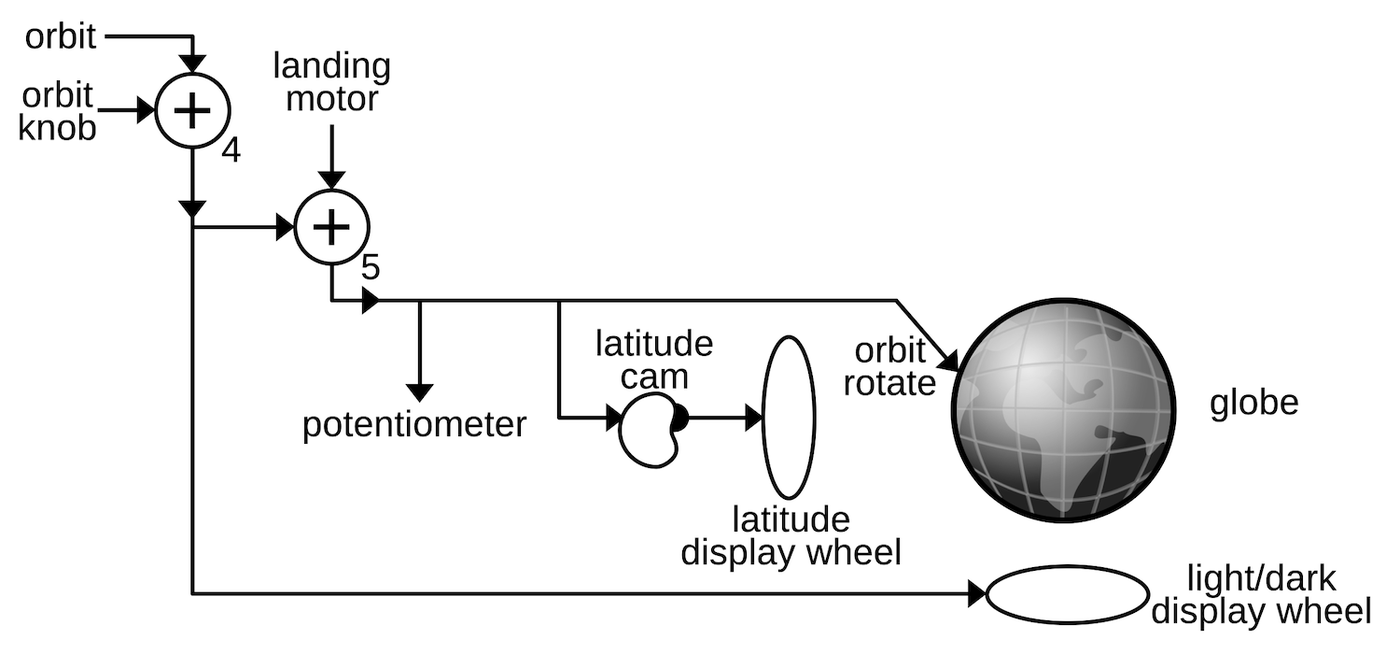
The diagram below summarizes my analysis. The Globus is an analog computer that represents values by rotating shafts by particular amounts. These rotations control the globe and the indicator dials. The flow of these rotational signals is shown by the lines on the diagram. The computation is based around addition, performed by ten differential gear assemblies. On the diagram, each "⨁" symbol indicates one of these differential gear assemblies. Other gears connect the components while scaling the signals through various gear ratios. Complicated functions are implemented with three specially-shaped cams. In the remainder of this blog post, I will break this diagram down into functional blocks and explain how the Globus operates.

This diagram shows the interconnections of the gear network in the Globus.

This diagram shows the interconnections of the gear network in the Globus.

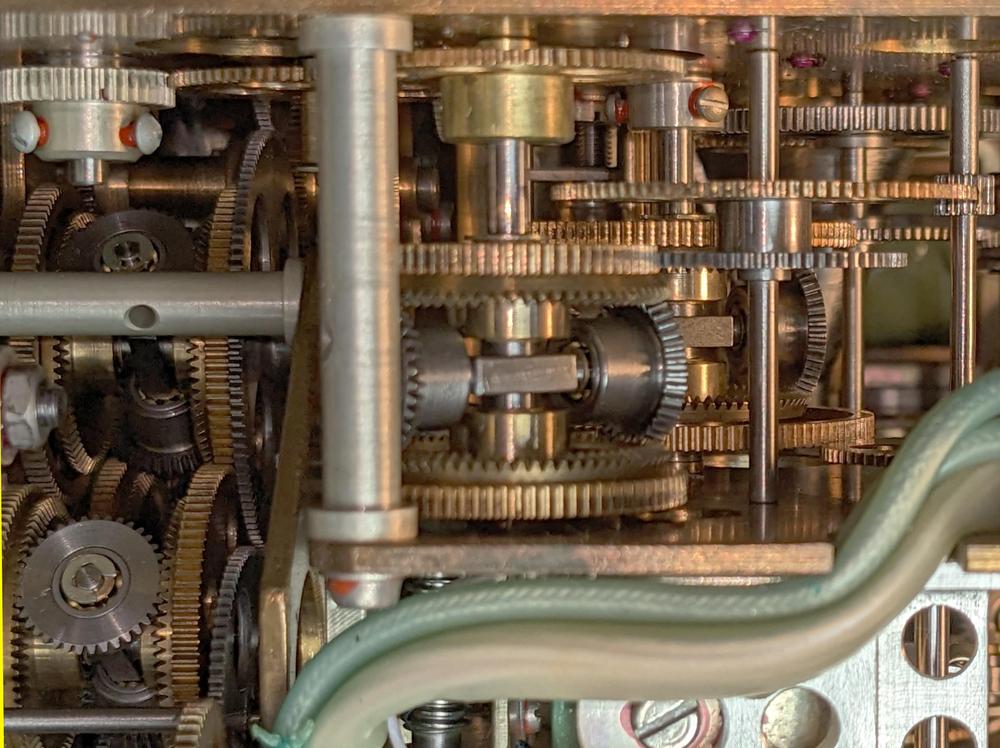
For all its complexity, though, the functionality of the Globus is pretty limited. It only handles a fixed orbit at a specific angle, and treats the orbit as circular. The Globus does not have any navigation input such as an inertial measurement unit (IMU). Instead, the cosmonauts configured the Globus by turning knobs to set the spacecraft's initial position and orbital period. From there, the Globus simply projected the current position of the spacecraft forward, essentially dead reckoning.

A closeup of the gears inside the Globus.

A closeup of the gears inside the Globus.

The globe

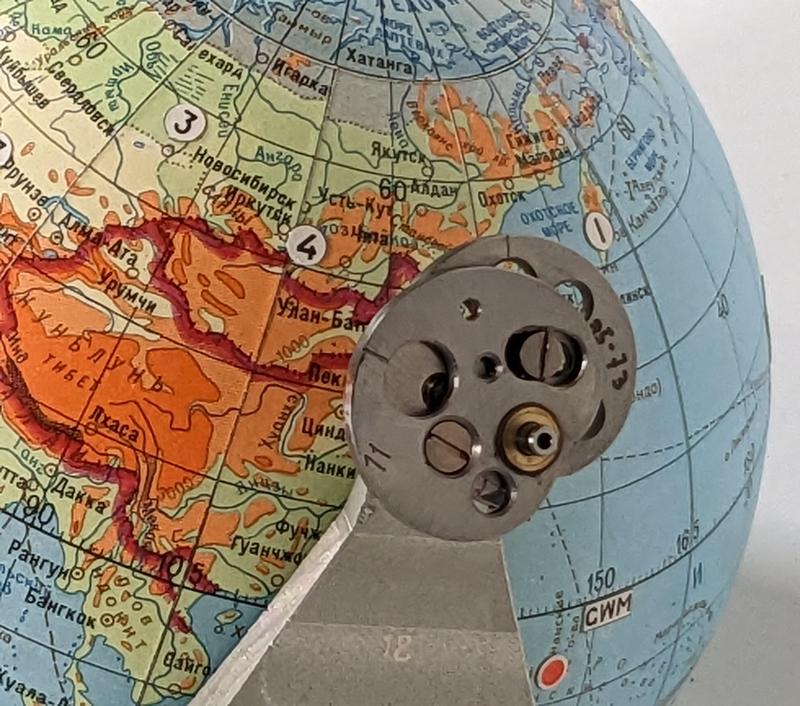
On seeing the Globus, one might wonder how the globe is rotated. It may seem that the globe must be free-floating so it can rotate in two axes. Instead, a clever mechanism attaches the globe to the unit. The key is that the globe's equator is a solid piece of metal that rotates around the horizontal axis of the unit. A second gear mechanism inside the globe rotates the globe around the North-South axis. The two rotations are controlled by concentric shafts that are fixed to the unit. Thus, the globe has two rotational degrees of freedom, even though it is attached at both ends.

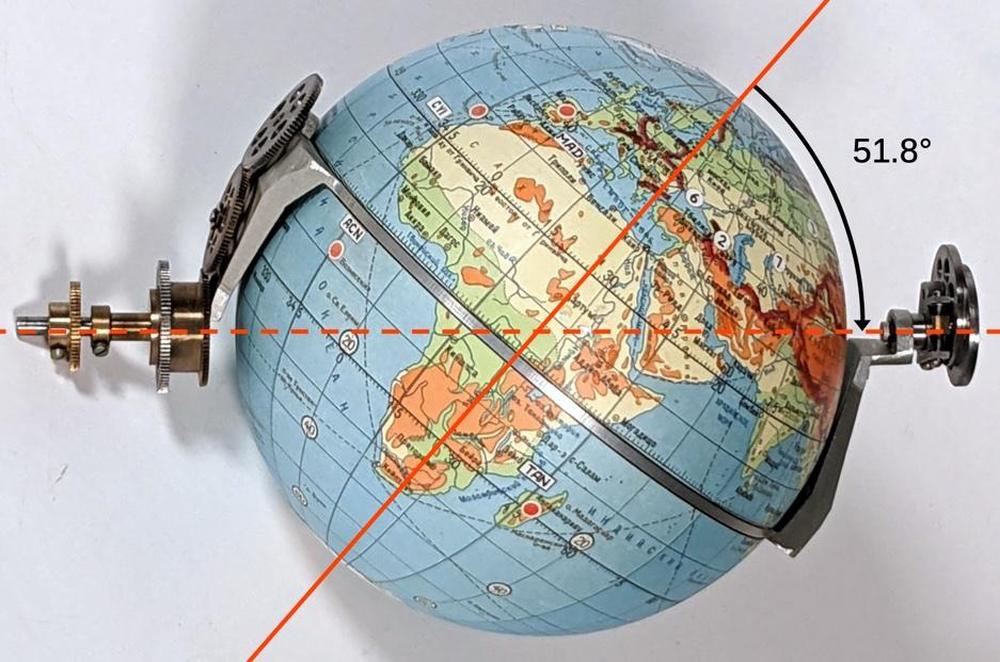
The photo below shows the frame that holds and controls the globe. The dotted axis is fixed horizontally in the unit and rotations are fed through the two gears at the left. One gear rotates the globe and frame around the dotted axis, while the gear train causes the globe to rotate around the vertical polar axis (while the equator remains fixed).

The axis of the globe is at 51.8° to support that orbital inclination.

The axis of the globe is at 51.8° to support that orbital inclination.

The angle above is 51.8° which is very important: this is the inclination of the standard Soyuz orbit. As a result, simply rotating the globe around the dotted line causes the crosshair to trace the orbit.3 Rotating the two halves of the globe around the poles yields the different paths over the Earth's surface as the Earth rotates. An important consequence of this design is that the Globus only supports a circular orbit at a fixed angle.

Differential gear mechanism

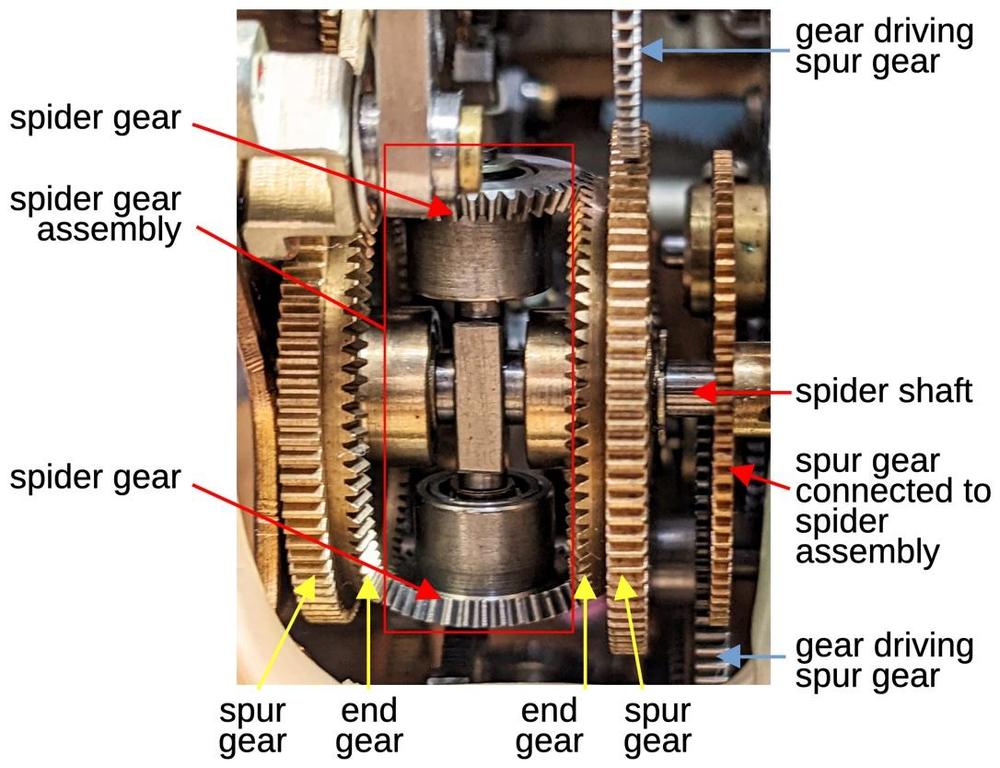
The primary mathematical element of the Globus is the differential gear mechanism, which can perform addition or subtraction. A differential gear takes two rotations as inputs and produces the (scaled) sum of the rotations as the output. The photo below shows one of the differential mechanisms. In the middle, the spider gear assembly (red box) consists of two bevel gears that can spin freely on a vertical shaft. The spider gear assembly as a whole is attached to a horizontal shaft, called the spider shaft. At the right, the spider shaft is attached to a spur gear (a gear with straight-cut teeth). The spider gear assembly, the spider shaft, and the spider's spur gear rotate together as a unit.

Diagram showing the components of a differential gear mechanism.

Diagram showing the components of a differential gear mechanism.

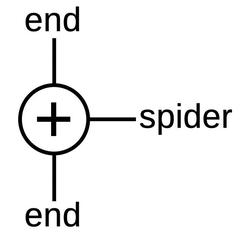
At the left and right are two end gear assemblies (yellow). The end gear is a bevel gear with angled teeth to mesh with the spider gears. Each end gear is locked to a spur gear and these gears spin freely on the horizontal spider shaft. In total, there are three spur gears: two connected to the end gears and one connected to the spider assembly. In the diagrams, I'll use the symbol below to represent the differential gear assembly: the end gears are symmetric on the top and bottom, with the spider shaft on the side. Any of the three spur gears can be used as an output, with the other two serving as inputs.

The symbol for the differential gear assembly.

The symbol for the differential gear assembly.

To understand the behavior of the differential, suppose the two end gears are driven in the same direction at the same rate, say upwards.4 These gears will push on the spider gears and rotate the spider gear assembly, with the entire differential rotating as a fixed unit. On the other hand, suppose the two end gears are driven in opposite directions. In this case, the spider gears will spin on their shaft, but the spider gear assembly will remain stationary. In either case, the spider gear assembly motion is the average of the two end gear rotations, that is, the sum of the two rotations divided by 2. (I'll ignore the factor of 2 since I'm ignoring all the gear ratios.) If the operation of the differential is still confusing, this vintage Navy video has a detailed explanation.

The controls and displays

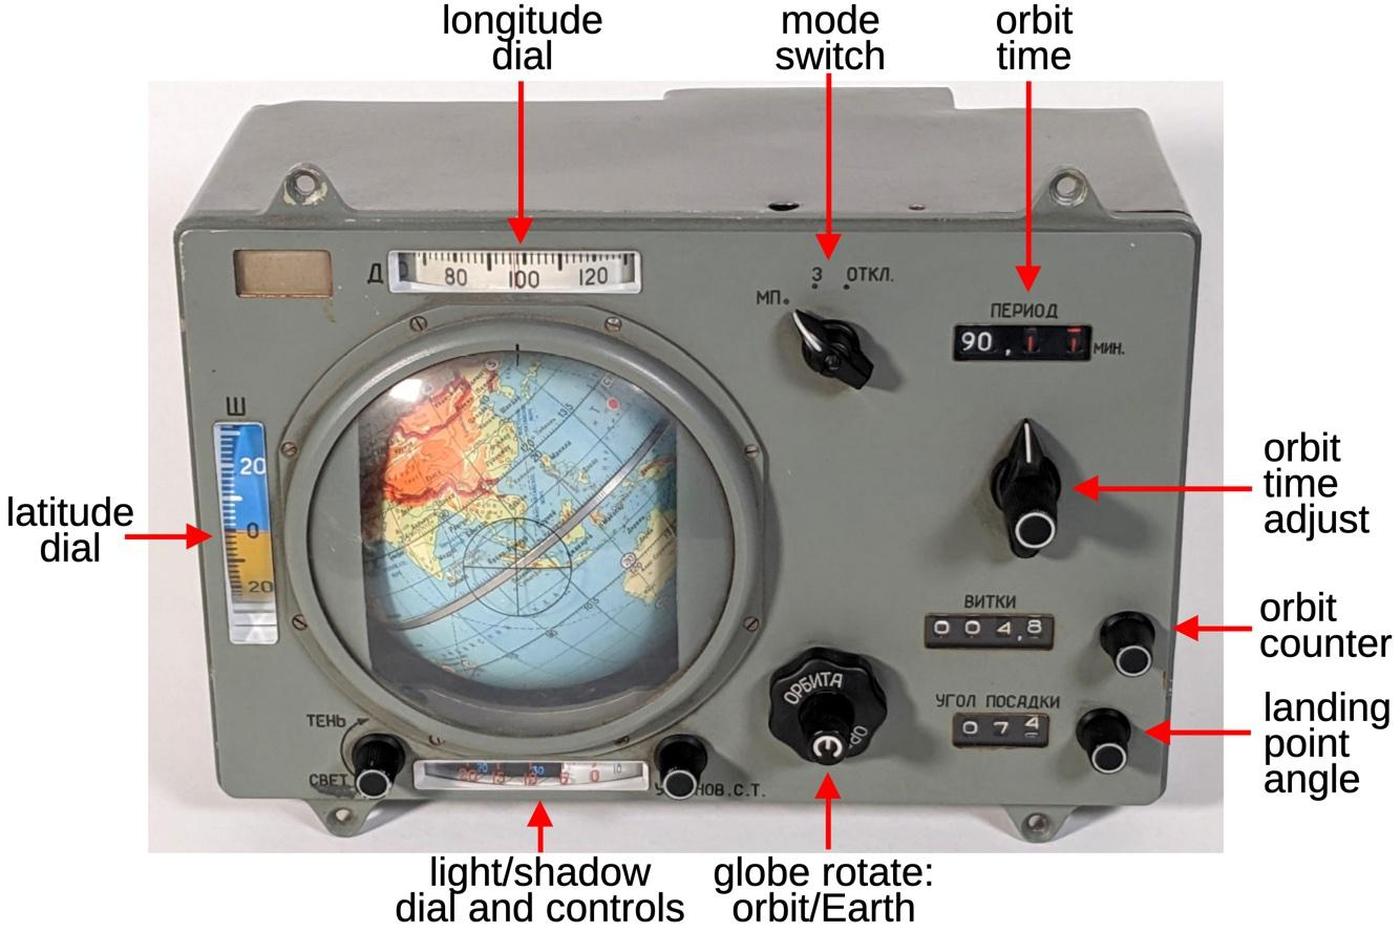
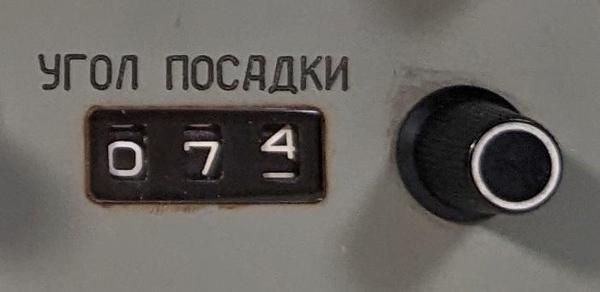
The diagram below shows the controls and displays of the Globus. The rotating globe is the centerpiece of the unit. Its plastic cover has a crosshair that represents the spacecraft's position above the Earth's surface. Surrounding the globe itself are dials that show the longitude, latitude, and the time before entering light and shadow. The cosmonauts manually initialize the globe position with the concentric globe rotation knobs: one rotates the globe along the orbital path while the other rotates the hemispheres. The mode switch at the top selects between the landing position mode, the standard Earth orbit mode, and turning off the unit. The orbit time adjustment configures the orbital time period in minutes while the orbit counter below it counts the number of orbits. Finally, the landing point angle sets the distance to the landing point in degrees of orbit.

The Globus with the controls labeled.

The Globus with the controls labeled.

Computing the orbit time

The primary motion of the Globus is the end-over-end rotation of the globe showing the movement of the spacecraft in orbit. The orbital motion is powered by a solenoid at the top of the Globus that receives pulses once a second and advances a ratchet wheel (video).5 This wheel is connected to a complicated cam and differential system to provide the orbital motion.

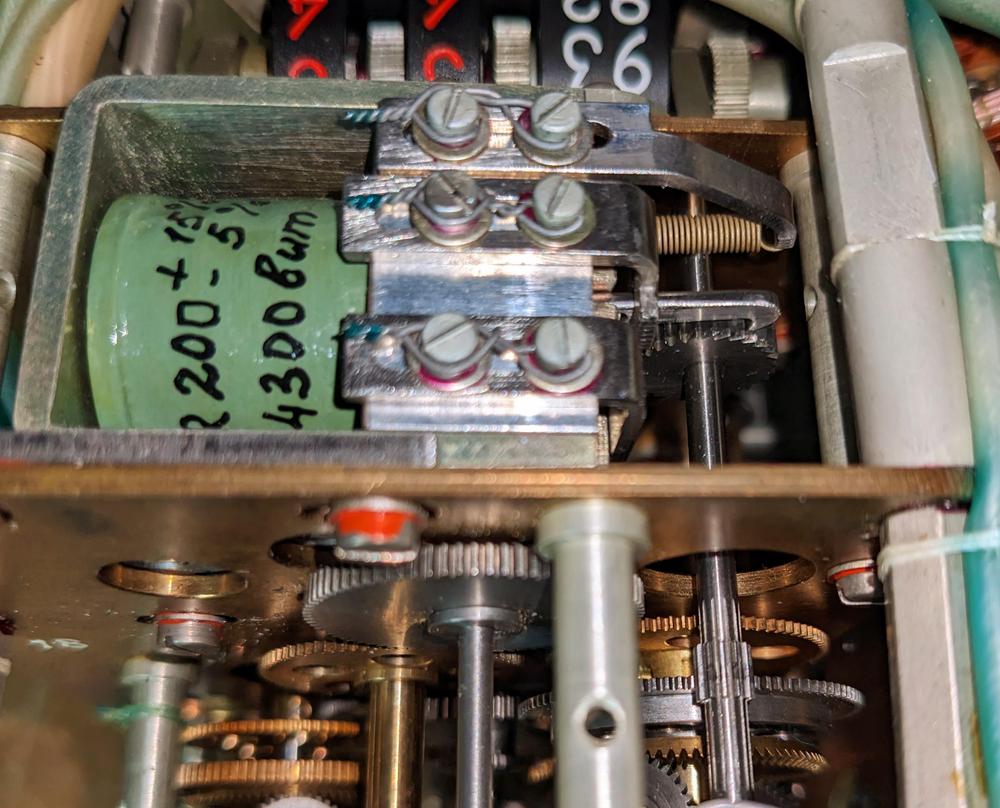
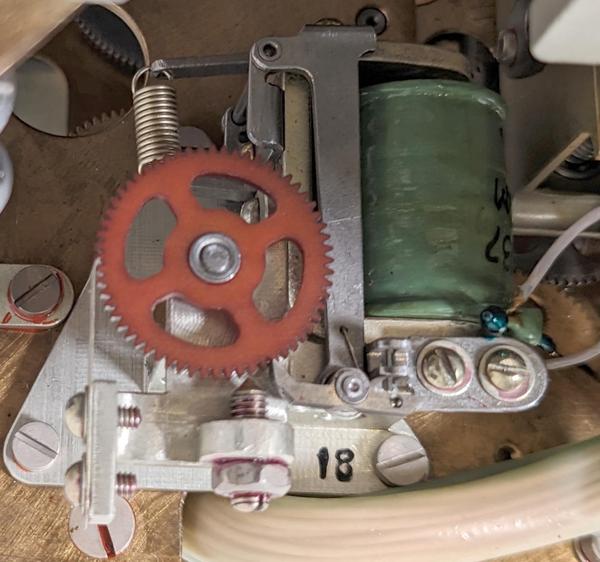
The orbit solenoid (green) has a ratchet that rotates the gear to the right. The shaft connects it to differential gear assembly 1 at the bottom right.

The orbit solenoid (green) has a ratchet that rotates the gear to the right. The shaft connects it to differential gear assembly 1 at the bottom right.

Each orbit takes about 92 minutes, but the orbital time can be adjusted by a few minutes in steps of 0.01 minutes6 to account for changes in altitude. The Globus is surprisingly inflexible and this is the only orbital parameter that can be adjusted.7 The orbital period is adjusted by the three-position orbit time switch, which points to the minutes, tenths, or hundredths. Turning the central knob adjusts the indicated period dial.

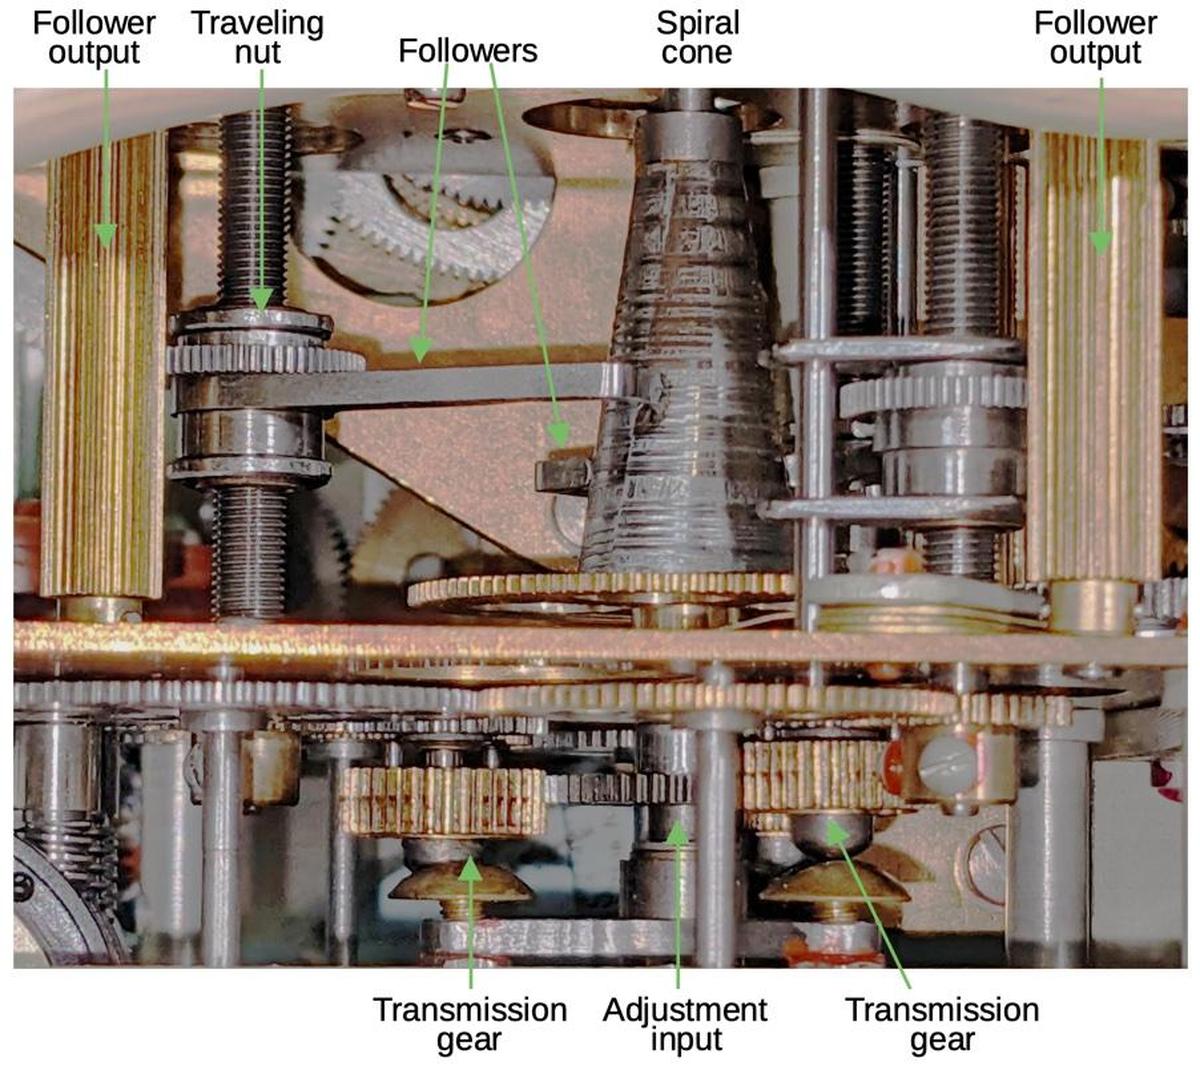
The problem is how to generate the variable orbital rotation speed from the fixed speed of the solenoid. The solution is a special cam, shaped like a cone with a spiral cross-section. Three followers ride on the cam, so as the cam rotates, the follower is pushed outward and rotates on its shaft. If the follower is near the narrow part of the cam, it moves over a small distance and has a small rotation. But if the follower is near the wide part of the cam, it moves a larger distance and has a larger rotation. Thus, by moving the follower to a particular point on the cam, the rotational speed of the follower is selected. One follower adjusts the speed based on the minutes setting with others for the tenths and hundredths of minutes.

A diagram showing the orbital speed control mechanism. The cone has three followers, but only two are visible from this angle. The "transmission" gears are moved in and out by the outer knob to select which follower is adjusted by the inner knob.

A diagram showing the orbital speed control mechanism. The cone has three followers, but only two are visible from this angle. The "transmission" gears are moved in and out by the outer knob to select which follower is adjusted by the inner knob.

Of course, the cam can't spiral out forever. Instead, at the end of one revolution, its cross-section drops back sharply to the starting diameter. This causes the follower to snap back to its original position. To prevent this from jerking the globe backward, the follower is connected to the differential gearing via a slip clutch and ratchet. Thus, when the follower snaps back, the ratchet holds the drive shaft stationary. The drive shaft then continues its rotation as the follower starts cycling out again. Each shaft output is accordingly a (mostly) smooth rotation at a speed that depends on the position of the follower.

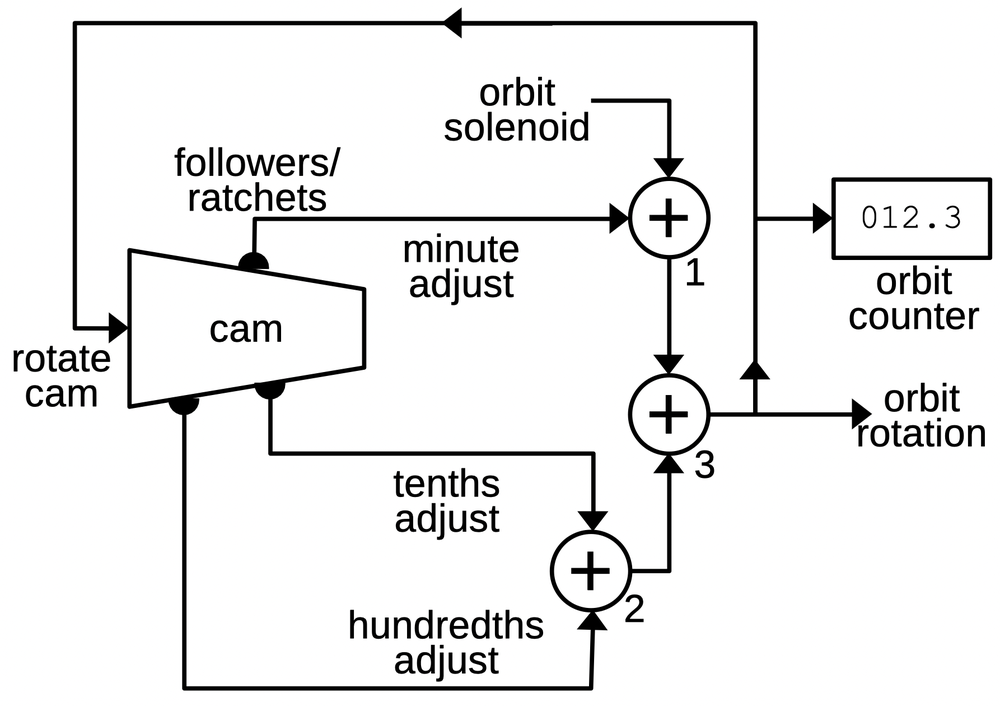
A cam-based system adjusts the orbital speed using three differential gear assemblies.

A cam-based system adjusts the orbital speed using three differential gear assemblies.

The three adjustment signals are scaled by gear ratios to provide the appropriate contribution to the rotation. As shown above, the adjustments are added to the solenoid output by three differentials to generate the orbit rotation signal, output from differential 3.8 This signal also drives the odometer-like orbit counter on the front of the Globus. The diagram below shows how the components are arranged, as viewed from the back.

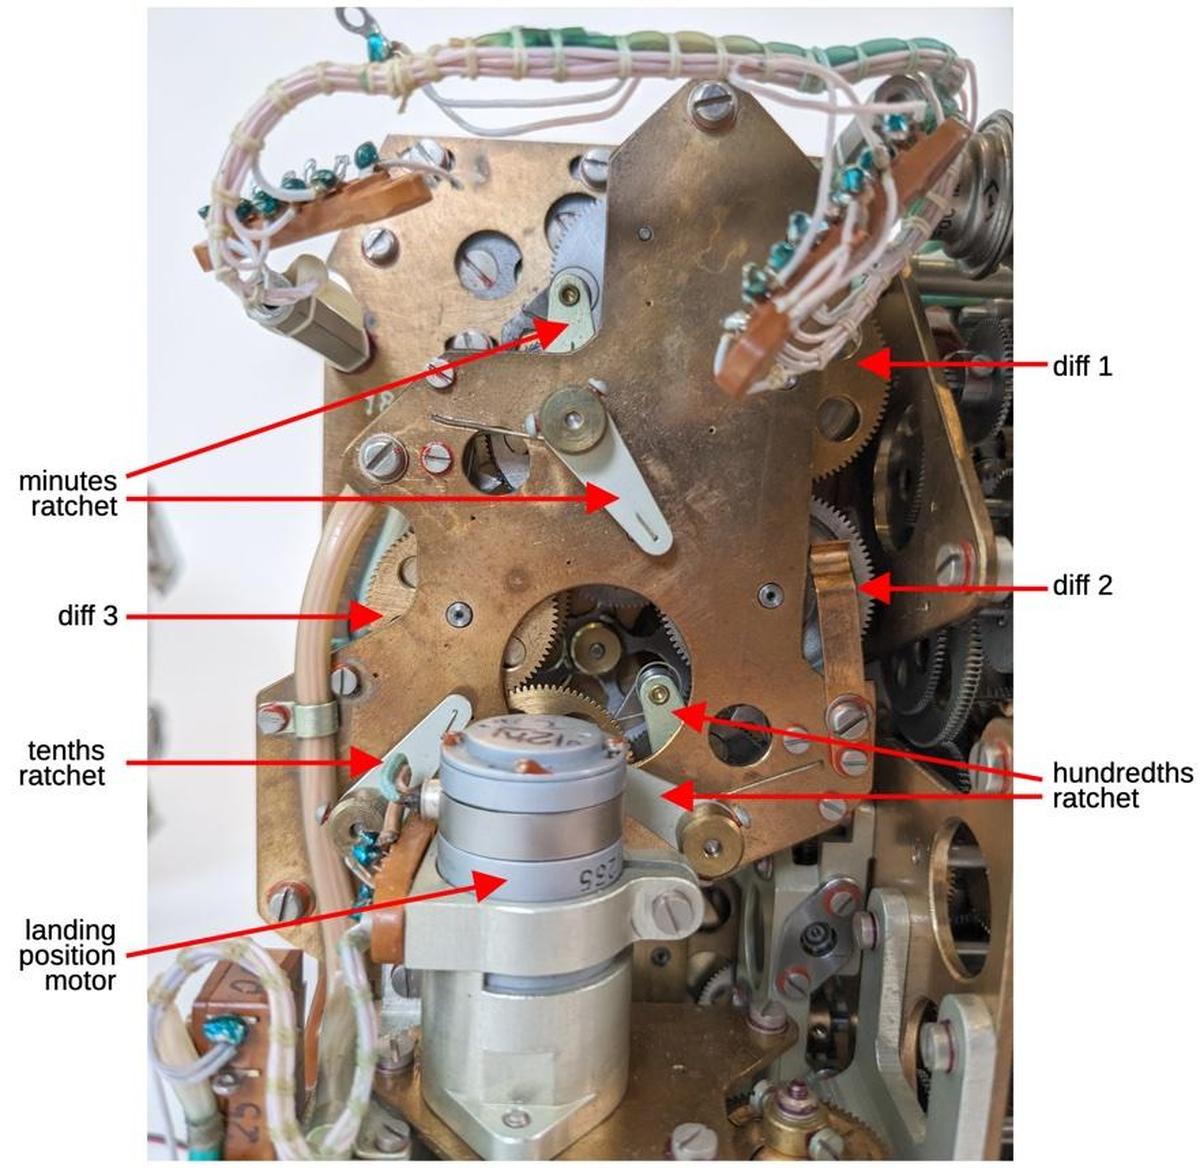
A back view of the Globus showing the orbit components.

A back view of the Globus showing the orbit components.

Displaying the orbit rotation

Since the Globus doesn't have any external position input such as inertial guidance, it must be initialized by the cosmonauts. A knob on the front of the Globus provides manual adjustment of the orbital position. Differential 4 adds the knob signal to the orbit output discussed above.

The orbit controls drive the globe's motion.

The orbit controls drive the globe's motion.

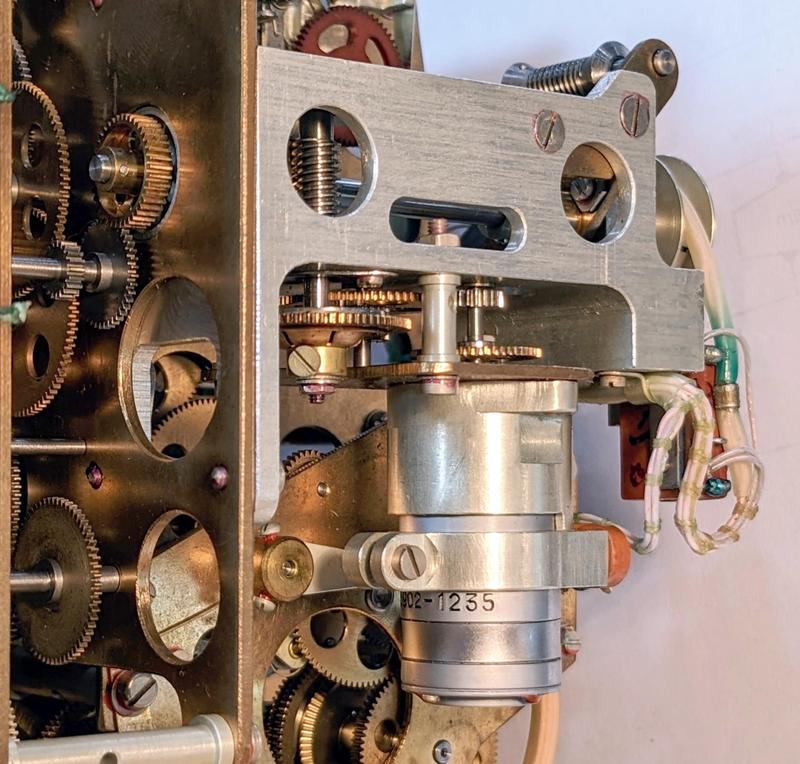
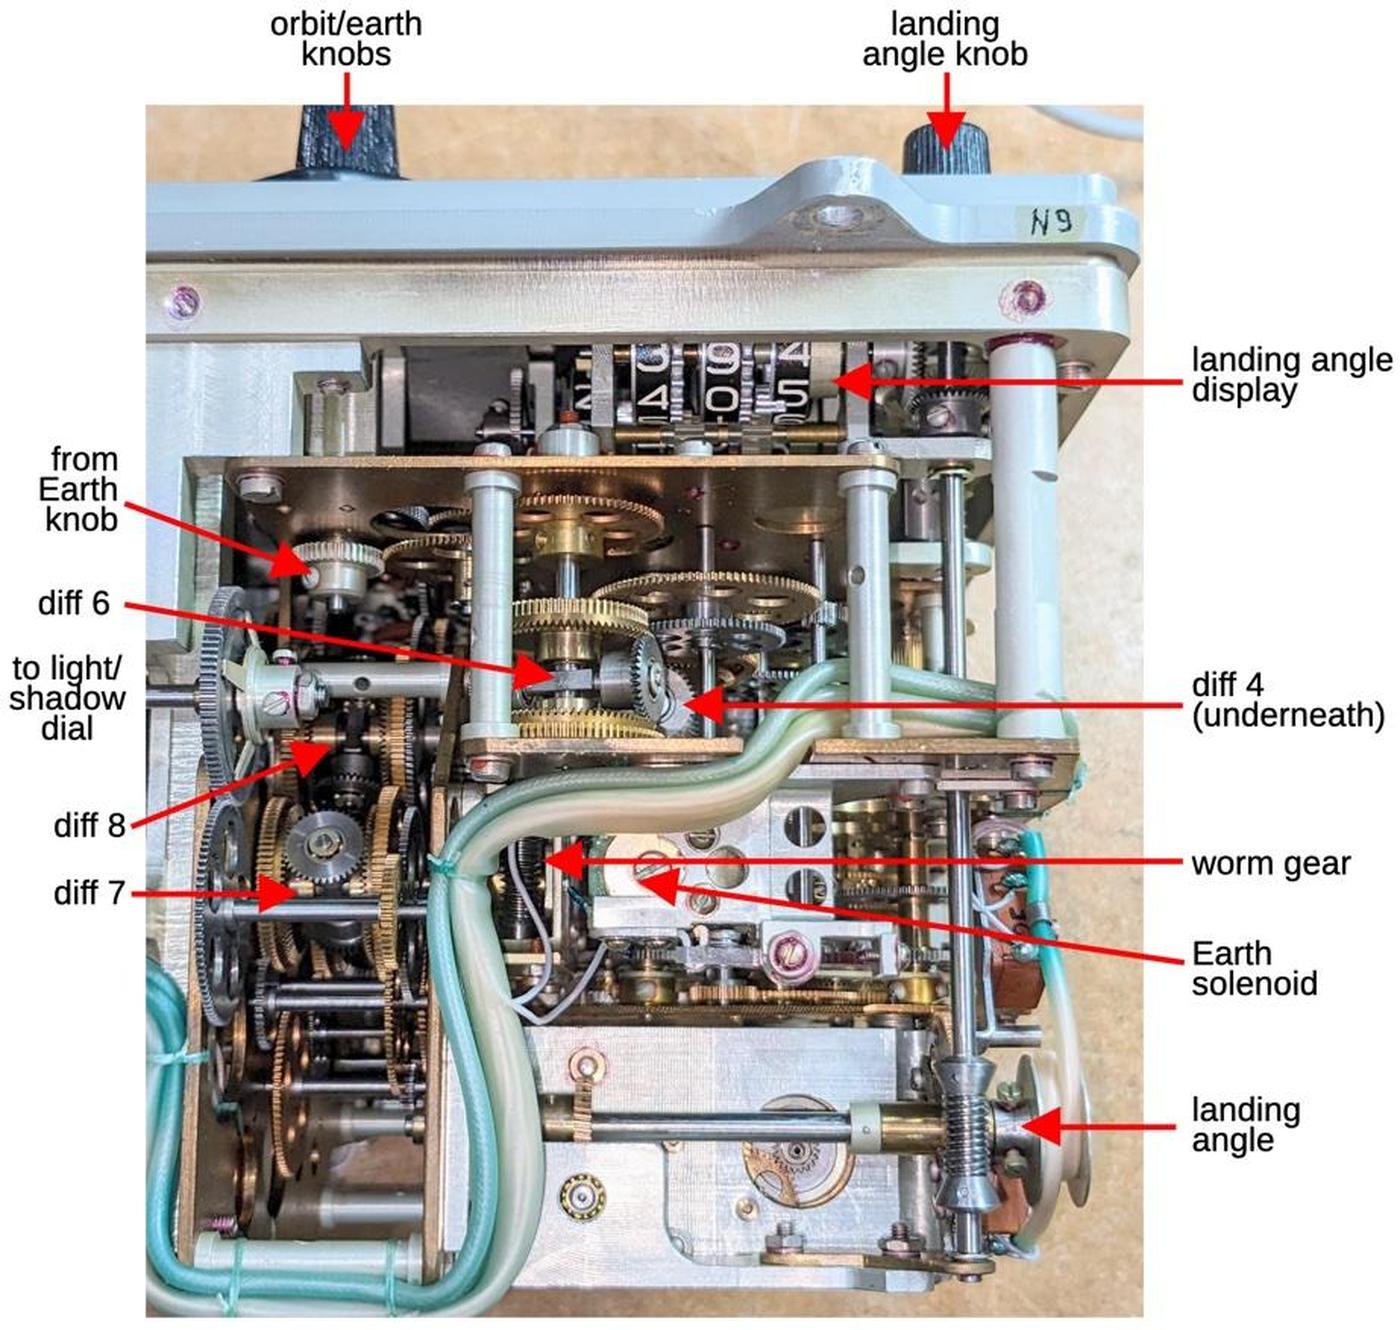
The Globus has a "landing point" mode where the globe is rapidly rotated through a fraction of an orbit to indicate where the spacecraft would land if the retro-rockets were fired. Turning the mode switch caused the globe to rotate until the landing position was under the crosshairs and the cosmonauts could evaluate the suitability of this landing site. This mode is implemented with a landing position motor that provides the rapid rotation. This motor also rotates the globe back to the orbital position. The motor is driven through an electronics board with relays and a transistor, controlled by limit switches. I discussed the electronics in a previous post so I won't go into more details here. The landing position motor feeds into the orbit signal through differential 5, producing the final orbit signal.

The landing position motor and its associated gearing. The motor speed is geared down and then fed through a worm gear (upper center).

The landing position motor and its associated gearing. The motor speed is geared down and then fed through a worm gear (upper center).

The orbit signal from differential 5 is used in several ways. Most importantly, the orbit signal provides the end-over-end rotation of the globe to indicate the spacecraft's travel in orbit. As discussed earlier, this is accomplished by rotating the globe's metal frame around the horizontal axis. The orbital signal also rotates a potentiometer to provide an electrical indication of the orbital position to other spacecraft systems.

The light/shadow indicator

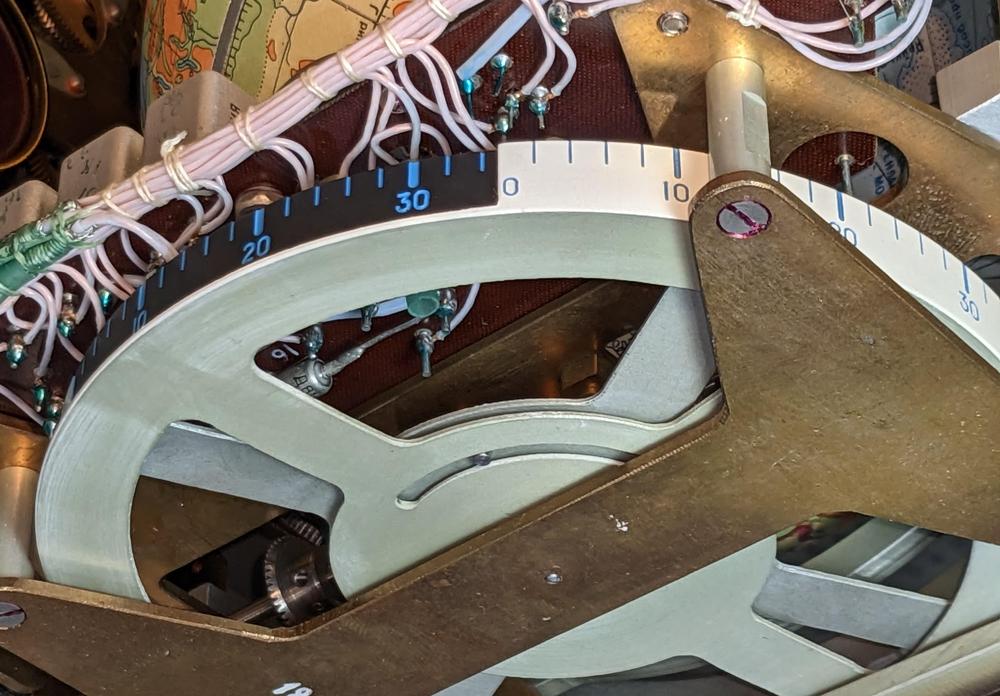
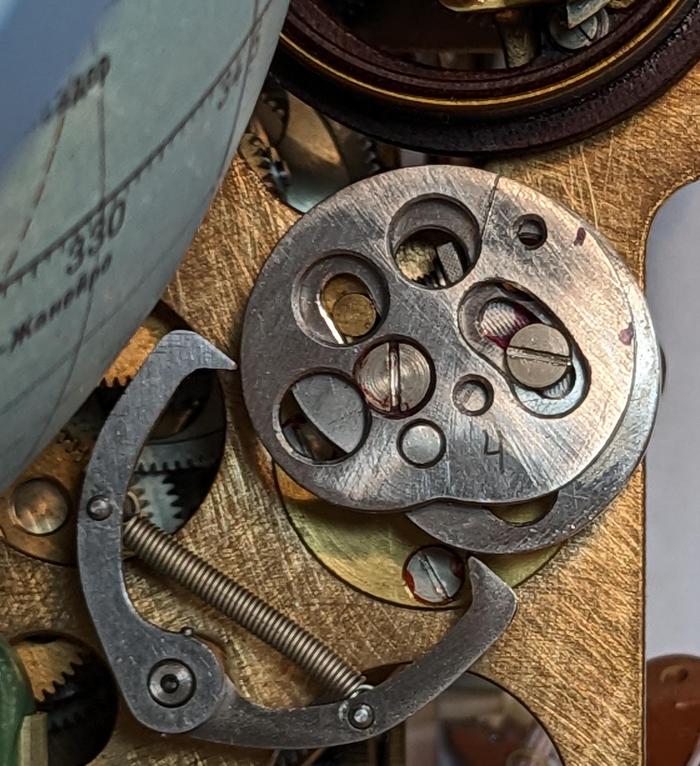
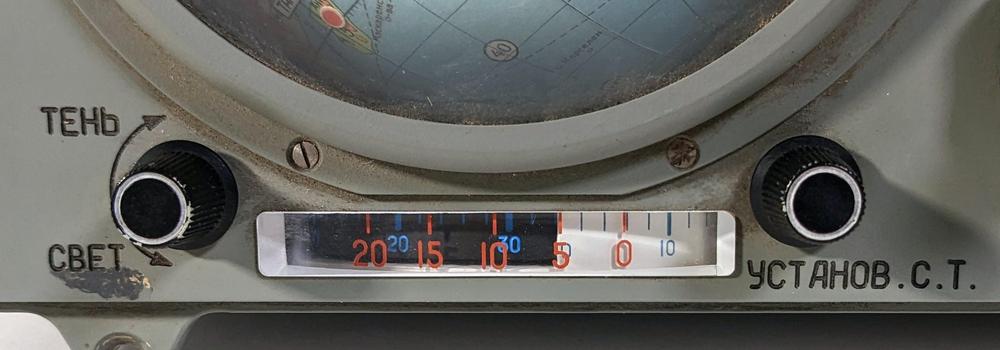
Docking a spacecraft is a tricky endeavor, best performed in daylight, so it is useful to know how much time remains until the spacecraft enters the Earth's shadow. The light/shadow dial under the globe provides this information. This display consists of two nested wheels. The outer wheel is white and has two quarters removed. Through these gaps, the partially-black inner wheel is exposed, which can be adjusted to show 0% to 50% dark. This display is rotated by the orbital signal, turning half a revolution per orbit. As the spacecraft orbits, this dial shows the light/shadow transition and the time to the transistion.9

The light/shadow indicator, viewed from the underside of the Globus. The shadow indicator has been set to 35% shadow. Near the hub, a pin restricts motion of the inner wheel relative to the outer wheel.

The light/shadow indicator, viewed from the underside of the Globus. The shadow indicator has been set to 35% shadow. Near the hub, a pin restricts motion of the inner wheel relative to the outer wheel.

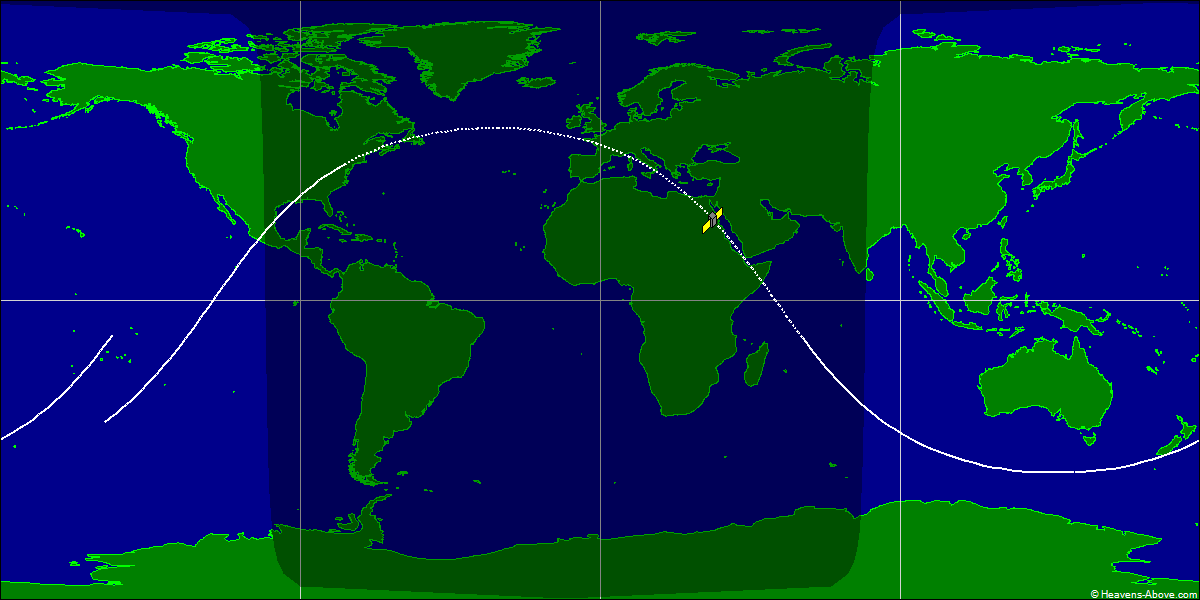
You might expect the orbit to be in the dark 50% of the time, but because the spacecraft is about 200 km above the Earth's surface, it will sometimes be illuminated when the surface of the Earth underneath is dark.10 In the ground track below, the dotted part of the track is where the spacecraft is in the Earth's shadow; this is considerably less than 50%. Also note that the end of the orbit doesn't match up with the beginning, due to the Earth's rotation during the orbit.

Ground track of an Apollo-Soyuz Test Project orbit, corresponding to this Globus. Image courtesy of heavens-above.com.

Ground track of an Apollo-Soyuz Test Project orbit, corresponding to this Globus. Image courtesy of heavens-above.com.

The latitude indicator

The latitude indicator to the left of the globe shows the spacecraft's latitude. The map above shows how the latitude oscillates between 51.8°N and 51.8°S, corresponding to the launch inclination angle. Even though the path around the globe is a straight (circular) line, the orbit appears roughly sinusoidal when projected onto the map.11 The exact latitude is a surprisingly complicated function of the orbital position.12 This function is implemented by a cam that is attached to the globe. The varying radius of the cam corresponds to the function. A follower tracks the profile of the cam and rotates the latitude display wheel accordingly, providing the non-linear motion.

A cam is attached to the globe and rotates with the globe.

A cam is attached to the globe and rotates with the globe.

The Earth's rotation

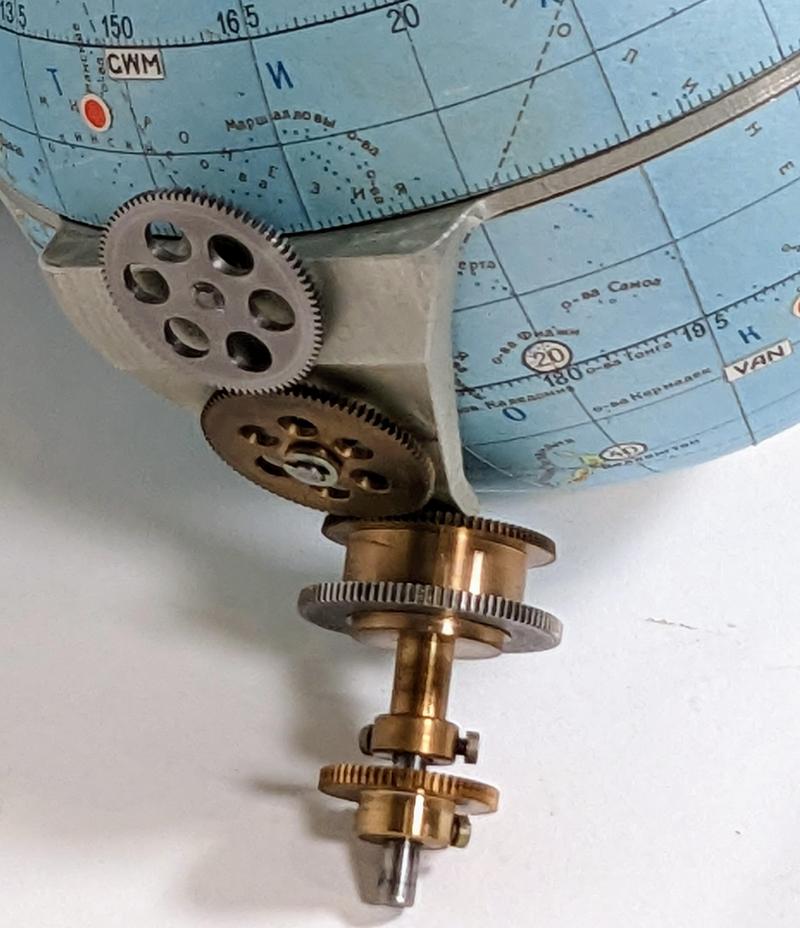
The second motion of the globe is the Earth's daily rotation around its axis, which I'll call the Earth rotation. The Earth rotation is fed into the globe through the outer part of a concentric shaft, while the orbital rotation is provided through the inner shaft. The Earth rotation is transferred through three gears to the equatorial frame, where an internal mechanism rotates the hemispheres. There's a complication, though: if the globe's orbital shaft turns while the Earth rotation shaft remains stationary, the frame will rotate, causing the gears to turn and the hemispheres to rotate. In other words, keeping the hemispheres stationary requires the Earth shaft to rotate with the orbit shaft.

A closeup of the gear mechanisms that drive the Globus, showing the concentric shafts that control the two rotations.

A closeup of the gear mechanisms that drive the Globus, showing the concentric shafts that control the two rotations.

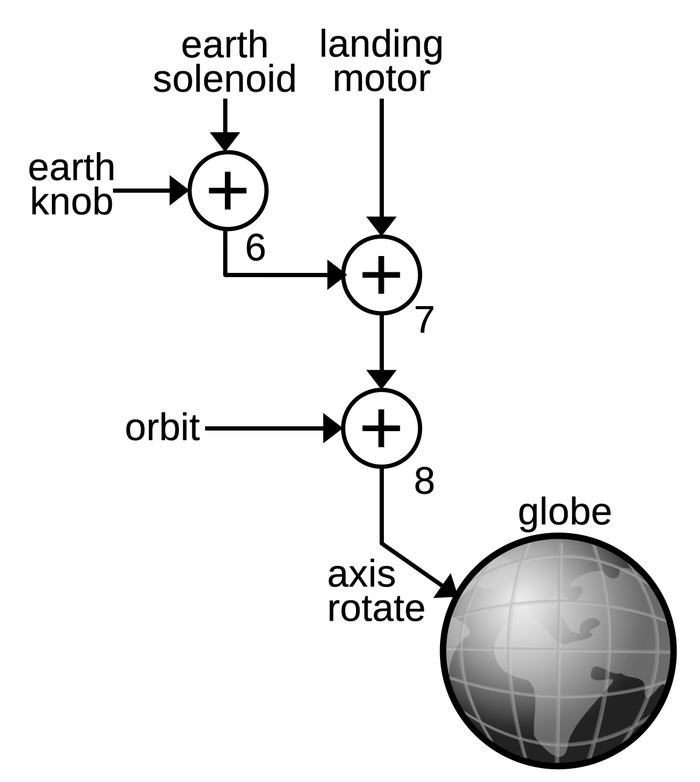
The Globus solves this problem by adding the orbit rotation to the Earth rotation, as shown in the diagram below, using differentials 7 and 8. Differential 8 adds the normal orbit rotation, while differential 7 adds the orbit rotation due to the landing motor.14

The mechanism to compute the Earth's rotation around its axis.

The mechanism to compute the Earth's rotation around its axis.

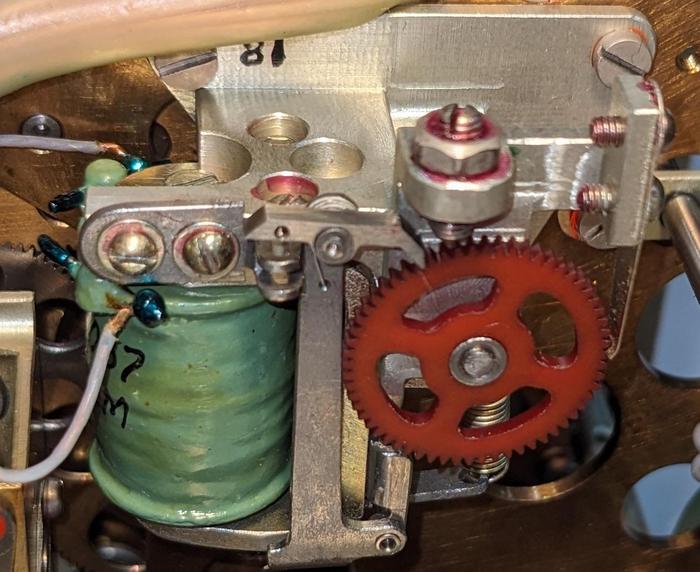
The Earth motion is generated by a second solenoid (below) that is driven with one pulse per second.13 This motion is simpler than the orbit motion because it has a fixed rate. The "Earth" knob on the front of the Globus permits manual rotation around the Earth's axis. This signal is combined with the solenoid signal by differential 6. The sum from the three differentials is fed into the globe, rotating the hemispheres around their axis.

This solenoid, ratchet, and gear on the underside of the Globus drive the Earth rotation.

This solenoid, ratchet, and gear on the underside of the Globus drive the Earth rotation.

The solenoid and differentials are visible from the underside of the Globus. The diagram below labels these components as well as other important components.

The underside of the Globus.

The underside of the Globus.

The longitude display

The longitude cam and the followers that track its radius.

The longitude cam and the followers that track its radius.

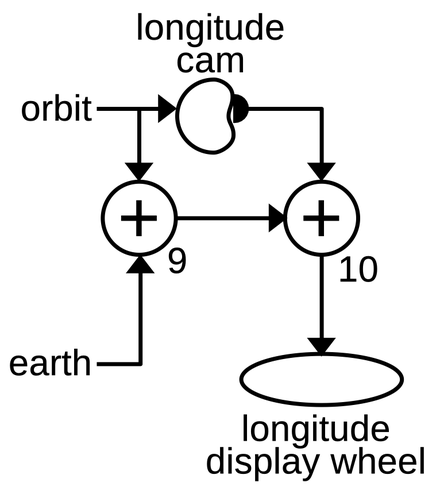
The longitude display is more complicated than the latitude display because it depends on both the Earth rotation and the orbit rotation. Unlike the latitude, the longitude doesn't oscillate but increases. The longitude increases by 360° every orbit according to a complicated formula describing the projection of the orbit onto the globe. Most of the time, the increase is small, but when crossing near the poles, the longitude changes rapidly. The Earth's rotation provides a smaller but steady negative change to the longitude.

The computation of the longitude.

The computation of the longitude.

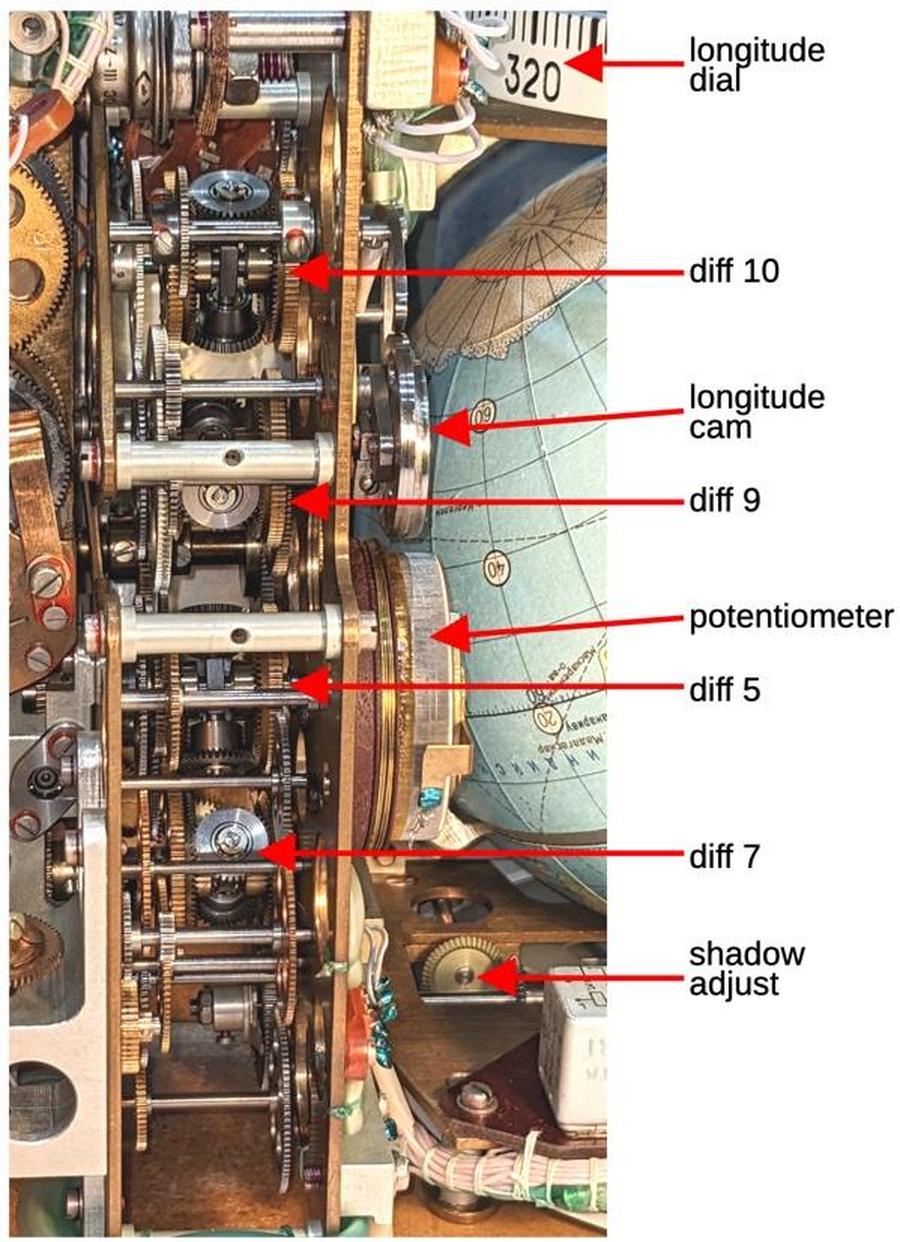
The diagram above shows how the longitude is computed by combining the Earth rotation with the orbit rotation. Differential 9 adds the linear effect of the orbit on longitude (360° per orbit) and subtracts the effect of the Earth's rotation (360° per day). The nonlinear effect of the orbit is computed by a cam that is rotated by the orbit signal. The shape of the cam is picked up and fed into differential 10, computing the longitude that is displayed on the dial. The differentials, cam, and dial are visible from the back of the Globus (below).

A closeup of the differentials from the back of the Globus.

A closeup of the differentials from the back of the Globus.

The time-lapse video below demonstrates the behavior of the rotating displays. The latitude display on the left oscillates between 51.8°N and 51.8°S. The longitude display at the top advances at a changing rate. Near the equator, it advances slowly, while it accelerates near the poles. The light/shadow display at the bottom rotates at a constant speed, completing half a revolution (one light/shadow cycle) per orbit.

Conclusions

The Globus INK is a remarkable piece of machinery, an analog computer that calculates orbits through an intricate system of gears, cams, and differentials. It provided astronauts with a high-resolution, full-color display of the spacecraft's position, way beyond what an electronic space computer could provide in the 1960s.

The drawback of the Globus is that its functionality is limited. Its parameters must be manually configured: the spacecraft's starting position, the orbital speed, the light/shadow regions, and the landing angle. It doesn't take any external guidance inputs, such as an IMU (inertial measurement unit), so it's not particularly accurate. Finally, it only supports a circular orbit at a fixed angle. While a more modern digital display lacks the physical charm of a rotating globe, the digital solution provides much more capability.

I recently wrote blog posts providing a Globus overview and the Globus electronics. Follow me on Twitter @kenshirriff or RSS for updates. I've also started experimenting with Mastodon recently as @[email protected]. Many thanks to Marcel for providing the Globus. I worked on this with CuriousMarc, so check out his Globus videos.

Notes and references

  1. In Russian, the name for the device is "Индикатор Навигационный Космический" abbreviated as ИНК (INK). This translates to "space navigation indicator." but I'll use the more descriptive nickname "Globus" (i.e. globe). The Globus has a long history, back to the beginnings of Soviet crewed spaceflight. The first version was simpler and had the Russian acronym ИМП (IMP). Development of the IMP started in 1960 for the Vostok (1961) and Voshod (1964) spaceflights. The more complex INK model (described in this blog post) was created for the Soyuz flights, starting in 1967. The landing position feature is the main improvement of the INK model. The Soyuz-TMA (2002) upgraded to the Neptun-ME system which used digital display screens and abandoned the Globus. 

  2. According to this document, one revolution of the globe relative to the axis of daily rotation occurs in a time equal to a sidereal day, taking into account the precession of the orbit relative to the earth's axis, caused by the asymmetry of the Earth's gravitational field. (A sidereal day is approximately 4 minutes shorter than a regular 24-hour day. The difference is that the sidereal day is relative to the fixed stars, rather than relative to the Sun.) 

  3. To see how the angle between the poles and the globe's rotation results in the desired orbital inclination, consider two limit cases. First, suppose the angle between is 90°. In this case, the globe is "straight" with the equator horizontal. Rotating the globe along the horizontal axis, flipping the poles end-over-end, will cause the crosshair to trace a polar orbit, giving the expected inclination of 90°. On the other hand, suppose the angle is 0°. In this case, the globe is "sideways" with the equator vertical. Rotating the globe will cause the crosshair to remain over the equator, corresponding to an equatorial orbit with 0° inclination. 

  4. There is a bit of ambiguity when describing the gear motions. If the end gears are rotating upwards when viewed from the front, the gears are both rotating clockwise when viewed from the right, so I'm referring to them as rotating in the same direction. But if you view each gear from its own side, the gear on the left is turning counterclockwise, so from that perspective they are turning in opposite directions. 

  5. The solenoids are important since they provide all the energy to drive the globe. One of the problems with gear-driven analog computers is that each gear and shaft has a bit of friction and loses a bit of torque, and there is nothing to amplify the signal along the way. Thus, the 27-volt solenoids need to provide enough force to run the entire system. 

  6. The orbital time can be adjusted between 86.85 minutes and 96.85 minutes according to this detailed page that describes the Globus in Russian. 

  7. The Globus is manufactured for a particular orbital inclination, in this case 51.8°. The Globus assumes a circular orbit and does not account for any variations. The Globus does not account for any maneuvering in orbit. 

  8. The outputs from the orbit cam are fed into the overall orbit rotation, which drives the orbit cam. This may seem like an "infinite loop" since the outputs from the cam turn the cam itself. However, the outputs from the cam are a small part of the overall orbit rotation, so the feedback dies off. 

  9. The scales on the light/shadow display are a bit confusing. The inner scale (blue) is measured in percentage of an orbit, up to 100%. The fixed outer scale (red) measures minutes, indicating how many minutes until the spacecraft enters or leaves shadow. The spacecraft completes 100% of an orbit in about 90 minutes, so the scales almost, but not quite, line up. The wheel is driven by the orbit mechanism and turns half a revolution per orbit.

    The light and shadow indicator is controlled by two knobs.

    The light and shadow indicator is controlled by two knobs.


  10. The Internation Space Station illustrates how an orbiting spacecraft is illuminated more than 50% of the time due to its height. You can often see the ISS illuminated in the nighttime sky close to sunset and sunrise (link). 

  11. The ground track on the map is roughly, but not exactly, sinusoidal. As the orbit swings further from the equator, the track deviates more from a pure sinusoid. The shape will depend, of course, on the rectangular map projection. For more information, see this StackExcahnge post

  12. To get an idea of how the latitude and longitude behave, consider a polar orbit with 90° angle of inclination, one that goes up a line of longitude, crosses the North Pole, and goes down the opposite line of latitude. Now, shift the orbit away from the poles a bit, but keeping a great circle. The spacecraft will go up, nearly along a constant line of longitude, with the latitude increasing steadily. As the spacecraft reaches the peak of its orbit near the North Pole, it will fall a bit short of the Pole but will still rapidly cross over to the other side. During this phase, the spacecraft rapidly crosses many lines of longitude (which are close together near the Pole) until it reaches the opposite line of longitude. Meanwhile, the latitude stops increasing short of 90° and then starts dropping. On the other side, the process repeats, with the longitude nearly constant while the latitude drops relatively constantly.

    The latitude and longitude are generated by complicated trigonometric functions. The latitude is given by arcsin(sin i * sin (2πt/T)), while the longitude is given by λ = arctan (cos i * tan(2πt/T)) + Ωt + λ0, where t is the spaceship's flight time starting at the equator, i is the angle of inclination (51.8°), T is the orbital period, Ω is the angular velocity of the Earth's rotation, and λ0 is the longitude of the ascending node. 

  13. An important function of the gears is to scale the rotations as needed by using different gear ratios. For the most part, I'm ignoring the gear ratios, but the Earth rotation gearing is interesting. The gear driven by the solenoid has 60 teeth, so it rotates exactly once per minute. This gear drives a shaft with a very small gear on the other end with 15 teeth. This gear meshes with a much larger gear with approximately 75 teeth, which will thus rotate once every 5 minutes. The other end of that shaft has a gear with approximately 15 teeth, meshed with a large gear with approximately 90 teeth. This divides the rate by 6, yielding a rotation every 30 minutes. The sequence of gears and shafts continues, until the rotation is reduced to once per day. (The tooth counts are approximate because the gears are partially obstructed inside the Globus, making counting difficult.) 

  14. There's a potential simplification when canceling out the orbital shaft rotation from the Earth rotation. If the orbit motion was taken from differential 5 instead of differential 4, the landing motor effect would get added automatically, eliminating the need for differential 7. I think the landing motor motion was added separately so the mechanism could account for the Earth's rotation during the landing descent. 

Reverse-engineering the electronics in the Globus analog navigational computer

In the Soyuz space missions, cosmonauts tracked their position above the Earth with a remarkable electromechanical device with a rotating globe. This navigation instrument was an analog computer that used an elaborate system of gears, cams, and differentials to compute the spacecraft's position. Officially, the unit was called a "space navigation indicator" with the Russian acronym ИНК (INK),1 but I'll use the nickname "Globus".

The INK-2S "Globus" space navigation indicator.

The INK-2S "Globus" space navigation indicator.

We recently received a Globus from a collector and opened it up for repair and reverse engineering. Although the Globus does all its calculations mechanically, it has some electronics to control the motors. Inconveniently, all the wires in the wiring harness to the external connector had been cut so I had to do some reverse engineering before we could power it up. In this blog post, I explain how the electronics operate. (For an overview of the mechanical components inside the Globus, see my previous article.)

A closeup of the gears inside the Globus. It performed calculations with gears, cams, and differentials.

A closeup of the gears inside the Globus. It performed calculations with gears, cams, and differentials.

Functionality

The primary purpose of the Globus is to indicate the spacecraft's position. The globe rotated while fixed crosshairs on the plastic dome indicated the spacecraft's position. Thus, the globe matched the cosmonauts' view of the Earth, allowing them to confirm their location. Latitude and longitude dials next to the globe provided a numerical indication of location. The light/shadow dial at the bottom showed when the spacecraft would be illuminated by the sun or in shadow.

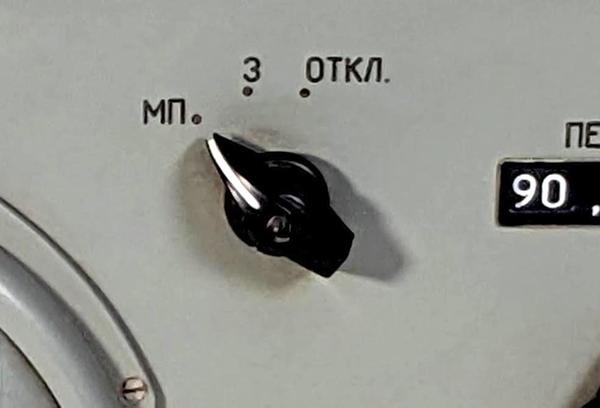
The mode of the Globus is controlled by a three-position rotary switch near the top of the Globus. The middle position "З" (Земля, Earth) shows the position of the spacecraft over the Earth. The left position, "МП" (место посадки, landing site) selects the landing position mode. The third position "Откл" (off) turns off most of the Globus. This rotary switch is surprisingly complicated with three wafers, each with two poles. Most of the electronics go through this switch, so this switch will appear often in the schematics below.

The rotary switch to select the landing angle mode.

The rotary switch to select the landing angle mode.

In the landing position mode, the Globus rotates to show where the spacecraft would land if you fired the retrorockets now. This allowed the cosmonauts to evaluate the suitability of this landing site. This position is computed simply by rapidly rotating the globe through a fraction of an orbit, since the landing position will be on the current orbital track. Most of the electronics in the Globus control the motor that performs this rotation.

Overview of the electronics

The Globus is primarily mechanical, but it has more electrical and electronic components than you might expect. The mechanical motion is powered by two solenoids with ratchets to turn gears. The landing site mode is implemented with a motor to rotate to the landing position, controlled by two limit switches. An electroluminescent light indicates the landing position mode. A potentiometer provides position feedback to external devices.

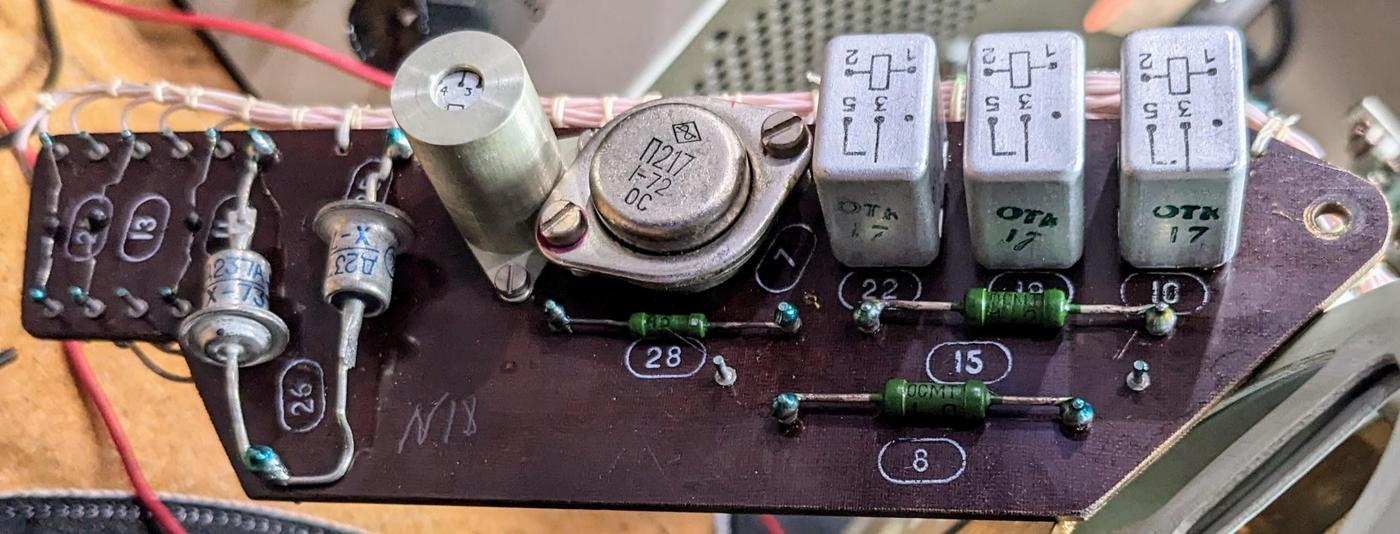
To control these components, the Globus has an electronics board with four relays, along with a germanium power transistor and some resistors and diodes.2 Bundles of thin white wires with careful lacing connect the electronics board to the other components.

The electronics circuit board.

The electronics circuit board.

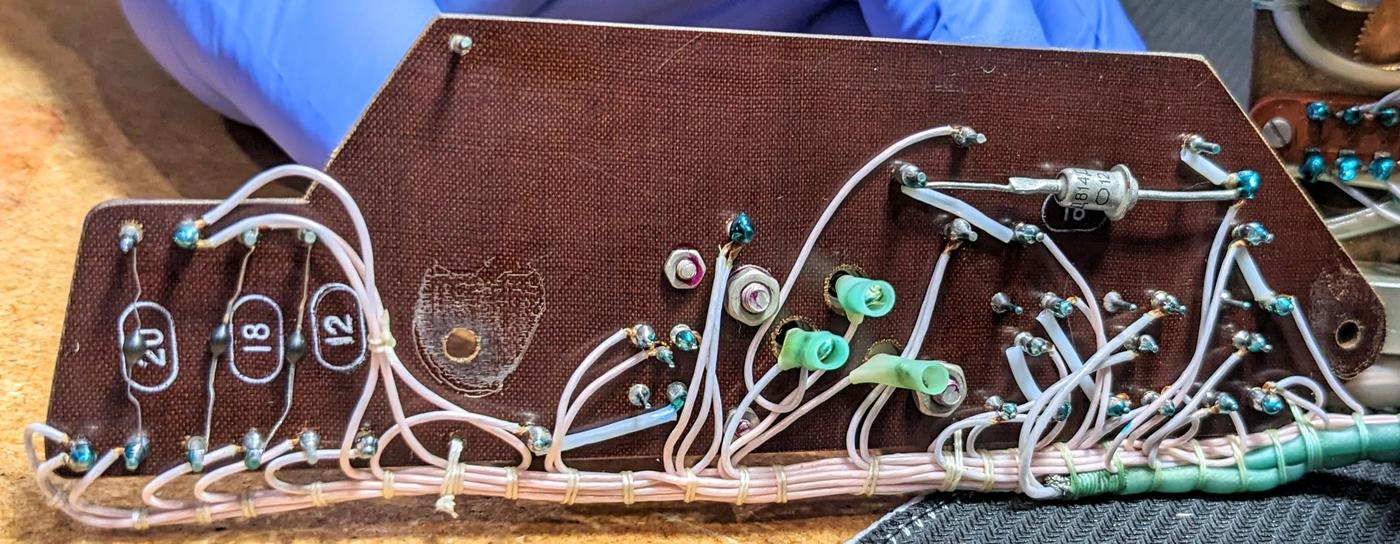
The back of the circuit board has a few more diodes. The wiring is all point-to-point; it is not a printed-circuit board. I will explain the circuitry in more detail below.

The back of the circuit board.

The back of the circuit board.

The drive solenoids

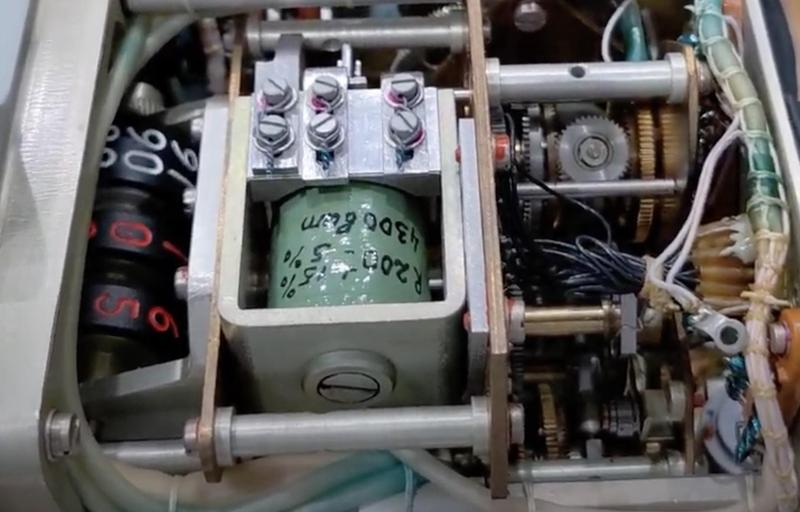
The green cylinder at the front is the upper solenoid, driving the orbital motion. The digit wheels to indicate orbital time are at the left.

The green cylinder at the front is the upper solenoid, driving the orbital motion. The digit wheels to indicate orbital time are at the left.

The Globus contains two ratchet solenoids: one for the orbital rotation and one for the Earth's rotation. The complex gear trains and the motion of the globe are driven by these solenoids. These solenoids take 1-hertz pules of 27 volts and 100ms duration. Each pulse causes the solenoid to advance the gear by one tooth; a pawl keeps the gear from slipping back. These small rotations drive the gears throughout the Globus and result in a tiny movement of the globe.

The lower driving solenoid powers the Earth rotation.

The lower driving solenoid powers the Earth rotation.

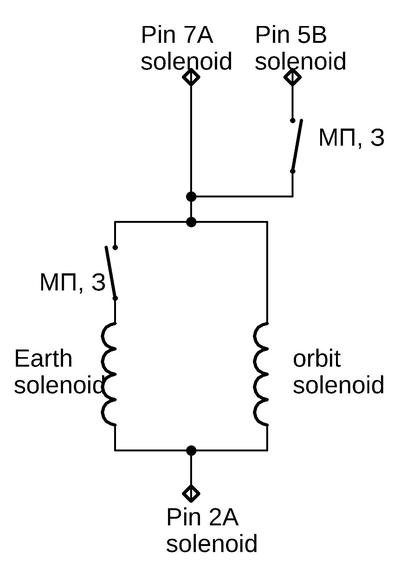
As the schematic shows, the solenoids are controlled by two switches that are closed in the МП (landing position) and З (Earth orbit) modes. The solenoids are powered through three pins. The wiring doesn't entirely make sense to me. If powered through pins 2A and 7A, the Earth motor is switched while the orbit motor is always powered. But if powered through pins 2A and 5B, both motors are switched. Maybe pin 7A monitors the on/off status of the Globus.

Schematic diagram of the solenoid wiring.

Schematic diagram of the solenoid wiring.

By powering the solenoids with 1 hertz pulses, we caused the Globus to rotate. The motion is very slow (90 minutes for an orbit and one day for the Earth's rotation), so we tried overclocking it at 10 hertz. This made the motion barely visible; Marc used a time-lapse to speed it up in the video below.

The landing location mechanism

The Globus can display where the spacecraft would land if you started a re-entry burn now, with an accuracy of 150 km. This is computed by projecting the current orbit forward for a particular distance, specified as an angle. The cosmonaut specifies this value with the landing angle knob (details). Rotating the globe to this new position is harder than you might expect, using a motor, limit switches, and the majority of the electronics in the Globus.

The landing angle control.

The landing angle control.

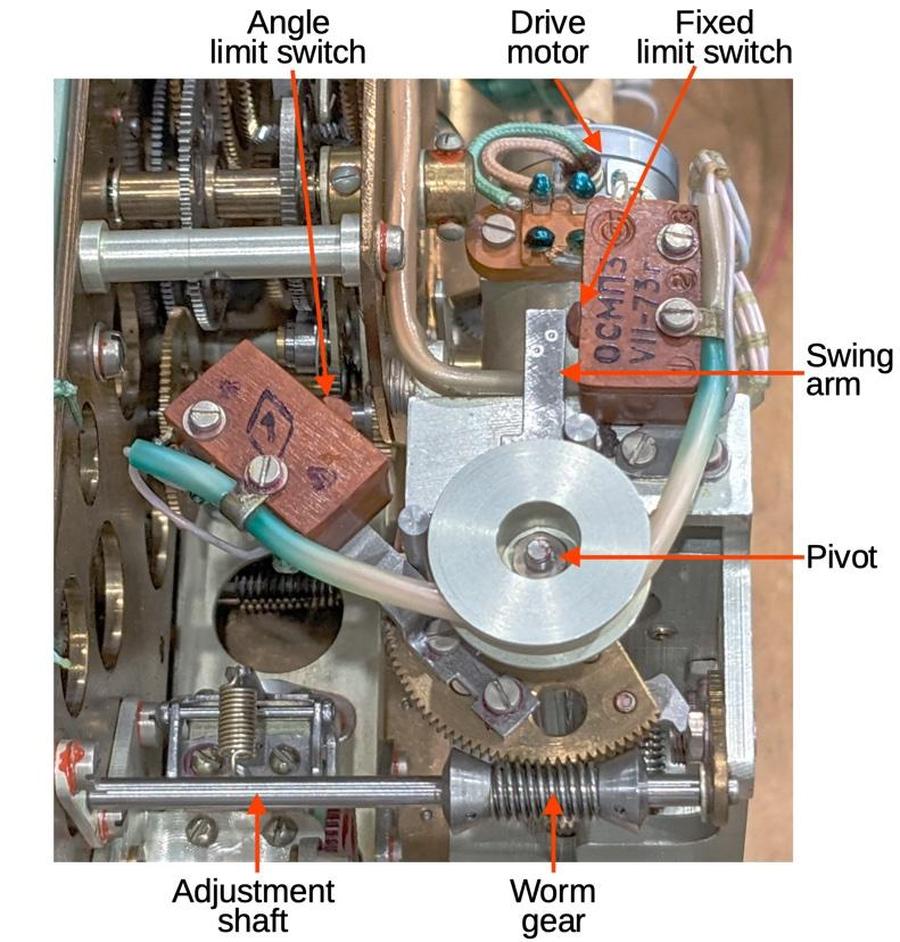
The landing angle knob pivots the angle limit switch, shown below. The swing arm moves as the globe rotates to the landing position and hits the angle limit switch when the landing position is reached. When returning to Earth orbit mode, the swing arm swings back until it hits the fixed limit switch. Thus, the globe is rotated by the selected amount when displaying the landing position.

The landing angle function uses a complex mechanism.

The landing angle function uses a complex mechanism.

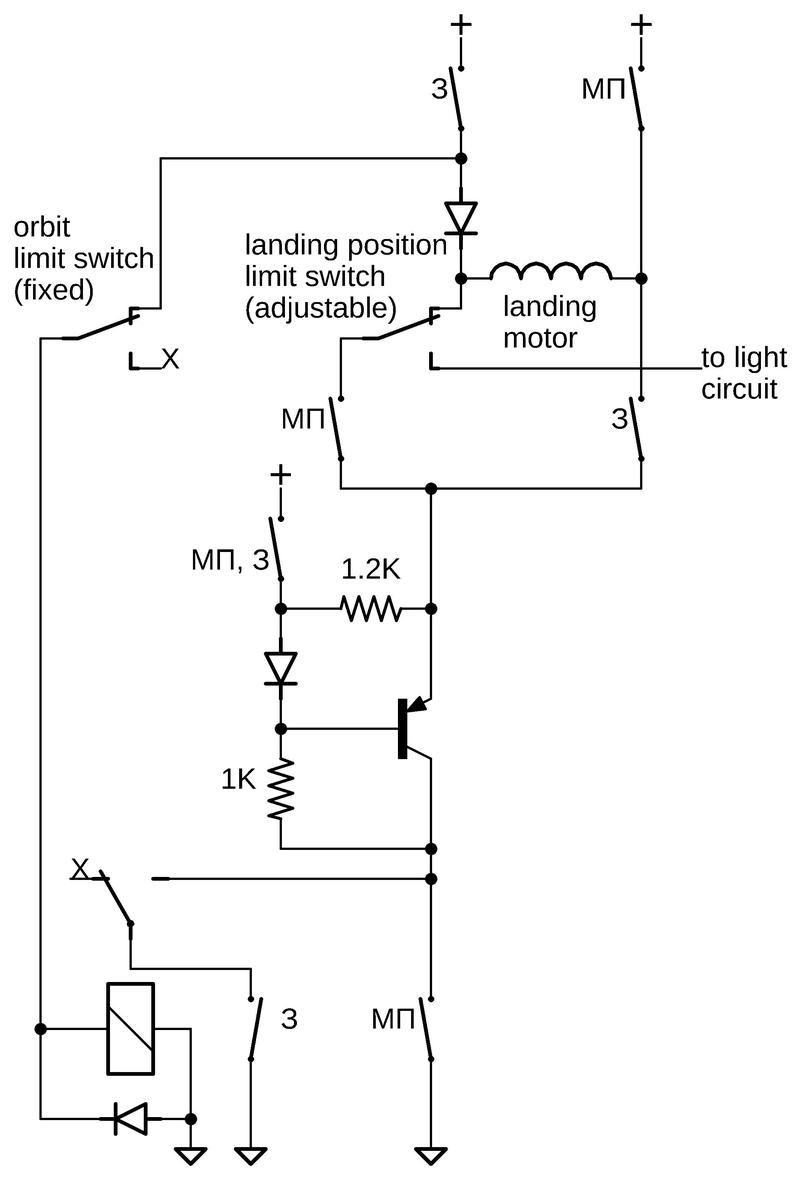
To control the motor, the rotary switch reverses the DC motor based on the mode, while the limit switches and power transistor turn the motor on and off. In landing position mode (МП), the motor spins the globe forward. The mode switch controls the direction of current flow: from upper right, through the motor, through the angle limit switch, through the transistor, and to ground at the bottom. The motor will rotate the globe and the arm until it hits the "landing position" limit switch, cutting power to the motor and activating the path to the light circuit, which I will discuss below. The diode prevents current flowing backward through the motor to the relay. The power transistor apparently acts as a current sink, regulating the current through the motor.

Schematic diagram of the landing location mechanism.

Schematic diagram of the landing location mechanism.

In Earth orbit mode (З), the motor spins the globe back to its regular position. The mode switch reverses the current flow through the motor: from the upper-left, through the diode and the motor, and out the lower-right to the transistor. At the bottom, the relay completes the circuit until the moving arm hits the fixed orbit limit switch. This opens the normally-closed contact, cutting power to the relay, opening the relay contact, and stopping the motor.

The landing place light

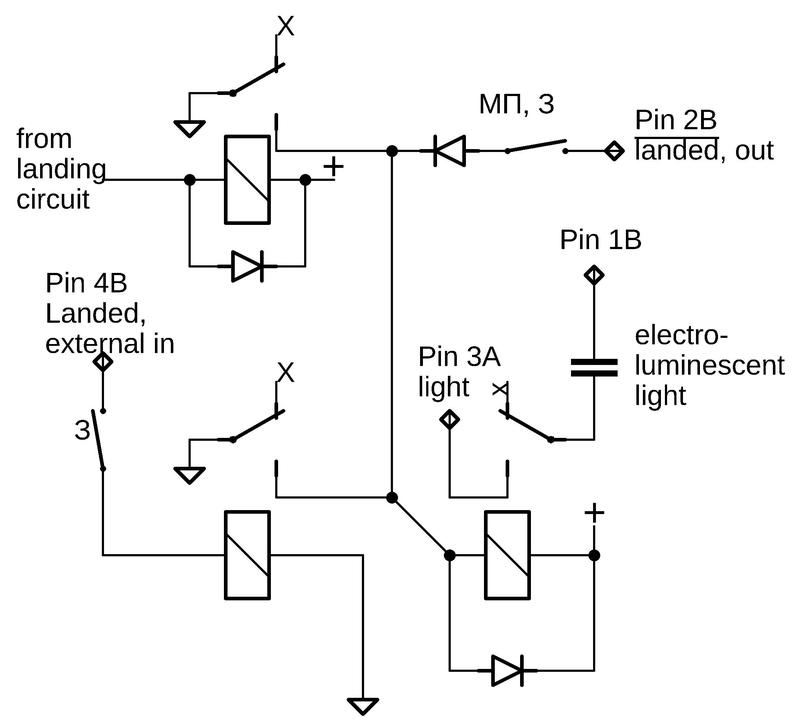
The upper-left corner of the Globus has an electroluminescent light labeled "Место посадки" (Landing place). This light illuminates when the globe indicates the landing place rather than the orbital position. The light is powered by AC provided on two external pins and is controlled by two relays. One relay is activated by the landing circuit described above, when the limit switch closes. The second relay is driven by an external pin. I don't know if this is for a "lamp test" or control from an external system.

Schematic diagram of the circuitry that controls the electroluminescent light.

Schematic diagram of the circuitry that controls the electroluminescent light.

We powered the light with an EL inverter from Adafruit, which produces 100 VAC at 2KHz, perhaps. The spacecraft used a "Static Inverter" to power the light, but I don't have any details on it. The display provides a nice blue glow.

The landing position indicator, illuminated.

The landing position indicator, illuminated.

The potentiometer

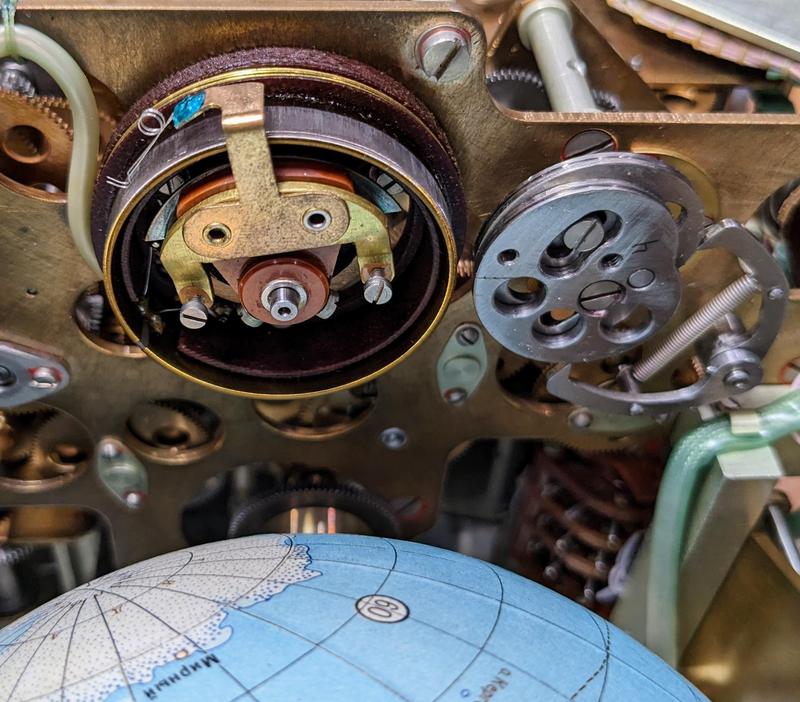
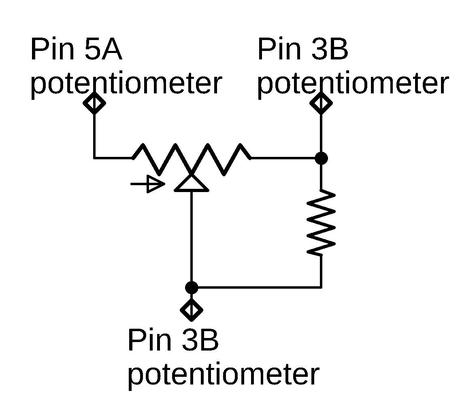
A 360° potentiometer (below) converts the spacecraft's orbital position into a resistance. Sources indicate that the Globus provides this signal to other units on the spacecraft, but I don't know specifically what these devices are. The potentiometer appears to linearly track the spacecraft's position through the orbital cycle. Note that this is not the same as the latitude, which oscillates, or the longitude, which is non-linear.

The potentiometer converts the orbital position into a voltage.
To the right is the cam that produces the longitude display. Antarctica is visible on the globe.

The potentiometer converts the orbital position into a voltage. To the right is the cam that produces the longitude display. Antarctica is visible on the globe.

As the schematic below shows, the potentiometer has a resistor on one leg for some reason.

Schematic diagram of the orbital-position potentiometer.

Schematic diagram of the orbital-position potentiometer.

The external connector

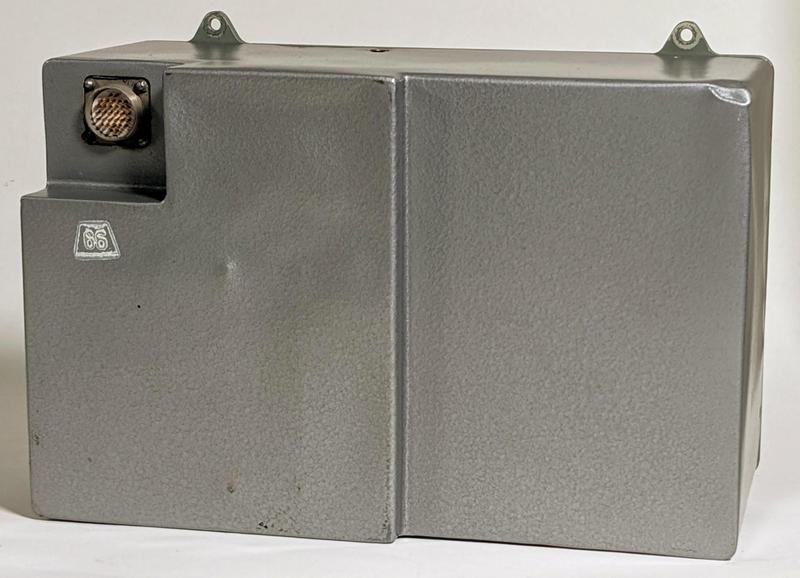
To connect the Globus to the rest of the spacecraft, the back of the Globus has a 32-pin connector, a standard RS32TV Soviet military design.

The back of the Globus, with the connector at the upper left.

The back of the Globus, with the connector at the upper left.

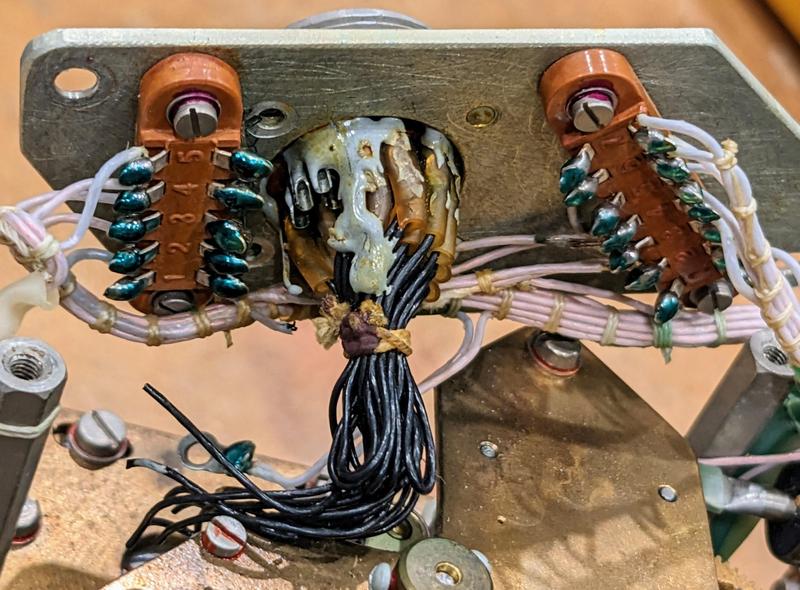
The connector was wired to nearby 5-pin and 7-pin terminal strips. In the schematics, I label these connectors as "B" and "A" respectively. Inconveniently, all the wires to the box's external connector were cut (the black wires), perhaps to decommission the unit. The pinout of the external connector is unknown so we can't easily reconnect the wires.

A closeup of the back of the connector showing the cut black wires.

A closeup of the back of the connector showing the cut black wires.

Conclusions

By tracing out the wiring of the Globus, I determined its circuitry. This was more difficult than expected, since the wiring consists of bundles of identical white wires. Moreover, many things go through the mode switch, and its terminals were inaccessible. Between the mode switch and the limit switches, there were many cases to check.

Once I determined the circuitry, we could power up the Globus. So far, we have powered the solenoids to turn the Globus. We also illuminated the landing position light. Finally, we ran the landing position motor.

Follow me on Twitter @kenshirriff or RSS for updates. I've also started experimenting with Mastodon recently as @oldbytes.space@kenshirriff. Many thanks to Marcel for providing the Globus.

Notes and references

  1. In Russian, the name for the device is "Индикатор Навигационный Космический" abbreviated as ИНК (INK). This translates to "space navigation indicator." 

  2. Most of the diodes are flyback diodes, two diodes in series across each relay coil to eliminate the inductive kick when the coil is disconnected.