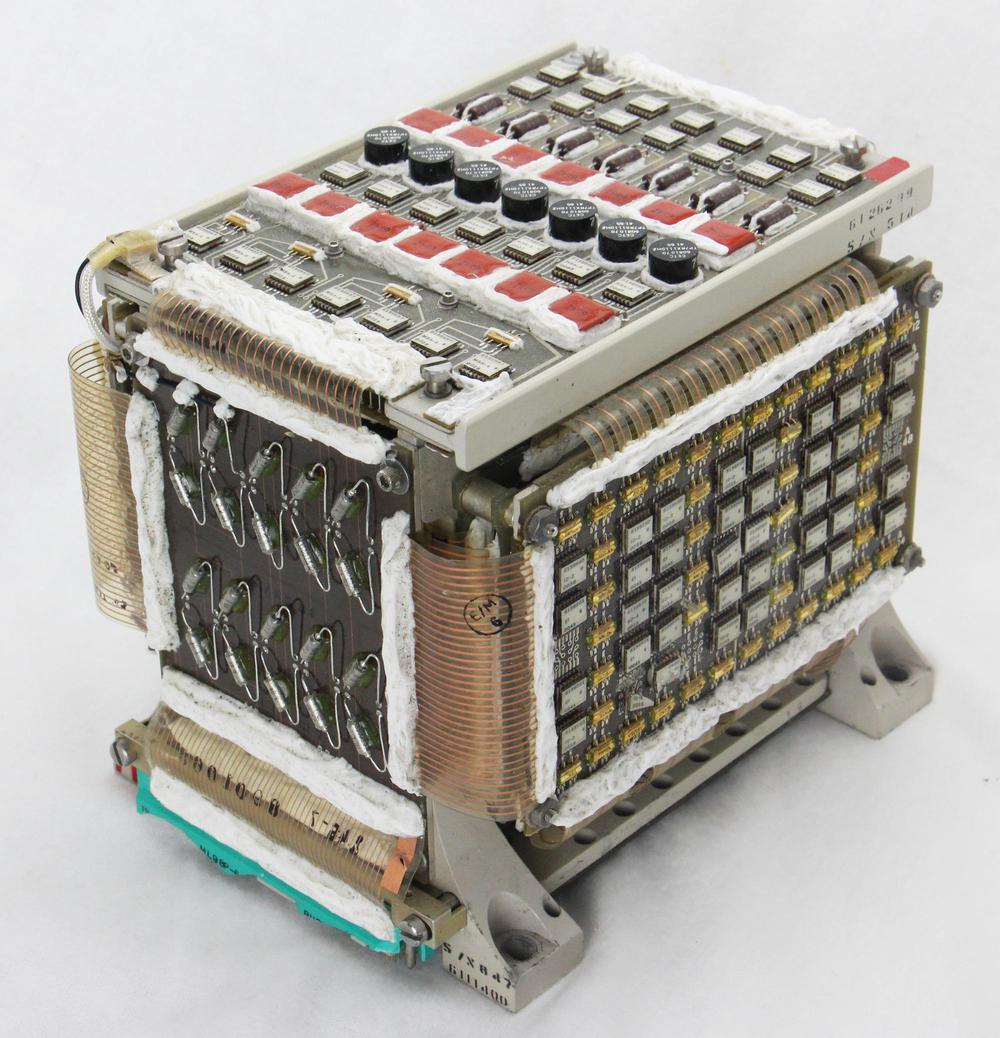
The Launch Vehicle Digital Computer (LVDC) had a key role in the Apollo Moon mission, guiding and controlling the Saturn V rocket. Like most computers of the era, it used core memory, storing data in tiny magnetic cores. In this article, I take a close look at an LVDC core memory module from Steve Jurvetson's collection. This memory module was technologically advanced for the mid-1960s, using surface-mount components, hybrid modules, and flexible connectors that made it an order of magnitude smaller and lighter than mainframe core memories.2 Even so, this memory stored just 4096 words of 26 bits.1
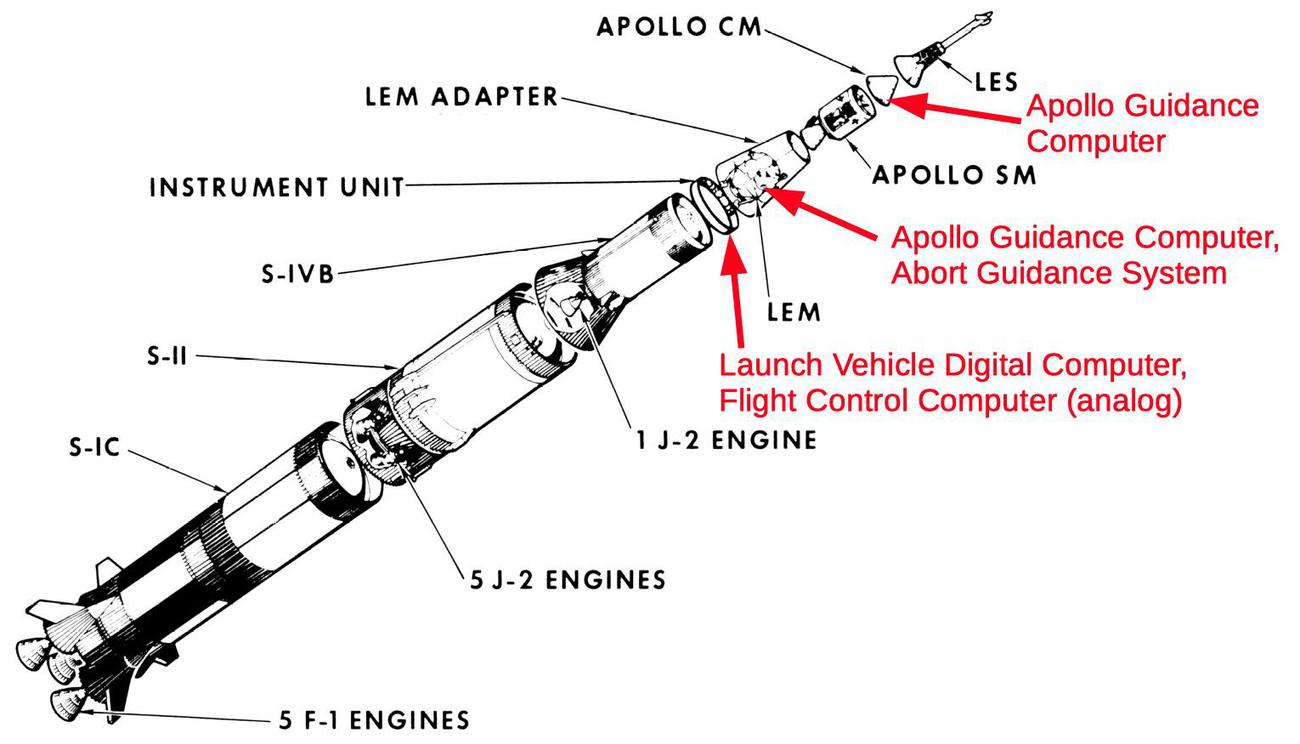
The race to the Moon started on May 25, 1961 when President Kennedy stated that America would land a man on the Moon before the end of the decade. This mission required the three-stage Saturn V rocket, the most powerful rocket ever built. The Saturn V was guided and controlled by the Launch Vehicle Digital Computer3 (below), from liftoff into Earth orbit, and then on a trajectory towards the Moon. (The Apollo spacecraft separated from the Saturn V rocket at that point, ending the LVDC's role.)
The LVDC was just one of several computers onboard the Apollo mission. The LVDC was connected to the Flight Control Computer, a 100-pound analog computer. The Apollo Guidance Computer (AGC) guided the spacecraft to the Moon's surface. The Command Module contained one AGC while the Lunar Module contained a second AGC7 along with the Abort Guidance System, an emergency backup computer.
Unit Logic Devices (ULD)
The LVDC was built with an interesting hybrid technology called ULD (Unit Logic Devices). Although they superficially resembled integrated circuits, ULD modules contained multiple components. They used simple silicon dies, each implementing just one transistor or two diodes. These dies, along with thick-film printed resistors, were mounted on a half-inch-square ceramic wafer to implement a circuit such as a logic gate. These modules were a variant of the SLT (Solid Logic Technology) modules developed for IBM's popular S/360 series of computers. IBM started developing SLT modules in 1961, before integrated circuits were commercially viable, and by 1966 IBM produced over 100 million SLT modules a year.
ULD modules were considerably smaller than SLT modules, as shown in the photo below, making them more suitable for a compact space computer.4 ULD modules used ceramic packages instead of SLT's metal cans, and had metal contacts on the upper surface instead of pins. Clips on the circuit board held the ULD module in place and connected with these contacts.5 The LVDC and associated hardware used more than 50 different types of ULDs.
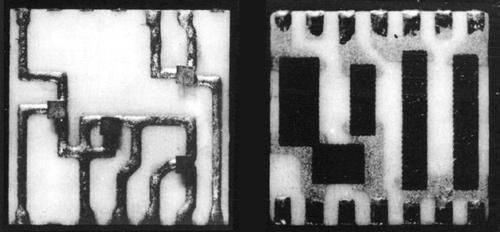
The photo below shows the internal components of a ULD module. On the left, the circuit traces are visible on the ceramic wafer, connected to four tiny square silicon dies. While this looks like a printed circuit board, keep in mind that it is much smaller than a fingernail. On the right, the black rectangles are thick-film resistors printed onto the underside of the wafer.
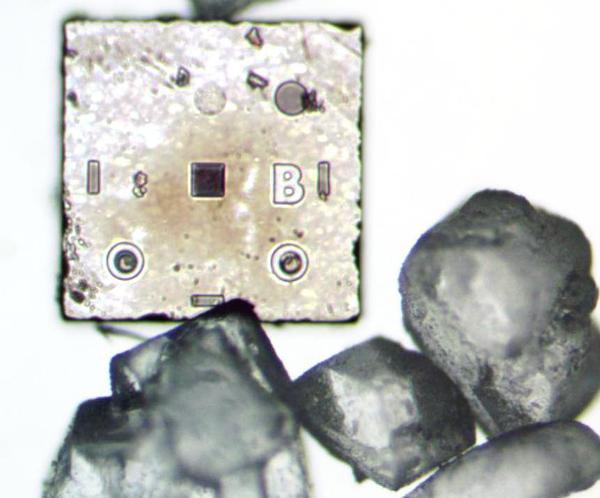
The microscope photo below shows a silicon die from a ULD module that implements two diodes.6 The die is very small; for comparison, grains of sugar are displayed next to the die. The die had three external connections through copper balls soldered to the three circles. The two lower circles were doped (darker regions) to form the anodes of the two diodes, while the upper-right circle was the cathode, connected to the substrate. Note that this die is much less complex than even a basic integrated circuit.
How core memory works
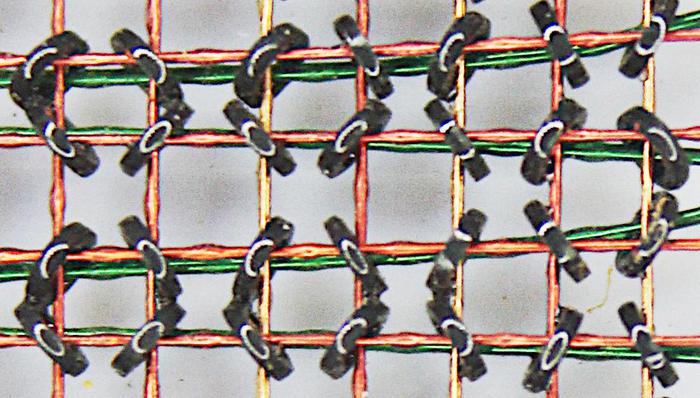
Core memory was the dominant form of computer storage from the 1950s until it was replaced by semiconductor memory chips in the 1970s. Core memory was built from tiny ferrite rings called cores, storing one bit in each core by magnetizing the core either clockwise or counterclockwise. A core was magnetized by sending a pulse of current through wires threaded through the core. The magnetization could be reversed by sending a pulse in the opposite direction.
To read the value of a core, a current pulse flipped the core to the 0 state. If the core was in the 1 state previously, the changing magnetic field created a voltage in a sense wire threaded through the cores. But if the core was already in the 0 state, the magnetic field wouldn't change and the sense wire wouldn't pick up a voltage. Thus, the value of the bit in the core was read by resetting the core to 0 and testing the sense wire. An important characteristic of core memory was that the process of reading a core destroyed its value, so it needed to be re-written.
Using a separate wire to flip each core would be impractical, but in the 1950s a technique called "coincident-current" was developed that used a grid of wires to select a core. This depended on a special property of cores called hysteresis: a small current has no effect on a core, but a current above a threshold would magnetize the core. This allowed a grid of X and Y lines to select one core from the grid. By energizing one X line and one Y line each with half the necessary current, only the core where both lines crossed would get enough current to flip leaving the other cores unaffected.
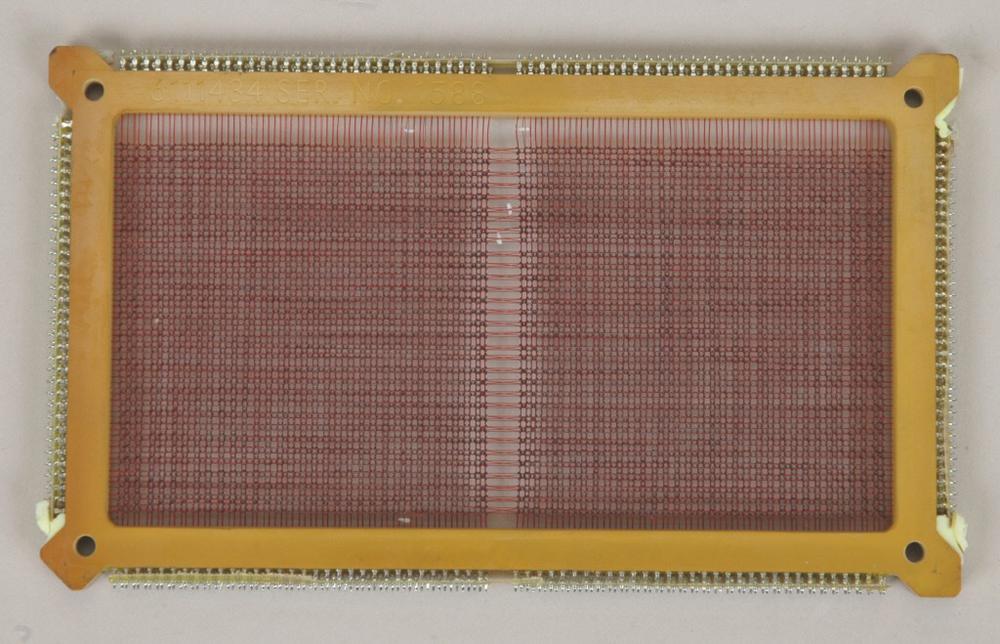
The photo below shows one core plane from the LVDC's memory.8 This plane has 128 X wires running vertically and 64 Y wires running horizontally, with a core at each intersection. For reading, a single sense wire runs through all the cores parallel to the Y wires. For writing, a single inhibit wire (explained below) runs through all the cores parallel to the X wires. The sense wires cross over in the middle of the plane; this reduces induced noise because noise from one half of the plane cancels out noise from the other half.
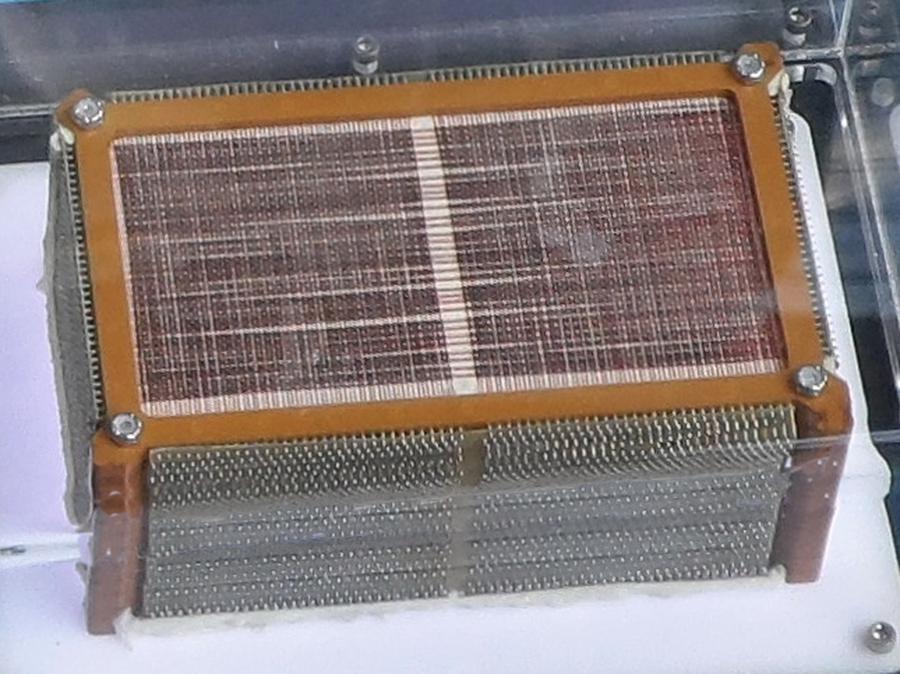
The plane above had 8192 locations, each storing a single bit. To store a word of memory, multiple core planes were stacked together, one plane for each bit in the word. The X and Y select lines were wired to zig-zag through all the core planes, in order to select a bit of the word from each plane. Each plane had a separate sense line for reading, and a separate inhibit line for writing. The LVDC memory used a stack of 14 core planes (below), storing a 13-bit "syllable" along with a parity bit.10
Writing to core memory required additional wires called the inhibit lines. Each plane had one inhibit line threaded through all the cores in the plane. In the write process, a current passed through the X and Y lines, flipping the selected cores (one per plane) to the 1 state, storing all 1's in the word. To write a 0 in a bit position, the plane's inhibit line was energized with half current, opposite to the X line. The currents canceled out, so the core in that plane would not flip to 1 but would remain 0. Thus, the inhibit line inhibited the core from flipping to 1. By activating the appropriate inhibit lines, any desired word could be written to the memory.
To summarize, a core memory plane had four wires through each core: X and Y drive lines, a sense line, and an inhibit line. These planes were stacked to form an array, one plane for each bit in the word. By energizing an X line and a Y line, one core in each plane was selected. The sense line was used to read the contents of the bit, while the inhibit line was used to write a 0 (by inhibiting the writing of a 1).9
The LVDC core memory module
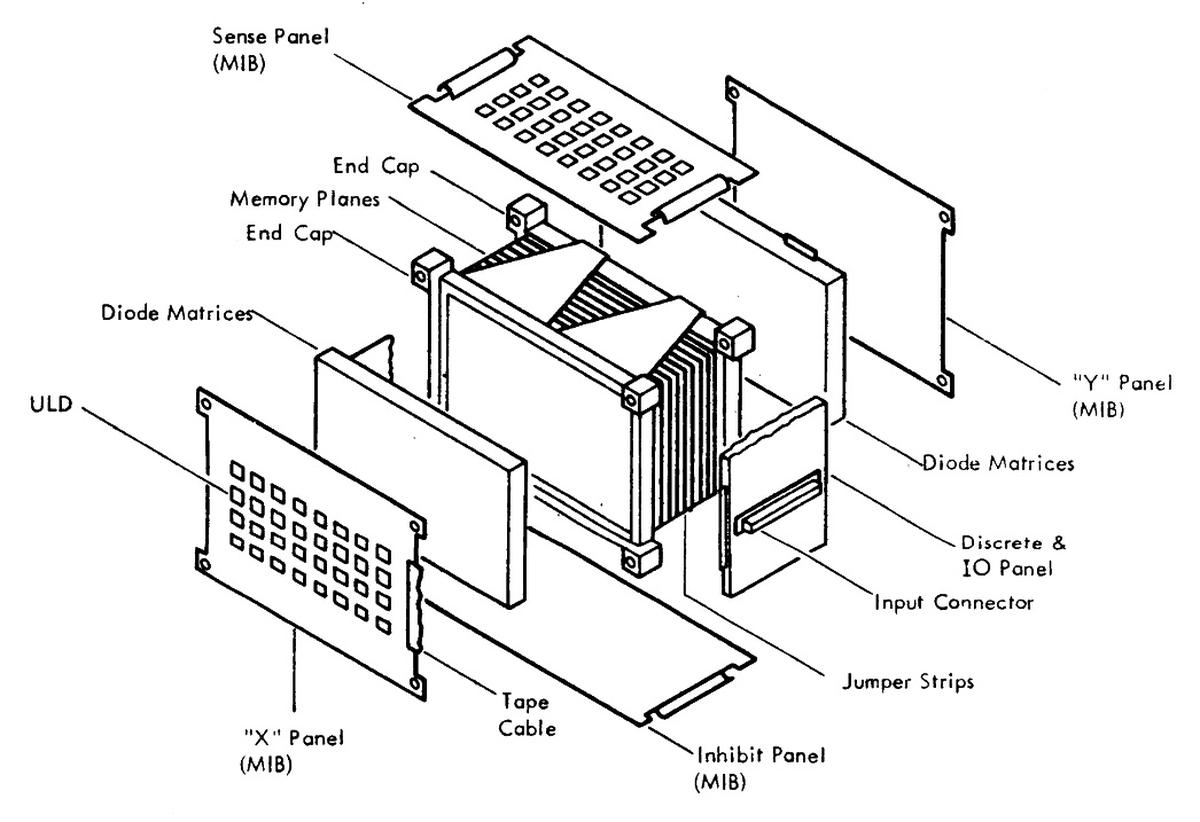
In this section, I'll explain how the LVDC core memory module was physically constructed. At its center, the core memory module contains the stack of 14 core planes shown earlier. This is surrounded by multiple boards with the circuitry to drive the X and Y select lines and the inhibit lines, read the bits from the sense lines, detect errors, and generate necessary clock signals.11
Memory Y driver panel
A word in core memory is selected by driving the appropriate X and Y lines through the core stack. I'll start by describing the Y driver circuitry and how it generates a signal through one of the 64 Y lines. Instead of having 64 separate driver circuits, the module reduces the amount of circuitry by using 8 "high" drivers and 8 "low" drivers. These are wired up in a "matrix" configuration so each combination of a high driver and a low driver selects a different line. Thus, the 8 high drivers and 8 low drivers select one of the 64 (8×8) Y lines. The footnote12 has more information on the matrix technique.
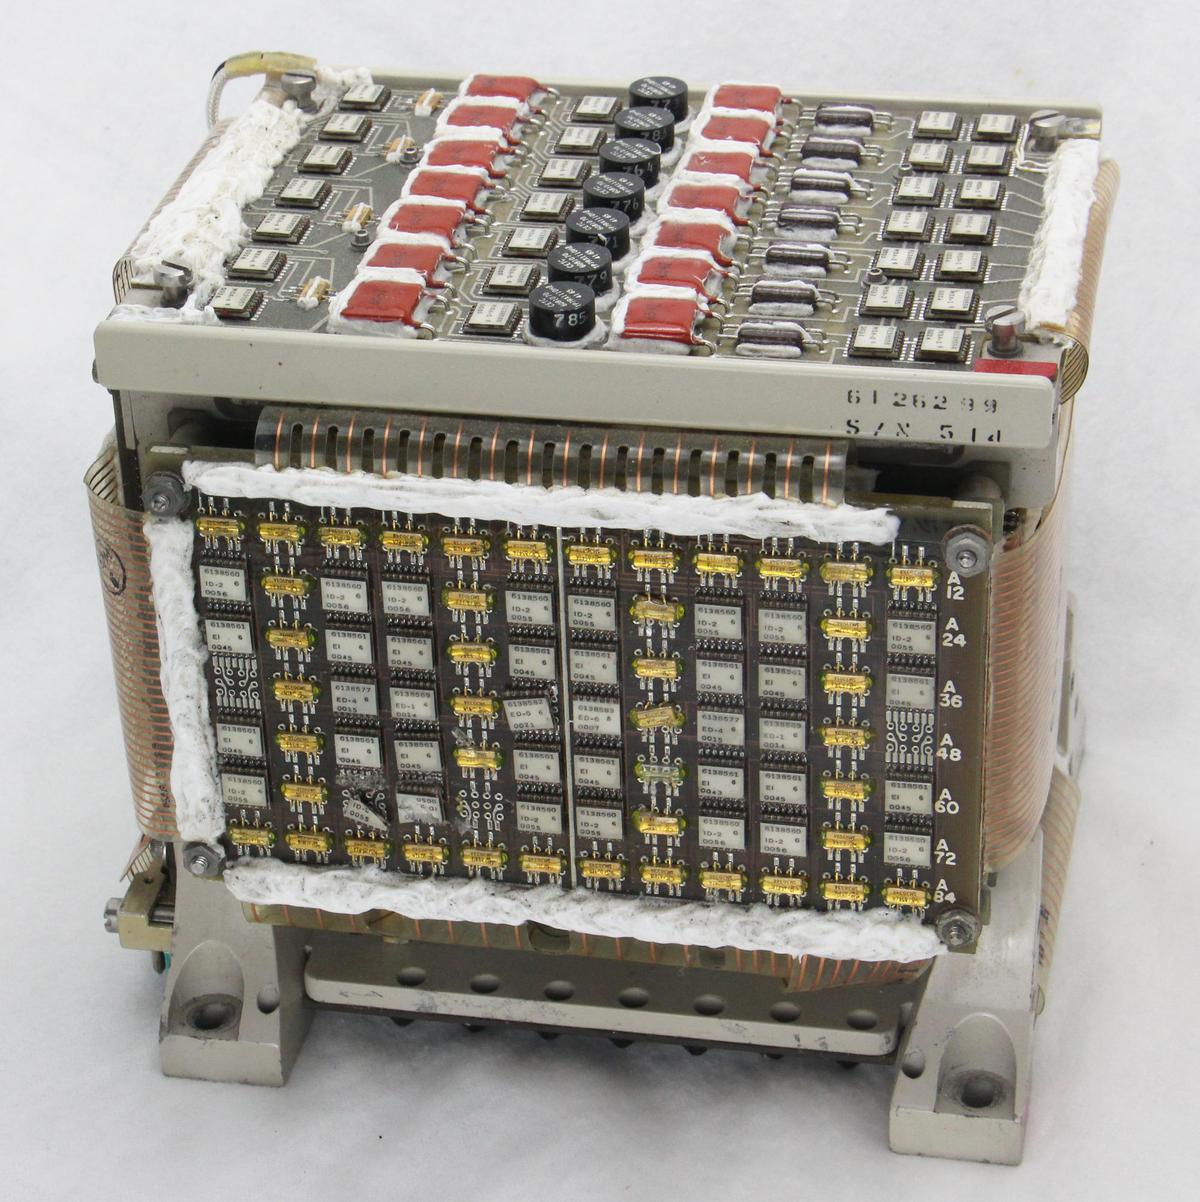
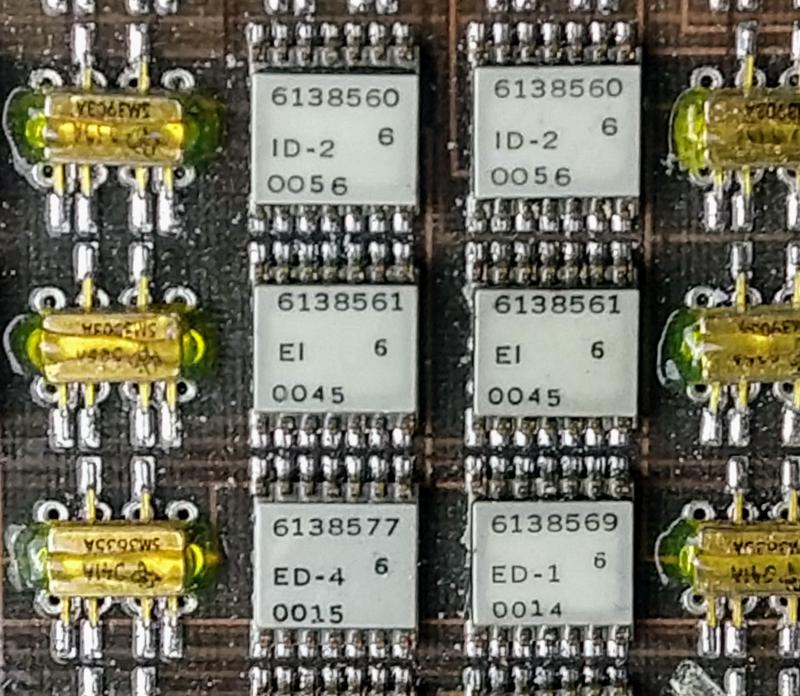
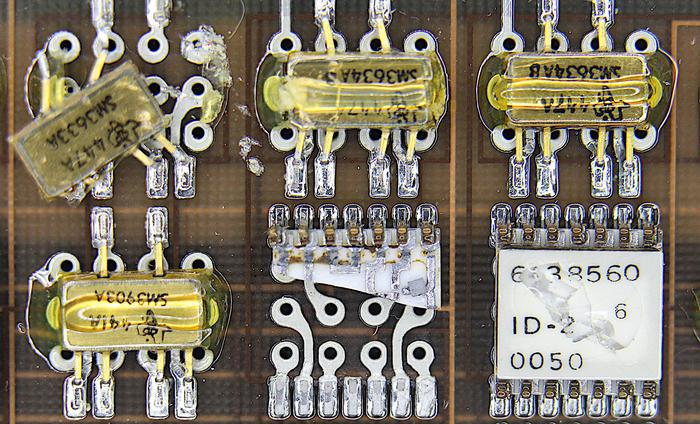
The closeup view below shows some of the ULD modules (white) and transistor pairs (golden) that drive the Y select lines. The "EI" module is the heart of the driver; it supplies a constant voltage pulse (E) or sinks a constant current pulse (I) through a select line.14 A select line is driven by activating an EI module in voltage mode at one end of the line and an EI module in current mode at the other end. The result is a pulse with the correct voltage and current to flip the core. It takes a hefty pulse to flip a core; the voltage pulse is fixed at 17 volts, while the current is adjusted from 180 mA to 260 mA depending on the temperature.13
The board also has error-detector (ED) modules that detect if more than one Y select line is driven at the same time. Implementing this with digital logic would require a complicated set of gates to detect if two or more of the 8 inputs are high. Instead, the ED module uses a simple semi-analog design: it sums the input voltages using a resistor network. If the resulting voltage is above a threshold, the output is triggered.
A diode matrix is underneath the driver board, containing 256 diodes and 64 resistors. This matrix converts the 8 high and 8 low pairs of signals from the driver board into connections to the 64 Y lines that pass through the core stack. Flex cables on the top and bottom of the board connect the board to the diode matrix. Two flex cables on the left (not visible in the photo) and two flex cables on the right (one visible) connect the diode matrix to the core stack.15 The flex cable visible on the left connects the Y board to the rest of the computer via the I/O board (described later) while a small flex cable on the lower right connects to the clock board.
Memory X driver panel
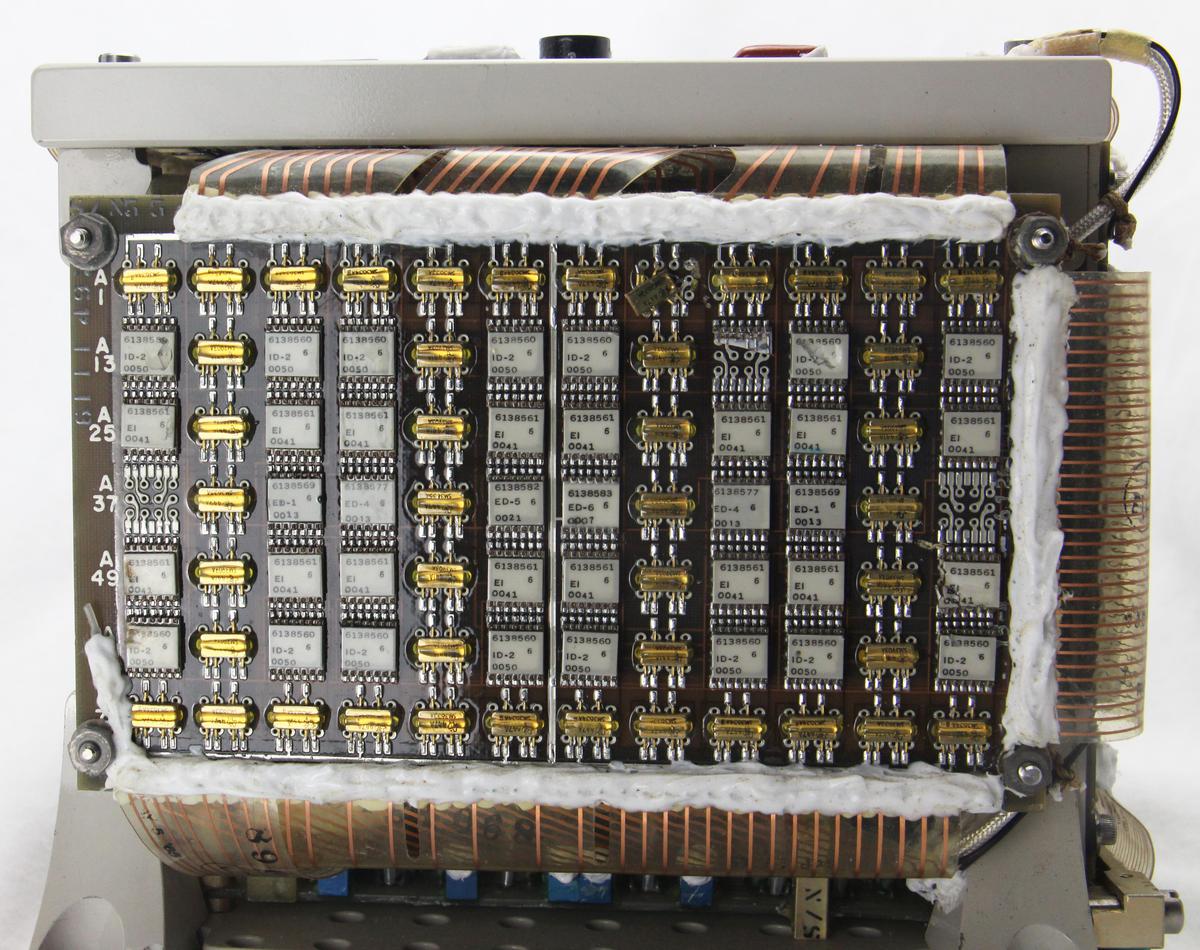
The circuitry to drive the X lines is similar to the Y circuitry, except there are 128 X lines compared to 64 Y lines. Because there are twice as many X lines, the module has a second X driver board underneath the one visible below. Although the X and Y boards have the same components, the wiring is different.
The closeup below shows that the board has suffered some component damage. One of the transistors has been dislodged, a ULD module has been broken in half, and the other ULD module is cracked. The wiring is visible inside the broken module as well as one of the tiny silicon dies (on the right). This photo also shows vertical and horizontal circuit board traces on several of the board's 12 layers.
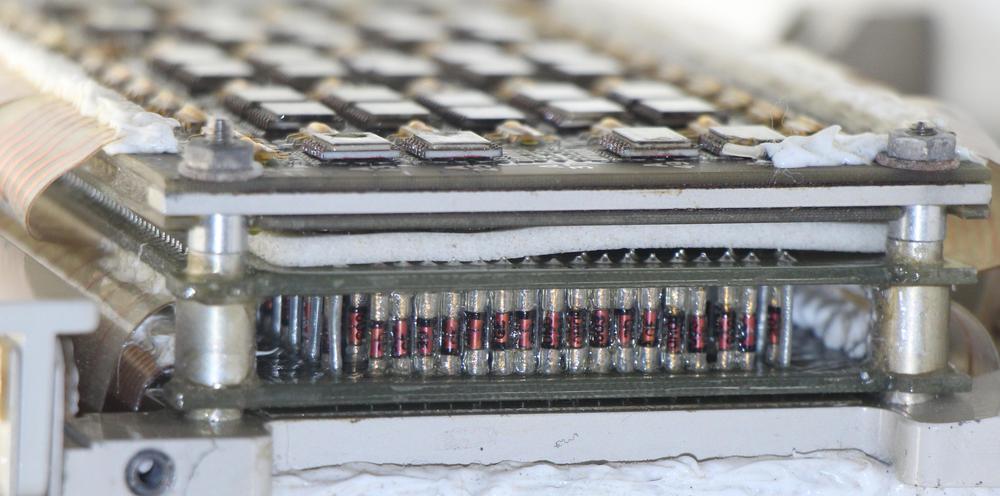
Underneath the X driver boards is the X diode matrix, containing 288 diodes and 128 resistors. The X diode matrix uses a different topology than the Y diode board to avoid doubling the number of components.16 Like the Y diode board, this board contains components mounted vertically between two printed circuit boards. This technique is called "cordwood" and allows the components to be packed together closely.
Memory sense amplifiers
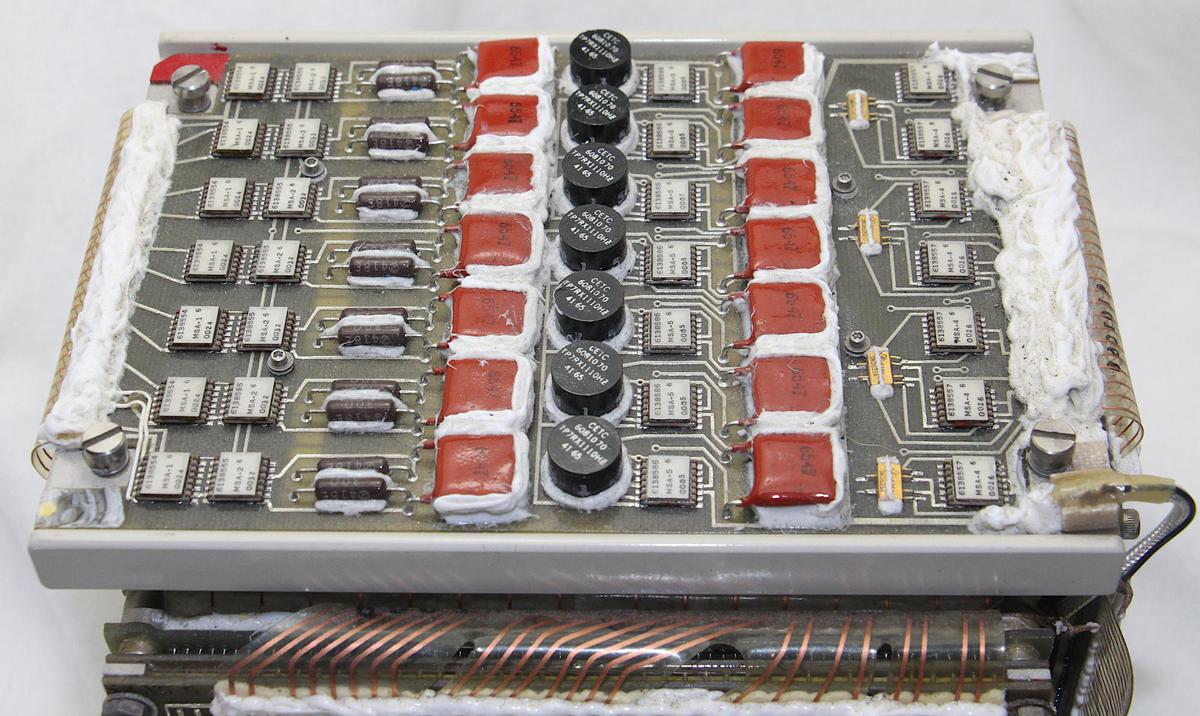
The photo below shows the sense amplifier board on top of the module.17 It has 7 channels to read 7 bits from the memory stack; an identical board below processes another 7 bits, for 14 bits in total. The job of the sense amplifier is to detect the small signal (20 millivolts) generated by a flipping core, and turn it into a 1-bit output. Each channel consists of a differential amplifier and buffer, followed by a differential transformer and an output latch. At the left, the 28-conductor flex cable connects to the memory stack, feeding the two ends of each sense wire into the amplifier circuitry, starting with an MSA-1 (Memory Sense Amplifier) module. The discrete components are resistors (brown cylinders), capacitors (red), transformers (black), and transistors (golden). The data bits exit the sense amplifier boards through the flex cable on the right.
Memory inhibit drivers
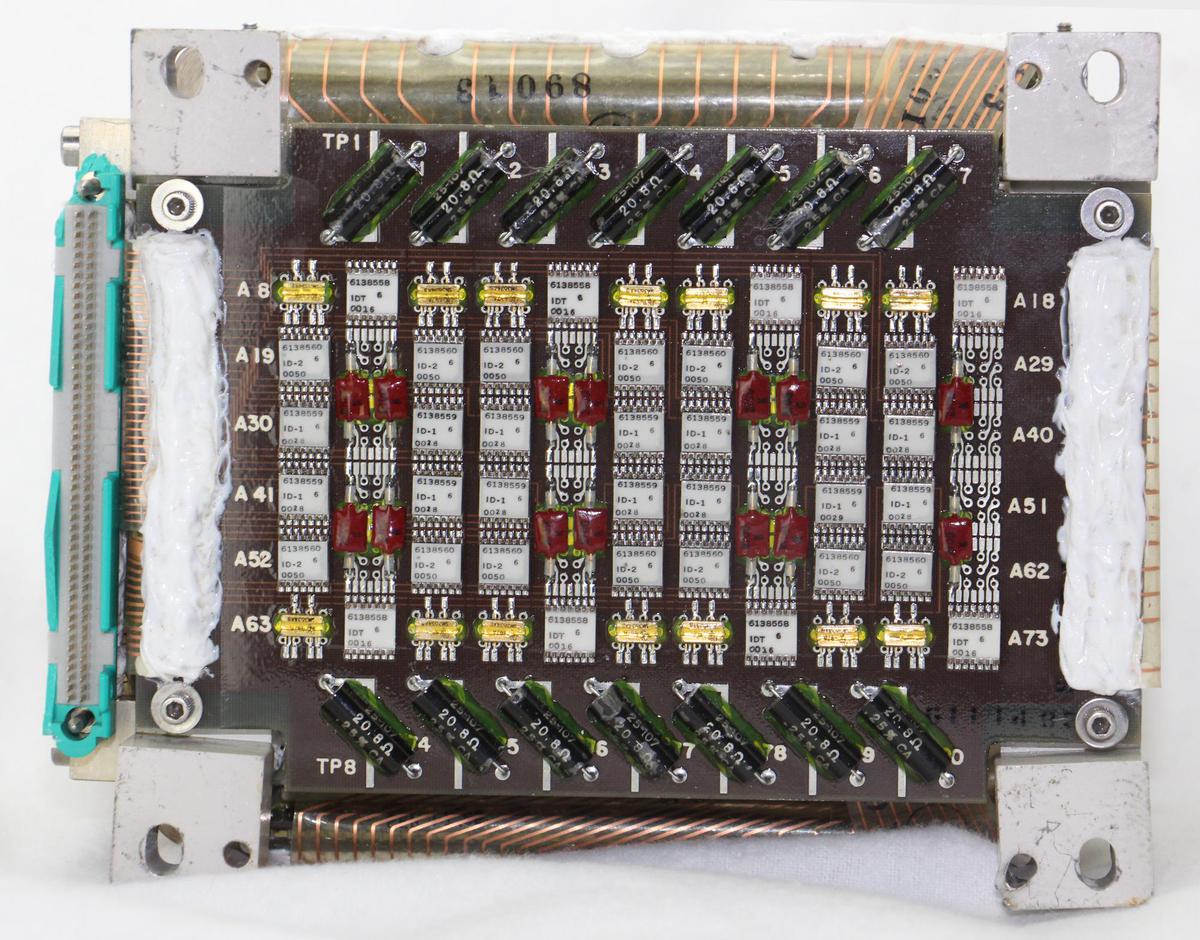
The inhibit board is on the underside of the core module and holds the inhibit drivers that are used for writing to memory. There are 14 inhibit lines, one for each plane in the core stack. To write a 0 bit, the corresponding inhibit driver is activated and the current through the inhibit line prevents the core from flipping to a 1. Each line is driven by an ID-1 and ID-2 (Inhibit Driver) module and a pair of transistors. The high-precision 20.8Ω resistors at the top and bottom of the board regulate the inhibit current. The 14-wire flex cable on the right connects the drivers to the 14 inhibit wires in the core stack.
Memory clock driver
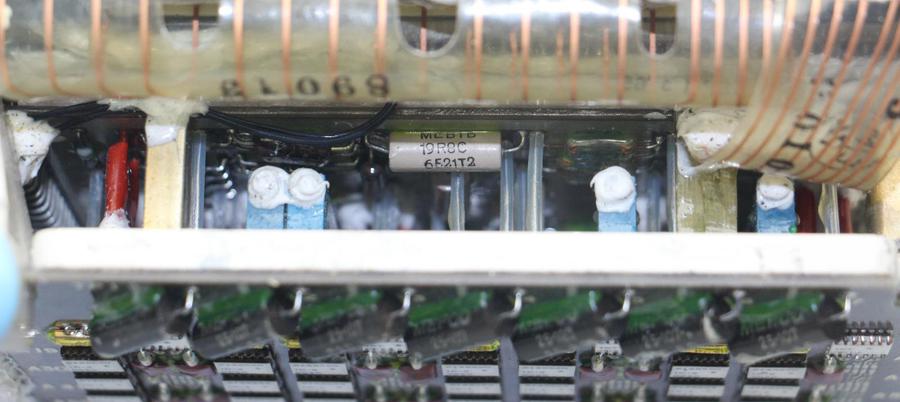
The clock driver is a pair of boards that generate the timing signals for the memory module. Once the computer starts a memory operation, the various timing signals used by the memory module are generated asynchronously by the module's clock driver. The clock driver boards are on the bottom of the module, between the core stack and the inhibit board so it is hard to see the boards.
The photo above looks between the clock driver boards; the inhibit board is on the bottom. The blue components are multi-turn potentiometers, presumably to adjust timings or voltages. Resistors and capacitors are also visible on the boards. The schematic shows several MCD (Memory Clock Driver) modules, but I can't see any modules on the boards. I don't know if that is due to the limited visibility, a change in the circuitry, or another board with these modules.
Memory input-output panel
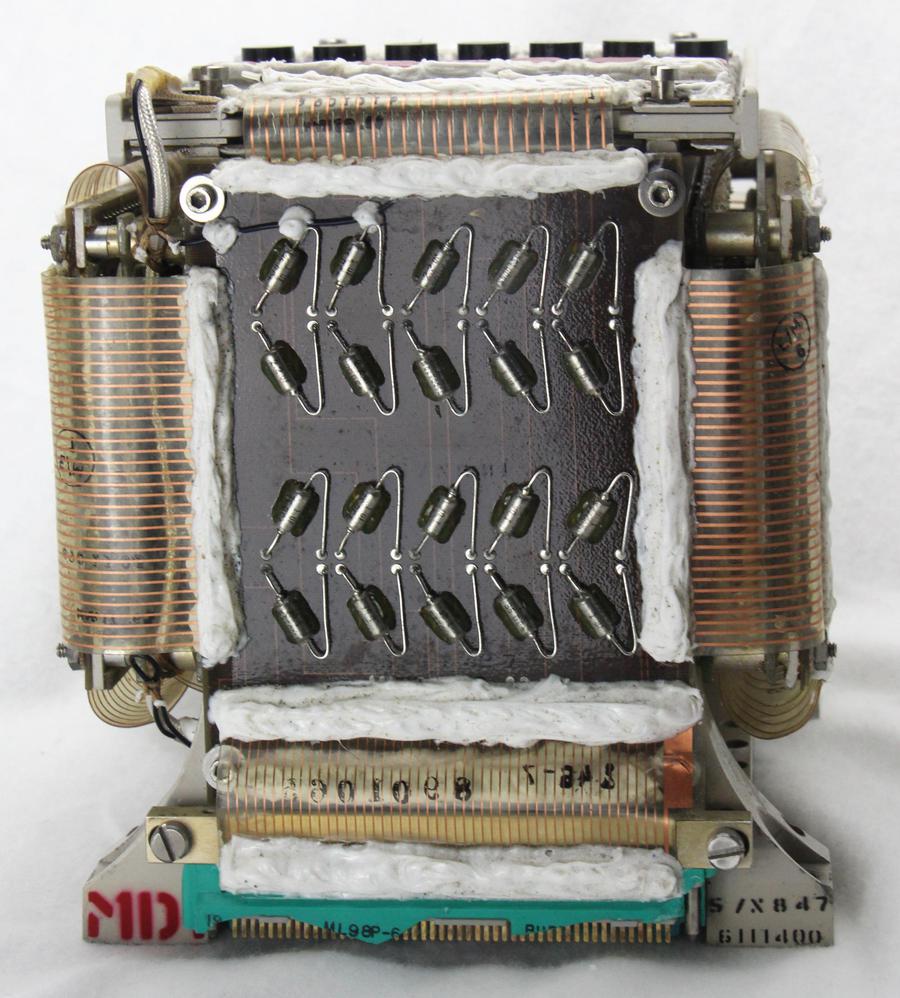
The final board of the memory module is the input-output panel (below), which distributes signals between the boards of the memory module and the remainder of the LVDC computer. At the bottom, the green 98-pin connector plugs into the LVDC's memory chassis, providing signals and power from the computer. (Much of the connector's plastic is broken, exposing the pins.) The distribution board is linked to this connector by two 49-pin flex cables at the bottom (only the front cable is visible). Other flex cables distribute signals to the X-driver board (left), the Y-driver board (right), the sense amplifier board (top), and inhibit board (underneath). The 20 capacitors on the board filter the power supplied to the memory module.
Conclusion
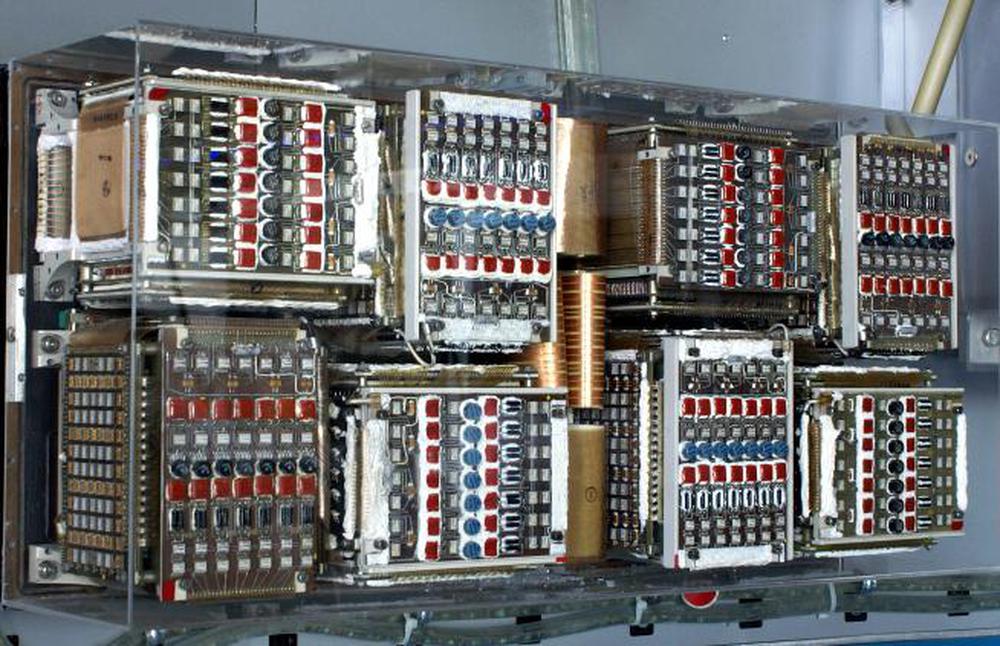
The LVDC's core memory module provided compact, reliable storage for the computer. The lower half of the computer (below) was filled by up to 8 core memory modules. This allowed the computer to hold a total of 32 kilowords of 26-bit words, or 16 kilowords in redundant high-reliability "duplex" mode.18
The core memory module provides an interesting view of a time when 8K of storage required a 5-pound module. While this core memory was technologically advanced for its time, the hybrid ULD modules were rapidly obsoleted by integrated circuits. Core memory as a whole died out in the 1970s with the advent of semiconductor DRAMs.
The contents of core memory are retained when the power is disconnected, so it's likely that the module still holds the software from when the computer was last used, even decades later. It would be interesting to try to recover this data, but the damaged circuitry poses a problem so the contents will probably remain locked inside the memory module for decades more.
I announce my latest blog posts on Twitter, so follow me @kenshirriff for future articles. I also have an RSS feed. For an explanation of core memory, see CuriousMarc's video where we wire up a core plane and demonstrate how it works. I've written before about core memory in the IBM 1401, core memory in the Apollo Guidance Computer, and core memory in the IBM S/360. Thanks to Steve Jurvetson for supplying the core array.
Notes and references
-
A word size of 26 bits may seem bizarre, but in the 1960s computers hadn't yet standardized on bytes and word sizes that were a power of two. Business computers often used 6-bit characters, while aerospace computers typically used whatever word size provided the necessary accuracy. ↩
-
It's interesting to compare the size of the LVDC's core memory to IBM's commercial core memories, which I wrote about here. The 128-kilobyte expansion for the IBM S/360 Model 40 computer required an additional cabinet weighing 610 pounds and measuring 62.5"×26"×60". An LVDC core memory module holds 4K words of 26 bits, equivalent to 13 kilobytes. Doing the math, the LVDC has 1/12 the weight and 1/40 the volume per byte. The core stack itself was very similar between the LVDC and the S/360 machines; the difference in weight and volume comes from the surrounding electronics and packaging. ↩
-
For more information on the LVDC, see the Virtual AGC project's LVDC page. Also see the interesting SmarterEveryDay video on the LVDC. Fran Blanche did an extensive investigation into an LVDC circuit board. ↩
-
The SLT modules in my photograph are mounted on an SMS card, rather than the expected SLT card. SMS cards were IBM's previous generation of circuit cards and normally used discrete germanium transistors. However, even after the introduction of SLT in 1964, IBM needed to support older computers with SMS cards. To reduce costs, they started building old-style SMS cards that used the more modern SLT modules. The point is that SLT modules were usually packed densely on multiple-layer circuit boards, rather than the low-density SMS card in the photo. ↩
-
One question is why did IBM use SLT modules instead of integrated circuits? The main reason was that integrated circuits were still in their infancy, having been invented in 1959. In 1963, SLT modules had cost and performance advantages over integrated circuits. However, SLT modules were viewed outside IBM as backward compared to integrated circuits. One advantage of SLT modules over integrated circuits was that the resistors in SLT were much more accurate than those in integrated circuits. During manufacturing, the thick-film resistors in SLT modules were carefully sand-blasted to remove resistive film until they had the desired resistance. SLT modules were also cheaper than comparable integrated circuits in the 1960s. By 1969, IBM started using integrated circuits, which they called MST (Monolithic Systems Technology). IBM packaged their integrated circuits in SLT-style metal packages, rather than the industry-standard DIP epoxy packages. Chapter 2 of IBM's 360 and Early 370 Systems discusses the history of SLT modules in great detail. ↩
-
Curiously, the ULD modules in the core memory did not contain any sealant inside. In contrast, the ULD modules examined by Fran Blanche were filled with pink silicone inside. ↩
-
It's interesting to compare the AGC to the LVDC since they took two very different approaches to computer design and manufacture. Both computers had rectangular metal boxes, magnesium-lithium for the LVDC and magnesium for the AGC. Physically, the LVDC was about twice the size (2.2 cubic feet vs 1.1 cubic feet) even though they were both about 70 pounds. The LVDC used 138 Watts and was liquid-cooled, while the AGC used 55 watts and was cooled by conduction. The LVDC used 26-bit words compared to 15 bits in the AGC. One big architectural difference was that the LVDC was a serial computer, operating on one bit at a time, while the AGC operated on all bits in parallel (like most computers). Another important difference was that the LVDC used triple redundancy for reliability, while the AGC had no hardware fault handling. Both computers used a 2.048 MHz clock, but the LVDC was considerably slower because it was serial: 82 µs for an add operation compared to 23.4 µs for the AGC. The LVDC had up to 8 core memory modules, holding 4K words each. The AGC's core memory was only 2K words. However, the AGC also had 36K words of read-only storage in its hardwired core rope modules. (The LVDC did not use core rope.)
The two computers were constructed in very different ways. The AGC was built from integrated circuits, while the LVDC used hybrid ULD modules. The AGC's logic gates were RTL (resistor-transistor logic) NOR gates, while the LVDC's were slightly more advanced DTL (diode-transistor logic) AND-OR-INVERT gates. While the AGC used two types of ICs (a dual NOR gate and a sense amplifier), the LVDC used many different types of modules.
The AGC's circuit boards were encapsulated into rectangular modules, while the LVDC's circuit boards plugged into a backplane in a more standard way. The AGC's backplane was wire-wrapped by machine, while the LVDC's backplane was a 14-layer printed circuit board.
IBM engaged in political battles, attempting to replace MIT's AGC with the LVDC. IBM argued that the AGC wasn't reliable enough compared to the triple-redundant LVDC. According to MIT, however, the AGC could run a guidance program 10 to 20 times faster than the LVDC, use half the memory, and provide more accuracy (by using double precision). MIT argued that the LVDC wasn't powerful enough to replace the AGC. In the end, the AGC survived the "naysayers" and was used on the Apollo spacecraft, while the LVDC had its role in the Saturn V rocket. The "showdown" is described in more detail here. ↩
-
The Smithsonian website states that the core plane is approximately 4"×7"×1", but that can't be right since the entire memory module is less than 7" wide. The Study Report page 3-43 says each plane is 5.5"×3.5×0.15", which seems accurate. ↩
-
The book Memories That Shaped an Industry discusses the history of core memory at IBM. ↩
-
The LVDC has 26-bit words, each word consisting of two 13-bit syllables. Its core memory is described as holding 4K words, where each word is 26 data bits and 2 parity bits. However, the core memory is physically constructed to store 8K syllables (13 data bits and 1 parity bit). Thus, two memory accesses are required to read a complete word. An instruction is one 13-bit syllable so an instruction can be read in a single memory cycle. Thus, executing a typical instruction requires three memory accesses: one for the instruction and two for the data. (Keep in mind that reading from core memory erases the data, so a memory access consists of a read followed by a write to restore the data.) ↩
-
Much of the memory-related circuitry is in the LVDC's computer logic, not the memory module itself. In particular, the computer's logic contains registers to hold the address and data word and convert between serial and parallel. It also contains circuitry to decode the address into drive lines, as well as to generate and check parity. ↩
-
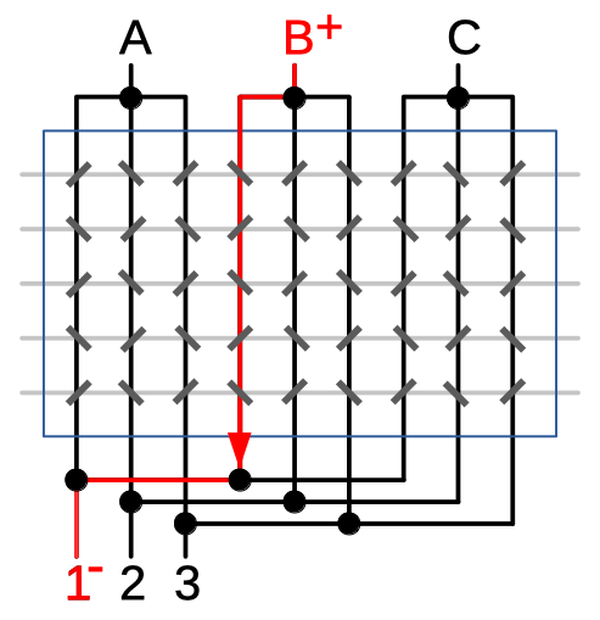
Core memories typically used a "matrix" approach to reduce the number of circuits required to drive the X and Y select lines. The diagram below demonstrates this technique for the vertical lines in a hypothetical 9×5 core array. There are three "high" drivers (A, B and C), and three "low" drivers (1, 2 and 3). If driver B is energized positive and driver 1 is energized negative, current flows through the core line highlighted in red. By selecting a different pair of drivers, a different line is energized. In a large array, this approach significantly reduces the number of line drivers required.
The "matrix" approach reduces the number of line drivers required.When using a matrix approach, each line must have diodes to prevent "sneak paths" through the cores. To see the need for diodes, note that in the example above current could flow from B to 2, up to A and finally down to 1, for instance, incorrectly energizing multiple lines and flipping the wrong cores. By putting diodes on each line, reverse current paths such as 2 to A can be blocked. Also note that writing core memory requires current pulses in the opposite direction from reading. Supporting this requires additional diodes in the opposite direction. ↩
-
Because the characteristics of ferrite cores change with temperature, the memory module adjusts the current based on temperature, from 260 mA at 10 °C to 180 mA at 70 °C. A sensor in the stack detects the temperature, causing a TCV regulator (Temperature Controlled Voltage) to generate a voltage ranging from 6 V at 10 °C to 4 V at 70 °C. The TCV control voltage is fed into each EI module, causing the current to drop 1.33 mA per °C. ↩
-
It's unclear why the driver boards use EI modules as well as ID-2 (Inhibit Driver) modules, since a separate board implements the inhibit drivers. The earlier schematics show just the EI modules. (See Laboratory Maintenance Instructions for LVDC Vol. II (1965) page 10-164 for the schematics.) The inhibit driver is similar to the current sink in the EI driver, so I suspect the ID-2 module is being used to boost the current. ↩
-
For reference, this footnote provides details of the Y driver signal routing. There are 8 high drive signals and 8 low drive signals generating the 64 Y select lines through the core stack. However, the current through the select line needs to go both ways, so cores can be flipped both directions. Thus, the drive signals are in pairs, one from the "E" side (voltage source) of the EI chip and one from the "I" side (current sink). These 32 signals go from the driver board to the diode matrix through two 16-wire flat cables. The diode board is connected to 64 Y select lines, but each line has two ends. These 128 connections are through four 32-wire flat cables, two on the left and two on the right. The two cables connected to the front side of the diode matrix wrap around to the far side of the stack, while the two cables connected to the back side of the diode matrix go to the near side of the stack. Thus, alternating select lines go through the stack in opposite directions. ↩
-
The X and Y diode matrices use a different wiring topology. There are 64 Y lines through the core stack. They are matrixed with 8 drivers at one end and 8 at the other end. The Y board has a diode pair (electrically) at each end of the 64 Y lines, so it has 256 diodes and 128 wires to the Y lines. (Because a line needs to be driven in either direction, one diode is required in each direction, making a pair at each end.)
On the other hand, there are 128 X lines through the core stack, matrixed with 16 drivers at one end and 8 at the other end. To avoid doubling the number of diodes used, the X board only has a diode pair at one end of each of the 128 X lines. At the other end, groups of 8 X lines are tied together directly, forming 16 groups with one diode pair is used for each group. Thus, there are 256 diodes in the matrix, as well as 32 diodes associated with the 16 groups. As far as wires between the diode matrix and the core stack, there are 128 wires for the diode-connected end, and 32 wires corresponding to the grouped end. See Figures 10-42 and 10-43 in the Laboratory Maintenance Instructions for LVDC Vol. II (1965) for schematics.
The X driver board is connected to other boards and the core stack through multiple flex cables. The cable on the right links the driver board to the rest of the computer via the I/O board. The top edge of the board has a 24-wire flex cable to the diode matrix, with a second 24-wire cable at the bottom. At the bottom, another smaller flex cable receives signals from the timing board underneath the core stack. The flex cables between the diode matrices and the core stack are not visible: there is a 16-wire cable and a 64-wire cable to the stack at the top and similar cables at the bottom.
There is an important difference between the X and Y wiring. The four flat cables between the X diode matrix and the core planes went vertically, from the top and bottom of the matrix. The flat cables from the Y diode matrix went horizontally, from the sides of the matrix. In this way, the X and Y cables were attached to orthogonal sides of the core planes, connecting to the orthogonal X and Y wires. ↩
-
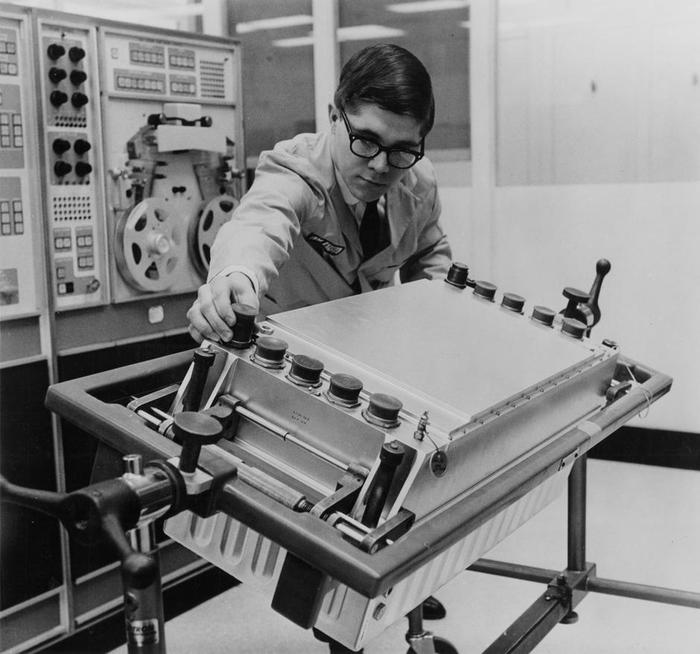
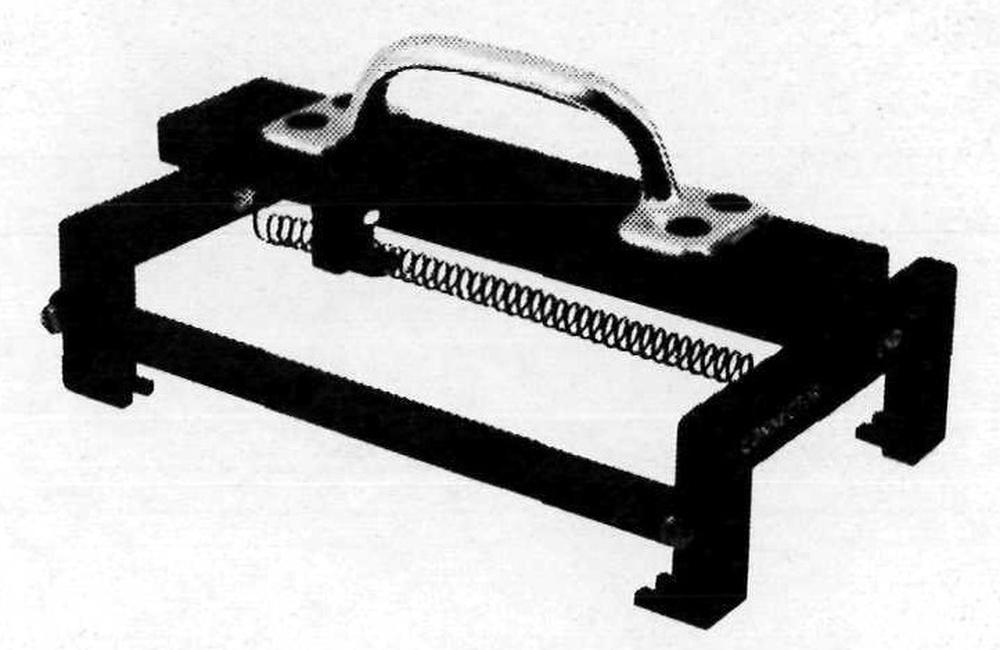
A special handle was produced to insert, remove, or carry the memory module. Because the memory modules were delicate and mounted with little clearance, this tool was developed to manipulate the module safely. This handle slides over the four shoulder screws on top of the module and latches into place.
The special carrying handle for the memory module. From Laboratory Maintenance Instructions for LVDC Vol. II page 4-5. -
One interesting feature of the LVDC was that memory modules could be mirrored for reliability. In "duplex" mode, each word was stored in two memory modules. If one module had an error, the correct word could be retrieved from the other module. While this provided reliability, it cut the memory capacity in half. Alternatively, memory modules could be used in "simplex" mode, with each word stored once.
Note that the LVDC's circuitry was triply-redundant to detect and correct errors. However, memory only needed to be doubly redundant because parity indicated which value was incorrect. The LVDC used odd parity. Odd parity had the advantage that parity would catch a word that was stuck all 0's or all 1's. One interesting feature of the simplex and duplex memory modes is that the software could switch between them while running, even setting separate modes for instructions and data. This allowed some words to be stored in simplex mode while more important words were stored in duplex mode. However, it appears that in actual use, the entire memory would be duplexed rather than specific parts. ↩

I was just now watching a video on the same thing on Smarter Everyday 2 channel where Luke Talley was explaining these things. It's awesome time for me to have a read up on this. Thanks a lot Ken. Your timing couldn't have been better.
ReplyDeleteAnother fascinating article, bravo! But I do have some questions and comments.
ReplyDeleteFirst, is there any discussion of why the AGC went with wirewrap, while the LVDC went with a 14 layer board. That does seem like a huge task to correctly layout the board, go through tapeout and then actually build it. The wirewrap would seem to be simpler to tweak, or make changes more quickly.
Was the LVDC building upon IBM's experience with laying out multilayer boards with the S/360 (and earlier systems) when they built this? Or was it more of just a re-packaging project since the actual memory modules were probably already designed and debugged, but needed to be built in reasonably large numbers.
It looks like one LVDC took eight modules, and with 15+ apollo launches and ground test, development and other needs, they probably built quite a number of these, versus the number of AGCs and their modules that were built. It would be interesting to compare production runs.
The next big question is the serial LVDC processor architecture versus the parallel design of the AGC processor architecture. Are there other serial decode based designs that were the predecessors of the LVDC, either inside IBM, or elsewhere? That would be a fascinating discussion and history lesson.
It's interesting to see how over time the serial versus parallel battle plays out in various designs. I'm more familiar with the RLL/MFM/IDE -> SATA change from parallel to serial disk controller technologies. Serial is easier to make fast, but parallel is easier to scale. For some values of scale, though the timing can get hairy.
Anyway, thanks for doing this, so darn instructive!
John
John S: I believe the LVDC was heavily influenced by IBM's S/360 technology. For instance, the ULD modules were similar to SLT modules, but packaged differently. So they probably used IBM's printed-circuit board expertise for these boards. The LVDC core planes were similar but not identical to the S/360 Model 50 core planes. A PCB saves a lot of space compared to wirewrap. but as you mention it's not as flexible. The S/360 used a mixture of PCB and wirewrap, which helped with field updates. As far as a serial vs parallel processor, there were various other serial processors used for aerospace, presumably for weight reasons. Some examples are the Arma Micro D, dD17B and Magic 321. Another important influence on the LVDC was IBM's Gemini computer, which was also serial.
ReplyDeleteThose MSI chips are very likely space qualified mil-spec 54-series logic gates. Consulting my real-live paper-bound Second Edition of the TI TTL Data Book, I see that the 54-series devices had different pinouts, in that the VCC and GND pins are not at the corners. All of the 14-pin 54-series parts had VCC on pin 4 and GND on pin 11, vs. 14 and 7 respectively for the 74-series brethren. I can see that by the power and ground buses that connect to pins 4 and 11.
ReplyDeleteIt's likely they also had some Delco-specific part number stamped on each device. They did that anyway with their automotive electronics, so it's not surprising you can't find any info on those components. Besides, space qualification is another layer of expense on top of mil certification. The paperwork involved in traceability is enormous, practically requiring some kind of form-filling whenever someone even looks at one of the devices. So custom part numbering would make things easier for them in any case.
Hi Ken thanks for another great post. I hate to be pushy but I was not sure that you would see or possibly reply to a question I just asked on your post about the one-wire protocol and the Magsafe connector. I just thought that I could draw your attention to that question by contacting you via this very recent blog article so please excuse my forward approach and thanks for your time Pedro147 (Peter Newman). The question was on this blog article http://www.righto.com/2013/06/teardown-and-exploration-of-magsafe.html
ReplyDelete