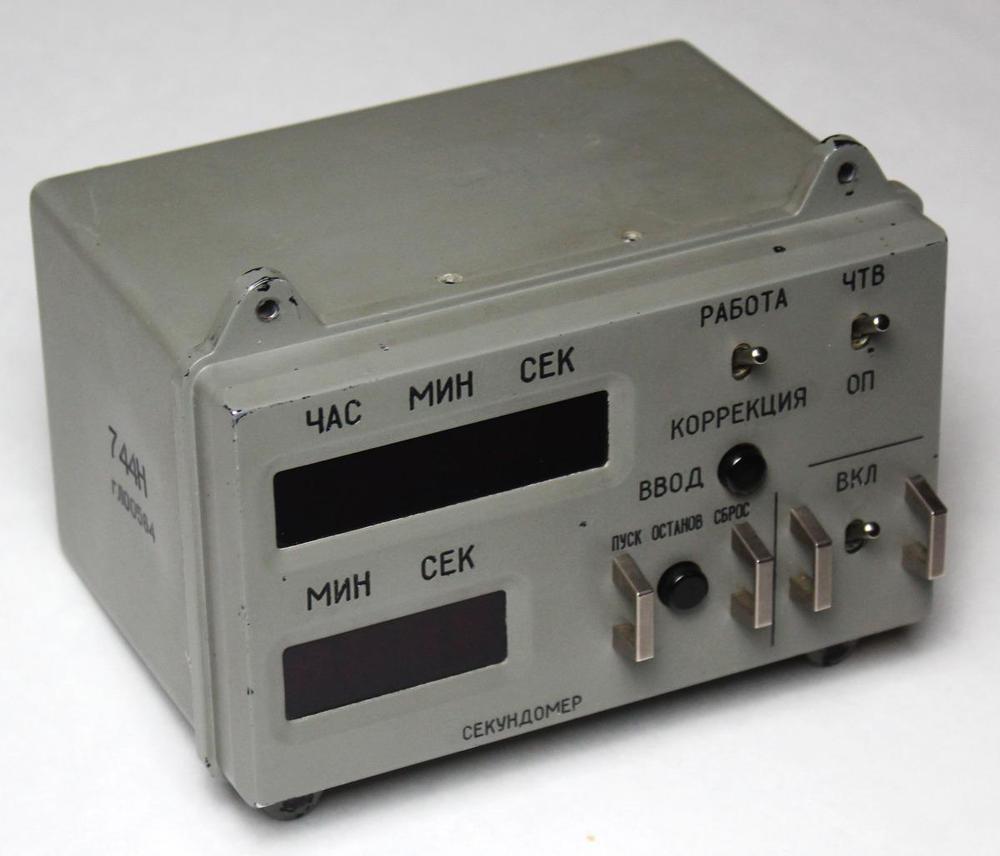
We recently obtained a clock that flew on a Soyuz space mission.1 The clock, manufactured in 1984, is much more complex inside than you'd expect, with over 100 integrated circuits on ten circuit boards. In this blog post, I examine the clock's circuitry and find that it needed so many chips because it was implemented with simple TTL logic. The clock also provides a glimpse into the little-known world of Soviet aerospace electronics and how it compares to American technology.
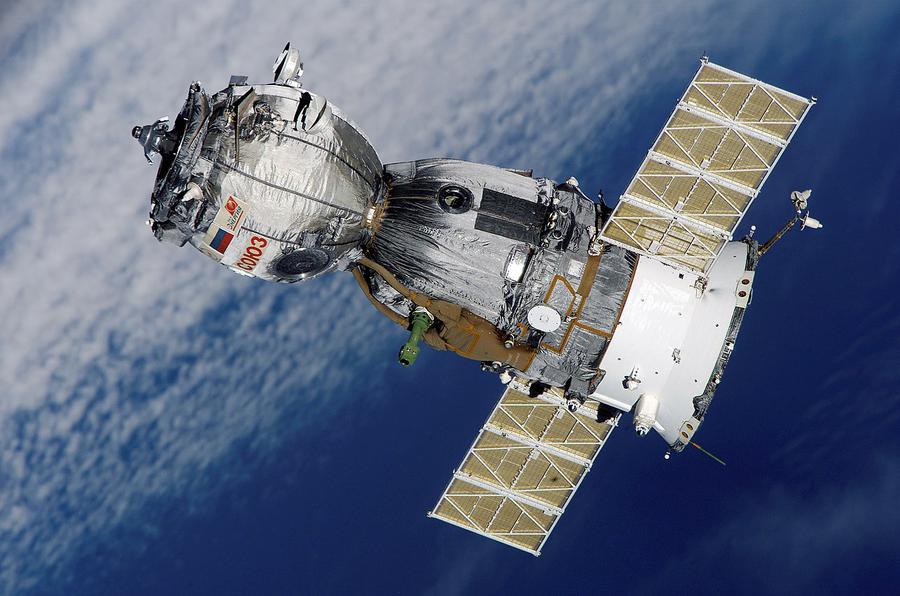
The Soyuz series of spacecraft was designed for the Soviet space program as part of the race to the Moon. Soyuz first flew in 1966 and has made more than 140 flights over the past 50 years. The spacecraft (below) consists of three parts. The round section on the left is the orbital or habitation module, holding cargo, equipment, and living space. The descent module in the middle is the only part that returns to Earth; the astronauts are seated in the descent module during launch and reentry. Finally, the service module on the right has the main engine, solar panels, and other systems.
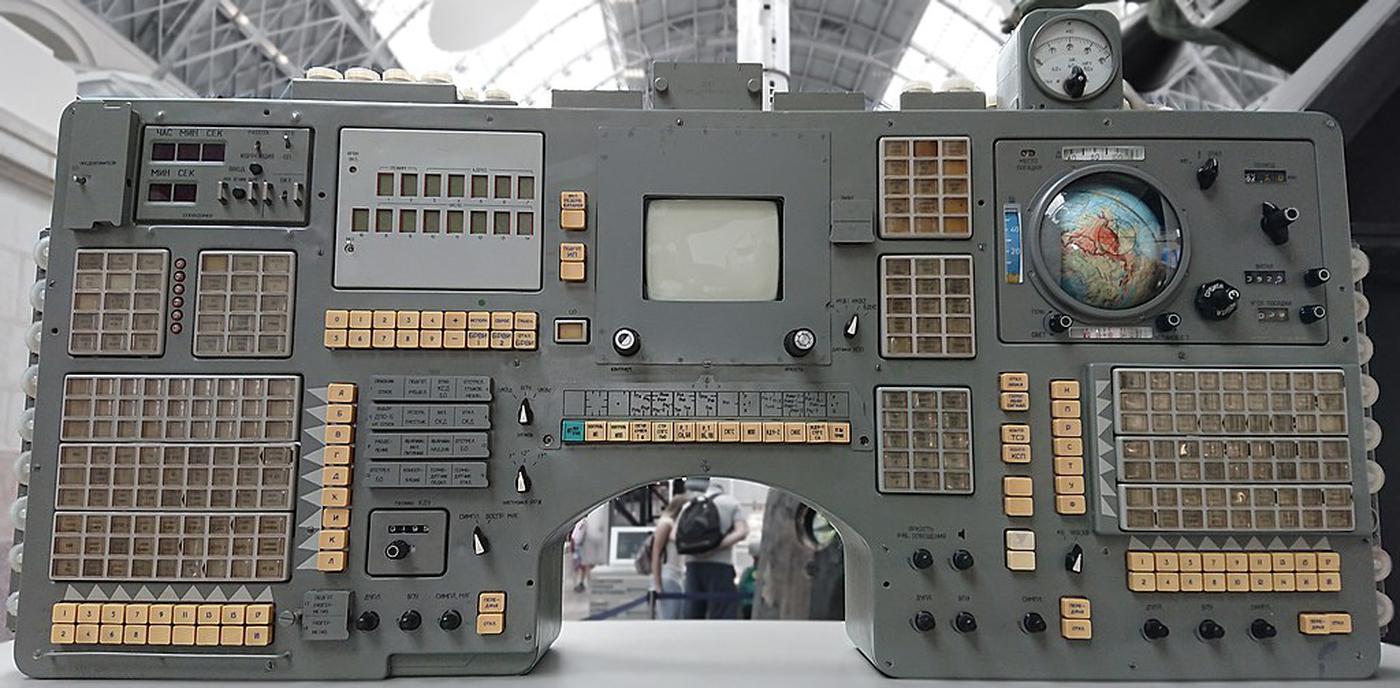
The descent module contains the spacecraft's control panel (below).2 Note the digital clock in the upper left. Early Soyuz spacecraft used an analog clock, but from 1996 to 2002, the spacecraft used a digital clock.3 The digital clock was also used in the Mir space station. The clock was eliminated from later Soyuz spacecraft, which used two computer screens on the control panel in place of the earlier controls.
A closer look at the clock
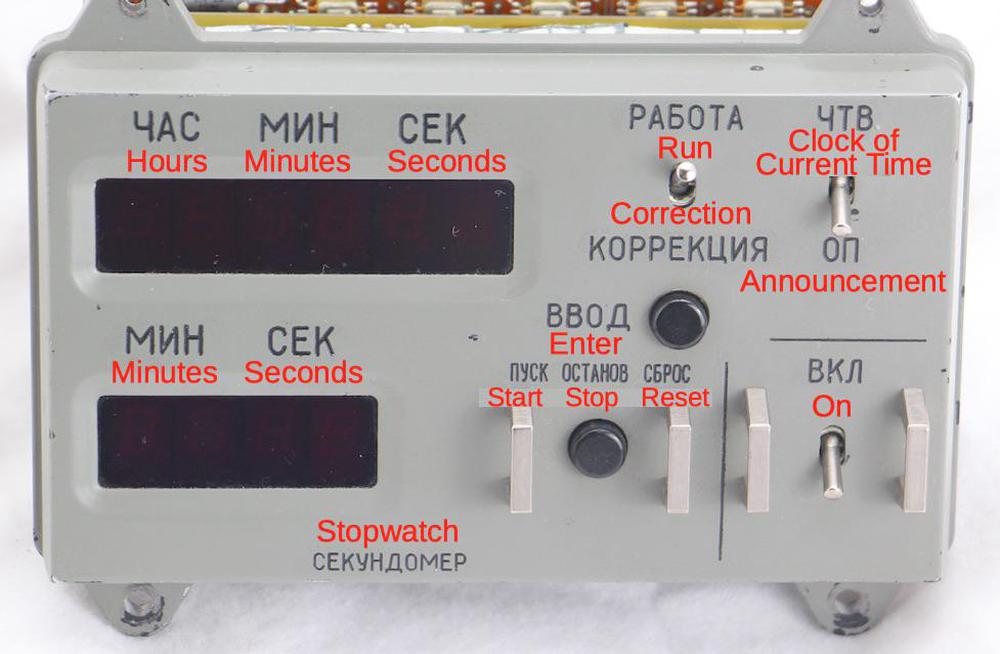
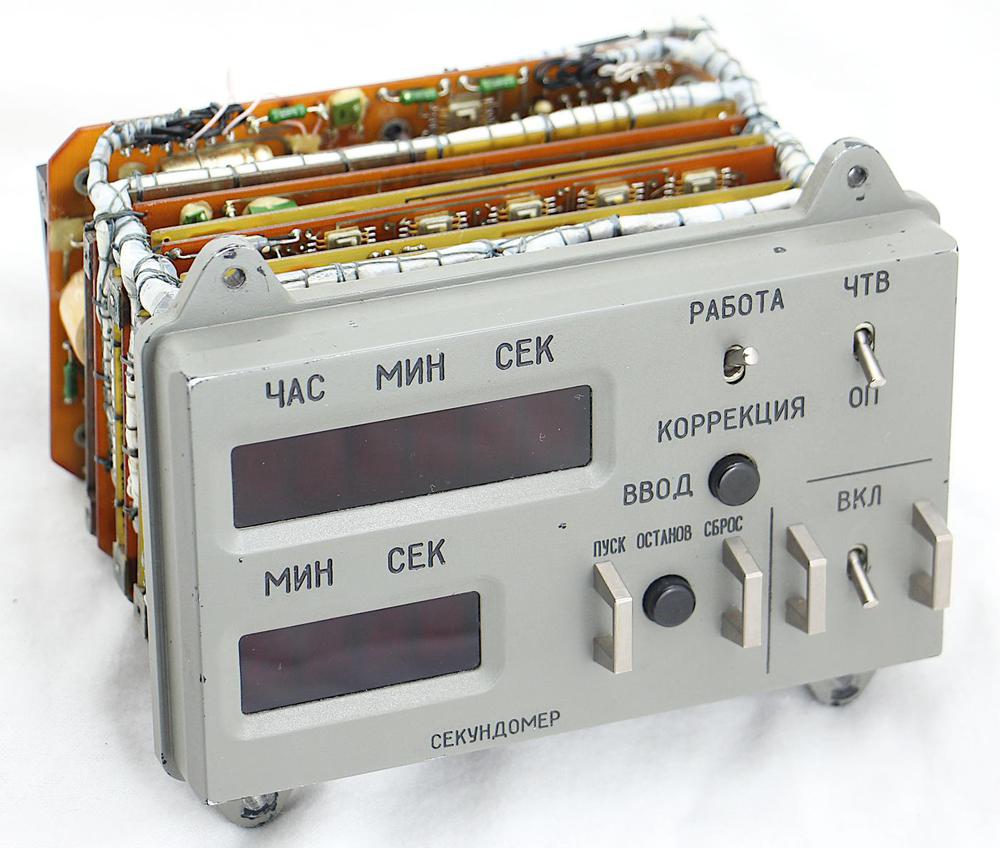
The diagram below shows the clock's labels translated into English. The clock has three functions: the time, an alarm, and a stopwatch. The "Clock of Current Time"5 mode shows the current Moscow time on the six upper LED digits, while "Announcement" shows the alarm time. The alarm can be set to a particular time; at that time, the clock triggers a relay activating an external circuit in the spacecraft.4 The clock is set using the "Correction" mode; digits are incremented using the "Enter" button. The lower half of the unit is the stopwatch; the bottom four LEDs display elapsed minutes and seconds. The lower pushbutton stops, starts, or resets the stopwatch.6 Finally, the power switch at the right turns the clock on.
We wanted to see what was inside the clock, of course, so Marc unscrewed the cover and removed it from the clock. This revealed a dense stack of circuit boards inside. The clock was much more complex than I expected, with ten circuit boards crammed full of surface-mount ICs and other components. The components are mounted on two-layer printed-circuit boards, a common construction technique. The boards use a mixture of through-hole components and surface-mount components. That is, components such as resistors and capacitors were mounted by inserting their leads through holes in the boards. The surface-mount integrated circuits, on the other hand, were soldered to pads on top of the board. This is more advanced than 1984-era American consumer electronics, which typically used larger through-hole integrated circuits and didn't move to surface-mount ICs until the late 1980s. (American aerospace computers, in contrast, had used surface-mount ICs since the 1960s.)
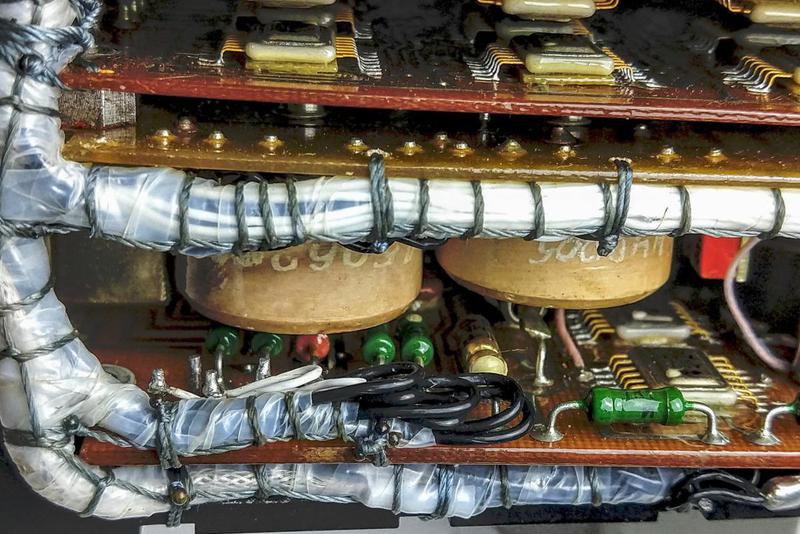
One interesting feature of the clock is that the boards are connected by individual wires that are bundled into wiring harnesses (below). (I expected the boards to plug into a backplane, or be connected by ribbon cables.) The boards have rows of pins along the sides, with wires soldered to these pins. These wires were gathered into bundles, wrapped in plastic, and then carefully laced into wiring harnesses that were tied to the boards.
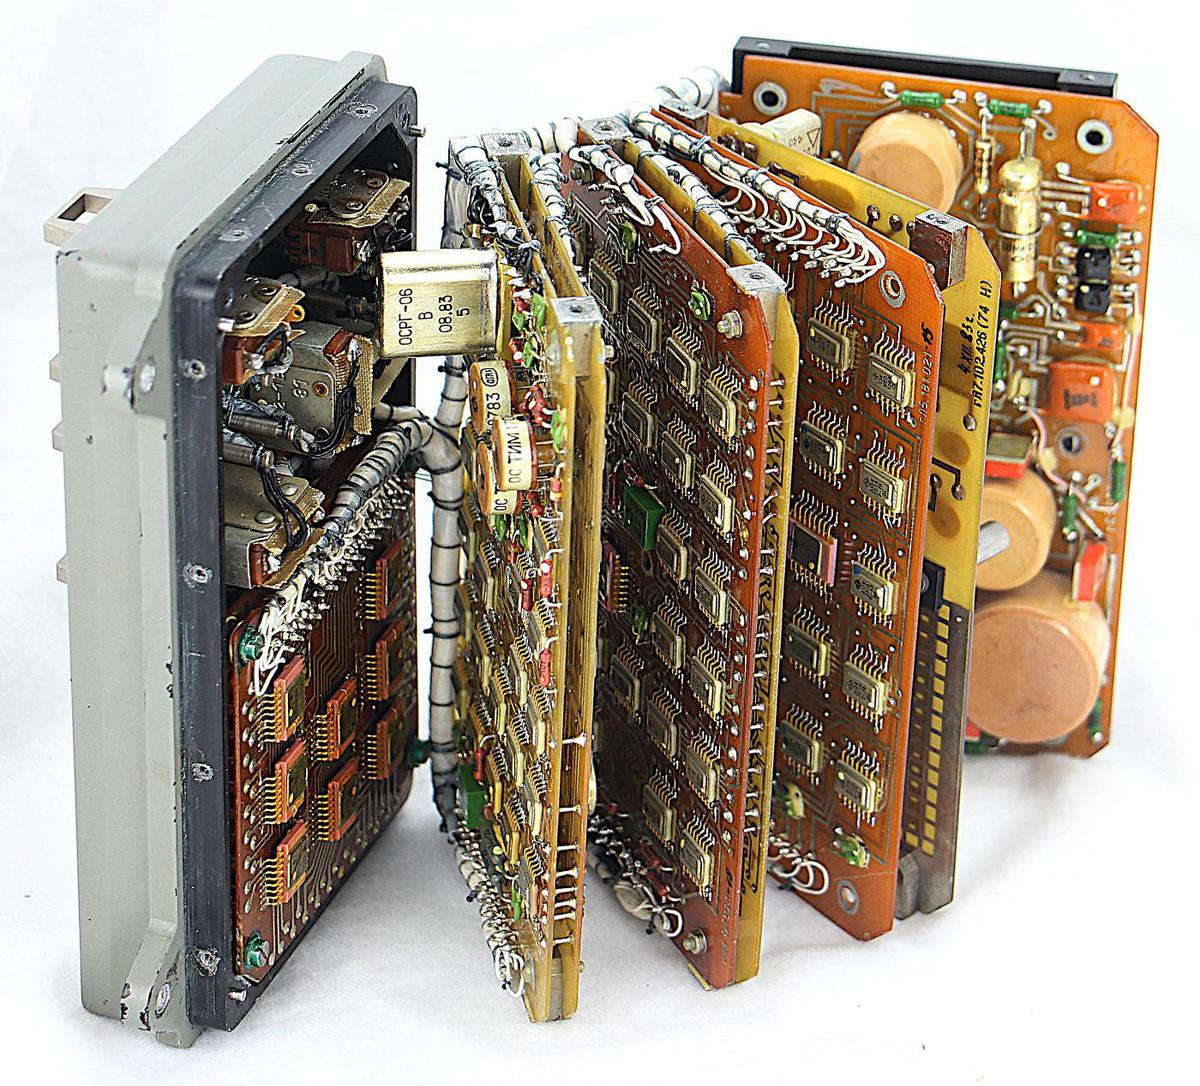
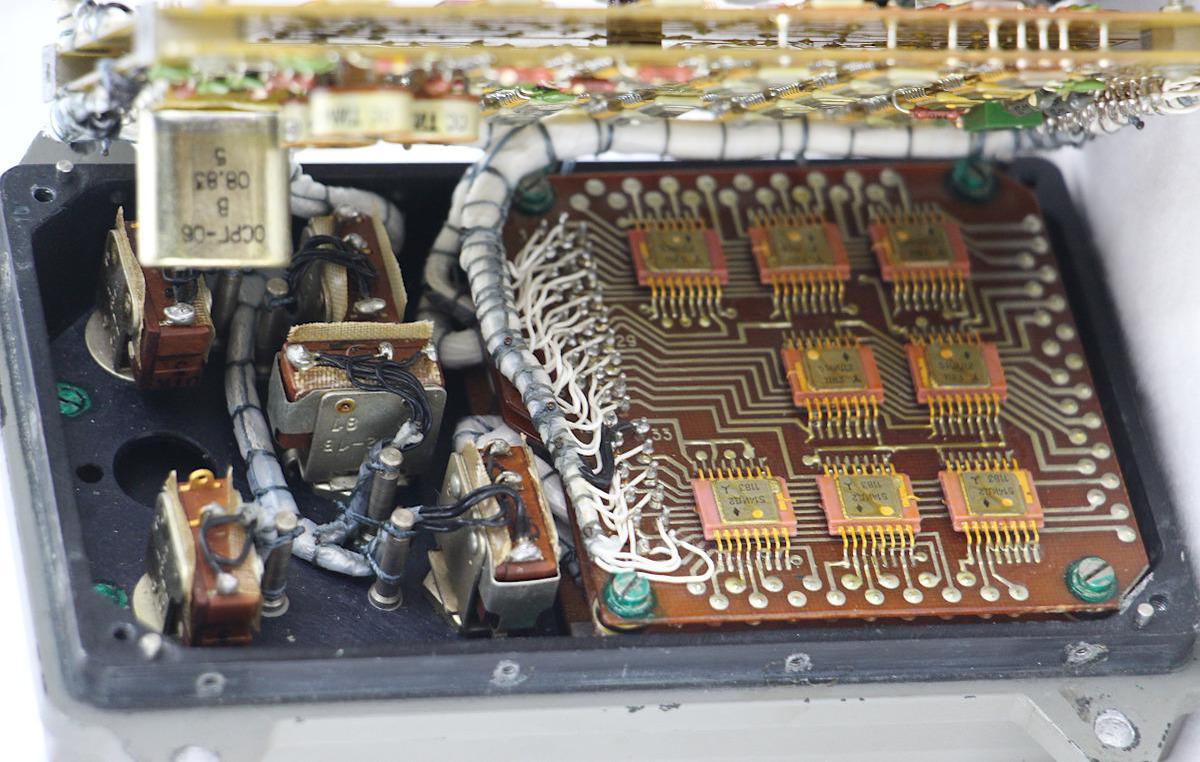
At first, we thought that further disassembly of the clock would be impossible without unsoldering all the wires, but then we realized that the wiring harnesses were designed so the boards could be opened like a book (see below). This allowed us to examine the boards more closely. Inconveniently, some pairs of boards were soldered together at the front by short wires, so we couldn't see both sides of these boards.
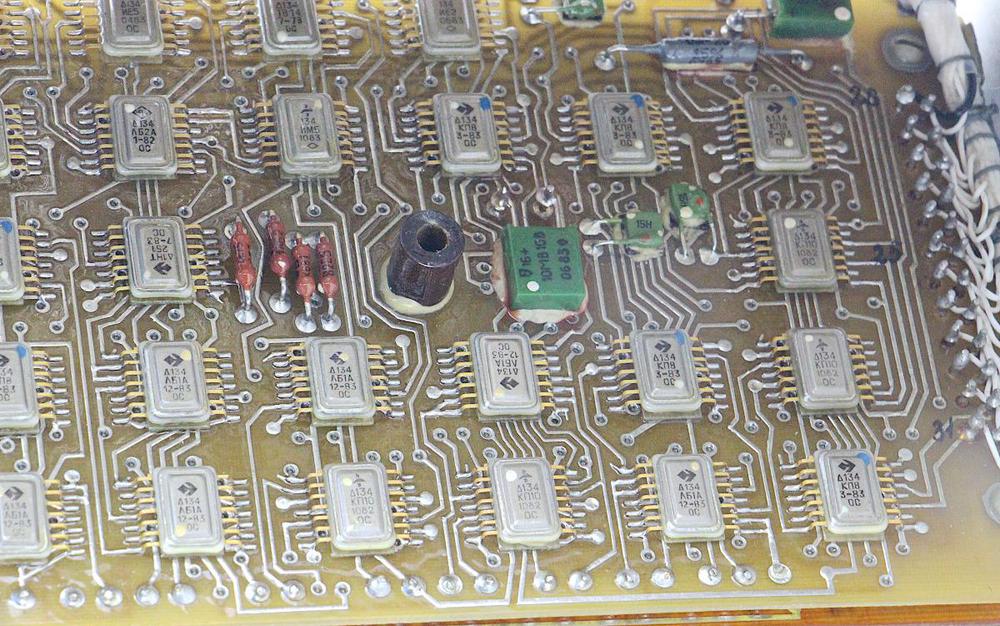
In the photo above, you can see the numerous integrated circuits in the clock. These are mostly 14-pin "flat pack" integrated circuits in metal packages, unlike contemporary American integrated circuits which were usually packaged in black epoxy. There are also some 16-pin integrated circuits, encased in pink ceramic.
The circuitry inside
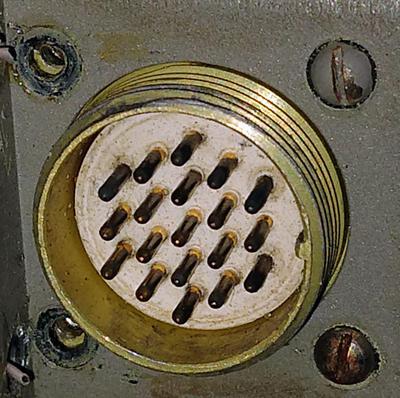
The next step was to examine the circuitry in more detail, which I'll discuss starting at the back of the clock. A 19-pin connector7 linked the clock to the rest of the spacecraft. The spacecraft provided the clock with 28 volts through this connector, as well as external timing pulses and stopwatch control signals. The clock could signal the spacecraft through relay contacts when the alarm time was reached.
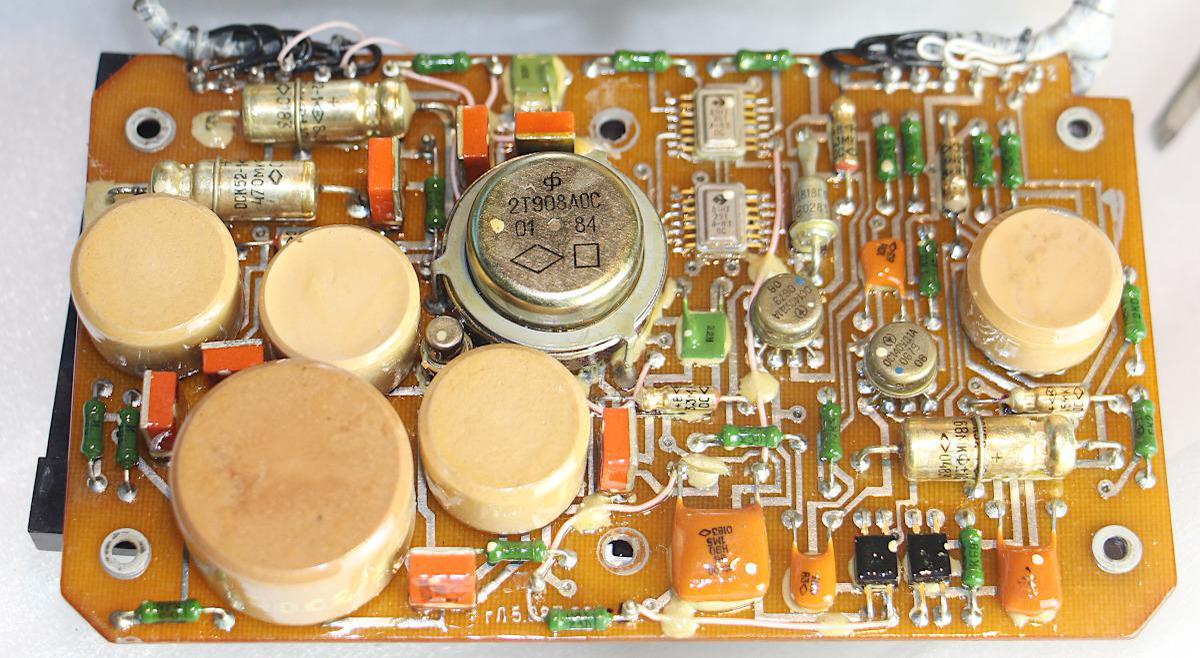
The two circuit boards at the back of the clock are the power supply, which was more complex than I expected. The first board (below) is a switching power supply that converts the spacecraft's 28-volt power to the 5 volts required by the integrated circuits. The round ceramic components are inductors, ranging from simple coils to complex 16-pin inductors. The control circuitry includes two op amps in metal can packages. Two other packages that look like integrated circuits each hold four transistors. Next to them, a bullet-shaped Zener diode sets the output voltage level. The large round switching power transistor is visible in the middle of the board. You might expect the power supply to be a simple buck converter. However, the power supply uses a more complicated design to provide electrical isolation between the spacecraft and the clock. I'm not sure, though, why isolation was necessary.8
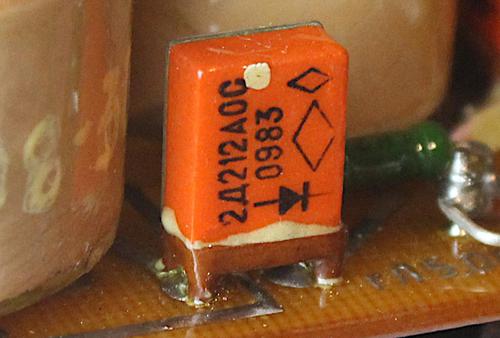
Many of the components in the power supply look different from American components. While American resistors are usually labeled with colored bands, the Soviet resistors are green cylinders with their values printed on them. The Soviet diodes have orange rectangular packages (below), unlike the usual cylindrical American diodes. The power transistor in the middle of the board is round, lacking the metal flanges of American power transistors in "TO-3" packages. I don't think the Soviet packaging is better or worse, but it's interesting to see how components from the two countries diverged.
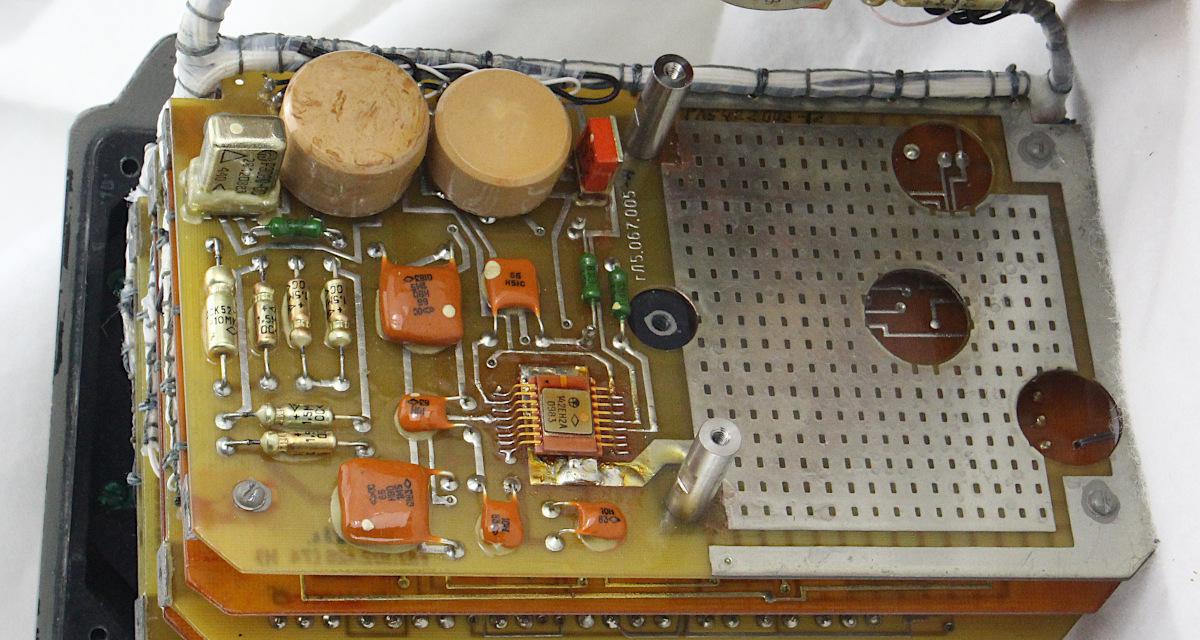
The second board is also part of the power supply, but is much simpler. It has inductors and capacitors to filter the power, as well as a linear voltage regulator chip (pink) to produce 15 volts for the op amp ICs in the first board. The voltage regulator chip has two large metal tabs on the bottom that were soldered to the circuit board to dissipate heat. Strangely, the board has three large holes in the right side. The obvious explanation would be that these holes made room for tall components, a situation that arises on another board. However, there are no components that fit the holes on this board. Thus, I suspect this board was originally designed for a different device and reused in the clock.
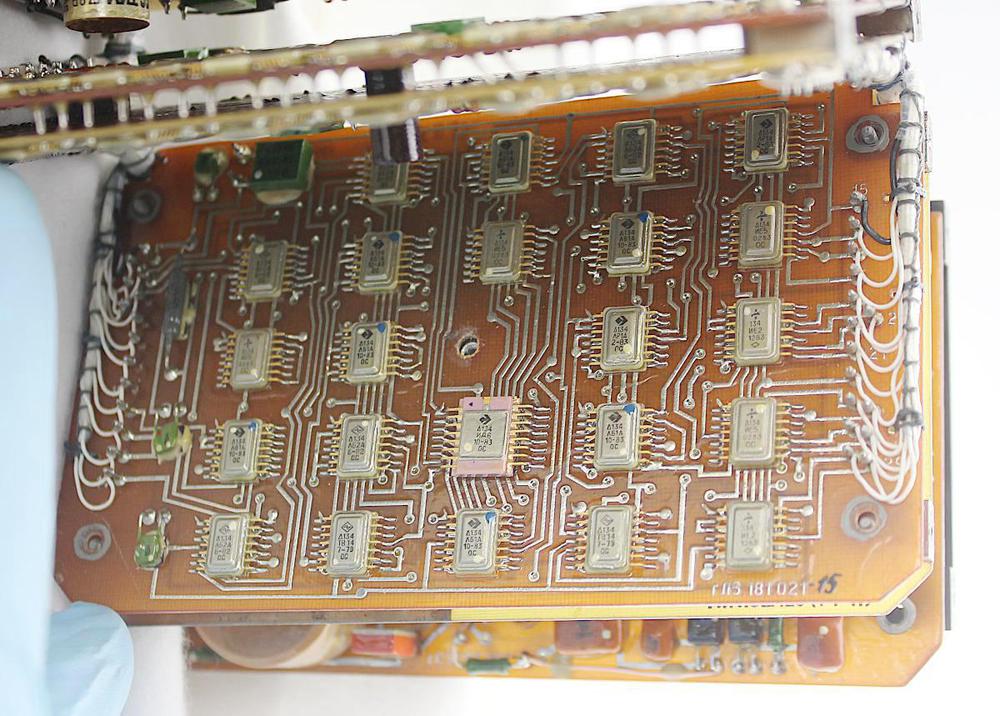
The remaining boards are filled with digital logic integrated circuits. Board 3 (below) and board 5 (which is similar) implement the current time and alarm time functions. Each board contains six BCD counter chips for the six digits (hours, minutes, and seconds).9 In addition, each digit counter requires a logic chip to control when it is incremented and another chip to control when it is reset, depending on whether the clock is being set or is running. (This is one reason why so many chips are required.) The pink chip on the board controls which digit is modified when setting the clock.10
Board 4 (below) has two functions. First, it controls whether the clock displays the current time or the alarm time. This is implemented with a selection chip for each digit. Second, the board signals the spacecraft when the current time reaches the alarm time. This is implemented with multiple chips to step through each digit, compare the times, and determine if they match. Thus, even though the functions of this board seem simple, they require a whole board of chips. The connections at the bottom of the board link board 4 to board 5. The board is connected to board 3 through the wiring harness.
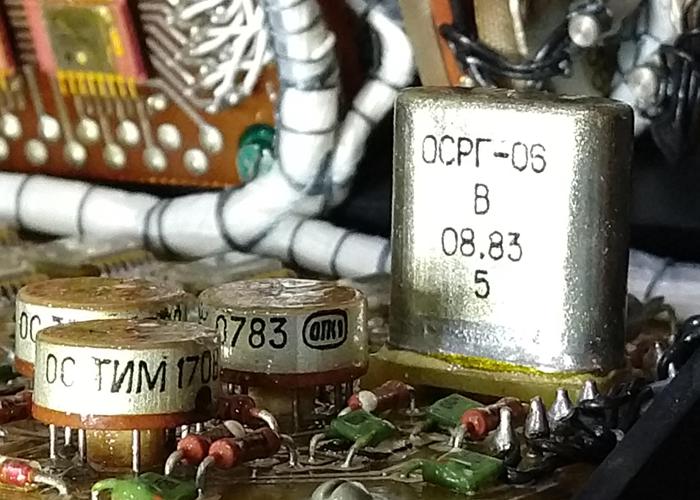
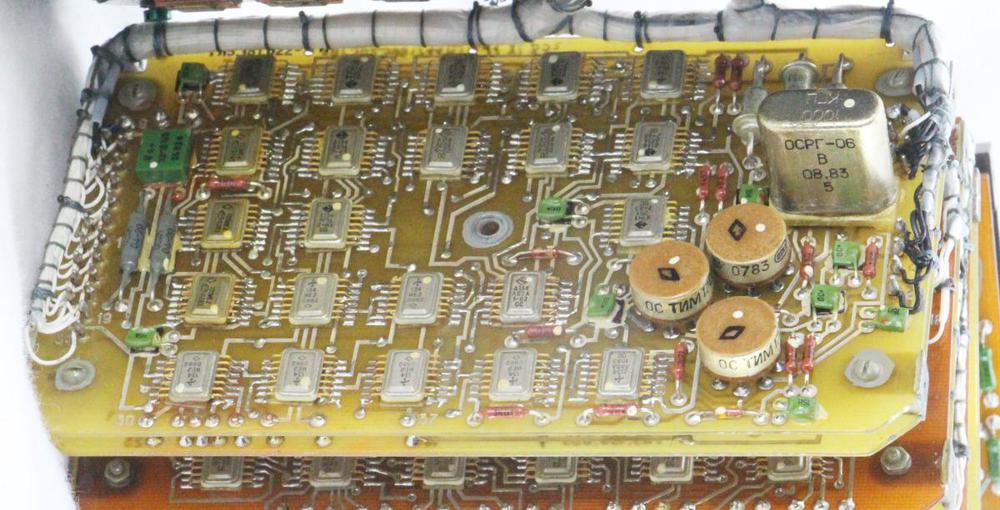
Some of the boards have more circuitry than just digital logic. For instance, boards 6 and 7 have pulse transformers to electrically isolate the control signals fed into the clock through the 19-pin connector. (In modern circuits, this role would be performed by an optoisolator.) These transformers look a bit like mushrooms or miniature water towers, and can be seen in the photo below. Board 7 also has a quartz crystal, the metal rectangle below.11
The two functions of board 7 (below) are to generate the clock's timing pulses and to implement the stopwatch. The quartz crystal generates accurate 1 megahertz pulses. These pulses are reduced to one-second pulses by six BCD counters; each counter chip divides the frequency by 10. These timing pulses are used by the rest of the clock. To implement the stopwatch, the board has four BCD counters for the four digits. It also has control logic to start, stop, and reset the stopwatch. The three pulse transformers allow the spacecraft to control the stopwatch when certain events happen. Additional chips handle these mode changes.
Boards eight and nine drive the LED displays. Each LED digit requires a chip to illuminates the appropriate segments of the 7-segment LED based on the BCD (binary-coded decimal) value. These BCD-to-7-segment driver chips are the pink 16-pin chips on the board.12 Since the clock displays 10 digits in total, 10 driver chips are used. Eight driver chips are on board 8, while board 9 has two chips along with numerous current-limiting resistors for the LEDs. The switches to control the clock are also visible in the photo below.
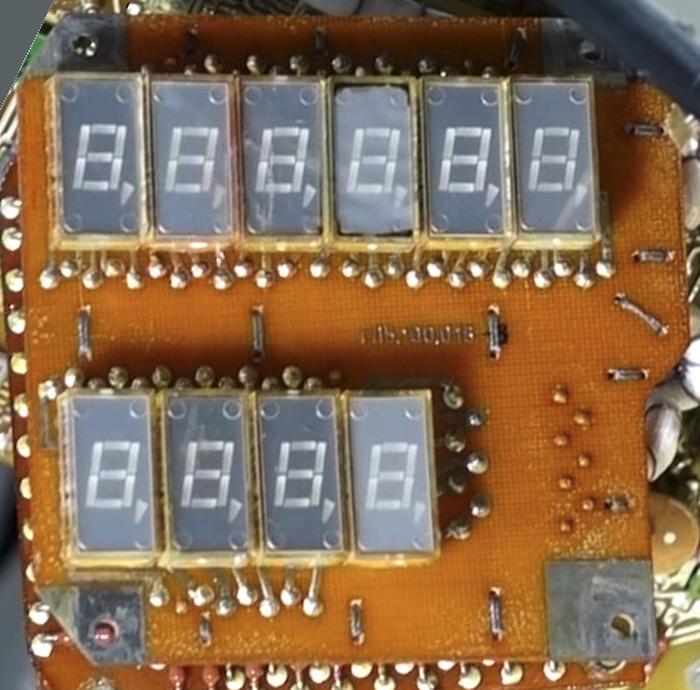
Finally, board 10 (below) holds the ten LED digits. Each digit consists of a seven-segment LED, along with a comma. I think one of the commas is wired up to indicate something; we'll find out what when we power up the clock.
Soviet integrated circuits
Next, I'll discuss the integrated circuits used in the clock. The clock is built mostly from TTL integrated circuits, a type of digital logic that was popular in the 1970s through the 1990s. (If you've done hobbyist digital electronics, you probably know the 7400-series of TTL chips.) TTL chips were fast, inexpensive and reliable. Their main drawback, however, was that a TTL chip didn't contain much functionality. A basic TTL chip contained just a few logic gates, such as 4 NAND gates or 6 inverters, while a more complex TTL chip implemented a functional unit such as a 4-bit counter. Eventually, TTL lost out to CMOS chips (the chips in modern computers), which use much less power and are much denser.
Because each chip in the Soyuz clock didn't do very much, the clock required many boards of chips to perform its functions. For example, each digit of the clock requires a counter chip, as well as a couple of logic chips to increment and clear that digit as needed, and a chip to drive the associated 7-segment LED display. Since the clock displays 10 digits, that's 40 chips already. Additional chips handle the buttons and switches, implement the alarm, keep track of the stopwatch state, run the oscillator, and so forth, pushing the total to over 100 chips.
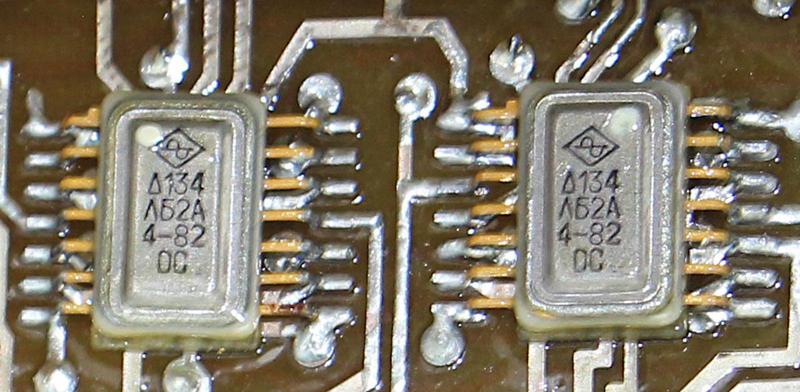
One nice thing about Soviet ICs is that the part numbers are assigned according to a rational system, unlike the essentially random numbering of American integrated circuits.13 Two letters in the part number indicate the function of the chip, such as a logic gate, counter, flip flop, or decoder. For example, the IC below is labeled "Δ134 ΛБ2A". The series number, 134, indicates the chip is a low-power TTL chip. The "Л" (L) indicates a logic chip (Логические), with "ЛБ" indicating NAND/NOR logic gates. Finally, "2" indicates a specific chip in the ЛБ category. (The 134ЛБ2 chip's functionality is two 4-input NAND gates and an inverter, a chip that doesn't have an American counterpart.) 14
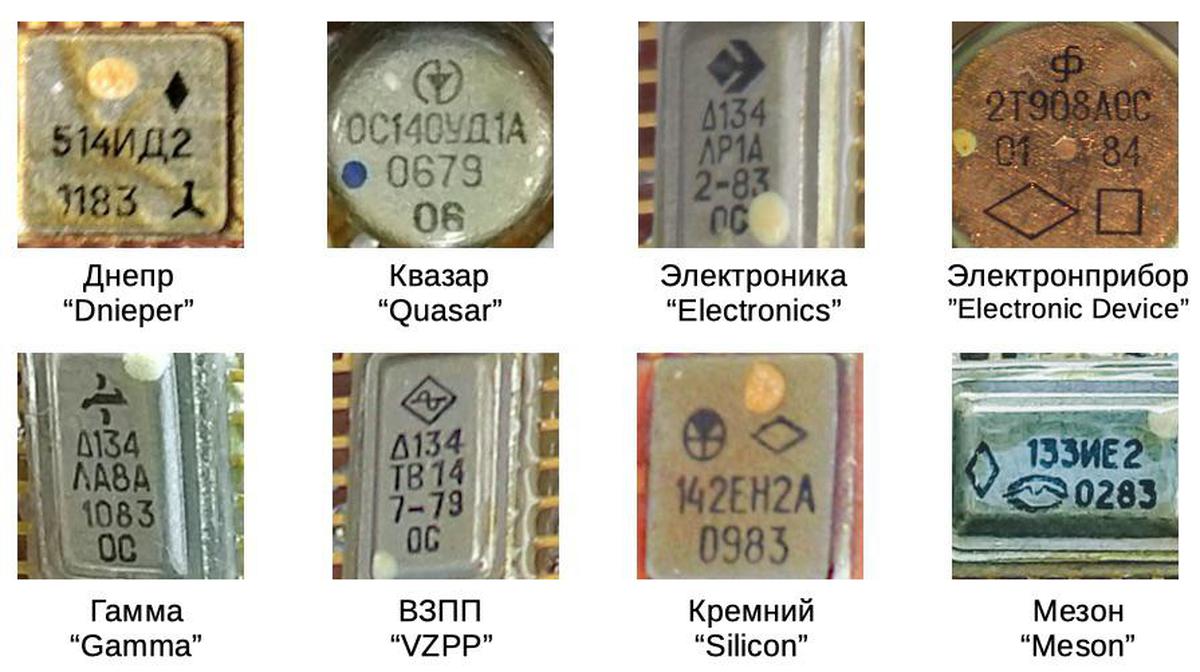
The logos on the integrated circuits reveal that they were manufactured by a variety of companies. Some of the chips in the clock are shown below, along with the name of the manufacturer and its English translation. More information on Soviet semiconductor logos can be found here and here.
Comparison with US technology
How does the Soyuz clock compare with US technology? When I first looked at the clock I would have guessed it was manufactured in 1969, not 1984, based on the construction and the large number of simple flat-pack chips. In comparison, American technology in 1984 produced the IBM PC/AT and the Apple Macintosh. It seemed absurd for the clock to use boards full of TTL chips a decade after the US had produced single-chip digital watches.16 However, the comparison turned out to be not so simple.
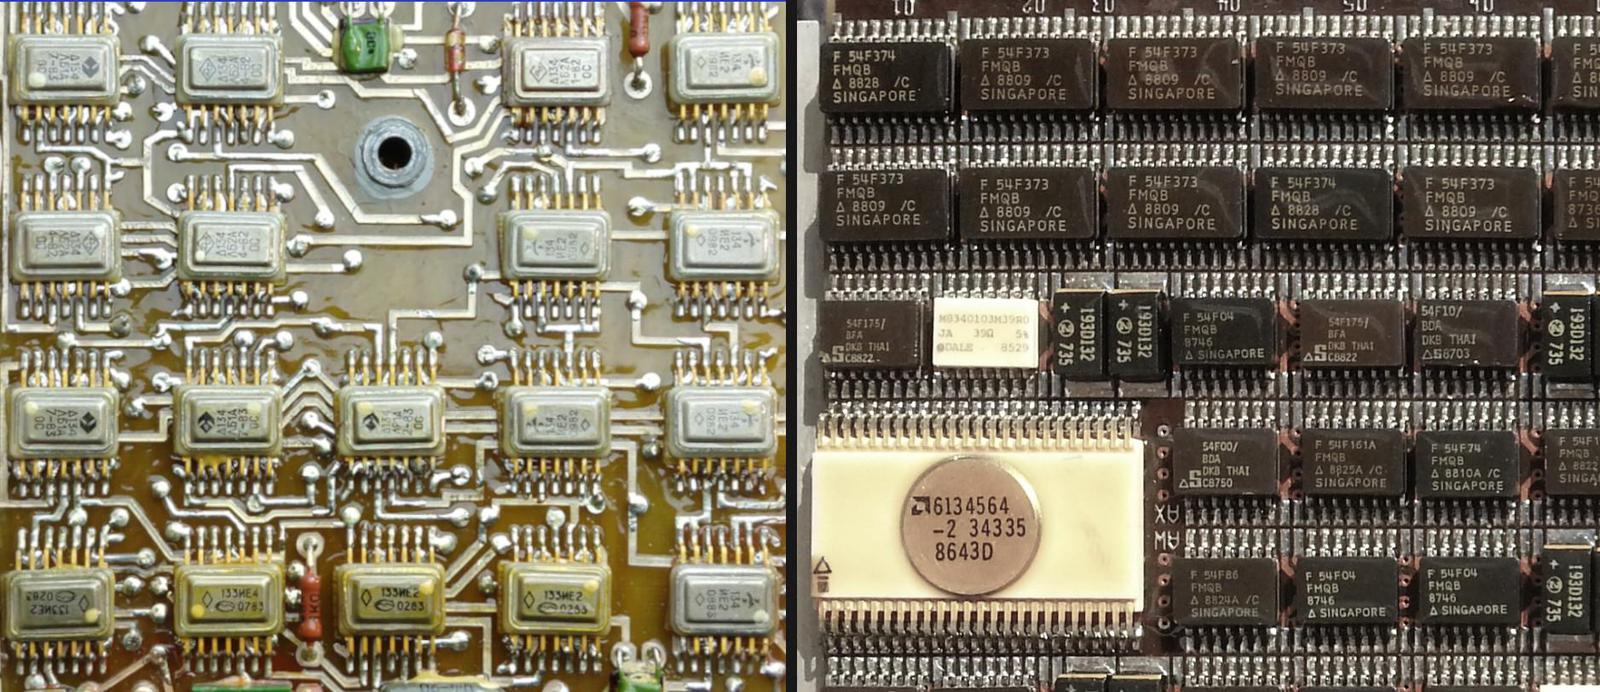
To compare the Soyuz clock with contemporary 1980s American space electronics, I looked at a board from the Space Shuttle's AP-101S computer.17 The photo below shows circuitry from the Soyuz clock (left) and the Shuttle computer (right). Although the Shuttle computer is technologically more advanced, the gap was smaller than I expected. Both systems were built from TTL chips, although the Shuttle computer used a faster generation of chips. Many Shuttle chips are slightly more complex; note the larger 20-pin chips at the top of the board. The large white chip is significantly more complex; it is an AMD Am2960 memory error correction chip. The Shuttle's printed-circuit board is more advanced, with multiple layers rather than two layers, allowing the chips to be packed 50% more densely. At the time, the USSR was estimated to be about 8 to 9 years behind the West in integrated circuit technology;15 this is in line with the differences I see between the two boards.
What surprised me, though, was the similarities between the Shuttle computer and the Soviet clock. I expected the Shuttle computer to use 1980s microprocessors and be a generation ahead of the Soyuz clock, but instead the two systems both use TTL technology, and in many cases chips with almost identical functionality. For example, both boards use chips that implement four NAND gates. (See if you can find the 134ΛБ1A chip on the left and the 54F00 on the right.)
Conclusion
Why does the Soyuz clock contain over 100 chips instead of being implemented with a single clock chip? Soviet integrated circuit technology was about 8 years behind American technology and TTL chips were a reasonable choice at the time, even in the US. Since each TTL chip doesn't do very much, it takes boards full of chips to implement even something simple like a clock.
The next step will be to power up the clock and see the clock in operation. I've been studying the power supply so we can make this happen. I plan to write more about the power supply and other parts of the clock, so follow me @kenshirriff for details. also have an RSS feed. Until then, you can watch Marc's video showing the disassembly of the space clock:
Notes and References
-
CuriousMarc obtained the clock from an auction and it was advertised as flown to space, but I don't know which mission it was flown on. The date codes on the components inside the clock are mostly from 1983, with one from 1984, so the clock was probably manufactured in 1984. The Russian name for the clock is "Бортовые Часы Космические" (Onboard Space Clock), which is abbreviated as "БЧК". ↩
-
The photo of the Soyuz console was mislabeled as from Soyuz 7K-VI. However, that mission was in the 1960s and the Soyuz-7K console was much different. A photo of the Soyuz-7K console is in this Russian article. ↩
-
The digital clock was used in the Soyuz-TM version of the spacecraft. This version of the console was known as Neptune (Нептун). For details on Soyuz consoles, see The Integrated Information Display System for the Soyuz-TMA. Two Russian documents are this and (this. The analog clock can be seen in a Scott Manley video here and in some photos by Steve Jurvetson. ↩
-
Most of the description of how the clock works is based on my reverse engineering, so I don't guarantee that everything in this post is accurate. When we power up the clock, I'll find out what I got wrong :-) ↩
-
The clock has the label "ЧТВ", which is an abbreviation for "Часы Текущего Времени". The Soyuz Crew Ops Manual translates this as "Clock of Current Time". ↩
-
The Soyuz Crew Ops Manual has some information on the clock on page 35. According to the manual, the stopwatch is controlled automatically during the propulsion system engine burn timing, to measure the time between the Engine Fire command and the Engine Cut Off command. It also automatically measures the time during descent until contact. ↩
-
The 19-pin connector was a standard Soviet military connector of type RS19TV (РС19ТВ in Cyrillic). I was able to find a matching connector on eBay, which we will use for powering the clock. ↩
-
Cell-phone chargers, for instance, use isolated power supplies for safety, to protect the user from the dangerous 120-volt line voltage. The clock, however, is powered with 28 volts, so there's no obvious reason for electrical isolation. (The Apollo Guidance Computer's power supply, for example, used a non-isolated switching power supply.) ↩
-
The clock uses a BCD counter chip for each digit with some exceptions. The top hours digit only goes to "2" (for a 24-hour clock), so two flip flops are used instead of a counter. The top digit for minutes and seconds needs to roll over at 6 (i.e. 60 seconds/minutes), so the clock uses a divide-by-12 chip similar to the 7492 chip. (The chip can be configured to roll over at 6 rather than 12.) ↩
-
The pink chip on board 3 is a К134ИД6 decimal decoder, which selects one of 10 outputs based on the 4-bit BCD value fed into it. (The part number ИД indicates a decoder, Дешифраторы.) This chip is a copy of the American 74L42 chip. For some reason, the 16-pin integrated circuits are in pink ceramic packages, while the more common 14-pin integrated circuits are in metal packages. ↩
-
The Soyuz Crew Ops Manual (page 35) specifies the clock's accuracy as 30 seconds per day, which isn't very good. In comparison, a low-cost Timex quartz watch from the early 1970s was accurate within 15 seconds per month. According to the manual, the clock could be synchronized to external time pulses. During launch/injection and autonomous orbital flight phases, the clock was synchronized to the Program-Timing Control Equipment (АПВУ). It could also be synchronized to the TV unit (KЛ110). ↩
-
LED displays often use multiplexing, where one driver chip is shared across all the digits and the display rapidly cycles through the digits. This reduces the number of chips and resistors required. I'm not sure why the clock uses separate drivers instead of multiplexing. ↩
-
For more information on Soviet integrated circuits, including the ones used in the clock, see the databook Интегральные микросхемы и их зарубежные аналоги (Integrated circuits and their foreign counterparts). ↩
-
The Soviet IC designation system is described in detail on Wikipedia. There are a few complications that make a chip's designation different from the labels printed on the chip. Because Л and П (Cyrillic L and P) look similar on small chips, the chip labels use Λ (Greek L) in place of Л (Cyrillic L). The Greek D (Δ) may replace Cyrillic D (Д) to avoid confusion with Cyrillic А. Moreover, names for commercial chips start with K, unlike the military chips used in the clock. Thus, a chip labeled "Δ134 ΛБ2A" appears in databooks and on the web under the name "К134ЛБ2". ↩
-
Two CIA reports (1974 and 1986) provide information on the lag between Soviet IC technology and Western technology. ↩
-
US manufacturers implemented clocks on a single chip in the early 1970s. Mostek introduced a single-chip digital clock chip in 1972, the Mostek MM5017. In 1974, Intel introduced a watch using a low-power CMOS chip, the Intel 5810 In other words, the Soyuz clock could (roughly) have been replaced with a single chip a decade earlier. ↩
-
The AP-101S computer in the Space Shuttle was part of IBM's System/4π line of avionics computers. This 64-pound computer was built from TTL integrated circuits, using the 74F00 series (Fairchild's FAST line) for improved performance. (Its memory, however, was built from high-capacity CMOS chips.) The AP-101S computer was an updated version of the AP-101B used in the earlier Space Shuttle flights. (See The new AP101S general-purpose computer (GPC) for the space shuttle and Space Shuttle Avionics Upgrade.)
At first, it surprised me that they designed both Shuttle computers from low-complexity TTL chips, but it made sense when the design of the earlier AP-101B computer started in 1972. Back in the 1970s, minicomputers were commonly built from TTL chips because microprocessors were new and much slower than TTL. The first Shuttle computer achieved a speed of 0.42 MIPS. This performance was respectable in 1972 but poor by 1981, when the Shuttle first flew.
To improve performance, a redesign of the computer started in 1982. The updated AP-101S computer stuck with TTL, so its performance improved only moderately, to 1.27 MIPS, slightly slower than the Motorola 68010 (1982) which ran at 2.4 MIPS. Unfortunately, the gap between TTL computers and microcomputers got exponentially worse, following Moore's law. By 1991, when the AP-101S first flew, the Motorola 68040 ran at 44 MIPS. And by the end of the Shuttle program in 2011, the Intel Core i7 processor ran at 100,000 MIPS, many orders of magnitude faster than the Shuttle computer.
So why did the Space Shuttle use mostly-obsolete TTL technology in the 1980s redesign? One reason was backward compatibility. Since the first Shuttle computer used the proprietary IBM 4π architecture, it couldn't be replaced by an off-the-shelf microprocessor. Reliability was another motivation for TTL. Commerical microprocessors weren't designed for the reliability needs of space systems and lacked features such as radiation resistance and parity-protected caches. Finally, the aerospace development cycle is very long; although the Shuttle computer redesign started in 1982, the computer wasn't used on a flight until 1991 and remained in use until 2011. The point is that there were reasons to build aerospace systems from TTL, even though microprocessors were much faster, more compact, and lower power. ↩
I've been waiting for this article to come out since CuriousMarc's video :) Looking forward to seeing it powered up. I've always found it interesting that most spacecraft computing hardware tends to lag commercial stuff by 10-20 years. It makes sense given the amount of time it takes to develop and certify. I've also heard that the designs tend towards older, larger process technology because it's less affected by random gamma rays.
ReplyDeleteBack in the 1980s, most of the chips in ceramic packages were Mil-Spec. Manufacturers had to commit to producing the product for an extended period of time. The largest market even then was commercial chips in plastic packages, so some of the rationale for not using certain chips was due to availability from the manufacturer in the right package, tested in the right way. Also, these chips had a wider temperature range than commercial devices, that sometimes caused problems.
ReplyDeleteNow, most chips are totally digital, but then even digital chips often had analog circuitry inside. Also, CMOS didn't go mainstream until the later 1980s, many of the microprocessors in the 1980s were NMOS, which used effectively a resistor for pull-up instead of a transistor.
Fascinating!
ReplyDeleteAs a Soviet born man I can't stop wondering how the Soviets were able to fly in space and the same time couldn't produce enough toilet paper for every comrade =)
ReplyDeleteThanks for the tech porn. Keep it up!
"Electronic digital clocks (referred to as БЧК BChK) are intended for:
ReplyDelete• issuing time information about the current time with a resolution of 1 second;
• crew alert about the occurrence of a given point in time;
• timing of individual operations;
On the front panel are located:
- toggle switch “ВКЛ VKL” - turning on the power of the watch,
- “Работа-коррекция Work-correction” toggle-switch - switching on the working mode of operation or the correction mode of the clock,
- “ЧТВ-ОП ChTV-OP” toggle switch - connection to the upper digital indicators
current time clock (ЧТВ ChTV) or siren (ОП OP);
- button “ПУСК. ОСТАНОВ. СБРОС - START. STOP. RESET ”- manual control
stopwatch
- digital indicators “ЧАС. МИН. СЕК - HOUR. MIN SEC ”- indication of the current time or time the alert was set,
- digital indicators “МИН. СЕК MIN. SEC ”- time indication second measure,
- The “ВВОД ENTER” button is used to enter temporary notification information.
The clock is turned on by moving the toggle switch “ВКЛ ON” to the upper position when the remote control power is on.
The БЧК BChK have an internal autonomous generator and an input for external highly stable pulses.
The stopwatch can work in two modes: manual and automatic.
Automatic control of the stopwatch is used to chronometrify the operating time of the propulsion system and has priority over manual.
Upon the formation of the “Включение СКД SKD Enable” command, a stop, reset and start of the stopwatch occurs.
By the formation of the command “Отключение СКД SKD Shutdown”, in the presence of the sign “Маневр Maneuver”, the stopwatch"
Wonderful article, I wish I could participate in making this clock work. I'm already learning about history of electronics in my mother country from this, though 😁
ReplyDeleteAn interesting article, I will wait to continue.
ReplyDeleteI want to note that the static indication was applied due to the fact that in the case of multiplexing, the visible brightness of the indicator is significantly reduced. This may require an increase in supply voltage, i.e. installation of keys with an open collector and complications of circuitry, volume and mass of the device. Reliability will also decrease.
As for transitional transformers, they can work not only as an isolation, but also as a way of matching signal levels with other equipment, for example, with the same keys with an open collector.
Also, in on-board equipment it was considered more reliable to use soldered wire harnesses instead of board connectors. It should be understood that this equipment was intended to be used once and was not supposed to be repaired.
And about 30 seconds a day .... In accordance with the adopted rules, the documentation indicated the maximum possible error in the entire possible range of operating temperatures, i.e. from -40 to +40 degrees Celsius. In the real temperature range, accuracy was orders of magnitude higher.
ReplyDeleteReally interesting stuff! I'm learning new things all the time from your posts, please keep them up.
ReplyDeleteThe junction isolated bipolar process used for TTL was inherently more radiation resistant than the junction isolated CMOS processes (1) which replaced it so it would make a good existing low cost choice for space electronics. Eventually dielectrically isolated processes replaced junction isolated processes where this was important however I do not know that they were ever used at lower levels of integration. I am amused that they upgraded to FAST (Fast Advanced Schottky TTL); it is a good choice and I wish the whole 74xx series had been implemented in it.
ReplyDeletePower supply isolation makes perfect sense between chassis and sometimes even between boards. It allows the power and signal grounds to be separated improving noise immunity and preventing some catastrophic failure modes. An isolated switching power supply also means that a pass element short will not apply high voltage to the circuits.
(1) For instance the photocurrent generated by single radiation event can trigger the parasitic SCR in a common junction isolated CMOS process causing catastrophic destruction. I have seen ESD do this to powered HCMOS logic. Junction isolated bipolar logic does not suffer from this particular problem.
I love Soviet technology and find this Russian clock amazing. I came a across a MM5314N one chip clock IC you mention. It amazing the difference of technology from USA compared Soviet. Good luck on repairing the clock :)
ReplyDeleteSoviet components had several problems, mostly with chemical industry lacking behind technologically. Plastic used for packaging was degrading quickly, and tend to crack and loose integrity. Chemicals used in production was uneven in quality, even producing substrate was a problem due to mechanical imprecision. Resulting components and ICs that was produced was uneven in quality and parameter drift, and one used for military was carefully selected (usually manual labor).
ReplyDeleteIn order to compensate for component quality sometimes schematics can be over-engineered, as it may seem.
As for wires used to connects boards instead of back-plane of some kind - this was a common practice for soviet rocket technology - when installed inside a missile, board is subjected to g-force beyond 10g, it bends and traces will come loose and snap. So wiring was used everywhere in soviet military "rocket" electronics, even for connection between individual components.
I used to see a lot of those green resistors in the late 1970s and early 1980s in England. Although usually only for higher wattages.
ReplyDelete"The Soviet diodes have orange rectangular packages" — that's a pretty unusual package for a Soviet diode actually. The large Zener diode would be much more representative, as far as packaging goes. Civilian equivalent for 2Д212 would be КД212. Kinda reminds me of the КТ315 packaging, might be the same kind of plastic.
ReplyDelete"chip labels use Λ (Greek L) in place of Л (Cyrillic L)" — actually just a different (more legible) font for Cyrillics. Same with Δ/Д. Try searching "sans serif Cyrillic" in Google images, there will be lots of fonts with Λ- and Δ-like shapes for Л and Д. It's a matter of font style pretty much.
"The power transistor in the middle of the board is round, lacking the metal flanges of American power transistors" — the flanges were on an optional part that goes over the transistor when it's mounted on a heatsink. Crappy illustration: https://forum.cxem.net/uploads/monthly_2017_09/IMG_20170925_172935.thumb.jpg.504072965c0c45a1a4a98f4dd3e22144.jpg
ReplyDeleteOn this board, there's a thin soldered-in ring in place of the flanged part.
There were Soviet transistors with TO-3 style built-in flanges, too, like КТ838.
@DHess CMOS has still today problems with radiation, especially with single event it can always just randomly turn on or off, this is less or unlikely to happen with Bipolar. You would be amazed how similar modern Space designs are but i cant elaborate on that unfortunately.
ReplyDeleteGreat work and article, as usual, Ken!
ReplyDeleteSome useful information on Soviet era components could be found here http://www.155la3.ru , although being a museum-like collection, it tends to focus more on oddities, rare parts or unusual packages. Lots of unobtainable elsewhere (ie in reference books) information, which is important because of irregularities and QC issues of Soviet electronics industry. Basically stuff was produced or packaged often (esp in 80s) with an ad-hoc approach rather then following books or standards to the letter.
Would be glad to offer my help in sourcing any missing information for the project, being electronics hobbyist myself and having Russian as my (second) native language.
134ЛБ2 IC hera are packaged into package type 401.14-3 with glass-ceramic substrate (looks similar to plastic but it is not).
ReplyDeletePink substrate on the other chips is definitely ceramics (most likely corundum-based)
Minor additions:
ReplyDeleteThe main name of the chip is 134ΛБ2A. Before this, the type of package or level of reliability (military/space or conventional) was usually indicated. For example, in the first case there might not have been a symbol, in the second it was designated “К” or “КР” for plastic, and “КМ” for ceramic package.
Comparison with US technology part: most of the chips on the shuttle's board photo are dated 1988 and this once again confirms that reliability in space is more important than technology advancement in any country: TTL logic will receive less damage from cosmic particles and radiation and was more reliable at that time than advanced Intel or Motorola processors.
Wow - fantastic! I have one of these clocks as part of the entire flown Soyuz flight deck: https://flic.kr/p/o8yPqN
ReplyDeleteand I had no idea how complicated it was inside!
I also have the earlier analog design in case you want to take that one apart to compare: https://flic.kr/p/dFYHwE
Thanks Ken for your very detail blog about the Soyuz russian digital clock. I will be taking Electrical Engineering classes hopefully next spring and watching your videos is real inspiration thanks again. Brian M.
ReplyDeleteI'm russian electronic engineer and want to add a few remarks. Actually chip name is not "Δ134 ΛБ2A" but simple 134ЛБ2А. Delta-shaped sign isn't a letter but just a triangle. The triangle sign on Soviet ICs means "handle with care", "sensible to electrostatic discharge". By default all 4000-like CMOS IC had this triangle, and in addition, some TTL chips too.
ReplyDeleteIn 1983 soviet chip industry had several chips for LED, VFD and LCD electronic watches, both single-chip (pMOS) from different vendors (К145ИК1901, К1016ХЛ1) and multi-chip:convenient 3-chip CMOS set (К176ИЕ12, К176 ИЕ13, К176ИД3). Soviet clock chips usually were original. But any of them never had a mil-spec version. You can see dozens of mass-market soviet electronic clocks from 1970s and 1980s here (including guts view):
http://www.leningrad.su/museum/main.php?lang=0
Not only Single event upset is a concern with Radiation hardness being a major factor but also there maybe some redundancy inside the box itself. Surely not just one clock? May have some circuits replicated.
ReplyDeleteAnonymous: there is no redundancy inside the clock; it is one clock with no replicated circuits. The only redundancy is the 19-pin connector uses pairs of pins for everything, so there are 9 electrical connections through this connector.
ReplyDeleteWhat's the quartz on the front panel for? Is the start/stop switch for the stopwatch simply cutting the lines of the quartz instead of halting the oscillator?!
ReplyDeleteI am surprised at the complexity of this clock when compared with contemporary Soviet "consumer" clocks. I realize that the Soyuz clock has additional functions compared with a wall clock, but the Elektronika 7-06M is implemented with only 6 K176-series ICs. See my blog at https://www.glaver.org/blog/?p=310 for more info. I also have a page on Soviet PDP-11 CPU clones at https://www.glaver.org/blog/?p=959
ReplyDeleteI love vintage technology and especially vintage space electronics. Thanks Ken for the look into this amazing soyuz russian digital clock. Are there any schematics of this clock available or did you made your own during your investigations?
ReplyDeleteFirst link (html syntax in the post) to the list of soviet semiconductor makers is broken.
ReplyDeleteCould you please also add the date and product numbers of the boards themselves?
ReplyDeleteI can see that one board is dated 4th of December 1983. And has product or order code: (after transliteration) GA7.102.426 (74 N).
THank you for translating the Russian on that clock. I have an identical one integrated as part of a Soyuz TM Spaceship panel and have always been interested in the individual functions of the timer. The clock had an analog predecessor that was utilized in earlier Soyuz spacecraft (the Soyuz-T variant spacecraft was the last to have the analog clock, its successor - the Soyuz TM utilized the digital version).
ReplyDeleteScott Schneeweis
Hi, here is a link of an ISS Zvezda Module image and I noticed a similar looking digital clock in the galley area of the module (up right part of the picture). This version can display Date and Day apparently. "Official" translation of the Cyrillic text is also provided.
ReplyDeletehttps://upload.wikimedia.org/wikipedia/commons/f/fa/ISS-01_Part_of_the_galley_area_on_the_Zvezda_Service_Module.jpg
The process of making a wiring harnesses was usually the opposite to your description. The wires were laid on a special template, wrapped and laced. Then the ends of each wire was trimmed, spliced, and soldered. Finally, the whole bundle was soldered in.
ReplyDeleteIt's interesting that the russian clock uses russian made chips and America used imported chips from Singapore perhaps the imported chips are better than chips made in America
ReplyDelete