The Alto was a revolutionary computer, designed at Xerox PARC in 1973 to investigate personal computing. It introduced the GUI, Ethernet and laser printers to the world, among other things. Y Combinator received an Alto from computer visionary Alan Kay and I'm helping restore the system, along with Marc Verdiell, Luca Severini, Ron Crane, Carl Claunch and Ed Thelen (from the IBM 1401 restoration team).
The broken wire
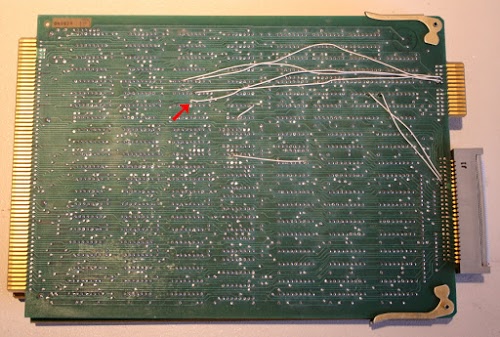
The Xerox Alto is built from 13 circuit boards, crammed with TTL chips. In 1973, minicomputers such as the Alto were built from a whole bunch of simple ICs instead of a primitive microprocessor chip. (People still do this as a retro project.) The Alto's CPU is split across 3 boards: an ALU board, a control board, and a control RAM board. The control board is the focus of today's adventures.If a circuit board has a design defect or needs changes, it can be modified by attaching new wires to create the necessary connections. The photo below shows the control board with several white modification wires. While examining the control board, we noticed one of the wires had come loose. Could the boot failures be simply due to a broken wire?
We carefully resoldered the wire and powered up the system. The disk drive slowly came up to speed and the heads lowered onto the disk surface. We pressed the reset button (under the keyboard) to boot. As before, nothing happened and the display remained blank. Fixing the wire had no effect.
After investigation, it appears the rework wires were to support the Trident/Tricon hard disk. In the photo above, note the small edge connector in the upper right, with the white wires connected. The Trident disk controller used this connector, but our (Diablo) disk controller does not. In other words, the broken wire might have caused problems with a different disk drive, but it was irrelevant to us.
Microcode on the Xerox Alto
Some background on the Xerox Alto's architecture will help motivate our day's investigation. The Alto, like most modern computers, is implemented using microcode. Computers are programmed in machine instructions, where each instruction may involve several steps. For instance, a "load" instruction may first compute a memory address by adding an offset to an index register. Then the address is sent to memory. Finally the contents of memory are stored into a register. Instead of hardcoding these steps (as done in the 6502 or Z-80 for instance), modern computers run a sequence of "micro-instructions", where each micro-instruction performs one step of the larger machine instructions. This technique, called microcode, is used by the Xerox Alto.The Alto uses microcode much more heavily than most computers. The Alto not only uses microcode to implement the instruction set, but implements part of the software in microcode directly. Part of the Alto's design philosophy was to use software (i.e. microcode) instead of hardware where possible. For instance, most video displays pull pixels out of memory and display them on the screen. In the Alto, the processor itself fetches pixels out of memory and passes them to the video hardware. Similarly, most disk interfaces transfer data between memory and the disk drive. But in the Alto, the processor moves each data word to/from memory itself. The code to perform these tasks is written in microcode.
To perform all these low-level activities, the Alto hardware manages 16 different tasks, listed below. High-priority tasks (such as handling high-speed data from the disk) can take over from low-priority tasks, such as handling the display cursor. The lowest-level task is the "emulator", the task that executes program instructions. (In a normal computer, the emulator task is the only thing microcode is doing.) Remember, these tasks are not threads or processes handled by the operating system. These are microcode tasks, below the operating system and scheduled directly by the hardware.
| Task | Name | Description |
|---|---|---|
| 0 | Emulator | Lowest priority. |
| 1 | - | unused |
| 2 | - | unused |
| 3 | - | unused |
| 4 | KSEC | Disk sector task |
| 5 | - | unused |
| 6 | - | unused |
| 7 | ETHER | Ethernet task |
| 8 | MRT | Memory refresh task. Wakeup every 38.08 microseconds. |
| 9 | DWT | Display word task |
| 10 | CURT | Cursor task |
| 11 | DHT | Display horizontal task |
| 12 | DVT | Display vertical task. Wakeup every 16.666 milliseconds. |
| 13 | PART | Parity task. Wakeup generated by parity error. |
| 14 | KWD | Disk word task |
| 15 | - | unused |
Last episode, we found that processor was running the various tasks, but never tried to access the disk. System boot is started by the emulator task, which stores a disk command in memory. The disk sector task (KSEC) periodically checks if there are any disk commands to perform. Thus, it seemed like something was going wrong in either the emulator task (setting up the disk request), or the disk sector task (performing the disk request). To figure out exactly what was happening, we needed to hook up a logic analyzer.
The logic analyzer
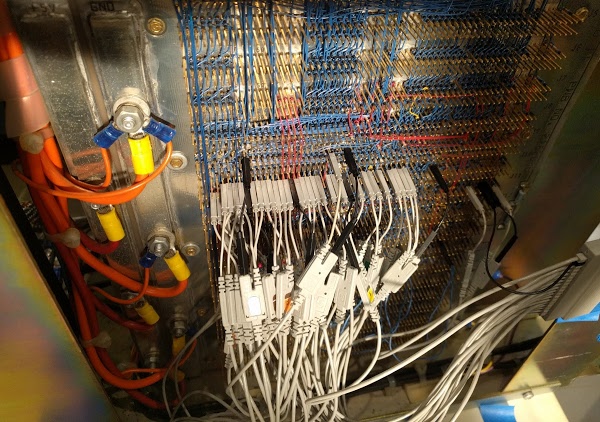
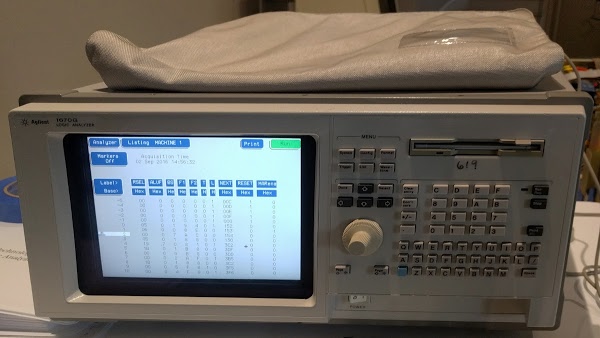
A logic analyzer is a piece of test equipment a bit like an oscilloscope, except instead of measuring voltages, it just measures 0's or 1's. A logic analyzer also has dozens of inputs, allowing many signals to be analyzed at once. By using a logic analyzer, we can log every micro-instruction the processor runs, track each task, and even record every memory access.Most of the signals of interest are available on the Alto's backplane, which connects all the circuit cards. Since the backplane is wire-wrapped, it consists of pins that conveniently fit the logic analyzer probes. For each signal, you need to find the right card, and then count the pins until you find the right pin to attach the probe. This setup is very tedious, but Marc patiently connected all the probes, while Carl entered the configuration into the logic analyzer.
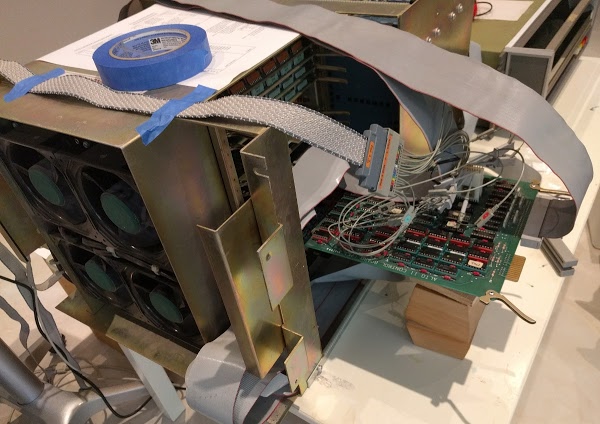
Unfortunately, a few important signals (the addresses of the micro-instructions) were not available on the backplane, and we needed to attach probes to one of the PROM chips that hold the microcode. Fortunately, the Living Computer Museum in Seattle gave us an extender card; by plugging the extender card into the backplane and the circuit board into the extender card, the board was accessible and we could connect the probes.
Hours later, with all the probes connected and the configuration programmed into the logic analyzer, we were ready to power up the system and collect data.
Running the logic analyzer
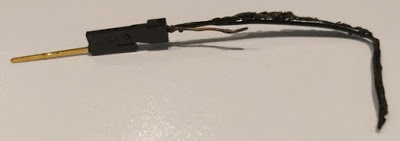
"Smoke! Stop! Shut it off!"As soon as we flipped the power switch, smoke poured out of the backplane. Had we destroyed this rare computing artifact? What had gone wrong? When something starts smoking, it's usually pretty obvious where the problem is. In our case, one of the ground wires from the logic analyzer pod had melted, turning its insulation into smoke. A bit of discussion followed: "Pin 3 is ground, right?" "No, pin 9 is ground, pin 3 is 5 volts." "Oops." It turns out that when you short +5 and ground, a probe wire is no match for a 60 amp power supply. Fortunately, this wire was the only casualty of the mishap.
With this problem fixed, we were able to get a useful trace from the logic analyzer. The trace showed that the Alto started off with the emulator/boot task. After just four instructions, execution switched to the disk word task, which was rapidly interrupted by the parity error task. When that task finished, execution went back to the disk word task, which was interrupted a few instructions later by the display vertical task. The disk word task was able to run a few more instructions before the display horizontal task ran, followed by the cursor task.
It's rather amazing how much task switching is going on in the Alto, with low-priority tasks only getting a few instructions executed before being interrupted by a higher-priority task. Looking at the trace made me realize how much overhead these tasks have. In our case, the emulator task is running the boot code, so progress towards boot requires looking at hundreds of instructions in the logic analyzer.
The key thing we noticed in the traces is the parity error task ran right near the start, indicating an error in memory. This would explain why the system doesn't boot up. We ran a few more boot cycles through the logic analyzer. The specific order of tasks varied each time, as you'd expect since they are triggered asynchronously from hardware events. But we kept seeing the parity errors.
The Alto's memory system
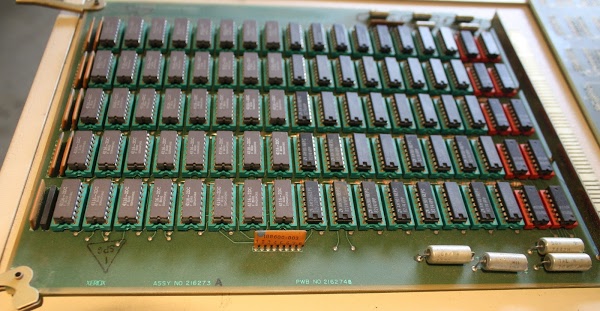
The Alto was built in the early days of semiconductor memory, when RAM chips were expensive and unreliable. The original Alto module used Intel's 1103 memory chips, which were the first commercially available DRAM chip, holding just 1 kilobit. To provide 128 kilobytes of memory, the Alto I used 16 boards crammed full of chips. (If you're reading this on a computer with 4 gigabytes of memory, think about how much memory capacity has improved since the 1970s.)We have the later Alto II XM (extended memory) system, which used more advanced 16 kilobit chips to fit 512 kilobytes of storage onto 4 boards. Each memory board stored a 10 bit chunk—why 10 bits? Because memory chips were unreliable, the Alto used error correction. To store a 32-bit word pair, 6 bits of Hamming error correction were added, along with a parity bit, and one unused bit. The extra bits allow single-bit errors to be corrected and double-bit errors to be detected. The four memory boards in parallel stored 40 bits at a time—the 32 bit word pair and the extra bits for error correction.
In addition to the 4 memory boards, the Alto has three circuit boards to control memory. The "MEAT" (Memory Extension And Terminator) is a trivial board to support four memory banks (the extended memory in the Alto XM). The "AIM" board (Address Interface Module) is a complex board that maps addresses to memory control signals, as well as handling memory-mapped peripherals such as the keyboard, mouse, and printer. Finally, the "DIM" board (Data Interface Module) generates the Hamming error correcting code signals, and performs error detection and correction.
More probing showed that the DIM board was always expressing a parity error. At this point, we're not sure if some of the memory chips are bad or if the complex circuitry on the DIM board is malfunctioning and reporting errors. As you can tell from the above description, the memory system on the Alto is complex. It may be a challenge to debug the memory and find out why we're getting errors.
A look at the microcode
In this section, I'll give a brief view of what the microcode looks like and how it appears in the logic analyzer. Microcode is generally hard to understand because it is at a very low level in the system, below the instruction set and running on the bare hardware. The Alto's microcode seems especially confusing.Each Alto micro-instruction specifies an ALU operation and two "functions". A function can be something like "read a register" or "send an address to memory". But a function can also change meaning depending on what task is running. For instance, when the Ethernet task is running, a function might mean "do a four-way branch depending on the Ethernet state". But during the display task, the same function could mean "display these pixels on the screen". As a result, you can't figure out what an instruction does unless you know which task it is a part of.
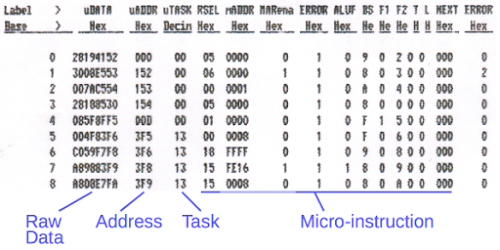
The image below shows a small part of the logic analyzer output (as printed on Marc's vintage HP line printer). Each line corresponds to one executed micro-instruction. The "address" column shows the address of the micro-instruction in the 1K PROM storage. The task field shows which task is running. You can see the task switch midway through execution; 0 is the emulator and 13 is the parity task. Finally, the 32-bit micro-instruction is broken into fields such as RSEL (register select), ALUF (ALU function) and F1 (function 1).
Note that the addresses jump around a lot; this is because the microcode isn't stored linearly in the PROM. Every micro-instruction has a "next instruction address" field in the instruction, so you can think of it as a GOTO inside every instruction. To make it worse, this field can be modified by the interface hardware, turning a GOTO into a computed GOTO. To make this work, the assembler shuffles instructions around in memory, so it's hard to figure out what code goes with a particular address. The point of this is that the logic analyzer output shows us every micro-instruction as it executes, but the output is somewhat difficult and tedious to interpret.
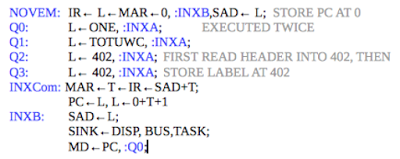
Fortunately we have the source code for the microcode, but understanding it is a challenge. The image below shows a small section of the boot code. I won't attempt to explain the microcode in detail, but want to give you a feel for what it is like. Labels (along the left) and jumps to labels are highlighted in blue. Things such as IR, L, and T are registers, and they get assigned values as indicated by the arrows. MAR is the memory address register (giving an address to memory) and MD is memory data, reading or writing the memory value.
Figuring out the control flow of the microcode requires detailed understanding of what is happening in the hardware. For example, in the last line above, ":Q0" indicates a jump to label "Q0". However the previous line says "BUS", which means the contents of the data bus are ORed into the address, turning the jump into a conditional jump to Q0, Q1, Q2, etc. depending on the bus value. And "TASK" indicates that a task switch can happen after the next instruction. So matching up the instructions in the logic analyzer output with instructions in the source code is non-trivial.
I should mention that the authors of the Alto's microcode were really amazing programers. An important feature for graphics displays is BITBLT, bit block transfer. The idea is to take an arbitrary rectangle of pixels in memory (such as a character, image, or window) and copy it onto the screen. The tricky part is that the regions may not be byte-aligned, so you may need to extract part of a byte, shift it over, and combine it with part of the destination byte. In addition, BITBLT supports multiple writing modes (copy, XOR, merge) and other features. So BITBLT is a difficult function to implement, even in a high-level language. The incredible part is that the Xerox Alto has BITBLT implemented in hundreds of lines of complex microcode! Using microcode for BITBLT made the operation considerably faster than implementing it in assembly code. (It also meant that BITBLT was used as a single machine language instruction.)
Awesome article as always! - I love this blog...
ReplyDeleteFirst time posting - just thought it be useful to mention a little thing that confused me longer than it should - the second paragraph section 'The Alto's memory system' says... 'To store a 32-bit word pair, 7 bits of Hamming error correction were added, along with a parity bit, and one unused bit'... It confused me because it makes it sound like 41 bits altogether (I guess it should instead be either '6 bits of Hamming error correction along with an extra parity bit', or '7 bits... including an extra parity bit')
Anyway, apart from that niggle it was a brilliant read - Thanks for a great blog!
Anonymous: thanks for pointing that out. I fixed the text. It's 6 bits of Hamming error correction, 1 bit of parity, and 1 unused (!) bit.
ReplyDeleteReading this reminded me of "It is a riddle, wrapped in a mystery, inside an enigma; but perhaps there is a key."
ReplyDeleteLuckily it looks like you have the micro code so at least you have the key.
I hope I'm not speaking out of turn but while it would be exceedingly tedious could you not analyze each DRAM chip? Surely, someone must've made a socket connector you could use to bang together a RAM tester; hang it off of a Raspi or even a USB port on a laptop or something?
ReplyDelete> In 1973, minicomputers such as the Alto were built from a whole bunch of simple ICs instead of a primitive microprocessor chip. (People still do this as a retro project.)
ReplyDeleteWhat, no mention of Eric Schlaepfer and Evil Mad Scientist Lab's MOnSter 6502?
Granted, it's down to transitors instead of ICs, but I figured it was worth a mention ;)
What's that original title in the URL? "Smoke and"...?
ReplyDelete