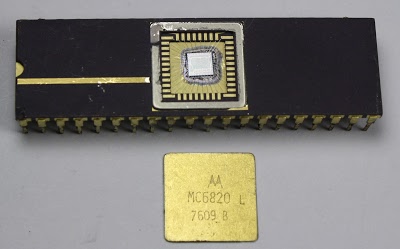
The first step is to take a bunch of photos of the die with a microscope. I used an old Motorola 6820 PIA (Peripheral Interface Adapter) chip. This chip had a metal cap over the die that popped off easily with a chisel, exposing the die. The 6820 is notable as the keyboard interface chip in the Apple I computer.
The next step is to take photos of the die through a microscope. I used an AmScope metallurgical microscope like the one below. A metallurgical microscope shines the light from above so you can view opaque objects such as chips. (The box on the right of the microscope is the light.) It's much easier if the microscope has an X-Y stage to precisely move the die for each picture.
The key to success is pictures with substantial overlap, so the software can figure out how to combine them. Use more overlap than you think necessary - at least 30% is good. Skimping on the overlap may result in hours of manual work later. The quality of the input photos is also important - make sure the die is level so you can get sharp focus across the whole image. Give the images structured names according to their grid position: 11.png, 12.png, 21.png, ... This will make it much easier to figure out which photos are overlapping neighbors when stitching them together.
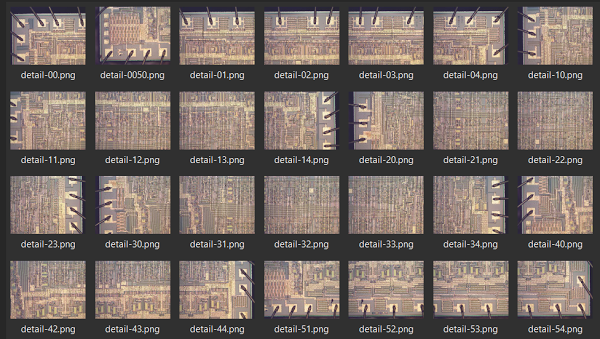
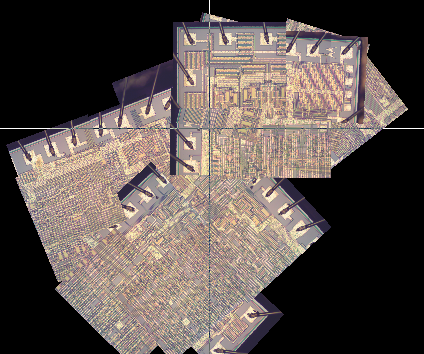
For this article, I used the set of images below. Some of them overlap substantially, and some ... not so much. As a result, this article describes a fairly difficult stitch. In the process I learned the importance of overlap, and Hugin worked much better when I tried again with a denser set of images.
The easiest way to stitch together photos is with Microsoft's Image Composite Editor (ICE). You simply import the photos, click Stitch, and save the result. If ICE works, it's super-easy, but it doesn't have any flexibility if you run into problems (as I did). ICE can be downloaded from Microsoft.
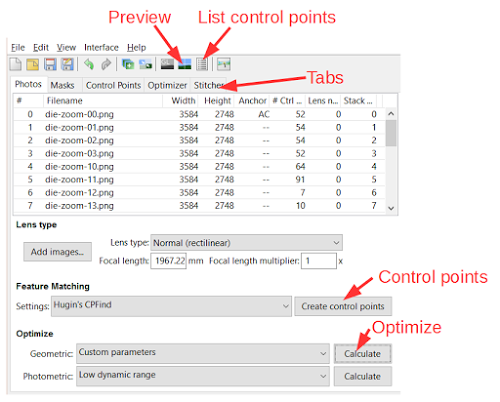
If ICE doesn't work for you, the open-source Hugin panorama photo stitcher is much more flexible and provides many more options. While Hugin is easy to use for simple panoramas, it's pretty confusing for more complex projects, which is why I've written this. The software can be downloaded from the Hugin website. To start a stitch with Hugin, load the images by dragging-and-dropping them into the Photos window. Enter "Normal (rectilinear)" for the lens type and 1 for HFOV in the dialog.
The next step is to generate the control points, which indicate features that match between pairs of images. The control points are what tie the images together, so high quality control points are critical. To generate control points, under "Feature Matching" select "Hugin's CPFind" and click "Create control points". (See the screenshot below.) It will take several minutes to generate control points. You can install other control point finders if you want. Autopano-SIFT-C is said to be good, but I didn't get good results at all with it; it is in a zip file here.
Next, optimize the control points to fit the images together. Select Custom Parameters under Optimize, which will add the Optimizer tab. Go to the Optimize tab, and disable rotation and lens parameter optimization, so only Pitch and Yaw are optimized: Right click on Roll, and select "Unselect all", so the roll entries are not underlined. Do the same for lens parameters. Back at the Photos tab, select "Positions (incremental, starting from anchor)" under Optimize and click "Calculate". Hugin will try to find the best positions for the images. You want a maximum distance of a few pixels, but if you're unlucky the distance may be in the hundreds. Click Yes to apply the optimization.
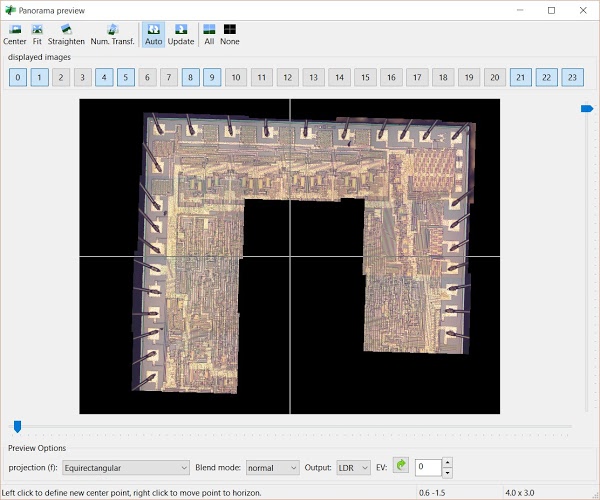
The Panorama Preview icon will generate a panorama based on the control points. To get the image to the center, click Center and then click the center of the images. Click Fit and it may fit the panorama into the window, or you may need to move the sliders (very slowly). Above the panorama, you can select which images you wish to display. Important: only the selected images will be optimized. If you don't have enough images selected, you'll get the mysterious error "No Feature Points". As you can see below, my first attempt was a mess with all the images in one badly-aligned horizontal strip.
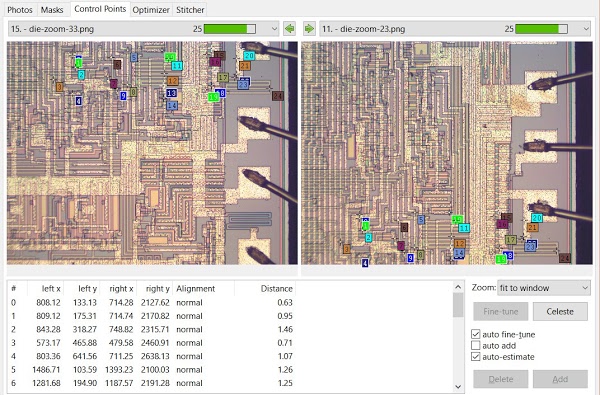
The next step is to fix the control points. Because Hugin optimizes globally, even a few bad control points can mess up the entire image. The main way to fix control points is the Control Points screen, shown below. Select an image on the left and an image on the right. The image selection dialog shows how many control points match between the images. The squares on the images indicate matching control points, which are also listed. If images overlap but don't have any control points, add control points by clicking matching spots in the left and right images. The images will then zoom so you can fine-tune the positions. Finally, click Add.
A quick way to create control points between two images that overlap is to re-run Hugin's feature mapper on the pair of images. Go to the Photos tab, control-click two images, and then click Create Control Points. If the images overlap sufficiently, Hugin should find control points. If this doesn't work, you're stuck with manually adding points as described above.
If two images shouldn't share control points, go to the Control Points tab, select the two images and delete their control points. This is where organized naming of the images helps - if you see control points between img00 and img35, there's probably something wrong.
You can also clean up bad control points with the control points list. Click the Show Control Points icon at the top and click Distance to sort. You should see a lot of small distances (good) and some very large distances (bad) at the bottom. Click a large distance, and it will bring up the Control Points page. Delete the bad control points. You can also do a bulk delete from the Show Control Points dialog. Click Select by Distance, enter 50 (for example), and then click delete. (But be warned this could delete some good control points too, so you might want to check them first.)
Once the control points are reasonably sensible, go back to the Photos tab and re-optimize. If you're lucky, the images will now be aligned. Unfortunately, I ended up with a cubist mess. I'll explain how to still get a panorama even if you run into problems like this.
If the parameters get too messed up, select Custom Parameters under Optimize, which will add the Optimizer tab. Under that tab you can reset all the parameters, or parameters for individual images. This is helpful if images start showing up rotated, for instance.
To debug your panorama, you can add images to the panorama one at a time to see which image is causing the problems. Use the Panorama Preview to select the images you want to process. After adding each new image, use the Optimizer tab to optimize the selected images: check "Only use control points between image selected in preview window" and click "Optimize now". If the image shows up in the right spot, all is well. Otherwise, there's something wrong with the last image's control points. Examine its control points under the Control Points tab, and delete any bad matches. (Since integrated circuits often have repeated blocks, it's easy for the matcher to generate convincing but entirely wrong control points.) If the newly-added image doesn't show up at all, it probably lacks any control points linking it with the rest of the images, and got placed at the origin. If the image shows up at an angle, it may have just one control point linking it to another image, letting it swivel around, so add more matching control points. After fixing the image's control points, re-optimize and hopefully it will now be placed correctly. You should be able to correct all the problems by proceeding image by image.
Once you have a good preview, you can generate the final image. Go to the Stitcher tab. Select Equirectangular project. Click Calculate field of view. I recommend starting with a small canvas; it's annoying to wait for a 100 megapixel image and then discover it's a mess. I suggest avoiding cropping; Hugin tends to crop too much, and it's easy to crop later with a tool such as Gimp. Finally, click Stitch, save the project, and wait while the image is generated.
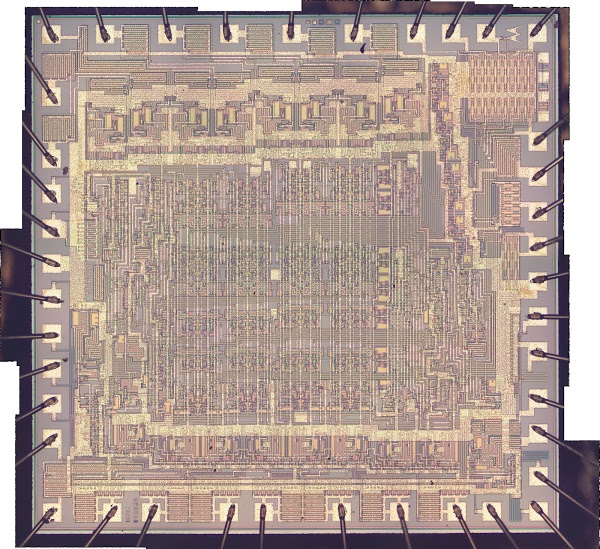
If the result looks good, increase the resolution and generate a high-res version. The photo below shows my final stitched image of the Motorola 6820 die. Click for the full-size image. I've left the image uncropped to make the tiling more visible. I've since made a better composite, starting with source images that overlapped more, and the process was much easier.
One advanced Hugin feature that may be useful is defining horizontal and vertical lines, so your image comes out straight (wiki). To do this, add control points on a horizontal line between two images, e.g. the upper edge at the left and the upper edge at the right. Note that unlike regular control points, you are not matching the same point in both images, just points on the same horizontal line. After clicking Add, change the mode to Horizontal Line using the dropdown. Put another horizontal edge on the bottom of the die. Vertical lines are similar.
To conclude, making a high-res die photo is an interesting project if you have the right kind of microscope. The Hugin compositing software has a steep learning curve, but hopefully this article will help. Starting with images that overlap significantly will make the process much easier. I should mention that I'm not at all an expert at Hugin or die photos - please leave a comment if you have suggestions.
Acknowledgements: Mikhail at zeptobars gave me helpful advice about Hugin. Other good sites with die photos are Visual 6502 and Silicon Pr0n.
Update: some more advanced information from Mikhail:
Regarding optimizing lens parameters – one of the optimal ways is to make a test panorama, some 10-20 shots with ~50-70% shots overlap. Then you align this (position only, no rotation), and at the end – add lens parameters (first optimize on a,b,c, then d,e then a,b,c,d,e). After that you can export lens distortion calibration data to a file and preload it for a large optimization job, so that you won’t need to optimize it. This works for the same lens and same microscope alignment. Good microscope lenses might be okay without lens correction though.
Another large topic is chromatic aberration correction on individual photos before stitching, which also could be done by Hugin tools.
"c:\Program Files\Hugin\bin\tca_correct.exe" -o cv -n 1000 -t 10 -m 1 5xsample.tif
This will try to detect optimal chromatic aberration correction for a single photo. It will give you coefficients, which could be tested by:
"c:\Program Files\Hugin\bin\fulla.exe" -r 0.0000094:0.0000000:0.0000097:0.9853381 -b -0.0000853:0.0000000:-0.0004039:1.0021658 -s -t 4 -o corrected.tif 5xsample.tif
If corrected looks better than original – you can do that for all photos in a batch before stitching. Each lens needs its own correction batch. So for example I have separate batches for 10x and 20x lenses. 5x lenses is quite good without chroma correction.
set path=%path%;"c:\Program Files\ImageMagick-6.8.7-Q16";"c:\Program Files\Hugin\bin\";
cd image
rem mogrify -shave 3
FOR %%I IN (*.tif) DO "fulla.exe" -r 0.0000000:0.0000000:-0.0003093:0.9990635 -b 0.0000000:0.0000000:0.0016437:1.0004672 -s -t 4 %%I -o %%I
mogrify -crop 4084x3276+6+5 *.tif
rem Original size: 4096x3286
ImageMagick crop is used at the end to cut any warped edges of the frame. Also some Chinese cameras have 1px artifacts on the very edges of the frame that should be cropped.


17 comments:
Hi,
Thanks for your excellent post. You mentioned AmScope microscope.
at Amazon.
I am also thinking about buying a good (metalurgical) miscroscope.
Not sure yet how metalurgical microscope works but I would need a good microscope to check digitizers/touch of touch mobiles. We repair mobiles and sometimes a digitizer stops working and we would need to check ( wire) traces in the digitizer.
Would you recommend that kind of microscope for that task?
Thank you.
Hi Lad,
I'm no expert on this, but I think you'd want a lower-power binocular microscope rather than a metallurgical microscope for checking wire traces, something like this one.
Hi Ken,
Thank you for your reply.
The lower-power binocular microscope seems to have a low magnification.( we already have one). As far as I know a metallurgical microscope is a kind of microscopes that have fairly high magnification and for that reason I was thinking about a metallurgical microscope.
Can you please explain when a metallurgical scope is/not useful ?
Thank you
If you need high magnification, the metallurgical microscope works well because it shines focused light down through the lens, providing enough illumination under high magnification. If you don't need high magnification, external lighting works. It depends on how much magnification you need.
Ken,thank you for the reply.
Yes, I need high magnification yet
I am not still sure if it is possible to use a metallurgical microscope for a touch screen( also called a digitizer) that is transparent.
What do you think?
Thank you for
Lad, I don't know if a touch screen would show up under the microscope. If it's totally transparent you wouldn't see anything. But it might be partially visible, maybe if you use a polarizer. If it's transparent, you could use a regular microscope, which is a lot cheaper than a metallurgical microscope. Sorry I don't have more specific information.
Pls try http://matthewalunbrown.com/autostitch/autostitch.html (automatic finding clue-points, auto brightness correction etc...)
Ken, Thank you for your reply.
The microscope you used has 40X-2000X Magnification.What magnification did you use for those
pictures you posted in this topic?
I was thinking about buying a metallurgical microscope for some time already but the price is still rather high and not sure if it works for our needs.
Would you mind taking a few pictures of a touch/digitizer of a mobile phone with your AmScope metallurgical microscope? (I can not imagine how a metallurgical scope displays a digitizer of mobile phone.)
Thank you very much again for your time and help
Hi Lad. The chip photos are at 100x magnification. I took some pictures of my Nexus 5 screen through the microscope so you can see how they turn out. Screen pixels, 40x, 100x. Hope these help.
Ken,Thank you very much for your time and taking those pictures.
It seems the metallurgical microscope to be useful for me too.
And what magnification did you use for that picture of the Screen pixels?
The microscope from Amazon( you provided a link) has 40X-2000X Magnification. But you use mostly 100x.
When can be useful to have a such large 2000x magnification?
(I am asking to choose the best microscope ( for me) regarding magnification/price.)
Thank you again for help.
Thank you for sharing this, it was very helpful. I too could not get any joy from Autopano-SIFT-C. I have now done it a few times and it works well, but it is a bit clunky. Having to change lens HOV, remember to go into custom parameters and then de-select the roll etc. And getting the final image centered before stitching is just awkward. But the final result is pretty good.
Just posting this in case someone comes along later and sees Lad's comments and questions: No one is getting 2000x magnification from an optical microscope used for die shots. 1000x is about the limit of practicality AT ALL, and the 400x range is much more reasonable. (By the time you hit 100x you are working with oil immersion objectives and are essentially touching the thing you are looking at.)
Thanks for the Hugin usage tips! I found it a bit intimidating at first, but your instructions made it easy. The strategy you described worked great for making a huge high-resolution picture of a PCB.
I don't have an easy way to enforce perfect horizontal or vertical movement with the pictures taken by my microscope, so one thing I found useful was to take a normal picture of the entire board and divide it into a grid ahead of time, so that it was easy to know what section of the PCB I needed for each microscope picture (and of course I left plenty of overlap as you suggested). Worked great, although a lot of manual control point cleanup was needed.
Try AutoStitch from Matthew Brown.
It uses SIFT to automatically recognize where to megre the images.
Excellent post!
Sift detection based automated stitching would work reasonably well but phase correlation algorithms work better with least squares optimisation since the microscope images have little to no rotational and zoom variance.
A little late to the party, but if you take photos in sequence, each overlapping the last photo, then you can optimise the control point detection to only look at adjacent photo pairs, instead of all possible pairs. (O(n) instead of (O(n^2)).)
To do this, load images (so they appear as a horizontal line), then Expert mode->Photos->Feature matching "Hugin's CPFind (Prealigned)".
Ditto if you have an x-y stage and are certain there is no rotation, Expert->Optimise->geometric->"Custom Parameters"--> Optimiser tab-> untick Roll (r), you can skip some of the weirder arrangements!
Post a Comment